2021 HYUNDAI SANTA FE electrical
[x] Cancel search: electricalPage 580 of 636
Maintenance
9-30
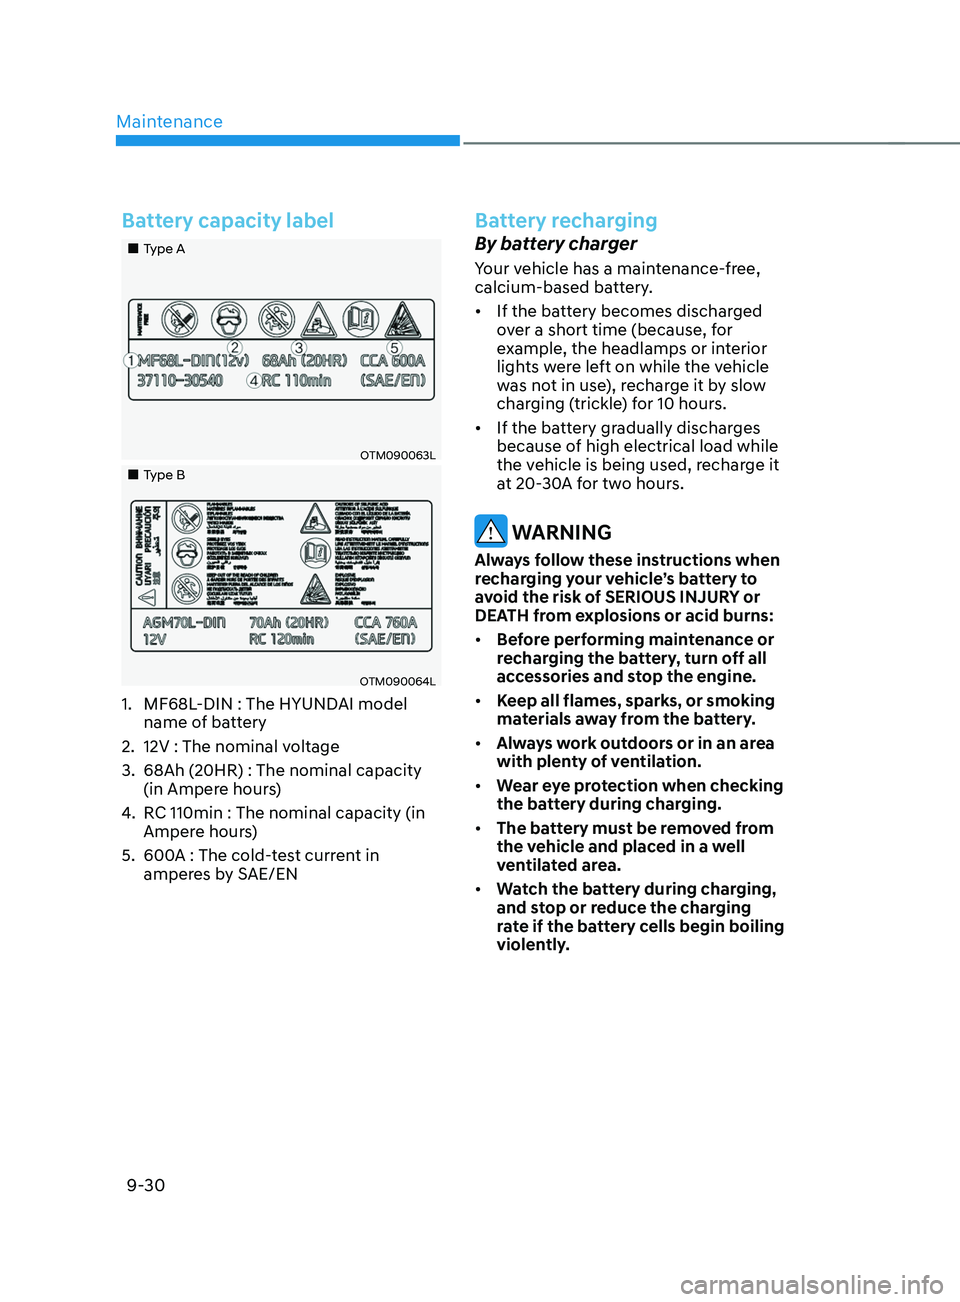
Battery capacity label
„„Type A
OTM090063L
„„Type B
OTM090064L
1. MF68L-DIN : The HYUNDAI model
name of battery
2.
12V : The nominal voltage
3.
68Ah (20HR) : The nominal capacity
(in Ampere hour
s)
4.
RC 110min : The nominal capacity (in
Amper
e hours)
5.
600A : The cold-
test current in
amperes by SAE/EN
Battery recharging
By battery charger
Your vehicle has a maintenance-free,
calcium-based battery.
• If the battery becomes discharged
over a short time (because, for
example, the headlamps or interior
lights were left on while the vehicle
was not in use), recharge it by slow
charging (trickle) for 10 hours.
• If the battery gradually discharges
because of high electrical load while
the vehicle is being used, recharge it
at 20-30A for two hours.
WARNING
Always follow these instructions when
recharging your vehicle’s battery to
avoid the risk of SERIOUS INJURY or
DEATH from explosions or acid burns:
• Before performing maintenance or
recharging the battery, turn off all
accessories and stop the engine.
• Keep all flames, sparks, or smoking
materials away from the battery.
• Always work outdoors or in an area
with plenty of ventilation.
• Wear eye protection when checking
the battery during charging.
• The battery must be removed from
the vehicle and placed in a well
ventilated area.
• Watch the battery during charging,
and stop or reduce the charging
rate if the battery cells begin boiling
violently.
Page 591 of 636
09
9-41
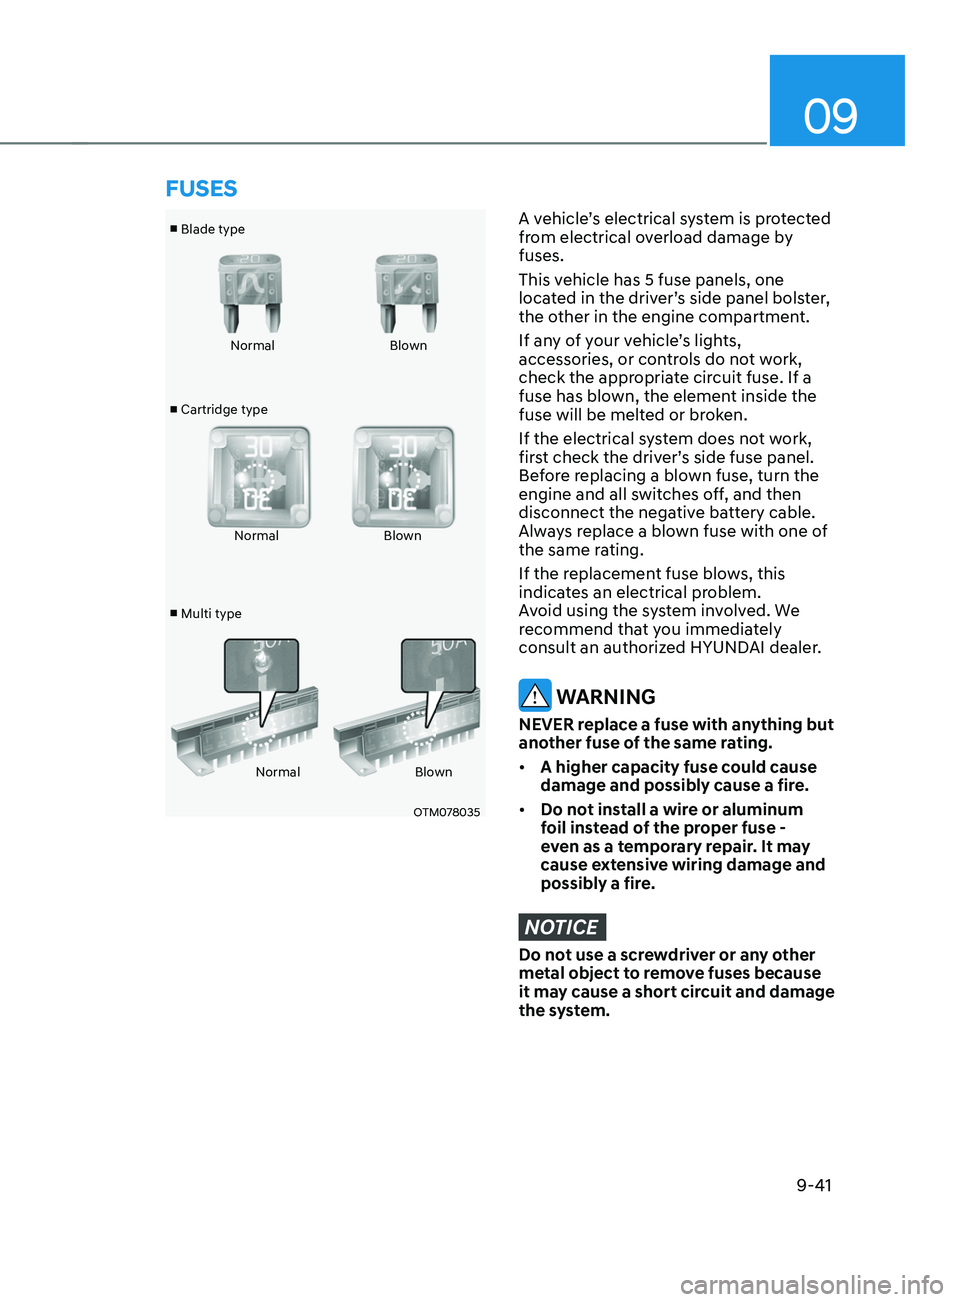
■ Blade type
■ Cartridge type
■ Multi type Normal
Blown
Normal Blown
Normal Blown
OTM078035
A vehicle’s electrical system is protected
from electrical overload damage by
fuses.
This vehicle has 5 fuse panels, one
located in the driver’s side panel bolster,
the other in the engine compartment.
If any of your vehicle’s lights,
accessories, or controls do not work,
check the appropriate circuit fuse. If a
fuse has blown, the element inside the
fuse will be melted or broken.
If the electrical system does not work,
first check the driver’s side fuse panel.
Before replacing a blown fuse, turn the
engine and all switches off, and then
disconnect the negative battery cable.
Always replace a blown fuse with one of
the same rating.
If the replacement fuse blows, this
indicates an electrical problem.
Avoid using the system involved. We
recommend that you immediately
consult an authorized HYUNDAI dealer.
WARNING
NEVER replace a fuse with anything but
another fuse of the same rating.
• A higher capacity fuse could cause
damage and possibly cause a fire.
• Do not install a wire or aluminum
foil instead of the proper fuse -
even as a temporary repair. It may
cause extensive wiring damage and
possibly a fire.
NOTICE
Do not use a screwdriver or any other
metal object to remove fuses because
it may cause a short circuit and damage
the system.
FUSES
Page 592 of 636
Maintenance
9-42
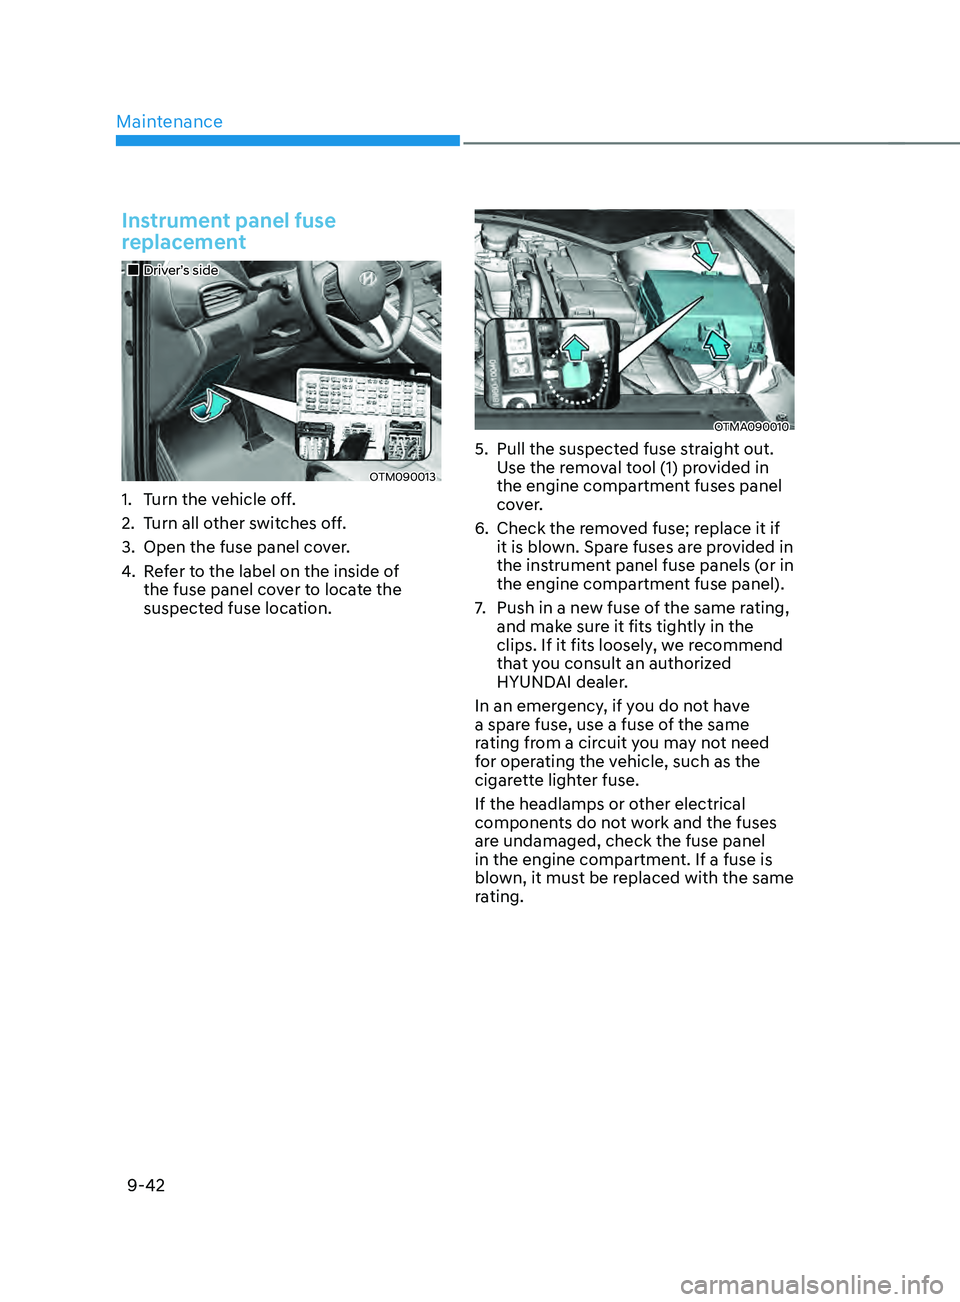
Instrument panel fuse
replacement
„„Driver’s side
OTM090013
1. Turn the vehicle off.
2.
Turn all o
ther switches off.
3.
Open the fuse panel cov
er.
4.
Re
fer to the label on the inside of
the fuse panel cover to locate the
suspected fuse location.
OTMA090010
5. Pull the suspected fuse s traight out.
Use the removal tool (1) provided in
the engine compartment fuses panel
cover.
6.
Check the remo
ved fuse; replace it if
it is blown. Spare fuses are provided in
the instrument panel fuse panels (or in
the engine compartment fuse panel).
7.
Push in a new fuse o
f the same rating,
and make sure it fits tightly in the
clips. If it fits loosely, we recommend
that you consult an authorized
HYUNDAI dealer.
In an emergency, if you do not have
a spare fuse, use a fuse of the same
rating from a circuit you may not need
for operating the vehicle, such as the
cigarette lighter fuse.
If the headlamps or other electrical
components do not work and the fuses
are undamaged, check the fuse panel
in the engine compartment. If a fuse is
blown, it must be replaced with the same
rating.
Page 593 of 636
09
9-43
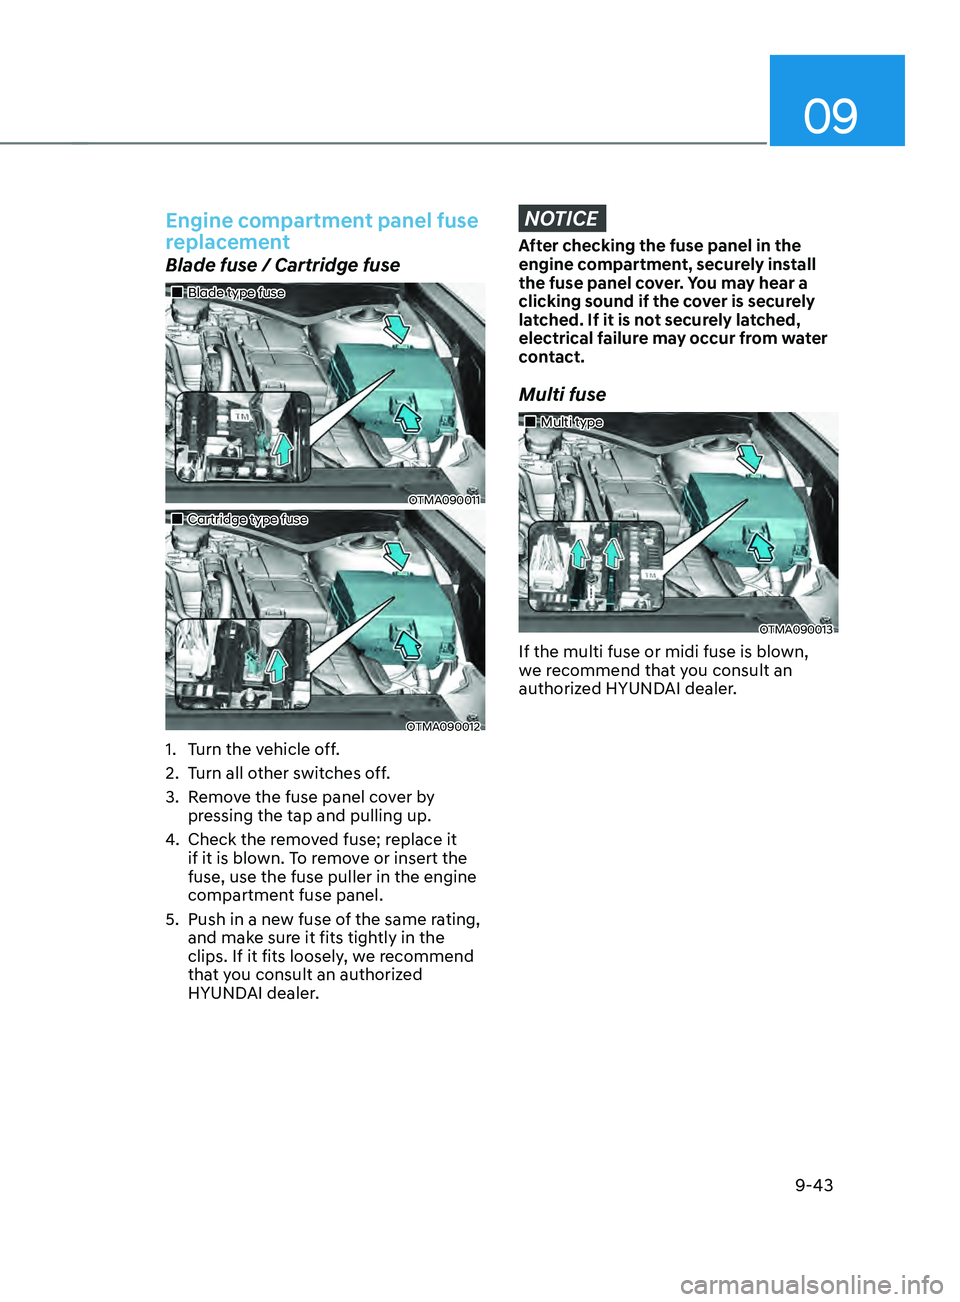
Engine compartment panel fuse
replacement
Blade fuse / Cartridge fuse
„„Blade type fuse
OTMA090011
„„Cartridge type fuse
OTMA090012
1. Turn the vehicle off.
2.
Turn all o
ther switches off.
3.
Remo
ve the fuse panel cover by
pressing the tap and pulling up.
4.
Check the remo
ved fuse; replace it
if it is blown. To remove or insert the
fuse, use the fuse puller in the engine
compartment fuse panel.
5.
Push in a new fuse o
f the same rating,
and make sure it fits tightly in the
clips. If it fits loosely, we recommend
that you consult an authorized
HYUNDAI dealer.
NOTICE
After checking the fuse panel in the
engine compartment, securely install
the fuse panel cover. You may hear a
clicking sound if the cover is securely
latched. If it is not securely latched,
electrical failure may occur from water
contact.
Multi fuse
„„Multi type
OTMA090013
If the multi fuse or midi fuse is blown,
we recommend that you consult an
authorized HYUNDAI dealer.
Page 601 of 636

09
9-51
We recommend that you consult an
authorized HYUNDAI dealer to replace
most vehicle light bulbs. It is difficult
to replace vehicle light bulbs because
other parts of the vehicle must be
removed before you can get to the bulb.
This is especially true for removing the
headlamp assembly to get to the bulb(s).
Removing/installing the headlamp
assembly can result in damage to the
vehicle.
WARNING
• Prior to working on a light, depress
the foot brake, shift to P (Park), apply
the parking brake, press the Engine
Start/Stop button to the OFF position
and take the key with you when
leaving the vehicle to avoid sudden
movement of the vehicle and to
prevent possible electric shock.
• Be aware the bulbs may be hot and
may burn your fingers.
NOTICE
Be sure to replace the burned-out bulb
with one of the same wattage rating.
Otherwise, it may cause damage to the
fuse or electrical wiring system.
NOTICE
To prevent damage, do not clean the
headlamp lens with chemical solvents
or strong detergents.
Information - Headlamp
desiccant (if equipped)
This vehicle is equipped with desiccant to
reduce fogging inside the headlamp due
to moisture. The desiccant is consumable
and its performance may change based on
the used period or environment. If fogging
inside the headlamp due to moisture
continues for a long time, we recommend
that you consult an authorized HYUNDAI
dealer.
Information
The headlamp and tail lamp lenses could
appear frosty if the vehicle is washed after
driving or the vehicle is driven at night
in wet weather. This condition is caused
by temperature difference between the
lamp inside and outside and, it does not
indicate a problem with your vehicle.
When moisture condenses in the lamp,
it will be removed after driving with the
headlamp on. The removable level may
differ depending on lamp size, lamp
position and environmental condition.
However, if moisture is not removed, we
recommend that your vehicle is inspected
by an authorized HYUNDAI dealer.
LIGHT BULBS
Page 602 of 636

Maintenance
9-52
Information
• A normally functioning lamp may
flicker momentarily to stabilize the
vehicle’s electrical control system.
However, if the lamp goes out after
flickering momentarily, or continues to
flicker, we recommend the system be
checked by an authorized HYUNDAI
dealer.
• The position lamp may not turn on
when the position lamp switch is turned
on, but the position lamp and headlamp
switch may turn on when the headlamp
switch is turned on. This may be caused
by network failure or vehicle electrical
control system malfunction. If this
occurs, we recommend the system be
checked by an authorized HYUNDAI
dealer.
Information
The headlamp aiming should be adjusted
after an accident or after the headlamp
assembly is reinstalled.
Information
Traffic Change (For Europe)
The low beam light distribution is
asymmetric. If you go abroad to a country
with opposite traffic direction, this
asymmetric part will dazzle oncoming car
driver. To prevent dazzle, ECE regulation
demand several technical solutions (ex.
automatic change system, adhesive
sheet, down aiming). This headlamps are
designed not to dazzle opposite drivers. So,
you need not change your headlamps in a
country with opposite traffic direction.
Headlamp, position lamp, turn
signal lamp, Daytime Running
Light (DRL) replacement
Type A
OTMA090019
(1) Headlamp (High)
(2)
Headlamp (L
ow)
(3)
Daytime running ligh
t/Position light
(4)
Turn signal lamp
(5)
Side marker lamp
T
urn signal lamp
1.
Engage the parking br
ake and
disconnect the negative battery cable.
OTM090022
2. Remove wheel guard clips (under the
fr ont bumper : 4 pieces).
Page 611 of 636
09
9-61
NOTICE
• Do not use strong soap, chemical
detergents or hot water, and do not
wash the vehicle in direct sunlight
or when the body of the vehicle is
warm.
• Be careful when washing the side
windows of your vehicle.
• Especially, with high-pressure water,
water may leak through the windows
and wet the interior.
• To prevent damage to the plastic
parts, do not clean with chemical
solvents or strong detergents.
NOTICE
OTM090031
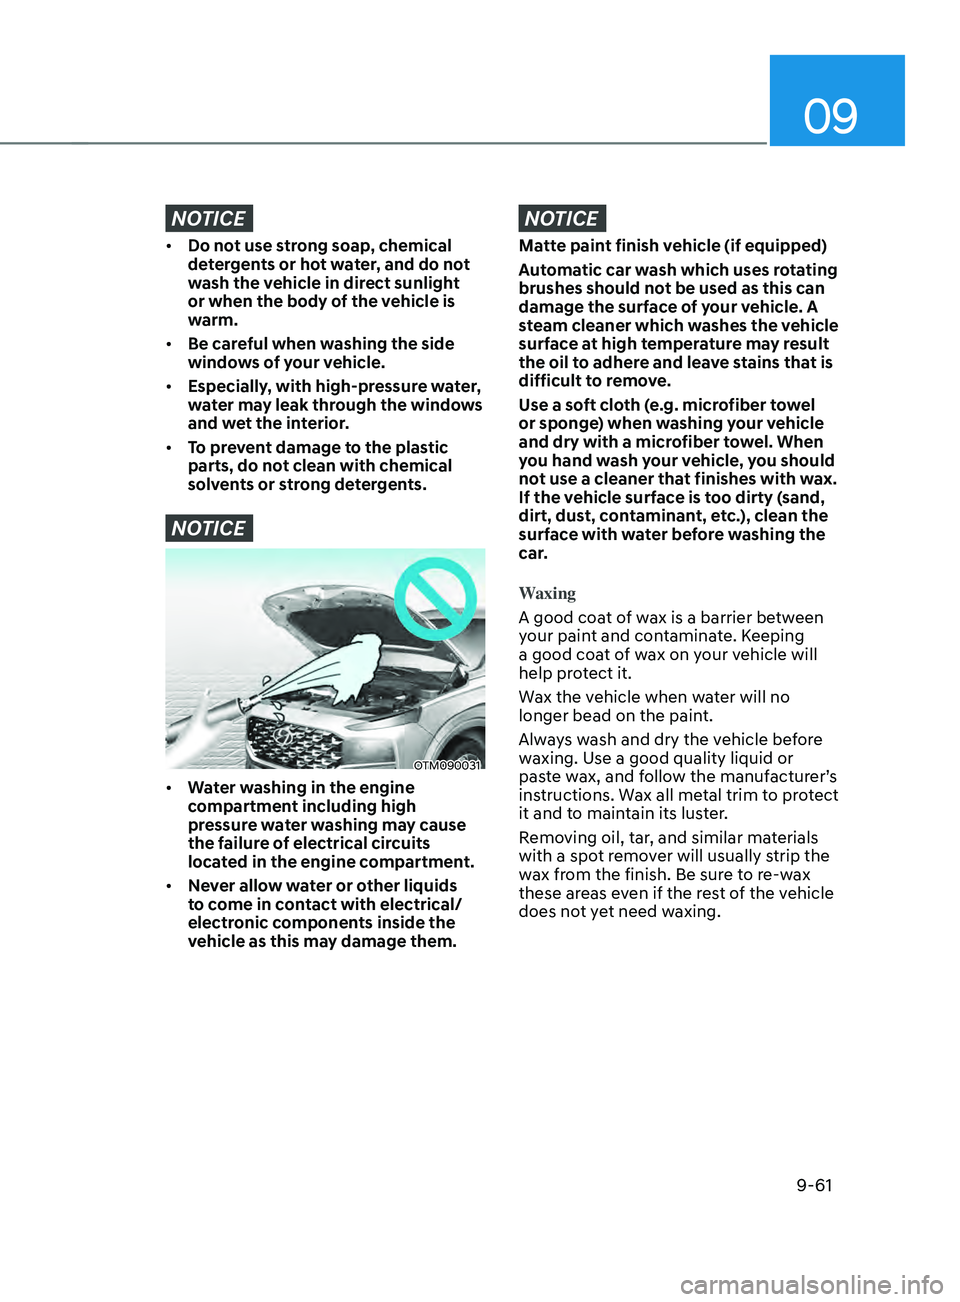
• Water washing in the engine
compartment including high
pressure water washing may cause
the failure of electrical circuits
located in the engine compartment.
• Never allow water or other liquids
to come in contact with electrical/
electronic components inside the
vehicle as this may damage them.
NOTICE
Matte paint finish vehicle (if equipped)
Automatic car wash which uses rotating
brushes should not be used as this can
damage the surface of your vehicle. A
steam cleaner which washes the vehicle
surface at high temperature may result
the oil to adhere and leave stains that is
difficult to remove.
Use a soft cloth (e.g. microfiber towel
or sponge) when washing your vehicle
and dry with a microfiber towel. When
you hand wash your vehicle, you should
not use a cleaner that finishes with wax.
If the vehicle surface is too dirty (sand,
dirt, dust, contaminant, etc.), clean the
surface with water before washing the
car.
Waxing
A good coat of wax is a barrier between
your paint and contaminate. Keeping
a good coat of wax on your vehicle will
help protect it.
Wax the vehicle when water will no
longer bead on the paint.
Always wash and dry the vehicle before
waxing. Use a good quality liquid or
paste wax, and follow the manufacturer’s
instructions. Wax all metal trim to protect
it and to maintain its luster.
Removing oil, tar, and similar materials
with a spot remover will usually strip the
wax from the finish. Be sure to re-wax
these areas even if the rest of the vehicle
does not yet need waxing.
Page 616 of 636

Maintenance
9-66
Interior care
Interior general precautions
Prevent caustic solutions such as
perfume and cosmetic oil, from
contacting the interior parts because
they may cause damage or discoloration.
If they do contact the interior parts,
wipe them off immediately. See the
instructions for the proper way to clean
vinyl.
NOTICE
• Never allow water or other liquids
to come in contact with electrical/
electronic components inside the
vehicle as this may damage them.
• When cleaning leather products
(steering wheel, seats etc.), use
neutral detergents or low alcohol
content solutions. If you use high
alcohol content solutions or acid/
alkaline detergents, the color of the
leather may fade or the surface may
get stripped off.
Cleaning the upholstery and interior
trim
Vinyl (if equipped)
Remove dust and loose dirt from vinyl
with a whisk broom or vacuum cleaner.
Clean vinyl surfaces with a vinyl cleaner.
Fabric (if equipped)
Remove dust and loose dirt from
fabric with a whisk broom or vacuum
cleaner. Clean with a mild soap solution
recommended for upholstery or carpets.
Remove fresh spots immediately with
a fabric spot cleaner. If fresh spots do
not receive immediate attention, the
fabric can be stained and its color can be
affected. Also, its fire-resistant properties
can be reduced if the material is not
properly maintained.
NOTICE
Using anything but recommended
cleaners and procedures may affect the
fabric’s appearance and fire-resistant
properties.