2021 HYUNDAI SANTA FE lock
[x] Cancel search: lockPage 510 of 636
Driver assistance system
7-128
• When remotely moving forward
using method (2), it is recognized
as a parking situation, and will
immediately control the steering
wheel according to the condition
ahead to assist with entering the
parking space and aligning the
vehicle. However, performance
may reduce depending on the
pedestrians, animals, shape of
objects, location, etc. around the
vehicle.
• For moving remotely in reverse,
both method (1) and (2) aligns the
steering wheel first, and then will
only move the vehicle straight.
• When remotely moving forward or
in reverse is completed, the vehicle
will automatically shift to P (Park)
and engage EPB (Electronic Parking
Brake). CAUTION
• When using Remote Remote
Forward/Backward function, make
sure that all passengers have gotten
out of the vehicle.
• If the vehicle’s battery is discharged
or Remote Smart Parking Assist
malfunctions when parked in a
narrow parking space, Remote
Forward/Backward function will not
operate. Always park your vehicle in
a space wide enough for you to get in
or out of your vehicle.
• Please note that depending on the
parking space, you may not be able
to exit from the space you have
entered by using Remote Forward/
Backward function.
• After parking, the surrounding may
change due to the movement of
surrounding vehicles. If this occurs,
Remote Forward/Backward function
may not operate.
• Before leaving the vehicle, close
windows and sunroofs, and make
sure the engine is off before locking
the doors.
Page 525 of 636
08
8 -7
If your temperature gauge indicates
overheating, you experience a loss of
power, or hear loud pinging or knocking,
the engine may be overheating. If this
happens, you should:
1.
Pull off the r
oad and stop as soon as it
is safe to do so.
2.
Shift the gear to P (P
ark) and set the
parking brake. If the air conditioning is
ON, turn it OFF.
3.
If engine coolant is running out under
the v
ehicle or steam is coming out
from the hood, stop the engine. Do
not open the hood until the coolant
has stopped running or the steaming
has stopped. If there is no visible
loss of engine coolant and no steam,
leave the engine running and check
to be sure the engine cooling fan is
operating. If the fan is not running,
turn the engine off.
WARNING
While the engine is running,
keep hands, clothing and tools
away from the moving parts
such as the cooling fan and
drive belt to prevent serious
injury. 4.
Check for coolan
t leaking from the
radiator, hoses or under the vehicle. (If
the air conditioning had been in use, it
is normal for cold water to be draining
from it when you stop.)
5.
If engine coolant is leaking out, s
top
the engine immediately and call the
nearest authorized HYUNDAI dealer
for assistance.
WARNING
Never remove the engine
coolant cap and/or water-
cooled intercooler coolant
cap or the drain plug while the
engine and radiator are hot.
Hot coolant and steam may blow out
under pressure, causing serious injury.
Turn the engine off and wait until the
engine cools down. Use extreme care
when removing the coolant cap. Wrap
a thick towel around it, and turn it
counterclockwise slowly to the first
stop. Step back while the pressure is
released from the cooling system. When
you are sure all the pressure has been
released, press down on the cap, using
a thick towel, and continue turning
counterclockwise to remove it.
IF THE ENGINE OVERHEATS
Page 533 of 636
08
8-15
OTM080030L
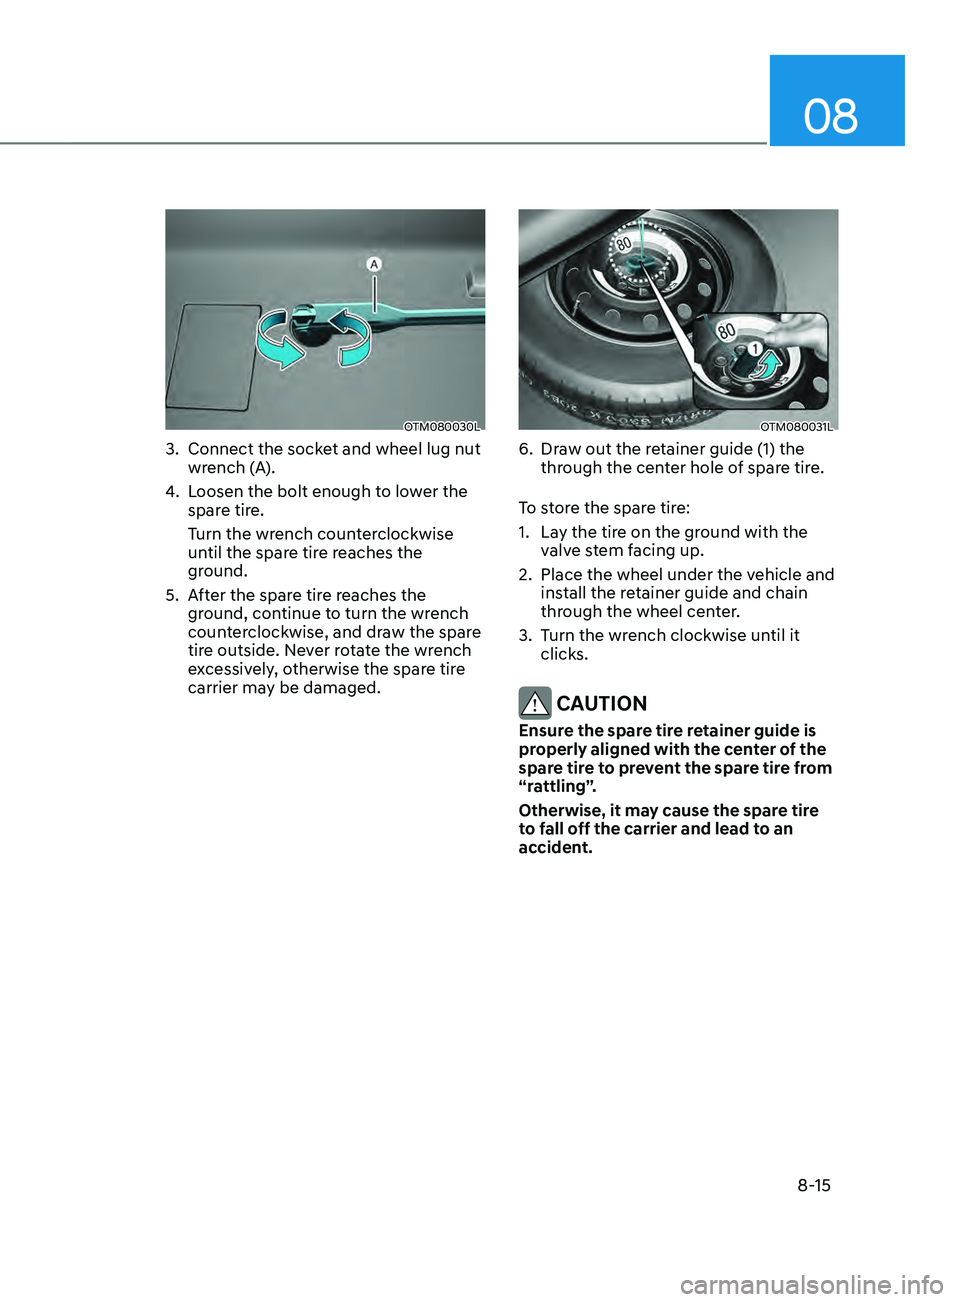
3. Connect the socket and wheel lug nut
wrench (A).
4.
Loosen the bolt enough t
o lower the
spare tire.
Turn the wrench counterclockwise
until the spare tire reaches the
ground.
5.
Aft
er the spare tire reaches the
ground, continue to turn the wrench
counterclockwise, and draw the spare
tire outside. Never rotate the wrench
excessively, otherwise the spare tire
carrier may be damaged.
OTM080031L
6. Draw out the retainer guide (1) the
thr ough the center hole of spare tire.
To store the spare tire:
1.
Lay the tir
e on the ground with the
valve stem facing up.
2.
Place the wheel under the vehicle and
ins
tall the retainer guide and chain
through the wheel center.
3.
Turn the wr
ench clockwise until it
clicks.
CAUTION
Ensure the spare tire retainer guide is
properly aligned with the center of the
spare tire to prevent the spare tire from
“rattling”.
Otherwise, it may cause the spare tire
to fall off the carrier and lead to an
accident.
Page 534 of 636
Emergency situations
8-16
Changing tires
WARNING
A vehicle can slip or roll off of a jack
causing serious injury or death to you or
those nearby. Take the following safety
precautions:
• Do not get under a vehicle that is
supported by a jack.
• NEVER attempt to change a tire in
the lane of traffic. ALWAYS move the
vehicle completely off the road on
level, firm ground away from traffic
before trying to change a tire. If you
cannot find a level, firm place off
the road, call a towing service for
assistance.
• Be sure to use the jack provided with
the vehicle.
• ALWAYS place the jack on the
designated jacking positions on the
vehicle and NEVER on the bumpers
or any other part of the vehicle for
jacking support.
• Do not start or run the engine while
the vehicle is on the jack.
• Do not allow anyone to remain in the
vehicle while it is on the jack.
• Keep children away from the road
and the vehicle. Follow these steps to change your
vehicle’s tire:
1.
Park on a le
vel, firm surface.
2. Shift the gear to P (P ark), apply the
parking brake, and press the Engine
Start/Stop button to the OFF position.
3.
Press the hazar
d warning flasher
button.
4.
Remo
ve the wheel lug wrench, jack,
jack handle, and spare tire from the
vehicle.
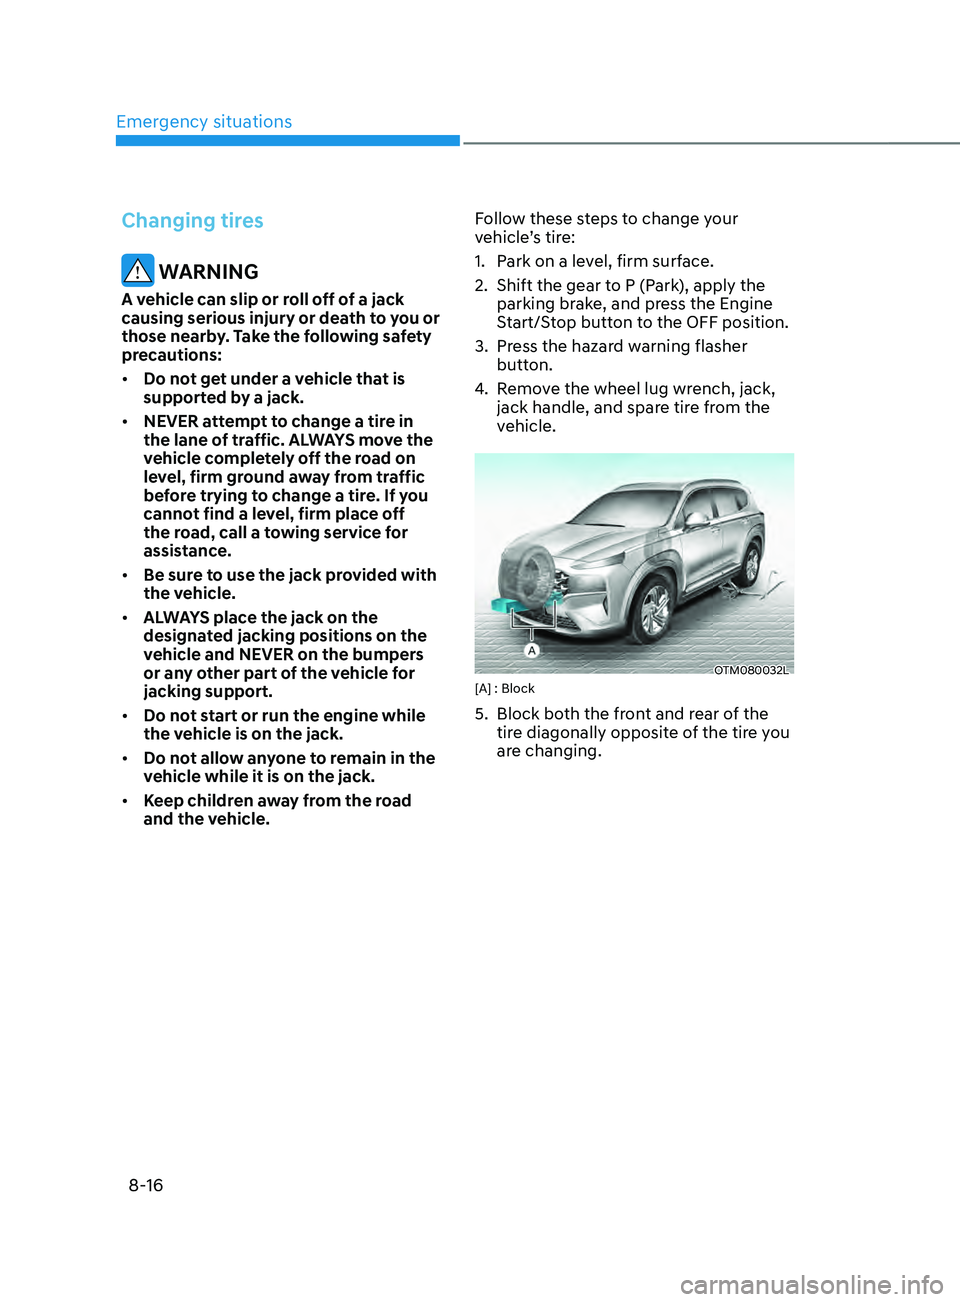
OTM080032L[A] : Block
5. Block both the fr ont and rear of the
tire diagonally opposite of the tire you
are changing.
Page 535 of 636
08
8-17
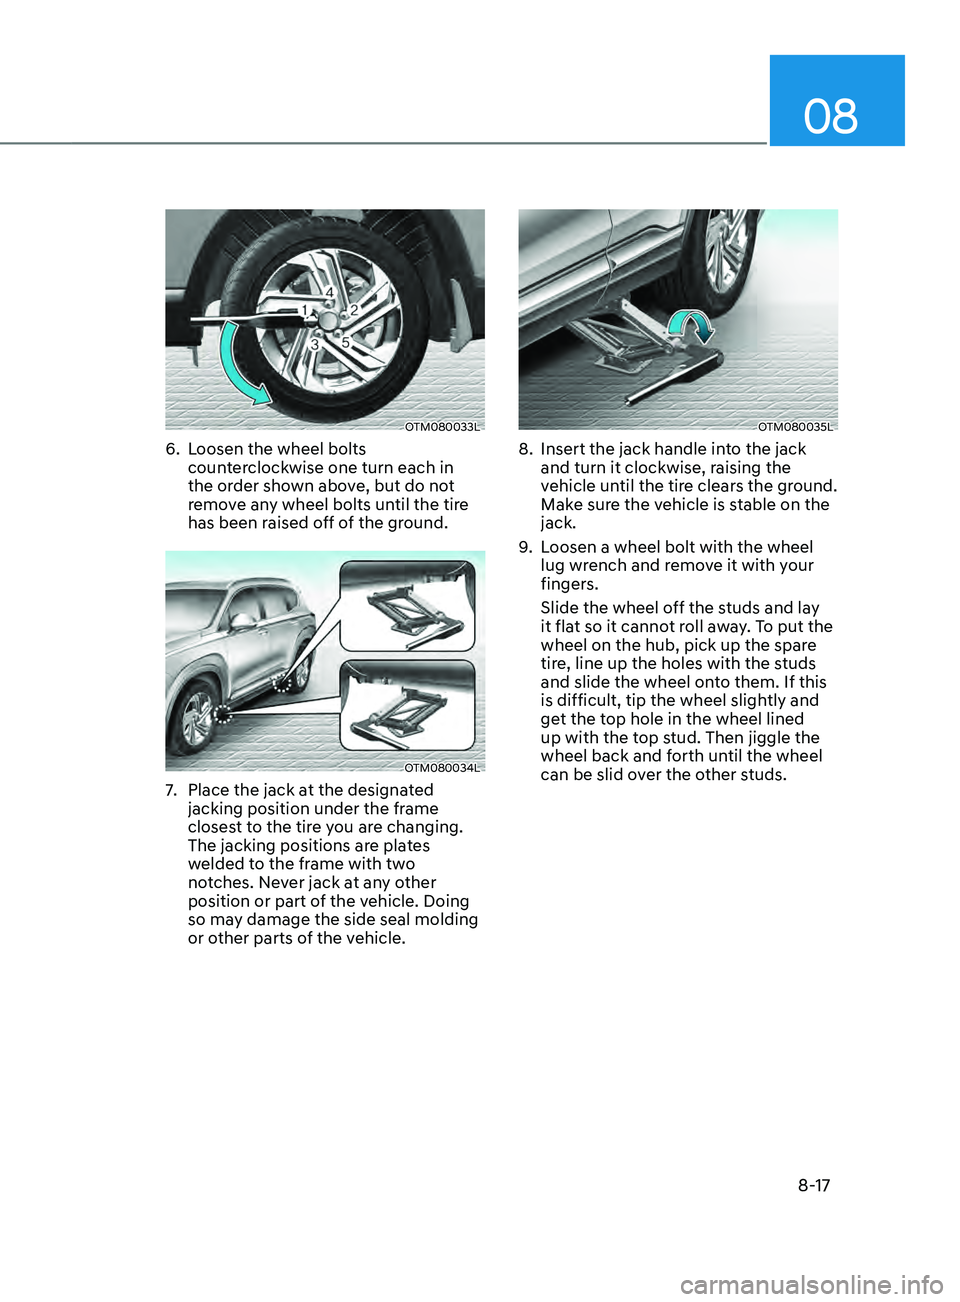
OTM080033L
6. Loosen the wheel bolts
counterclockwise one turn each in
the order shown above, but do not
remove any wheel bolts until the tire
has been raised off of the ground.
OTM080034L
7. Place the jack at the designa ted
jacking position under the frame
closest to the tire you are changing.
The jacking positions are plates
welded to the frame with two
notches. Never jack at any other
position or part of the vehicle. Doing
so may damage the side seal molding
or other parts of the vehicle.
OTM080035L
8. Insert the jack handle int o the jack
and turn it clockwise, raising the
vehicle until the tire clears the ground.
Make sure the vehicle is stable on the
jack.
9.
Loosen a wheel bolt with the wheel
lug wr
ench and remove it with your
fingers.
Slide the wheel off the studs and lay
it flat so it cannot roll away. To put the
wheel on the hub, pick up the spare
tire, line up the holes with the studs
and slide the wheel onto them. If this
is difficult, tip the wheel slightly and
get the top hole in the wheel lined
up with the top stud. Then jiggle the
wheel back and forth until the wheel
can be slid over the other studs.
Page 536 of 636
Emergency situations
8-18
WARNING
Wheels may have sharp edges. Handle
them carefully to avoid possible severe
injury. Before putting the wheel into
place, be sure that there is nothing on
the hub or wheel (such as mud, tar,
gravel, etc.) that interferes with the
wheel from fitting solidly against the
hub.
If there is, remove it. If there is not
good contact on the mounting surface
between the wheel and hub, the wheel
nuts could come loose and cause the
loss of a wheel. Loss of a wheel may
result in loss of control of the vehicle.
This may cause serious injury or death.
10. To reinstall the wheel, hold it on the
studs, put the wheel nuts on the studs
and tighten them finger tight. The
nuts should be installed with their
tapered small diameter ends directed
inward. Jiggle the tire to be sure it is
completely seated, then tighten the
nuts as much as possible with your
fingers again.
11. Lower the vehicle to the ground
by turning the wheel lug wrench
counterclockwise.
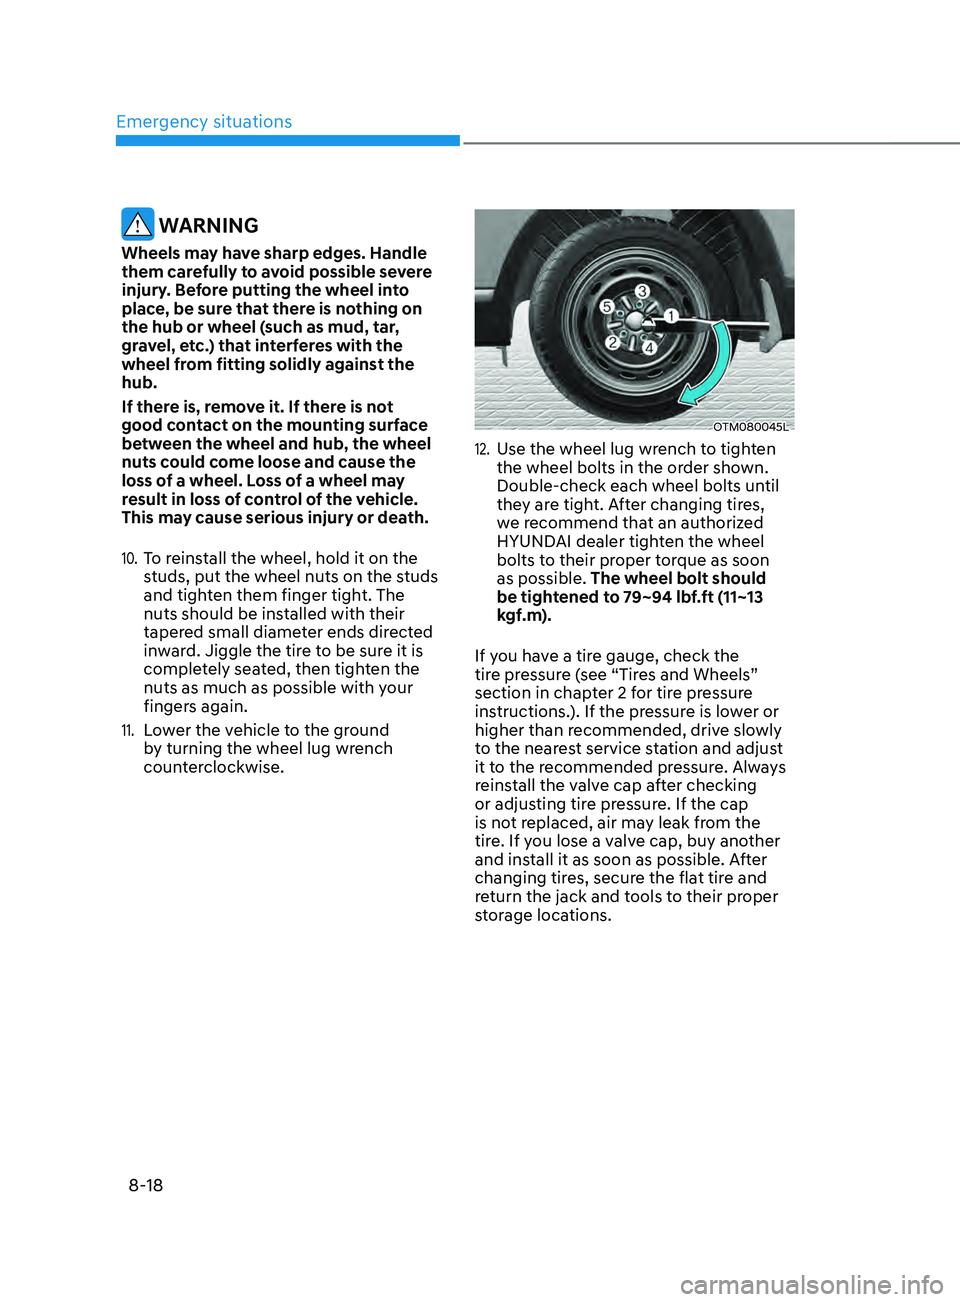
OTM080045L
12. Use the wheel lug wrench to tighten
the wheel bolts in the order shown.
Double-check each wheel bolts until
they are tight. After changing tires,
we recommend that an authorized
HYUNDAI dealer tighten the wheel
bolts to their proper torque as soon
as possible. The wheel bolt should
be tightened to 79~94 lbf.ft (11~13
kgf.m).
If you have a tire gauge, check the
tire pressure (see “Tires and Wheels”
section in chapter 2 for tire pressure
instructions.). If the pressure is lower or
higher than recommended, drive slowly
to the nearest service station and adjust
it to the recommended pressure. Always
reinstall the valve cap after checking
or adjusting tire pressure. If the cap
is not replaced, air may leak from the
tire. If you lose a valve cap, buy another
and install it as soon as possible. After
changing tires, secure the flat tire and
return the jack and tools to their proper
storage locations.
Page 555 of 636
09
9-5
WARNING
Performing maintenance work on a
vehicle can be dangerous. If you lack
sufficient knowledge and experience or
the proper tools and equipment to do
the work, we recommend that having it
done by an authorized HYUNDAI dealer.
ALWAYS follow these precautions for
performing maintenance work:
• Park your vehicle on level ground.
Shift the vehicle to P (Park), apply
the parking brake, and press the
Engine Start/Stop button to the OFF
position.
• Block the tires (front and back) to
prevent the vehicle from moving.
Remove loose clothing or jewelry
that can become entangled in
moving parts.
• If you must run the engine during
maintenance, do so out doors or in
an area with plenty of ventilation.
• Keep flames, sparks, or smoking
materials away from the battery and
fuel-related parts.
WARNING
Touching metal parts
Do not touch metal parts (including
strut bars) while the engine is operating
or hot. Doing so could result in serious
personal injury. Turn the engine off and
wait until the metal parts cool down
to perform maintenance work on the
vehicle. The following lists are vehicle checks and
inspections that should be performed
by the owner or an authorized HYUNDAI
dealer at the frequencies indicated to
help ensure safe, dependable operation
of your vehicle.
Any adverse conditions should be
brought to the attention of your dealer as
soon as possible.
These Owner Maintenance vehicle
checks are generally not covered by
warranties and you may be charged for
labor, parts and lubricants used.
OWNER MAINTENANCE
Page 556 of 636
Maintenance
9-6
Owner maintenance schedule
When you stop for fuel:
• Check the engine oil level.
• Check the coolant level in the engine
coolant reservoir or the water-cooled
intercooler coolant reservoir.
• Check the windshield washer fluid
level.
• Check for low or under-inflated tires.
WARNING
Be careful when checking your coolant
level when the engine is hot. This may
result in coolant being blown out of the
opening and cause serious burns and
other injuries.
While operating your vehicle:
• Note any changes in the sound of the
exhaust or any smell of exhaust fumes
in the vehicle.
• Check for vibrations in the steering
wheel. Notice if there is any increased
steering effort or looseness in the
steering wheel, or change in its
straight-ahead position.
• Notice if your vehicle constantly turns
slightly or “pulls” to one side when
traveling on smooth, level road.
• When stopping, listen and check for
unusual sounds, pulling to one side,
increased brake pedal travel or “hard-
to-push” brake pedal.
• If any slipping or changes in the
operation of your transmission occurs,
check the transmission fluid level.
• Check the automatic transmission P
(Park) function.
• Check the parking brake.
• Check for fluid leaks under your
vehicle (water dripping from the air
conditioning system during or after
use is normal).
At least monthly:
• Check coolant level in the engine
coolant reservoir.
• Check the operation of all exterior
lights, including the stoplights, turn
signals and hazard warning flashers.
• Check the inflation pressures of all
tires including the spare for tires that
are worn, show uneven wear, or are
damaged.
• Check for loose wheel lug nuts.
At least twice a year: (i.e., every
Spring and Autumn)
• Check radiator, heater and air
conditioning hoses for leaks or
damage.
• Check windshield washer spray and
wiper operation. Clean wiper blades
with a clean cloth dampened with
washer fluid.
• Check headlamp alignment.
• Check muffler, exhaust pipes, shields
and clamps.
• Check the seat belts for wear and
function.
At least once a year:
• Clean body and door drain holes.
• Lubricate door hinges and hood
hinges.
• Lubricate door and hood locks and
latches.
• Lubricate door rubber weather strips.
• Check the air conditioning system.
• Inspect and lubricate automatic
transmission linkage and controls.
• Clean the battery and terminals.
• Check the brake fluid level.