2021 HYUNDAI SANTA FE HYBRID turn signal
[x] Cancel search: turn signalPage 411 of 598
Driver assistance system
7-58
Overtaking Acceleration Assist
Overtaking Acceleration Assist will
operate when the turn signal indicator
is turned on to the left (left-hand drive)
or turned on to the right (right-hand
drive) while Smart Cruise Control is
operating, and the following conditions
are satisfied:
• Your vehicle speed is above 40 mph
(60 km/h)
• The hazard warning flasher is off
• A vehicle is detected in front of your
vehicle
• Deceleration is not needed to
maintain distance with the vehicle in
front
WARNING
• When the turn signal indicator is
turned on to the left (left-hand drive)
or turned on to the right (right-
hand drive) while there is a vehicle
ahead, the vehicle may accelerate
temporarily. Pay attention to the
road conditions at all times.
• Regardless of your countries driving
direction, Overtaking Acceleration
Assist will operate when the
conditions are satisfied. When
using the function in countries with
different driving direction, always
check the road conditions at all
times.
System display and control
Basic function
You can see the status of the Smart
Cruise Control operation in the Driving
Assist mode on the cluster. Refer to “LCD
Display Modes” section in chapter 4.
Smart Cruise Control will be displayed
as below depending on the status of the
system.
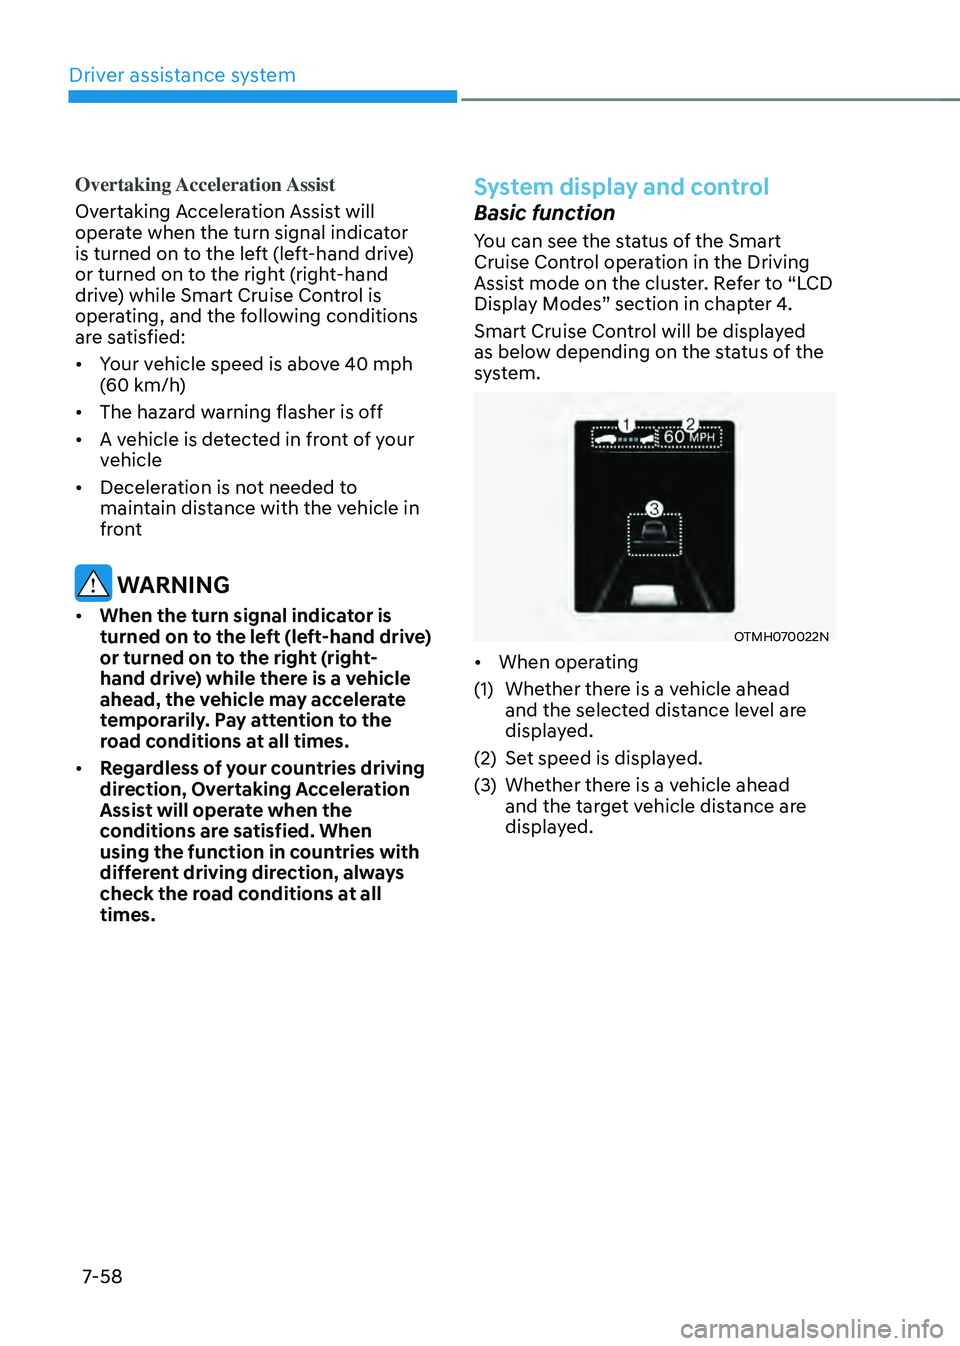
OTMH070022N
• When operating
(1) Whether there is a vehicle ahead
and the selected distance level are
displayed.
(2) Set speed is displayed.
(3) Whether there is a vehicle ahead
and the target vehicle distance are
displayed.
Page 439 of 598
Driver assistance system
7-86
• Highway Driving Assist may
inadvertently operate or turn off
depending on road conditions
(navigation information) and
surroundings.
• Lane Following Assist function may
be temporarily disabled when the
front view camera cannot detect
lanes properly or the hands-off
warning is on.
• You may not hear the warning sound
of Highway Driving Assist if the
surrounding is noisy.
• If the vehicle is driven at high speed
above a certain speed at a curve,
your vehicle may drive to one side or
may depart from the driving lane.
• When you are towing a trailer or
another vehicle, we recommend that
Highway Driving Assist is turned off
due to safety reasons.
• The hands–off warning message
may appear early or late depending
on how the steering wheel is held or
road conditions. Always have your
hands on the steering wheel while
driving.
• For your safety, please read the
owner's manual before using the
Highway Driving Assist.
• Highway Driving Assist will not
operate when the engine is started,
or when the detecting sensors or
navigation is being initialized.Limitations of the system
Highway Driving Assist may not operate
normally, or may not operate under the
following circumstances:
• The map information and the
actual road is different because the
navigation is not updated
• The map information and the actual
road is different because of real-time
GPS data or map information error
• The infotainment system is overloaded
by simultaneously performing
functions such as route search, video
playback, voice recognition, etc.
• GPS signals are blocked in areas such
as a tunnel
• The driver goes off course or the
route to the destination is changed or
canceled by resetting the navigation
• The vehicle enters a service station or
rest area
• Android Auto or Car Play is operating
• The navigation cannot detect the
current vehicle position (ex: elevated
roads including overpass adjacent to
general roads or nearby roads exist in
a parallel way)
For more details on the limitations of
the front view camera, front radar, front
corner radar and rear corner radar, refer
to “Forward Collision-Avoidance Assist
(FCA)” section in chapter 7.
Page 492 of 598
Emergency situations
8-2
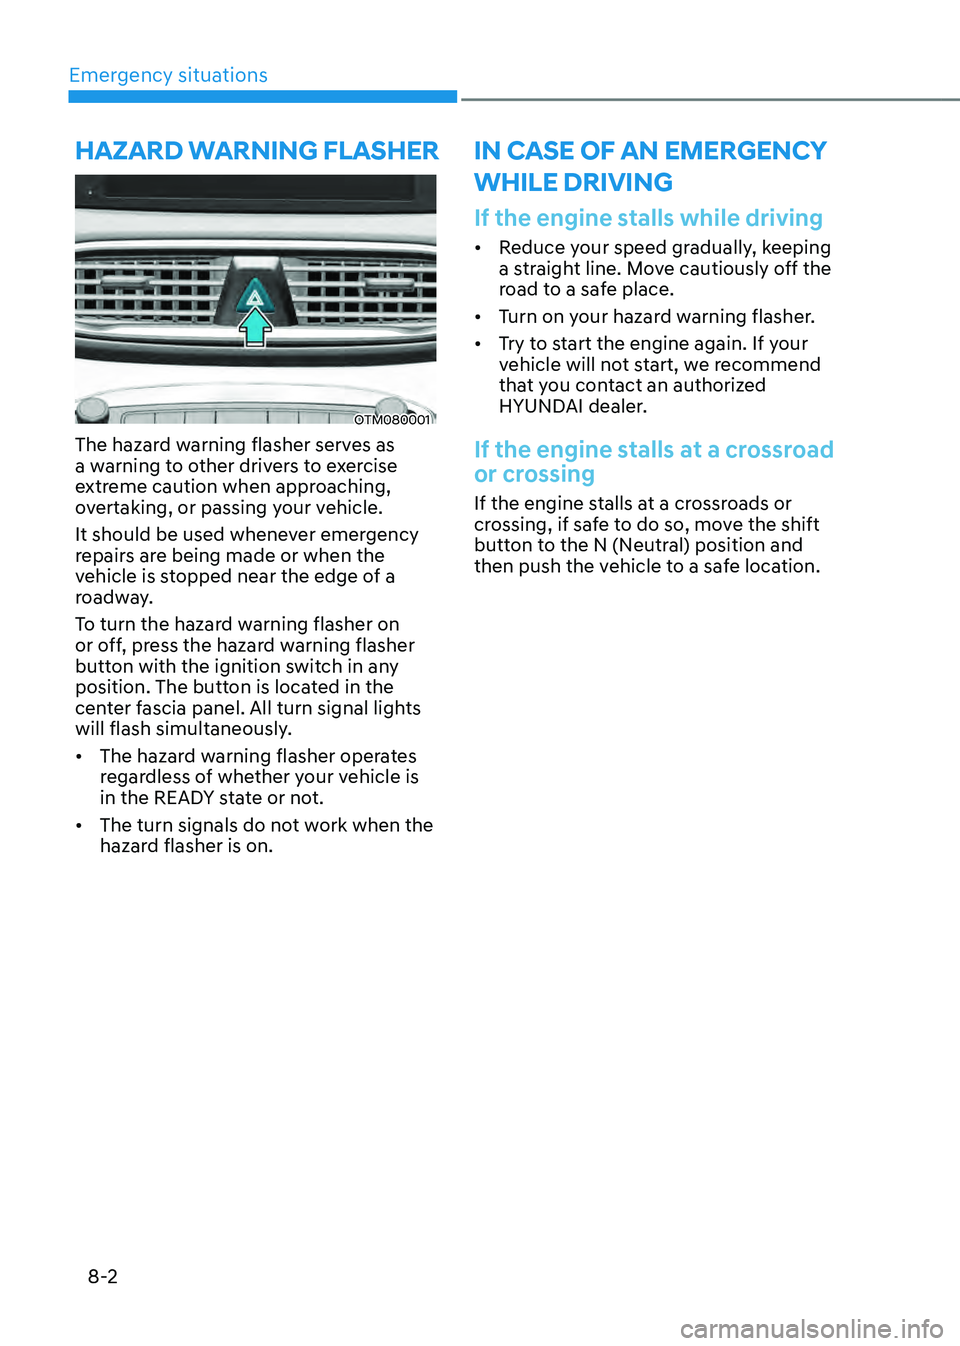
OTM080001
The hazard warning flasher serves as
a warning to other drivers to exercise
extreme caution when approaching,
overtaking, or passing your vehicle.
It should be used whenever emergency
repairs are being made or when the
vehicle is stopped near the edge of a
roadway.
To turn the hazard warning flasher on
or off, press the hazard warning flasher
button with the ignition switch in any
position. The button is located in the
center fascia panel. All turn signal lights
will flash simultaneously.
• The hazard warning flasher operates
regardless of whether your vehicle is
in the READY state or not.
• The turn signals do not work when the
hazard flasher is on.
If the engine stalls while driving
• Reduce your speed gradually, keeping
a straight line. Move cautiously off the
road to a safe place.
• Turn on your hazard warning flasher.
• Try to start the engine again. If your
vehicle will not start, we recommend
that you contact an authorized
HYUNDAI dealer.
If the engine stalls at a crossroad
or crossing
If the engine stalls at a crossroads or
crossing, if safe to do so, move the shift
button to the N (Neutral) position and
then push the vehicle to a safe location.
HAZARD WARNING FLASHER IN CASE OF AN EMERGENCY
WHILE DRIVING
Page 517 of 598

Tires and wheels ........................................................................\
......................9-31Tire care ........................................................................\
..............................................9-31
Recommended cold tire inflation pressures ............................................................9-31
Check tire inflation pressure ........................................................................\
.............9-32
Tire rotation ........................................................................\
........................................9-33
Wheel alignment and tire balance ........................................................................\
....9-34
Tire replacement ........................................................................\
................................9-34
Wheel replacement ........................................................................\
............................9-35
Tire traction ........................................................................\
........................................9-35
Tire maintenance ........................................................................\
...............................9-35
Tire sidewall labeling ........................................................................\
..........................9-36
Low aspect ratio tires ........................................................................\
.........................9-39
Fuses ........................................................................\
........................................9-40Instrument panel fuse replacement ........................................................................\
.9-41
Engine compartment panel fuse replacement .......................................................9-42
Fuse/relay panel description ........................................................................\
............9-43
Light bulbs ........................................................................\
................................9-51Headlamp, position lamp, turn signal lamp, Daytime Running Light (DRL)
replacement ........................................................................\
.......................................9-52
Side repeater lamp replacement ........................................................................\
......9-53
Rear combination lamp replacement ......................................................................9-54
High mounted stop lamp replacement ....................................................................9-57
License plate lamp replacement ........................................................................\
.......9-57
Interior light replacement ........................................................................\
..................9-57
Appearance care ........................................................................\
.....................9-59Exterior care ........................................................................\
......................................9-59
Interior care ........................................................................\
.......................................9-63
Emission control system ........................................................................\
......... 9-66
California perchlorate notice
........................................................................\
.9-70
9
Page 521 of 598
Maintenance
9-6
While operating your vehicle:
• Note any changes in the sound of the
exhaust or any smell of exhaust fumes
in the vehicle.
• Check for vibrations in the steering
wheel. Notice if there is any increased
steering effort or looseness in the
steering wheel, or change in its
straight-ahead position.
• Notice if your vehicle constantly turns
slightly or “pulls” to one side when
traveling on smooth, level road.
• When stopping, listen and check for
unusual sounds, pulling to one side,
increased brake pedal travel or “hard-
to-push” brake pedal.
• If any slipping or changes in the
operation of your transmission occurs,
check the transmission fluid level.
• Check the automatic transmission P
(Park) function.
• Check the parking brake.
• Check for fluid leaks under your
vehicle (water dripping from the air
conditioning system during or after
use is normal).
At least monthly:
• Check coolant level in the engine
coolant reservoir.
• Check the operation of all exterior
lights, including the stoplights, turn
signals and hazard warning flashers.
• Check the inflation pressures of all
tires including the spare for tires that
are worn, show uneven wear, or are
damaged.
• Check for loose wheel lug nuts.
At least twice a year: (i.e., every
Spring and Autumn)
• Check radiator, heater and air
conditioning hoses for leaks or
damage.
• Check windshield washer spray and
wiper operation. Clean wiper blades
with a clean cloth dampened with
washer fluid.
• Check headlamp alignment.
• Check muffler, exhaust pipes, shields
and clamps.
• Check the seat belts for wear and
function.
At least once a year:
• Clean body and door drain holes.
• Lubricate door hinges and hood
hinges.
• Lubricate door and hood locks and
latches.
• Lubricate door rubber weather strips.
• Check the air conditioning system.
• Inspect and lubricate automatic
transmission linkage and controls.
• Clean the battery and terminals.
• Check the brake fluid level.
Page 567 of 598

Maintenance
9-52
Headlamp, position lamp, turn
signal lamp, Daytime Running
Light (DRL) replacement
Type A
OTMA090019
(1) Headlamp (High)
(2) Headlamp (Low)
(3) Daytime running light/Position light
(4) Turn signal lamp
(5) Side marker lamp
Turn signal lamp
1. Engage the parking brake and
disconnect the negative battery cable.
OTM090022
2. Remove wheel guard clips (under the
front bumper : 4 pieces).
OTM090035
3. Push the wheel guard aside and
remove the bulb socket by turning it
counterclockwise.
4. Remove the bulb from the socket
by pressing it in and rotating it
counterclockwise until the tabs on the
bulb align with the slots in the socket.
Pull the bulb out of the socket.
5. Install a new bulb by inserting it into
the socket and rotating it until it locks
into place.
6. Push the socket into the assembly and
turn the socket clockwise.
7. Install the wheel guard in the reverse
order.
Headlamp (High/Low), Daytime running
light, position light (LED)
If the LED lamp does not operate, we
recommend that you have the vehicle
checked by an authorized HYUNDAI
dealer.
Page 568 of 598
09
9-53
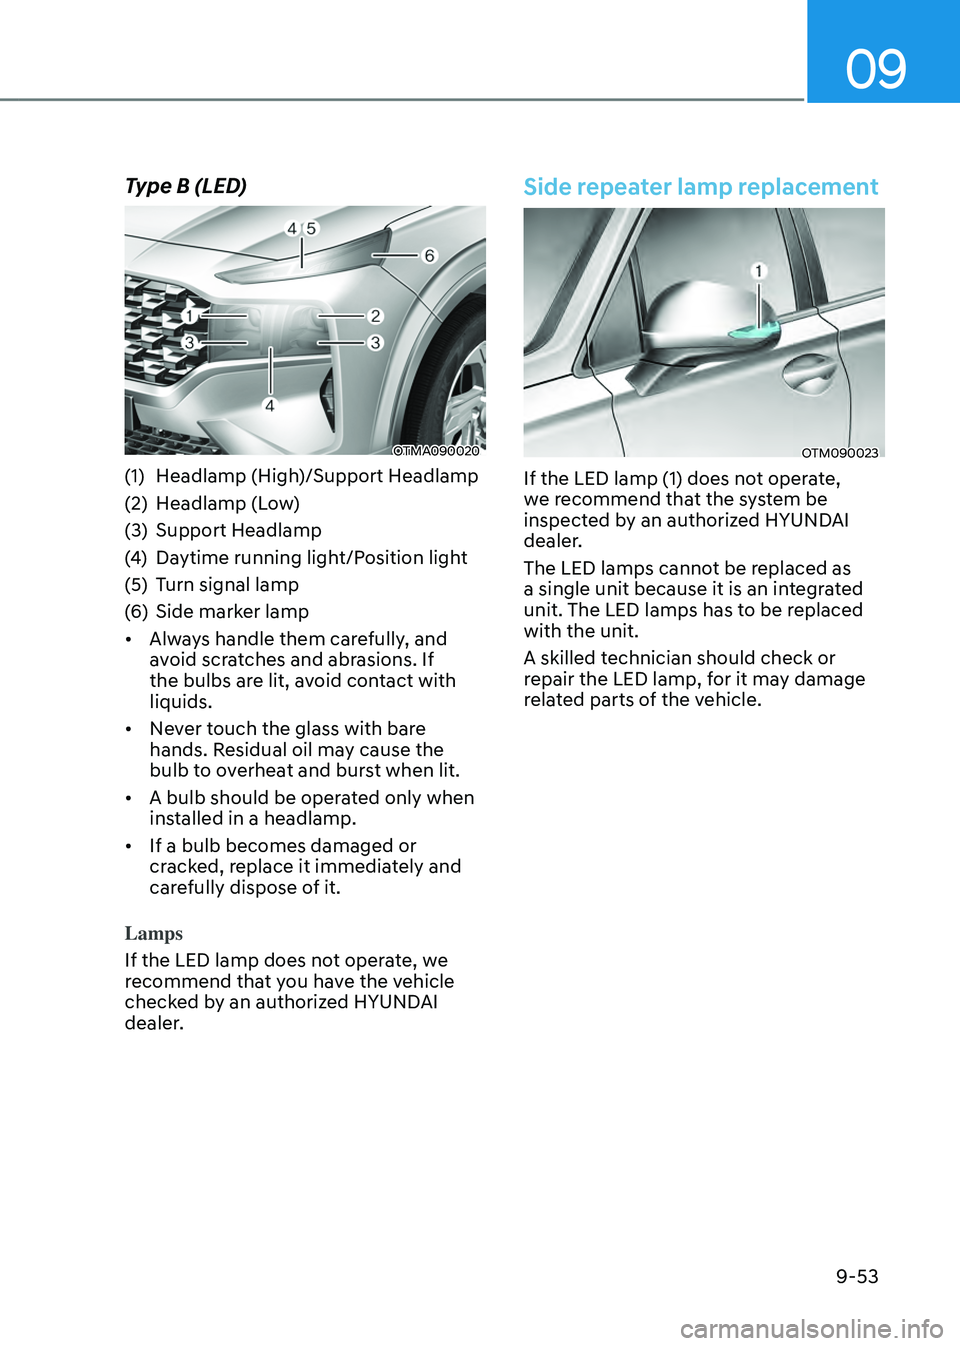
Type B (LED)
OTMA090020
(1) Headlamp (High)/Support Headlamp
(2) Headlamp (Low)
(3) Support Headlamp
(4) Daytime running light/Position light
(5) Turn signal lamp
(6) Side marker lamp
• Always handle them carefully, and
avoid scratches and abrasions. If
the bulbs are lit, avoid contact with
liquids.
• Never touch the glass with bare
hands. Residual oil may cause the
bulb to overheat and burst when lit.
• A bulb should be operated only when
installed in a headlamp.
• If a bulb becomes damaged or
cracked, replace it immediately and
carefully dispose of it.
Lamps
If the LED lamp does not operate, we
recommend that you have the vehicle
checked by an authorized HYUNDAI
dealer.
Side repeater lamp replacement
OTM090023
If the LED lamp (1) does not operate,
we recommend that the system be
inspected by an authorized HYUNDAI
dealer.
The LED lamps cannot be replaced as
a single unit because it is an integrated
unit. The LED lamps has to be replaced
with the unit.
A skilled technician should check or
repair the LED lamp, for it may damage
related parts of the vehicle.
Page 569 of 598
Maintenance
9-54
Rear combination lamp
replacement
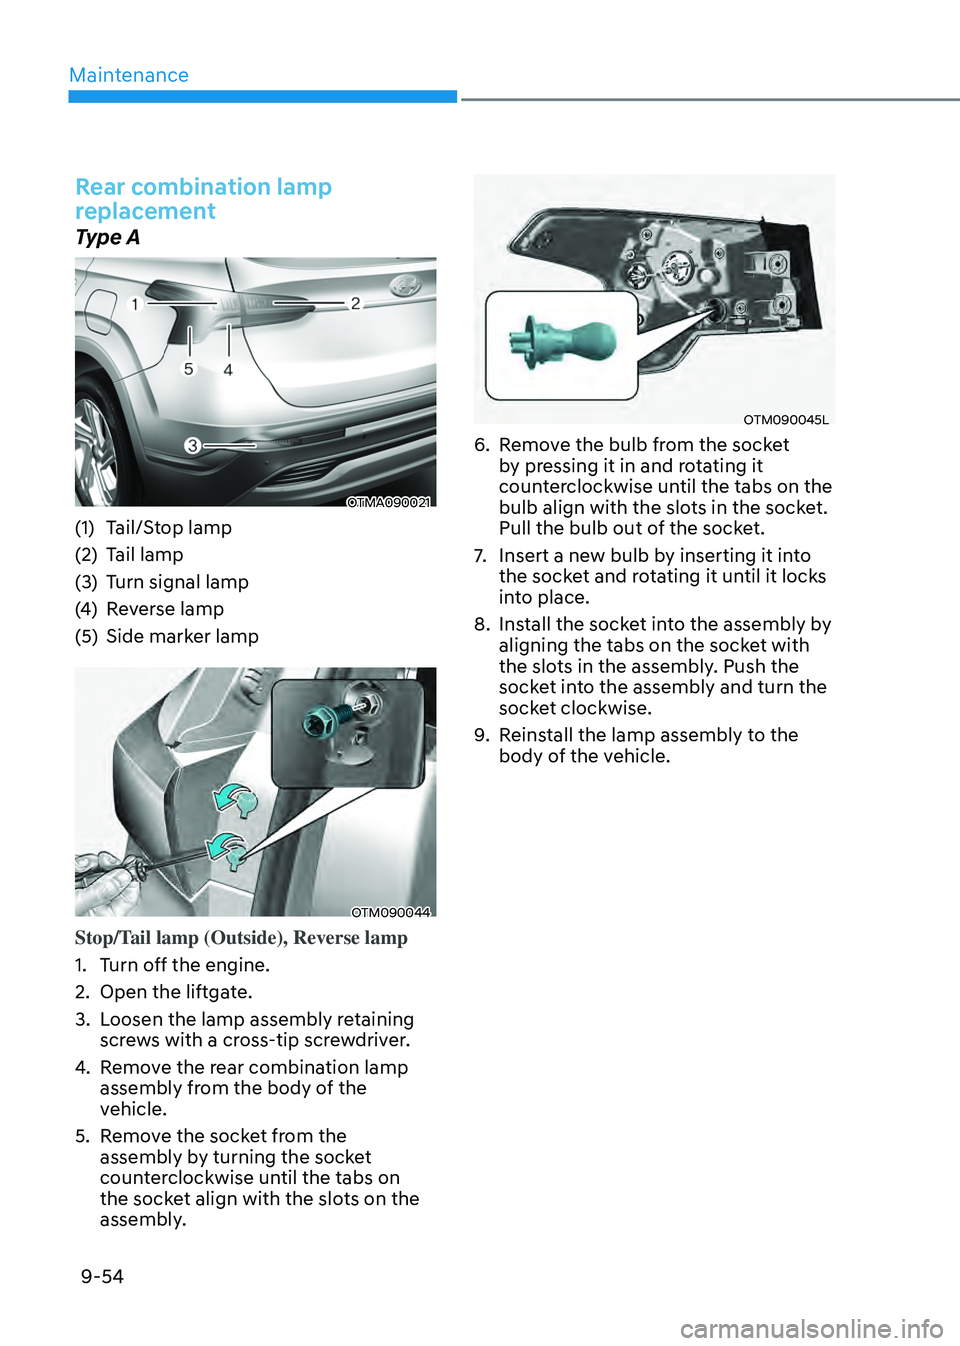
Type A
OTMA090021
(1) Tail/Stop lamp
(2) Tail lamp
(3) Turn signal lamp
(4) Reverse lamp
(5) Side marker lamp
OTM090044
Stop/Tail lamp (Outside), Reverse lamp
1. Turn off the engine.
2. Open the liftgate.
3. Loosen the lamp assembly retaining
screws with a cross-tip screwdriver.
4. Remove the rear combination lamp
assembly from the body of the
vehicle.
5. Remove the socket from the
assembly by turning the socket
counterclockwise until the tabs on
the socket align with the slots on the
assembly.
OTM090045L
6. Remove the bulb from the socket
by pressing it in and rotating it
counterclockwise until the tabs on the
bulb align with the slots in the socket.
Pull the bulb out of the socket.
7. Insert a new bulb by inserting it into
the socket and rotating it until it locks
into place.
8. Install the socket into the assembly by
aligning the tabs on the socket with
the slots in the assembly. Push the
socket into the assembly and turn the
socket clockwise.
9. Reinstall the lamp assembly to the
body of the vehicle.