2021 HYUNDAI KONA EV bulb
[x] Cancel search: bulbPage 152 of 478
3-68
Convenient features of your vehicle
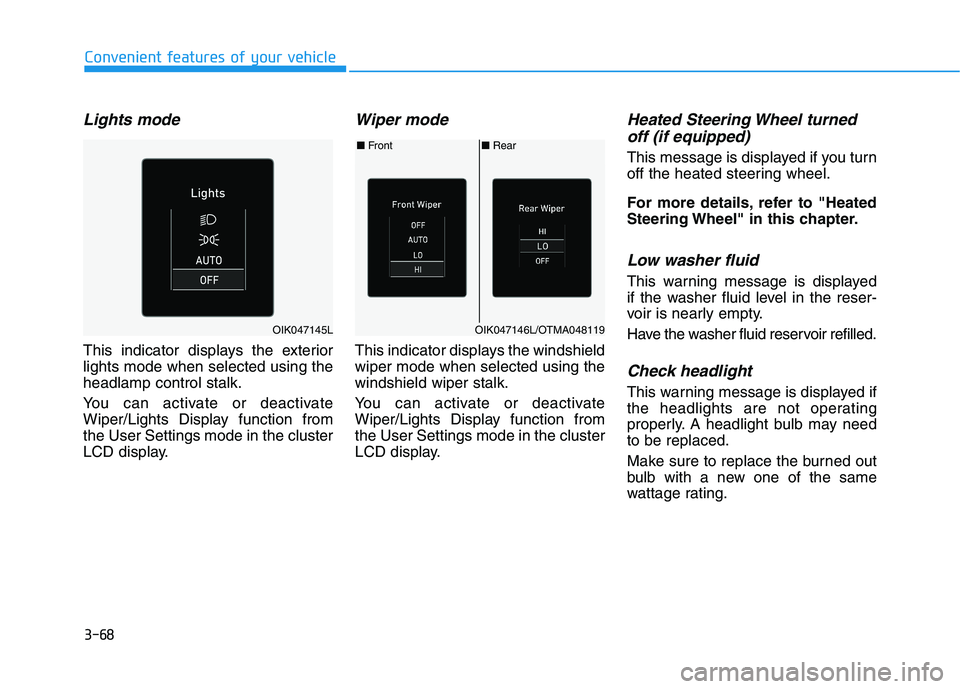
Lights mode
This indicator displays the exterior
lights mode when selected using the
headlamp control stalk.
You can activate or deactivate
Wiper/Lights Display function from
the User Settings mode in the cluster
LCD display.
Wiper mode
This indicator displays the windshield
wiper mode when selected using the
windshield wiper stalk.
You can activate or deactivate
Wiper/Lights Display function from
the User Settings mode in the cluster
LCD display.
Heated Steering Wheel turned
off (if equipped)
This message is displayed if you turn
off the heated steering wheel.
For more details, refer to "Heated
Steering Wheel" in this chapter.
Low washer fluid
This warning message is displayed
if the washer fluid level in the reser-
voir is nearly empty.
Have the washer fluid reservoir refilled.
Check headlight
This warning message is displayed if
the headlights are not operating
properly. A headlight bulb may need
to be replaced.
Make sure to replace the burned out
bulb with a new one of the same
wattage rating.
■Rear ■Front
OIK047146L/OTMA048119OIK047145L
Page 153 of 478
3-69
Convenient features of your vehicle
3
Check turn signal
This warning message is displayed if
the turn signal lamps are not operat-
ing properly. A lamp may need to be
replaced.
Make sure to replace the burned out
bulb with a new one of the same
wattage rating.
Check brake light
This warning message is displayed if
the stop lamps are not operating
properly. A lamp may need to be
replaced.
Make sure to replace the burned out
bulb with a new one of the same
wattage rating.
Check cornering lamp
(if equipped)
This warning message is displayed if
the cornering lamps are not operat-
ing properly. A lamp may need to be
replaced.
Make sure to replace the burned out
bulb with a new one of the same
wattage rating.
Check High Beam Assist (HBA)
system (if equipped)
This warning message is displayed if
there is a problem with High Beam
Assist system. Have the vehicle
inspected by an authorized HYUNDAI
dealer.
For more details, refer to "High
Beam Assist (HBA)" in chapter 3.
Check headlight LED (if equipped)
This warning message is displayed if
there is a problem with the LED
headlight. Have the vehicle inspected
by an authorized HYUNDAI dealer.
Check Forward Collision
Avoidance Assist system
This warning message is displayed if
there is a problem with Forward
Collision-Avoidance Assist system.
Have the vehicle inspected by an
authorized HYUNDAI dealer.
For more details, refer to "Forward
Collision-Avoidance Assist (FCA)"
in chapter 5.
Check Blind-Spot Collision
Warning (BCW) system
This warning message is displayed if
there is a problem with the Blind-
Spot Collision Warning system. Have
the vehicle inspected by an author-
ized HYUNDAI dealer.
For more details, refer to "Blind-
Spot Collision Warning/Rear Cross-
Traffic Collision Warning (RCCW)
System in chapter 5.
Page 188 of 478
3-104
Convenient features of your vehicle
Turn signals and lane change
signals
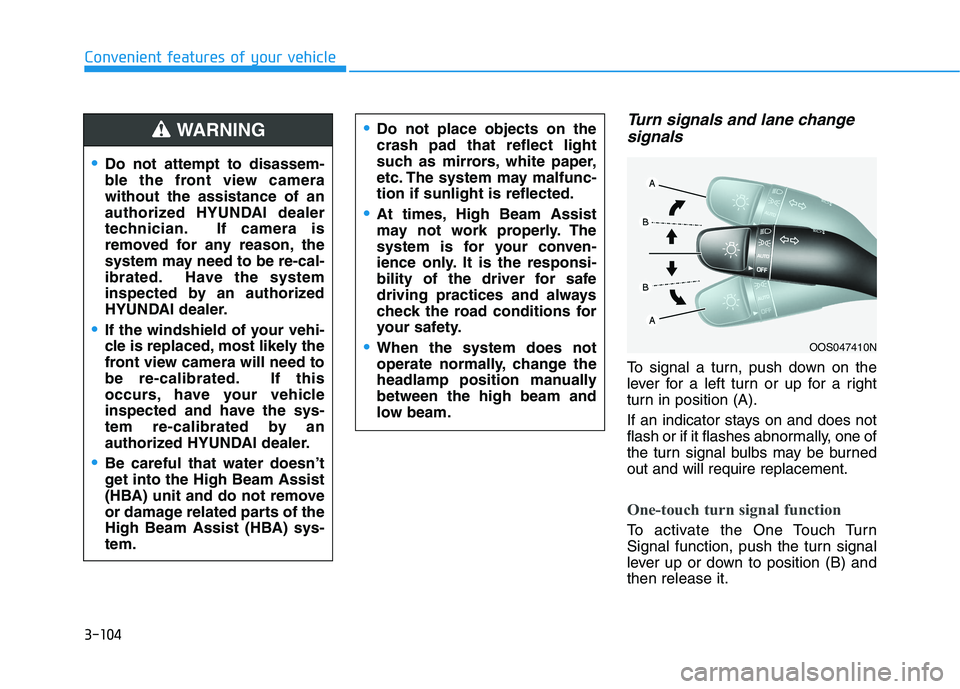
To signal a turn, push down on the
lever for a left turn or up for a right
turn in position (A).
If an indicator stays on and does not
flash or if it flashes abnormally, one of
the turn signal bulbs may be burned
out and will require replacement.
One-touch turn signal function
To activate the One Touch Turn
Signal function, push the turn signal
lever up or down to position (B) and
then release it.
OOS047410N
Do not attempt to disassem-
ble the front view camera
without the assistance of an
authorized HYUNDAI dealer
technician. If camera is
removed for any reason, the
system may need to be re-cal-
ibrated. Have the system
inspected by an authorized
HYUNDAI dealer.
If the windshield of your vehi-
cle is replaced, most likely the
front view camera will need to
be re-calibrated. If this
occurs, have your vehicle
inspected and have the sys-
tem re-calibrated by an
authorized HYUNDAI dealer.
Be careful that water doesn’t
get into the High Beam Assist
(HBA) unit and do not remove
or damage related parts of the
High Beam Assist (HBA) sys-
tem.
Do not place objects on the
crash pad that reflect light
such as mirrors, white paper,
etc. The system may malfunc-
tion if sunlight is reflected.
At times, High Beam Assist
may not work properly. The
system is for your conven-
ience only. It is the responsi-
bility of the driver for safe
driving practices and always
check the road conditions for
your safety.
When the system does not
operate normally, change the
headlamp position manually
between the high beam and
low beam.
WARNING
Page 384 of 478
7
Fuses ......................................................................7-39
Instrument Panel Fuse Replacement..........................7-40
Motor Compartment Panel Fuse Replacement ........7-41
Fuse/Relay Panel Description ......................................7-43
Light Bulbs ............................................................7-53
Headlamp, Daytime Running Light (DRL),
Cornering Lamp, Parking Lamp, Turn Signal Lamp
and Side Marker ..............................................................7-54
Side Repeater Lamp Replacement ..............................7-59
Rear Combination Light Bulb Replacement .............7-59
High Mounted Stop Lamp Bulb Replacement ..........7-60
License Plate Light Bulb Replacement ......................7-60
Interior Light Bulb Replacement .................................7-61
Appearance Care..................................................7-63
Exterior Care ....................................................................7-63
Interior Care .....................................................................7-69
California Perchlorate Notice.............................7-72
Page 435 of 478
7-53
7
Maintenance
L LI
IG
GH
HT
T
B
BU
UL
LB
BS
S
Consult an authorized HYUNDAI
dealer to replace most vehicle light
bulbs. It is difficult to replace vehicle
light bulbs because other parts of the
vehicle must be removed before you
can get to the bulb. This is especially
true for removing the headlamp
assembly to get to the bulb(s).
Removing/installing the headlamp
assembly can result in damage to
the vehicle.Light replacement
Be sure to replace the burned out
bulb with one of the same wattage
rating. Otherwise, it may cause
damage to the fuse or electric
wiring system.
Headlamp lens
To prevent damage, do not clean
the headlamp lens with chemical
solvents or strong detergents.
Information
The headlamp and tail lamp lenses
could appear frosty if the vehicle is
washed after driving or the vehicle is
driven at night in wet weather. This
condition is caused by temperature
difference between the lamp inside
and outside and, it does not indicate a
problem with your vehicle. When
moisture condenses in the lamp, it will
be removed after driving with the
headlamp on. The removable level may differ
depending on lamp size, lamp position
and environmental condition.
However, if moisture is not removed,
we recommend that your vehicle is
inspected by an authorized
HYUNDAI dealer.
Information
• A normally functioning lamp may
flicker momentarily to stabilize the
vehicle’s electrical control system.
However, if the lamp goes out after
flickering momentarily, or contin-
ues to flicker, we recommend the
system be checked by an authorized
HYUNDAI dealer.
• The position lamp may not turn on
when the position lamp switch is
turned on, but the position lamp and
headlamp switch may turn on when
the headlamp switch is turned on.
This may be caused by network fail-
ure or vehicle electrical control sys-
tem malfunction. If this occurs, we
recommend the system be checked
by an authorized HYUNDAI dealer.
i
i
NOTICE
NOTICE
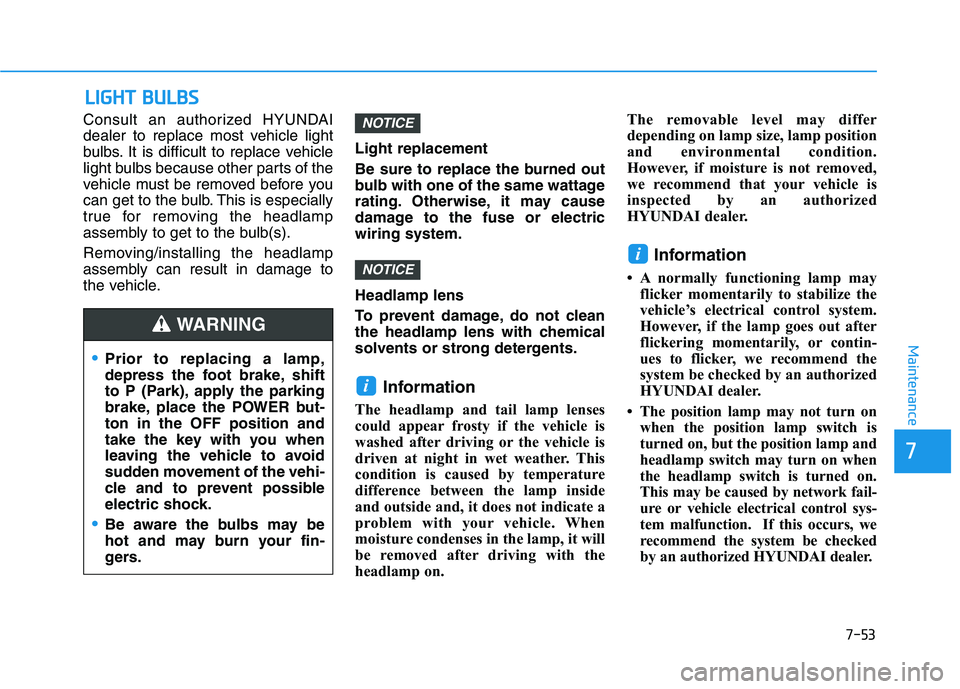
Prior to replacing a lamp,
depress the foot brake, shift
to P (Park), apply the parking
brake, place the POWER but-
ton in the OFF position and
take the key with you when
leaving the vehicle to avoid
sudden movement of the vehi-
cle and to prevent possible
electric shock.
Be aware the bulbs may be
hot and may burn your fin-
gers.
WARNING
Page 436 of 478
7-54
Maintenance
Headlamp, Daytime Running
Light (DRL), Cornering Lamp,
Parking Lamp, Turn Signal
Lamp and Side Marker
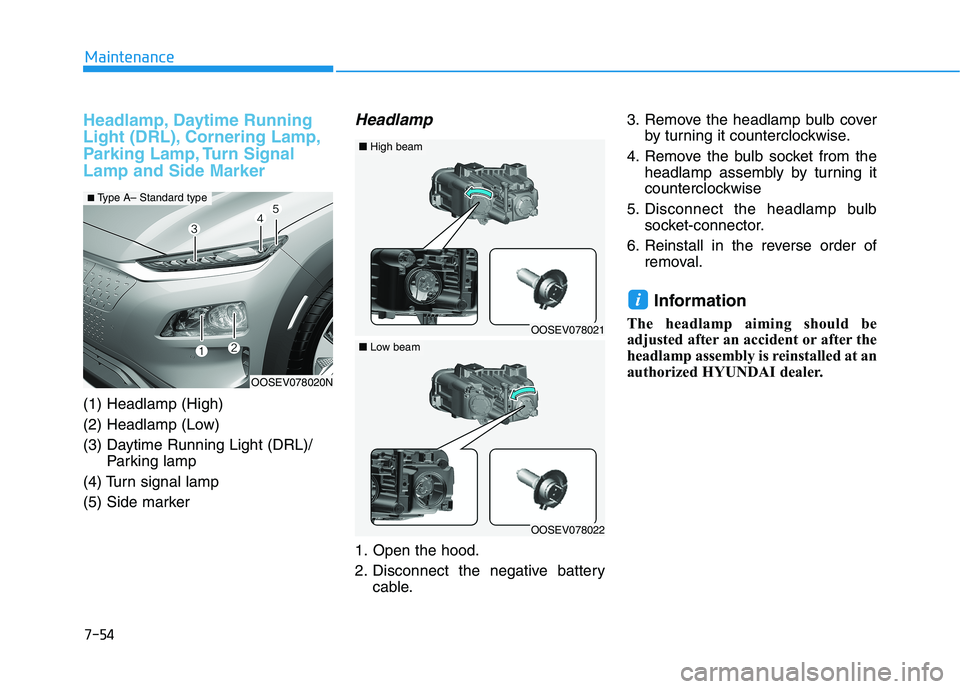
(1) Headlamp (High)
(2) Headlamp (Low)
(3) Daytime Running Light (DRL)/
Parking lamp
(4) Turn signal lamp
(5) Side marker
Headlamp
1. Open the hood.
2. Disconnect the negative battery
cable.3. Remove the headlamp bulb cover
by turning it counterclockwise.
4. Remove the bulb socket from the
headlamp assembly by turning it
counterclockwise
5. Disconnect the headlamp bulb
socket-connector.
6. Reinstall in the reverse order of
removal.
Information
The headlamp aiming should be
adjusted after an accident or after the
headlamp assembly is reinstalled at an
authorized HYUNDAI dealer.
i
OOSEV078020N
■ Type A– Standard type
OOSEV078021
■High beam
OOSEV078022
■Low beam
Page 437 of 478
7-55
7
Maintenance
Always handle them carefully, and
avoid scratches and abrasions. If
the bulbs are lit, avoid contact with
liquids.
Never touch the glass with bare
hands. Residual oil may cause the
bulb to overheat and burst when lit.
A bulb should be operated only
when installed in a headlamp.
If a bulb becomes damaged or
cracked, replace it immediately
and carefully dispose of it.
Daytime running light
(DRL)/Position lamp
If the lamp (LED) does not operate,
have the system checked by an
authorized HYUNDAI dealer.
The LED lamps cannot be replaced
as a single unit because it is an inte-
grated unit. The LED lamps has to be
replaced with the unit.
A skilled technician should check or
repair the LED lamp, for it may dam-
age related parts of the vehicle.
Turn signal lamp
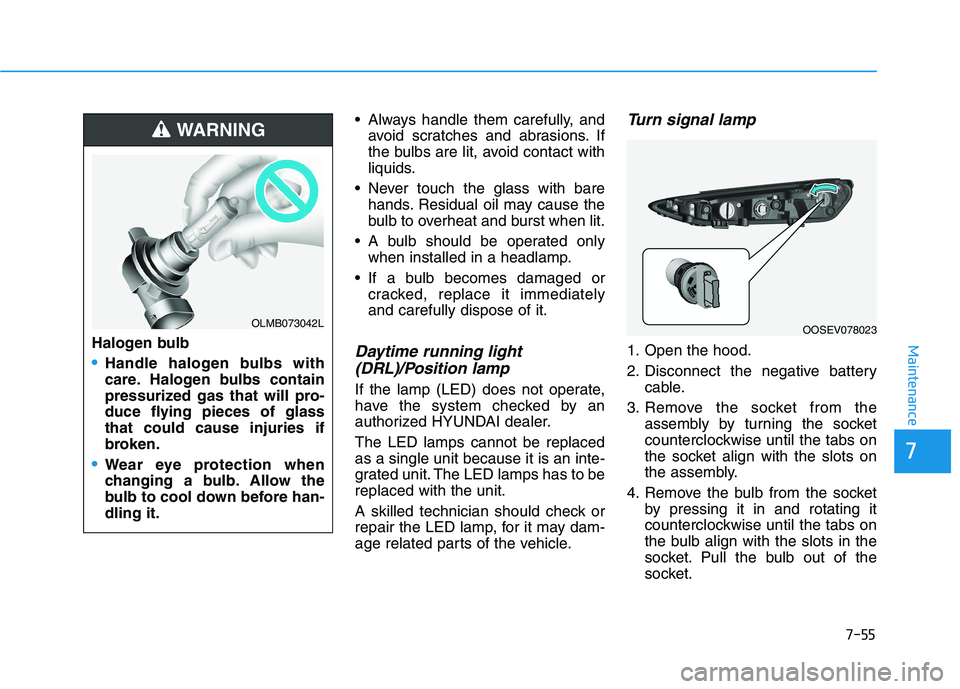
1. Open the hood.
2. Disconnect the negative battery
cable.
3. Remove the socket from the
assembly by turning the socket
counterclockwise until the tabs on
the socket align with the slots on
the assembly.
4. Remove the bulb from the socket
by pressing it in and rotating it
counterclockwise until the tabs on
the bulb align with the slots in the
socket. Pull the bulb out of the
socket.
OOSEV078023Halogen bulb
Handle halogen bulbs with
care. Halogen bulbs contain
pressurized gas that will pro-
duce flying pieces of glass
that could cause injuries if
broken.
Wear eye protection when
changing a bulb. Allow the
bulb to cool down before han-
dling it.
WARNING
OLMB073042L
Page 438 of 478
7-56
Maintenance
5. Install a new bulb by inserting it
into the socket and rotating it until
it locks into place.
6. Install the socket in the assembly
by aligning the tabs on the socket
with the slots in the assembly.
7. Push the socket into the assembly
and turn the socket clockwise.
Side marker
1. Open the hood.
2. Disconnect the negative battery
cable.
3. Remove the socket from the
assembly by turning the socket
counterclockwise until the tabs on
the socket align with the slots on
the assembly.
4. Remove the bulb from the socket
by pulling out the bulb.
5. Insert a new bulb.
6. Reinstall in the reverse order of
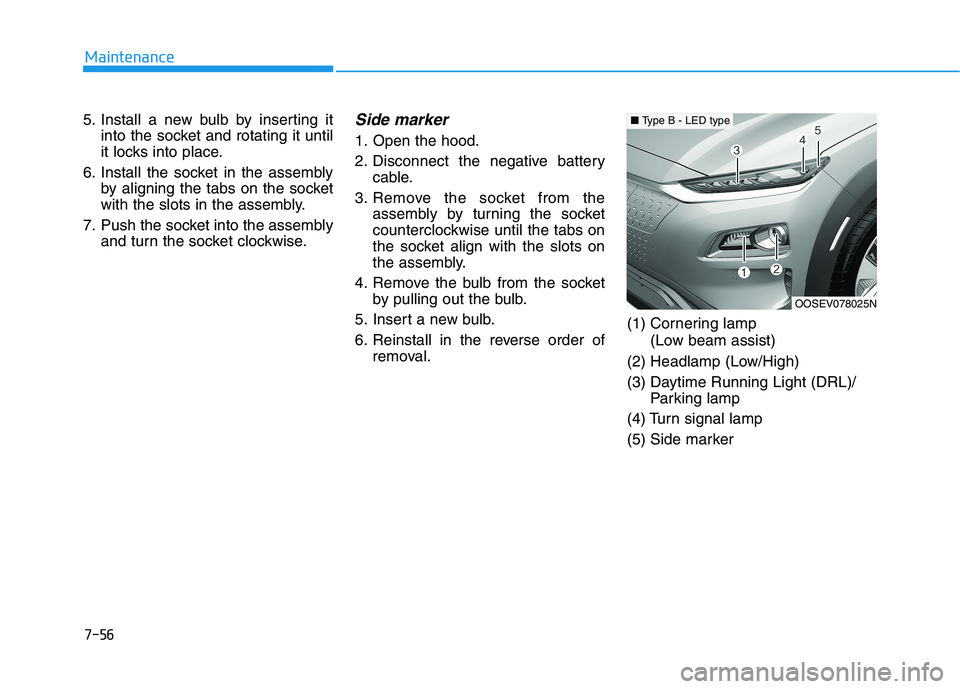
removal.(1) Cornering lamp
(Low beam assist)
(2) Headlamp (Low/High)
(3) Daytime Running Light (DRL)/
Parking lamp
(4) Turn signal lamp
(5) Side marker
OOSEV078025N
■Type B - LED type