Page 169 of 546

3-19
Convenient features of your vehicle
3
Inside Rearview Mirror
Before you start driving, adjust the
rearview mirror to the center on the
view through the rear window.When cleaning the mirror, use a
paper towel or similar material
dampened with glass cleaner. Do
not spray glass cleaner directly on
the mirror as that may cause the
liquid cleaner to enter the mirrorhousing.
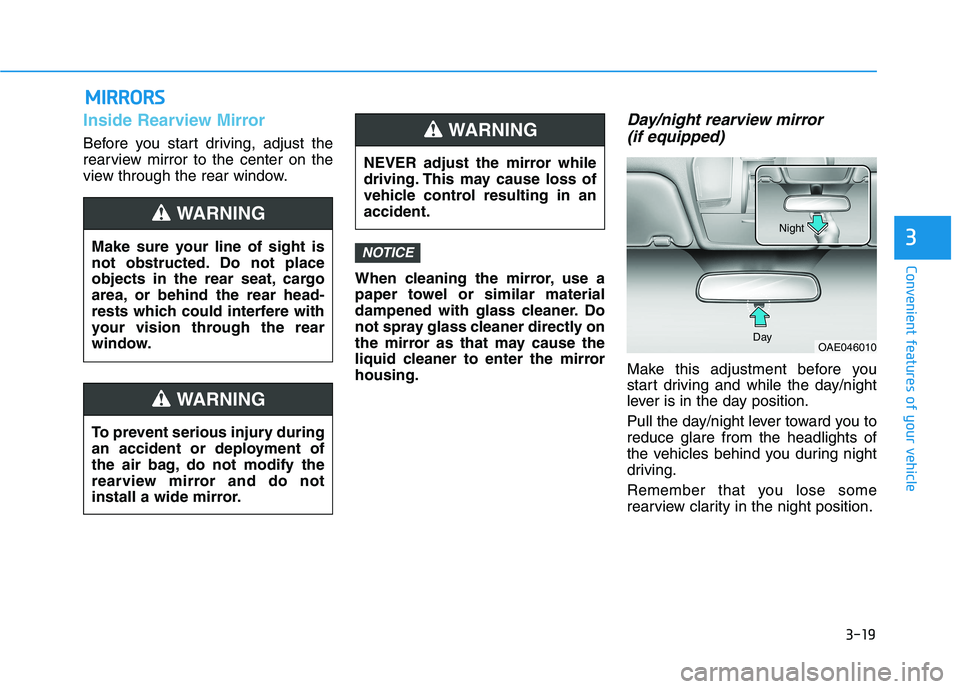
Day/night rearview mirror (if equipped)
Make this adjustment before you
start driving and while the day/night
lever is in the day position.
Pull the day/night lever toward you to reduce glare from the headlights of
the vehicles behind you during night
driving.
Remember that you lose some
rearview clarity in the night position.
NOTICEMake sure your line of sight is
not obstructed. Do not place
objects in the rear seat, cargo
area, or behind the rear head-
rests which could interfere with
your vision through the rear
window.
WARNING
NEVER adjust the mirror while
driving. This may cause loss of
vehicle control resulting in anaccident.
WARNING
To prevent serious injury during
an accident or deployment of
the air bag, do not modify the
rearview mirror and do not
install a wide mirror.
WARNING
MM IIRR RROO RRSS
OAE046010
Day Night
Page 195 of 546
3-45
Convenient features of your vehicle
3
Instrument Cluster Control
Adjusting instrument clusterillumination
When the vehicle’s parking lights or headlights are on, press the illumina-
tion control button to adjust the
brightness of the instrument panelillumination. When pressing the illumination con-
trol button, the interior switch illumi-nation intensity is also adjusted. The brightness of the instrument
panel illumination is displayed.
If the brightness reaches the maxi- mum or minimum level, a chimewill sound.
OIK047144L
OAEPH049401N Never adjust the instrument
cluster while driving. Doing socould lead to driver distraction
which may cause an accident
and lead to vehicle damage,
serious injury, or death.
WARNING
Page 210 of 546
3-60
Convenient features of your vehicle
High Beam IndicatorLight
This indicator light illuminates:
When the headlights are on and in the high beam position.
When the turn signal lever is pulled into the Flash-to-Pass position.
Light ON Indicator
Light
This indicator light illuminates:
When the parking lights or head- lights are on.
High Beam Assist indi-cator light (if equipped)
This indicator light illuminates :
When the high-beam is on with the light switch in the AUTO light posi- tion.
If your vehicle detects oncoming or preceding vehicles, High Beam
Assist system will switch the high
beam to low beam automatically.
For more details, refer to "High
Beam Assist (HBA)" in this chap-
ter.
Cruise Indicator Light (if equipped)
This indicator light illuminates:
When the cruise control system is
enabled.
For more information, refer to
"Cruise Control System" in chap-ter 5.
Page 241 of 546
3-91
Convenient features of your vehicle
3
LLIIGG HH TT
Exterior Lights
Lighting control
To operate the lights, turn the knob at
the end of the control lever to one of
the following positions:
1. OFF position
2. AUTO light position
3. Parking lamp position
4. Headlamp position
Daytime running light (DRL)
The Daytime Running Lights (DRL)
can make it easier for others to see
the front of your vehicle during the
day, especially after dawn and beforesunset.
The DRL system will turn the dedi- cated lamp OFF when :
• The headlights are ON.
The vehicle is turned off.
AUTO light position
The parking lamp and headlamp will
be turned ON or OFF automaticallydepending on the amount of light
outside the vehicle.
Even with the AUTO light feature in
operation, it is recommended to
manually turn ON the lamps when
driving at night or in a fog, driving in
the rain, or when you enter dark
areas, such as tunnels and parking
facilities.
OAD045451N
OAD045436C
Page 247 of 546

3-97
Convenient features of your vehicle
Onetouch turn signal function
To activate the One Touch Turn
Signal function, push the turn signal
lever up or down to position (B) andthen release it.
The lane change signals will blink 3,
5 or 7 times.
You can activate or deactivate the
One Touch Turn Signal function or
choose the number of blinking (3, 5,or 7) from the User Settings mode
(Light) on the LCD display.
For more information, refer to the
"LCD Display" section in this
chapter.
Battery saver function
The purpose of this feature is to pre-
vent the battery from being dis-
charged. The system automatically
turns off the parking lamp when the
driver turns the vehicle off and opens
the driver-side door.
With this feature, the parking lamps
will turn off automatically if the driver
parks on the side of road at night.
If necessary, to keep the lamps on
when the the vehicle is turned off, per-
form the following:
1) Open the driver-side door.
2) Turn the parking lamps OFF andON again using the light switch on
the steering column.
Headlamp delay function
(if equipped)
If the POWER button is placed in the
ACC position or the OFF positionwith the headlamps ON, the head-
lamps (and/or parking lamps) remain
on for about 5 minutes. However, if
the driver’s door is opened and
closed, the headlights are turned off
after 15 seconds. Also, with the vehi-
cle off if the driver's door is openedand closed, the headlamps (and/or
parking lamps) are turned off after 15
seconds.
The headlamps (and/or parking
lamps) can be turned off by pressing
the lock button on the smart key
twice or turning the light switch to the
OFF or AUTO position.
You can activate or deactivate the
Headlamp Delay function from theUser Settings mode (Light) on the
LCD display.
For more information, refer to the
"LCD Display" section in this
chapter.
3