2021 HYUNDAI IONIQ ELECTRIC warning
[x] Cancel search: warningPage 496 of 546
7-37
7
Maintenance
Longer wearing tires can be more
susceptible to irregular tread wear. It
is very important to follow the tire
rotation interval in this chapter to
achieve the tread life potential of
these tires. Cuts and punctures in
radial-ply tires are repairable only in
the tread area, because of sidewall
flexing. Consult your tire dealer for
radial-ply tire repairs.Low Aspect Ratio Tires (if equipped)
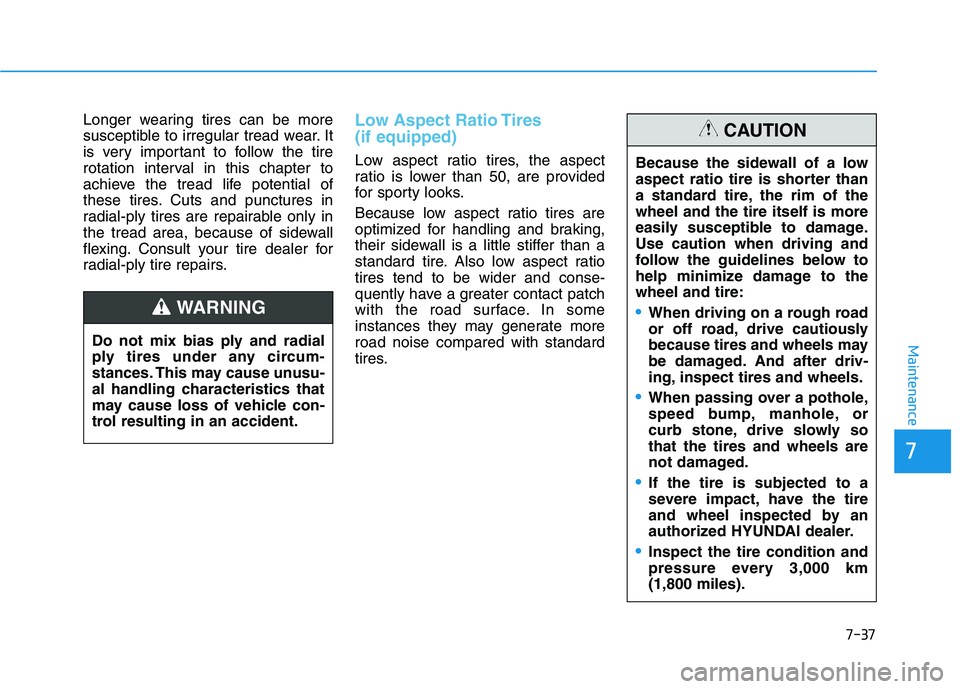
Low aspect ratio tires, the aspect
ratio is lower than 50, are provided
for sporty looks.
Because low aspect ratio tires are
optimized for handling and braking,
their sidewall is a little stiffer than a
standard tire. Also low aspect ratiotires tend to be wider and conse-
quently have a greater contact patch
with the road surface. In some
instances they may generate moreroad noise compared with standard
tires.
Do not mix bias ply and radial
ply tires under any circum-
stances. This may cause unusu-
al handling characteristics that
may cause loss of vehicle con-
trol resulting in an accident.
WARNING
Because the sidewall of a low
aspect ratio tire is shorter than
a standard tire, the rim of thewheel and the tire itself is more
easily susceptible to damage.Use caution when driving and
follow the guidelines below to
help minimize damage to thewheel and tire:
When driving on a rough road
or off road, drive cautiously
because tires and wheels may
be damaged. And after driv-
ing, inspect tires and wheels.
When passing over a pothole,
speed bump, manhole, or
curb stone, drive slowly sothat the tires and wheels are
not damaged.
If the tire is subjected to asevere impact, have the tire
and wheel inspected by an
authorized HYUNDAI dealer.
Inspect the tire condition and
pressure every 3,000 km(1,800 miles).
CAUTION
Page 498 of 546
7-39
7
Maintenance
FFUU SSEE SS
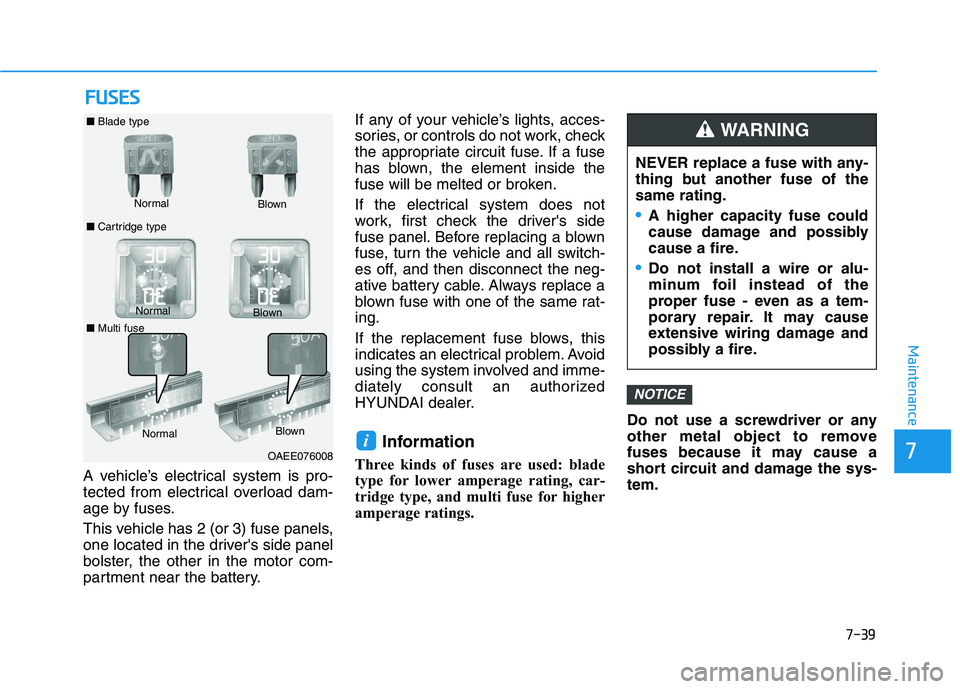
A vehicle’s electrical system is pro-
tected from electrical overload dam-
age by fuses.
This vehicle has 2 (or 3) fuse panels,
one located in the driver's side panel
bolster, the other in the motor com-
partment near the battery. If any of your vehicle’s lights, acces-
sories, or controls do not work, check
the appropriate circuit fuse. If a fuse
has blown, the element inside the
fuse will be melted or broken.
If the electrical system does not
work, first check the driver's side
fuse panel. Before replacing a blown
fuse, turn the vehicle and all switch-
es off, and then disconnect the neg-
ative battery cable. Always replace a
blown fuse with one of the same rat-ing.
If the replacement fuse blows, this
indicates an electrical problem. Avoid
using the system involved and imme-
diately consult an authorized
HYUNDAI dealer.
Information
Three kinds of fuses are used: blade
type for lower amperage rating, car-
tridge type, and multi fuse for higher
amperage ratings. Do not use a screwdriver or any
other metal object to remove
fuses because it may cause a
short circuit and damage the sys-tem.
NOTICE
i
NEVER replace a fuse with any-
thing but another fuse of thesame rating.
A higher capacity fuse could
cause damage and possibly
cause a fire.
Do not install a wire or alu-
minum foil instead of the
proper fuse - even as a tem-
porary repair. It may cause
extensive wiring damage and
possibly a fire.
WARNING
Normal
■
Blade type
■ Cartridge type Blown
Normal Blown
OAEE076008
Normal
Blown
■ Multi fuse
Page 503 of 546
7-44
Maintenance
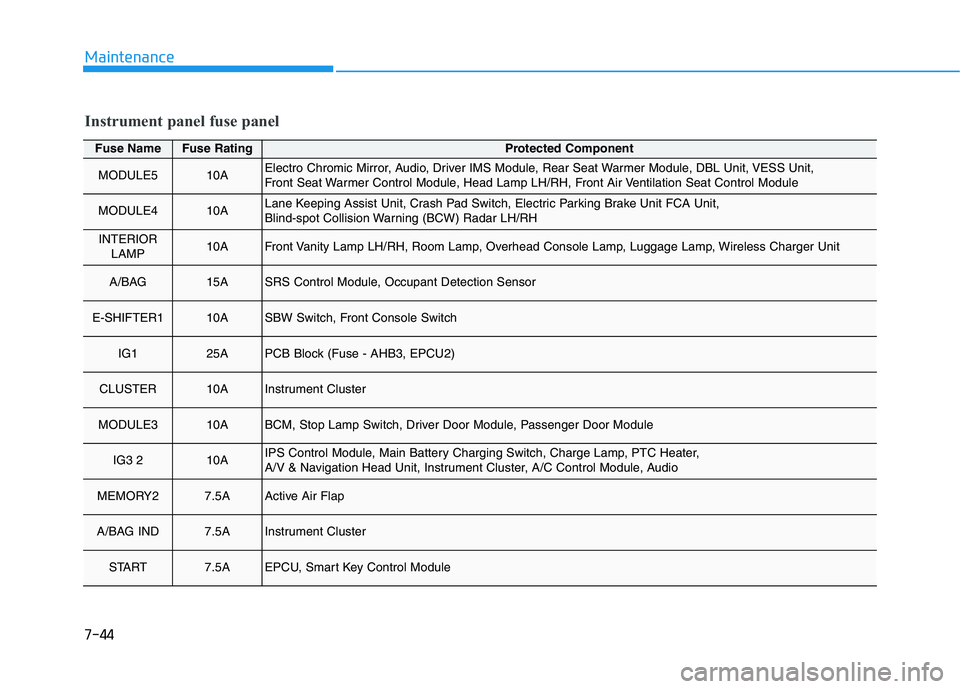
Fuse NameFuse RatingProtected Component
MODULE510AElectro Chromic Mirror, Audio, Driver IMS Module, Rear Seat Warmer Module, DBL Unit, VESS Unit,
Front Seat Warmer Control Module, Head Lamp LH/RH, Front Air Ventilation Seat Control Module
MODULE410ALane Keeping Assist Unit, Crash Pad Switch, Electric Parking Brake Unit FCA Unit,
Blind-spot Collision Warning (BCW) Radar LH/RH
INTERIORLAMP10AFront Vanity Lamp LH/RH, Room Lamp, Overhead Console Lamp, Luggage Lamp, Wireless Charger Unit
A/BAG 15ASRS Control Module, Occupant Detection Sensor
E-SHIFTER110ASBW Switch, Front Console Switch
IG125APCB Block (Fuse - AHB3, EPCU2)
CLUSTER10AInstrument Cluster
MODULE310ABCM, Stop Lamp Switch, Driver Door Module, Passenger Door Module
IG3 210AIPS Control Module, Main Battery Charging Switch, Charge Lamp, PTC Heater,
A/V & Navigation Head Unit, Instrument Cluster, A/C Control Module, Audio
MEMORY27.5AActive Air Flap
A/BAG IND7.5AInstrument Cluster
START7.5AEPCU, Smart Key Control Module
Instrument panel fuse panel
Page 511 of 546
7-52
MaintenanceL
L IIGG HH TT BB UU LLBB SS
Consult an authorized HYUNDAI
dealer to replace most vehicle light
bulbs. It is difficult to replace vehicle
light bulbs because other parts of the
vehicle must be removed before you
can get to the bulb. This is especially
true for removing the headlamp
assembly to get to the bulb(s).
Removing/installing the headlamp
assembly can result in damage to
the vehicle.
Information
The headlamp and tail lamp lenses
could appear frosty if the vehicle is
washed after driving or the vehicle is
driven at night in wet weather. This
condition is caused by temperature dif-
ference between the lamp inside and
outside and, it does not indicate a prob-
lem with your vehicle. When moisture
condenses in the lamp, it will be
removed after driving with the head-
lamp on. The removable level may dif-
fer depending on lamp size, lamp posi-
tion and environmental condition.
However, if moisture is not removed, we
recommend that your vehicle is inspect-
ed by an authorized HYUNDAI dealer. Information
A normally functioning lamp may flicker momentarily to stabilize the
vehicle’s electrical control system.
However, if the lamp goes out after
flickering momentarily, or contin-
ues to flicker, we recommend the
system be checked by an authorized
HYUNDAI dealer.
The position lamp may not turn on when the position lamp switch is
turned on, but the position lamp and
headlamp switch may turn on when
the headlamp switch is turned on.
This may be caused by network fail-
ure or vehicle electrical control sys-
tem malfunction. If this occurs, we
recommend the system be checked
by an authorized HYUNDAI dealer.i
i
Prior to replacing a lamp,
depress the foot brake, shift
to P (Park), apply the parking
brake, place the POWER but-ton in the OFF position and
take the key with you when
leaving the vehicle to avoid
sudden movement of the vehi-
cle and to prevent possible
electric shock.
Be aware the bulbs may be
hot and may burn your fin-
gers.
WARNING
Page 512 of 546
7-53
7
Maintenance
Headlamp, Parking Lamp, Turn Signal Lamp and Side Marker
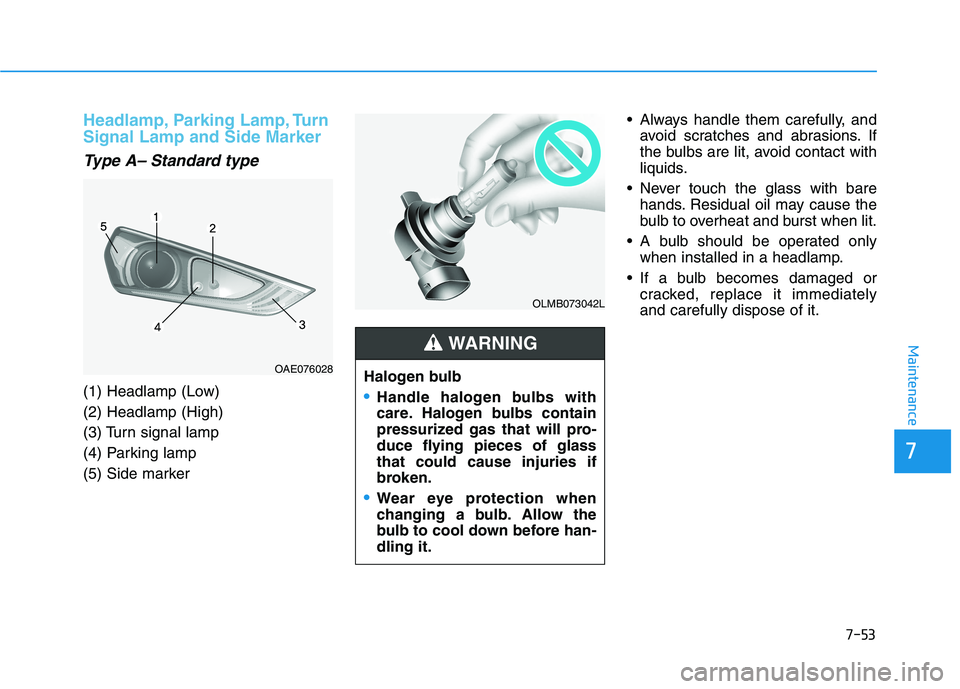
Type A– Standard type
(1) Headlamp (Low) (2) Headlamp (High)
(3) Turn signal lamp
(4) Parking lamp
(5) Side marker Always handle them carefully, and
avoid scratches and abrasions. If
the bulbs are lit, avoid contact with
liquids.
Never touch the glass with bare hands. Residual oil may cause the
bulb to overheat and burst when lit.
A bulb should be operated only when installed in a headlamp.
If a bulb becomes damaged or cracked, replace it immediatelyand carefully dispose of it.
OLMB073042L
Halogen bulb
Handle halogen bulbs with
care. Halogen bulbs contain
pressurized gas that will pro-
duce flying pieces of glassthat could cause injuries if
broken.
Wear eye protection when
changing a bulb. Allow the
bulb to cool down before han-dling it.
WARNING
OAE076028
Page 515 of 546
7-56
Maintenance
Information
If your vehicle is equipped with High
Intensity Discharge (HID) headlamps,
these headlamps contain mercury. So
if you need to have your vehicle dis-
posed, you should remove the HID
Headlamps before disposal. The
removed HID headlamps should be
recycled, re-used or disposed as haz-
ardous waste. Information
HID lamps have superior perform-
ance vs. halogen bulbs.
HID lamps are estimated by the man-
ufacturer to last twice as long or
longer than halogen bulbs depending
on their frequency of use. They will
probably require replacement at some
point in the life of the vehicle. Cycling
the headlamps on and off more than
typical use will shorten HID lamps
life. HID lamps do not fail in the same
manner as halogen incandescent
lamps. If a headlamp goes out after a
period of operation but will immedi-
ately relight when the headlamp
switch is cycled it is likely the HID
lamp needs to be replaced. HID light-
ing components are more complex
than conventional halogen bulbs thus
have higher replacement cost.
Information
The headlamp aiming should be
adjusted after an accident or after the
headlamp assembly is reinstalled at an
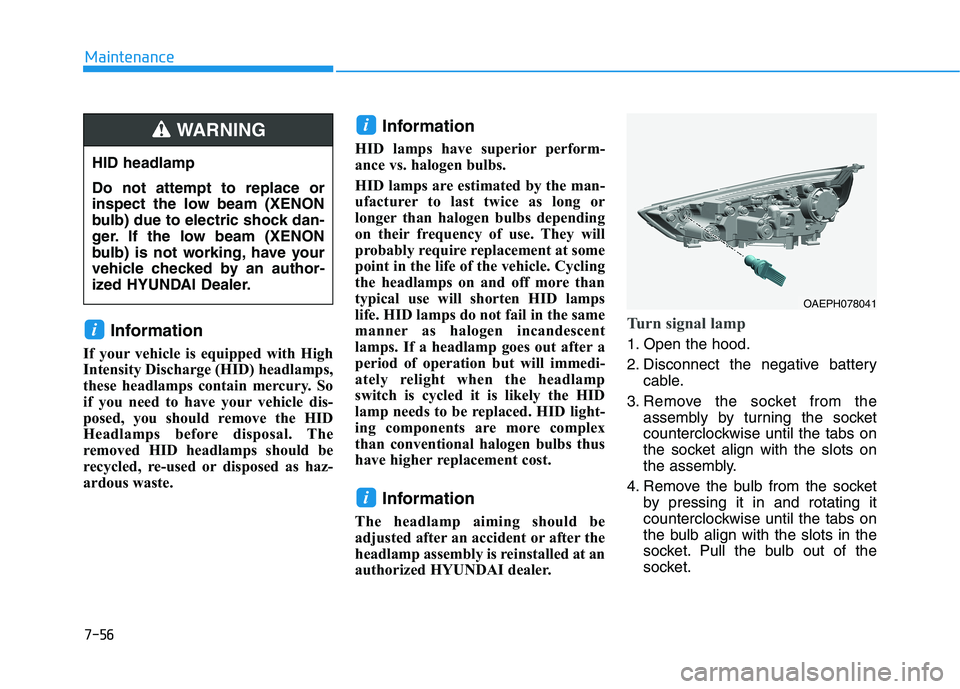
authorized HYUNDAI dealer.Turn signal lamp
1. Open the hood.
2. Disconnect the negative battery cable.
3. Remove the socket from the assembly by turning the socket
counterclockwise until the tabs on
the socket align with the slots on
the assembly.
4. Remove the bulb from the socket by pressing it in and rotating it
counterclockwise until the tabs on
the bulb align with the slots in the
socket. Pull the bulb out of the
socket.
i
i
i
OAEPH078041
HID headlamp Do not attempt to replace or
inspect the low beam (XENON
bulb) due to electric shock dan-
ger. If the low beam (XENON
bulb) is not working, have your
vehicle checked by an author-
ized HYUNDAI Dealer.
WARNING
Page 521 of 546
7-62
Maintenance
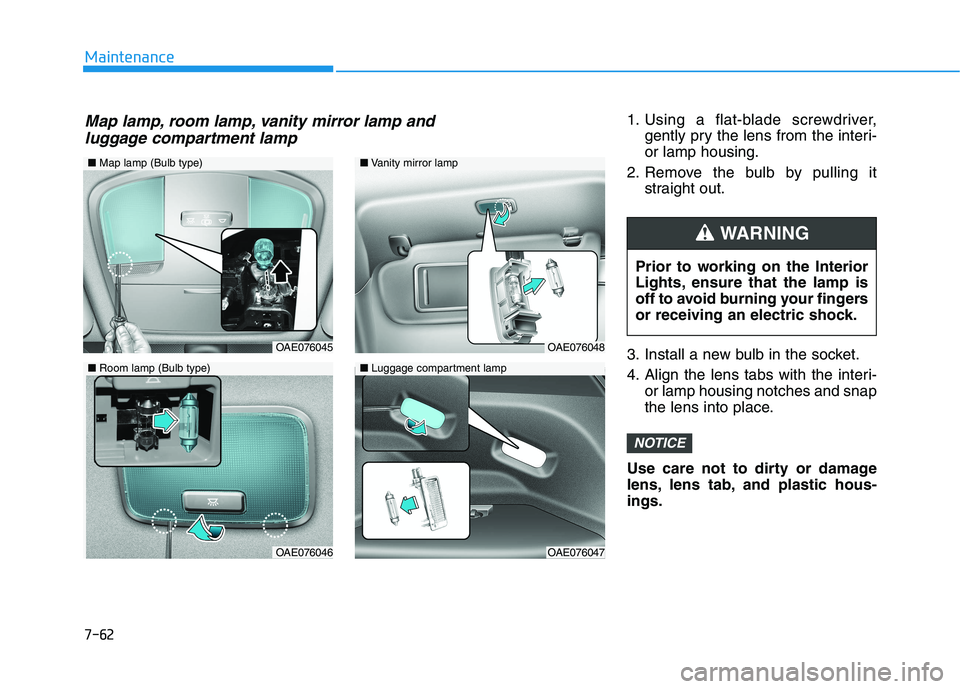
1. Using a flat-blade screwdriver,gently pry the lens from the interi- or lamp housing.
2. Remove the bulb by pulling it straight out.
3. Install a new bulb in the socket.
4. Align the lens tabs with the interi- or lamp housing notches and snap
the lens into place.
Use care not to dirty or damage
lens, lens tab, and plastic hous-ings.
NOTICE
Prior to working on the Interior
Lights, ensure that the lamp is
off to avoid burning your fingers
or receiving an electric shock.
WARNING
■ Map lamp (Bulb type)
OAE076045
OAE076046
■Vanity mirror lamp
■ Luggage compartment lamp
OAE076048
OAE076047
■Room lamp (Bulb type)
Map lamp, room lamp, vanity mirror lamp and
luggage compartment lamp
Page 522 of 546
7-63
7
Maintenance
AAPPPPEEAA RRAA NN CCEE CC AA RREE
Exterior Care
Exterior general caution
It is very important to follow the label
directions when using any chemical
cleaner or polish. Read all warningand caution statements that appearon the label.
Protecting your vehicle’s finish
Washing
To help protect your vehicle’s finish
from rust and deterioration, wash itthoroughly and frequently at least
once a month with lukewarm or cold
water.
If you use your vehicle for off-road
driving, you should wash it after each
off-road trip. Pay special attention to
the removal of any accumulation of
salt, dirt, mud, and other foreign
materials. Make sure the drain holes
in the lower edges of the doors and
rocker panels are kept clear andclean.
Insects, tar, tree sap, bird droppings,
industrial pollution and similar
deposits can damage your vehicle’s
finish if not removed immediately.
Even prompt washing with plain
water may not completely remove all
these deposits. A mild soap, safe for
use on painted surfaces, should beused. After washing, rinse the vehicle thor-
oughly with lukewarm or cold water.
Do not allow soap to dry on the fin-ish.
After washing the vehicle, test
the brakes while driving slowly
to see if they have been affected
by water before getting on the
road. If braking performance is
impaired, dry the brakes by
applying them lightly while
maintaining a slow forwardspeed.
WARNING