Page 39 of 546
H30
CCHH AARRGG IINN GG EE LLEE CCTT RR IICC VV EEHH IICC LLEE (( DD CC CC HH AARRGG EE)) (( CC OO NNTT..))
Information
Even though charging is possible with the POWER button in the
ON/START position, for your safe-
ty, start charging when the POWER
button is in the OFF position and
the vehicle shifted to P (Park).
After charging has started, you can
use electrical components such as
the radio by pressing the POWER
button to ACC or ON position.
During charging, the gear cannot be shifted from P (Park) to any other
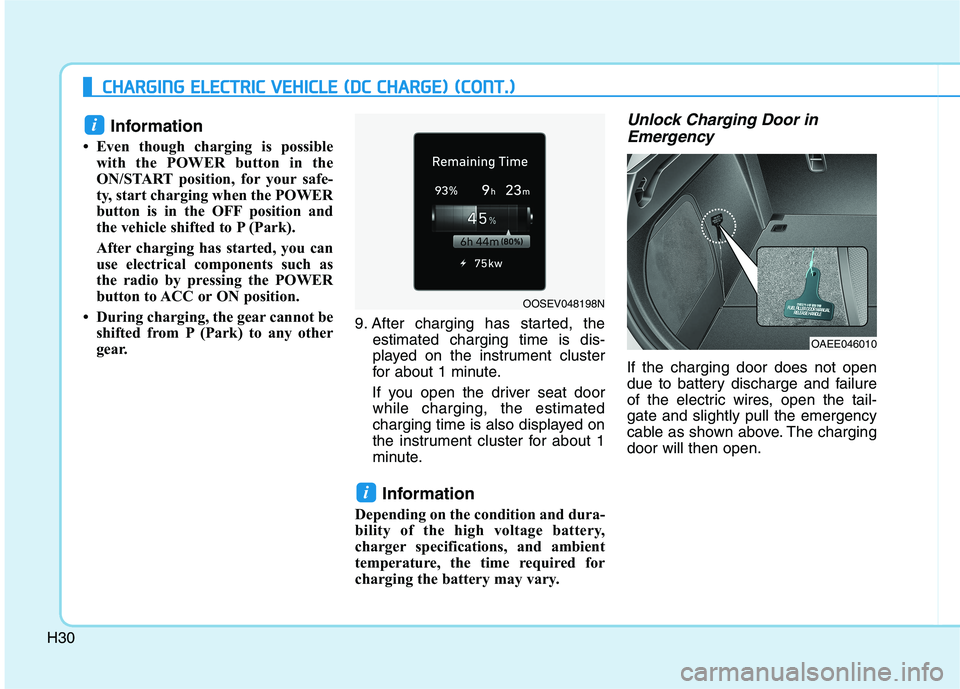
gear. 9. After charging has started, the
estimated charging time is dis-
played on the instrument cluster
for about 1 minute.
If you open the driver seat door while charging, the estimated
charging time is also displayed on
the instrument cluster for about 1
minute.
Information
Depending on the condition and dura-
bility of the high voltage battery,
charger specifications, and ambient
temperature, the time required for
charging the battery may vary. Unlock Charging Door in Emergency
If the charging door does not open
due to battery discharge and failure
of the electric wires, open the tail-gate and slightly pull the emergency
cable as shown above. The chargingdoor will then open.
i
i
OOSEV048198N
OAEE046010
Page 45 of 546
H36
CCHH AARRGG IINN GG EE LLEE CCTT RR IICC VV EEHH IICC LLEE (( TT RR IICC KK LLEE CC HH AARRGG EE)) (( CC OO NNTT..))
6. If you cannot open the charging
door due to freezing weather :
1) Remove any ice near the charging door.
2) Pull the emergency cable to open the charging door.
(When the charging door does
not open, refer to "How to
Unlock Charging Door in
Emergencies.")
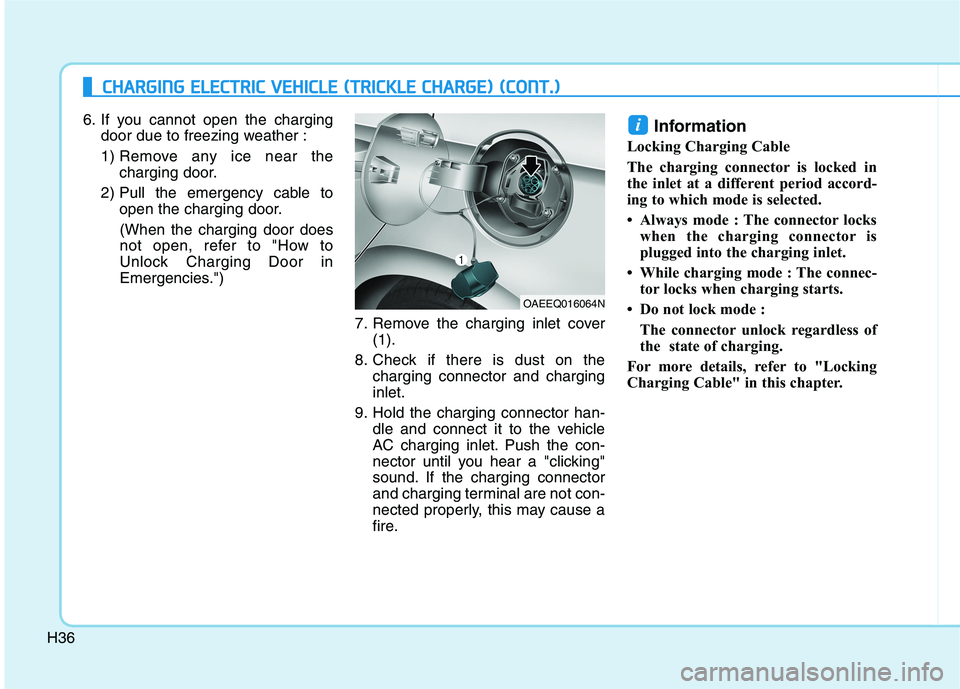
7. Remove the charging inlet cover(1).
8. Check if there is dust on the charging connector and charginginlet.
9. Hold the charging connector han- dle and connect it to the vehicle
AC charging inlet. Push the con-
nector until you hear a "clicking"
sound. If the charging connector
and charging terminal are not con-
nected properly, this may cause a
fire. Information
Locking Charging Cable
The charging connector is locked in
the inlet at a different period accord-
ing to which mode is selected.
Always mode : The connector locks when the charging connector is
plugged into the charging inlet.
While charging mode : The connec- tor locks when charging starts.
Do not lock mode : The connector unlock regardless of
the state of charging.
For more details, refer to "Locking
Charging Cable" in this chapter.i
OAEEQ016064N
Page 47 of 546
H38
CCHH AARRGG IINN GG EE LLEE CCTT RR IICC VV EEHH IICC LLEE (( TT RR IICC KK LLEE CC HH AARRGG EE)) (( CC OO NNTT..))
12. After charging has started, the
estimated charging time is dis-
played on the instrument cluster
for about 1 minute.
If you open the driver seat doorwhile charging, the estimated
charging time is also displayed
on the instrument cluster for
about 1 minute.
When scheduled charging is set, the estimated charging time is
displayed as "--" . Information
Depending on the condition and dura-
bility of the high voltage battery,
charger specifications, and ambient
temperature, the time required for
charging the battery may vary.
Unlock Charging Door in Emergency
If the charging door does not open
due to battery discharge and failure
of the electric wires, open the tail-gate and slightly pull the emergency
cable as shown above. The chargingdoor will then open.
i
OOSEV048133N
OAEE046010
Page 52 of 546
H43
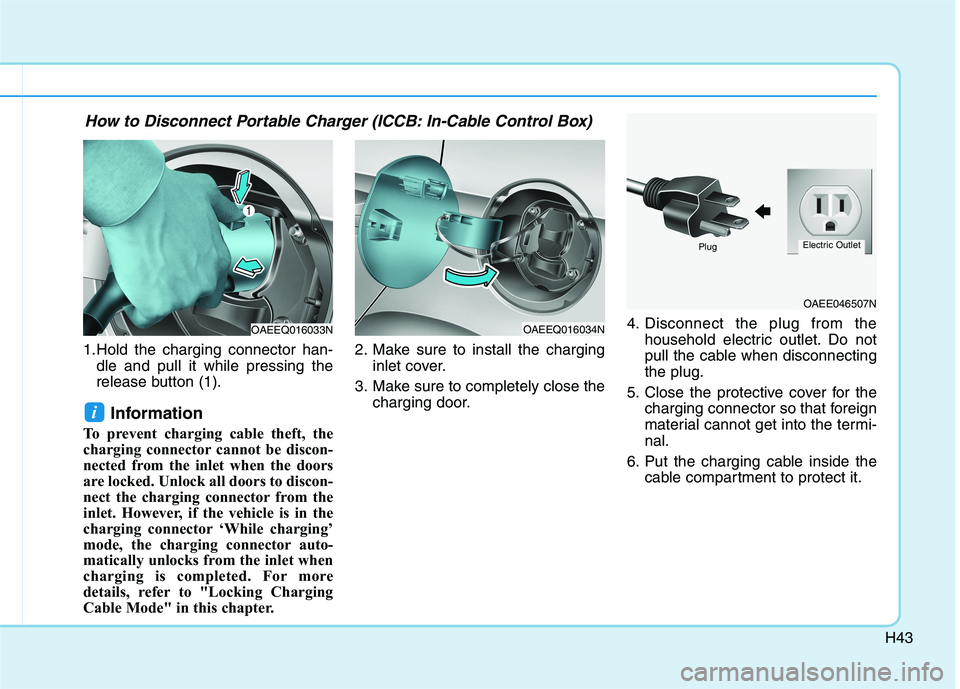
1.Hold the charging connector han-dle and pull it while pressing the
release button (1).
Information
To prevent charging cable theft, the
charging connector cannot be discon-
nected from the inlet when the doors
are locked. Unlock all doors to discon-
nect the charging connector from the
inlet. However, if the vehicle is in the
charging connector ‘While charging’
mode, the charging connector auto-
matically unlocks from the inlet when
charging is completed. For more
details, refer to "Locking Charging
Cable Mode" in this chapter. 2. Make sure to install the charging
inlet cover.
3. Make sure to completely close the charging door. 4. Disconnect the plug from the
household electric outlet. Do not
pull the cable when disconnectingthe plug.
5. Close the protective cover for the charging connector so that foreign
material cannot get into the termi-nal.
6. Put the charging cable inside the cable compartment to protect it.
i
OAEEQ016033NOAEEQ016034N
OAEE046507N
PlugElectric Outlet
How to Disconnect Portable Charger (ICCB: In-Cable Control Box)
Page 73 of 546
H64
Other Precautions for Electric
Vehicle
When you paint or apply heat treat-ment to the vehicle as a result of
an accident, the performance of
the high voltage battery can bereduced. If heat treatment is required, contact
an authorized HYUNDAI dealer.
When you clean the motor com- partment, do not use high pressure
water to wash. This may cause an
electric shock due to a discharge in
high voltage electricity, or damage
the vehicle's electric system.
Do not use, remodel, or install non- genuine parts. This may damage
the electric power system.
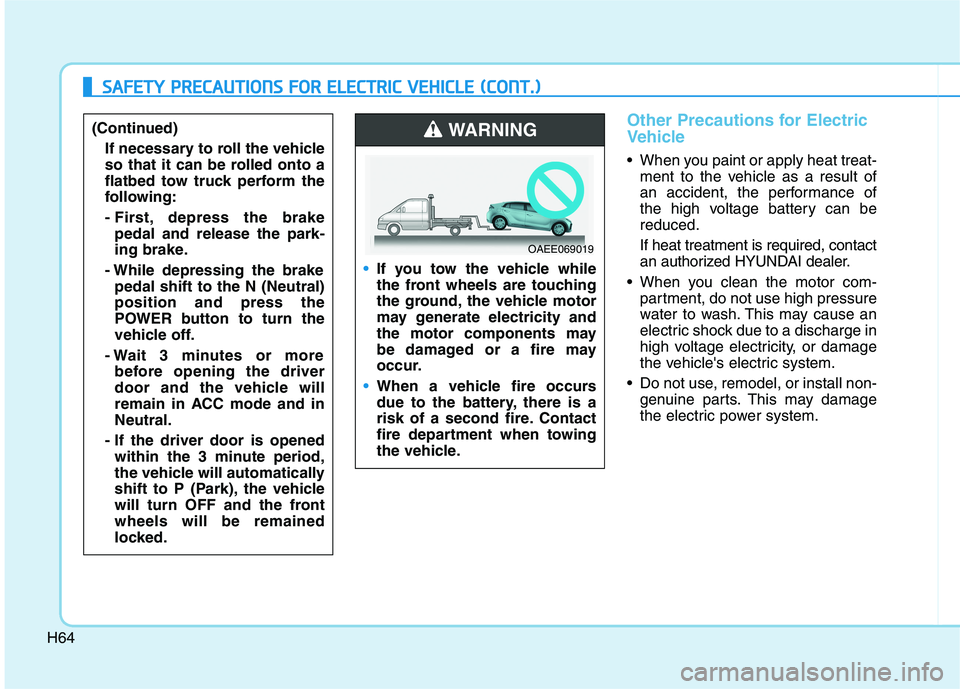
If you tow the vehicle while
the front wheels are touching
the ground, the vehicle motor
may generate electricity and
the motor components may
be damaged or a fire may
occur.
When a vehicle fire occurs
due to the battery, there is a
risk of a second fire. Contact
fire department when towing
the vehicle.
WARNING
OAEE069019
SSAA FFEE TT YY PP RR EECCAA UU TTIIOO NNSS FF OO RR EE LLEE CCTT RR IICC VV EEHH IICC LLEE (( CC OO NNTT..))
(Continued)
If necessary to roll the vehicle
so that it can be rolled onto a
flatbed tow truck perform the
following:
- First, depress the brakepedal and release the park-
ing brake.
- While depressing the brake pedal shift to the N (Neutral)position and press the
POWER button to turn the
vehicle off.
- Wait 3 minutes or more before opening the driver
door and the vehicle will
remain in ACC mode and inNeutral.
- If the driver door is opened within the 3 minute period,
the vehicle will automatically
shift to P (Park), the vehicle
will turn OFF and the frontwheels will be remained
locked.
Page 77 of 546
1-3
Your vehicle at a glance
1
10. Door lock ....................................................
11. Charging door ............................................
12. Rear combination lamp ..............................
13. Liftgate ........................................................14. High mounted stop lamp ............................
15. Rear view camera ......................................
16. Antenna ......................................................
OAEE019005N
■■
Rear view
The actual shape may differ from the illustration.
Page 78 of 546
1-4
Your vehicle at a glanceI
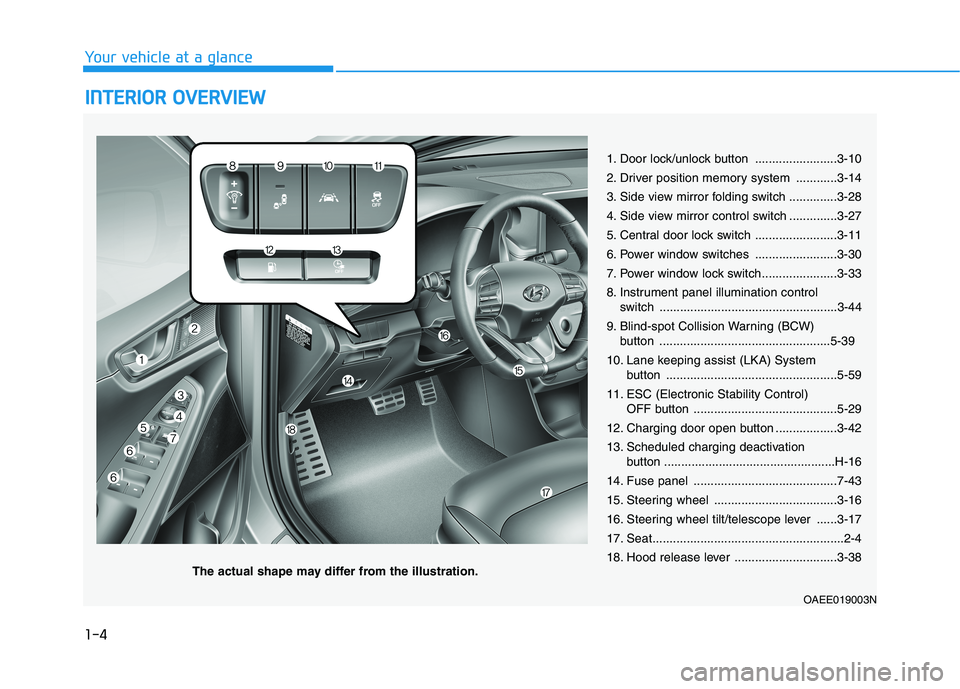
I NN TTEERR IIOO RR OO VVEERR VV IIEE WW
1. Door lock/unlock button ........................3-10
2. Driver position memory system ............3-14
3. Side view mirror folding switch ..............3-28
4. Side view mirror control switch ..............3-27
5. Central door lock switch ........................3-11
6. Power window switches ........................3-30
7. Power window lock switch......................3-33
8. Instrument panel illumination control
switch ....................................................3-44
9. Blind-spot Collision Warning (BCW) button ..................................................5-39
10. Lane keeping assist (LKA) System button ..................................................5-59
11. ESC (Electronic Stability Control) OFF button ..........................................5-29
12. Charging door open button ..................3-42
13. Scheduled charging deactivation button ..................................................H-16
14. Fuse panel ..........................................7-43
15. Steering wheel ....................................3-16
16. Steering wheel tilt/telescope lever ......3-17
17. Seat........................................................2-4
18. Hood release lever ..............................3-38
OAEE019003N
The actual shape may differ from the illustration.
Page 107 of 546
2-27
Safety system of your vehicle
2
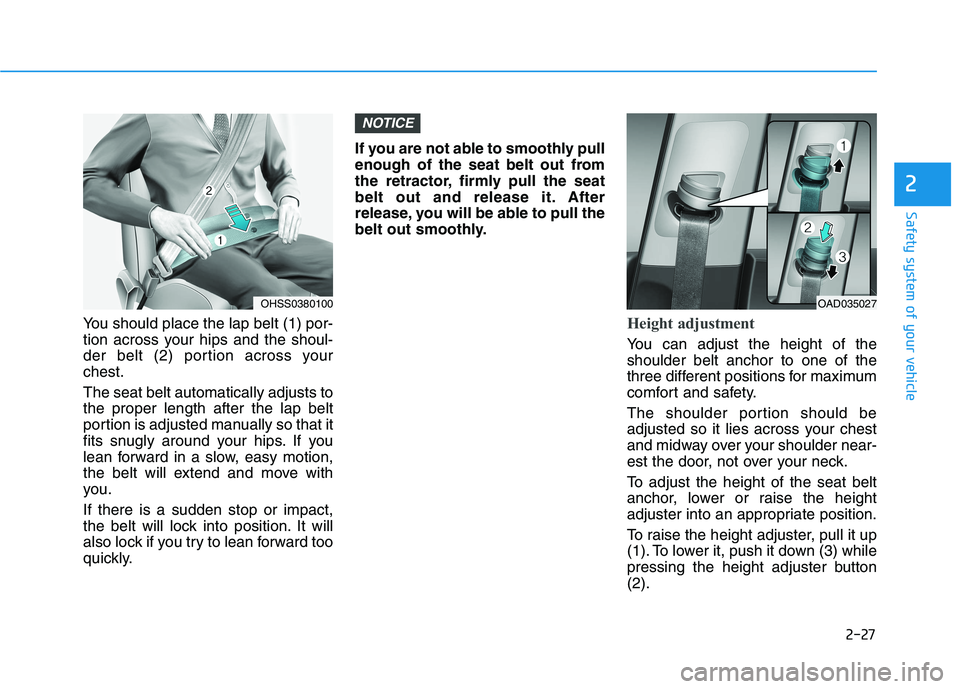
You should place the lap belt (1) por-
tion across your hips and the shoul-
der belt (2) portion across yourchest. The seat belt automatically adjusts to the proper length after the lap belt
portion is adjusted manually so that it
fits snugly around your hips. If you
lean forward in a slow, easy motion,
the belt will extend and move with
you. If there is a sudden stop or impact,
the belt will lock into position. It will
also lock if you try to lean forward too
quickly.If you are not able to smoothly pull
enough of the seat belt out from
the retractor, firmly pull the seat
belt out and release it. After
release, you will be able to pull the
belt out smoothly.Height adjustment
You can adjust the height of the shoulder belt anchor to one of the
three different positions for maximum
comfort and safety.
The shoulder portion should be
adjusted so it lies across your chest
and midway over your shoulder near-
est the door, not over your neck.
To adjust the height of the seat belt
anchor, lower or raise the height
adjuster into an appropriate position.
To raise the height adjuster, pull it up
(1). To lower it, push it down (3) while
pressing the height adjuster button(2).
NOTICE
OHSS0380100OAD035027