2021 HYUNDAI ELANTRA HYBRID lock
[x] Cancel search: lockPage 51 of 555
3-6
OCN7030003
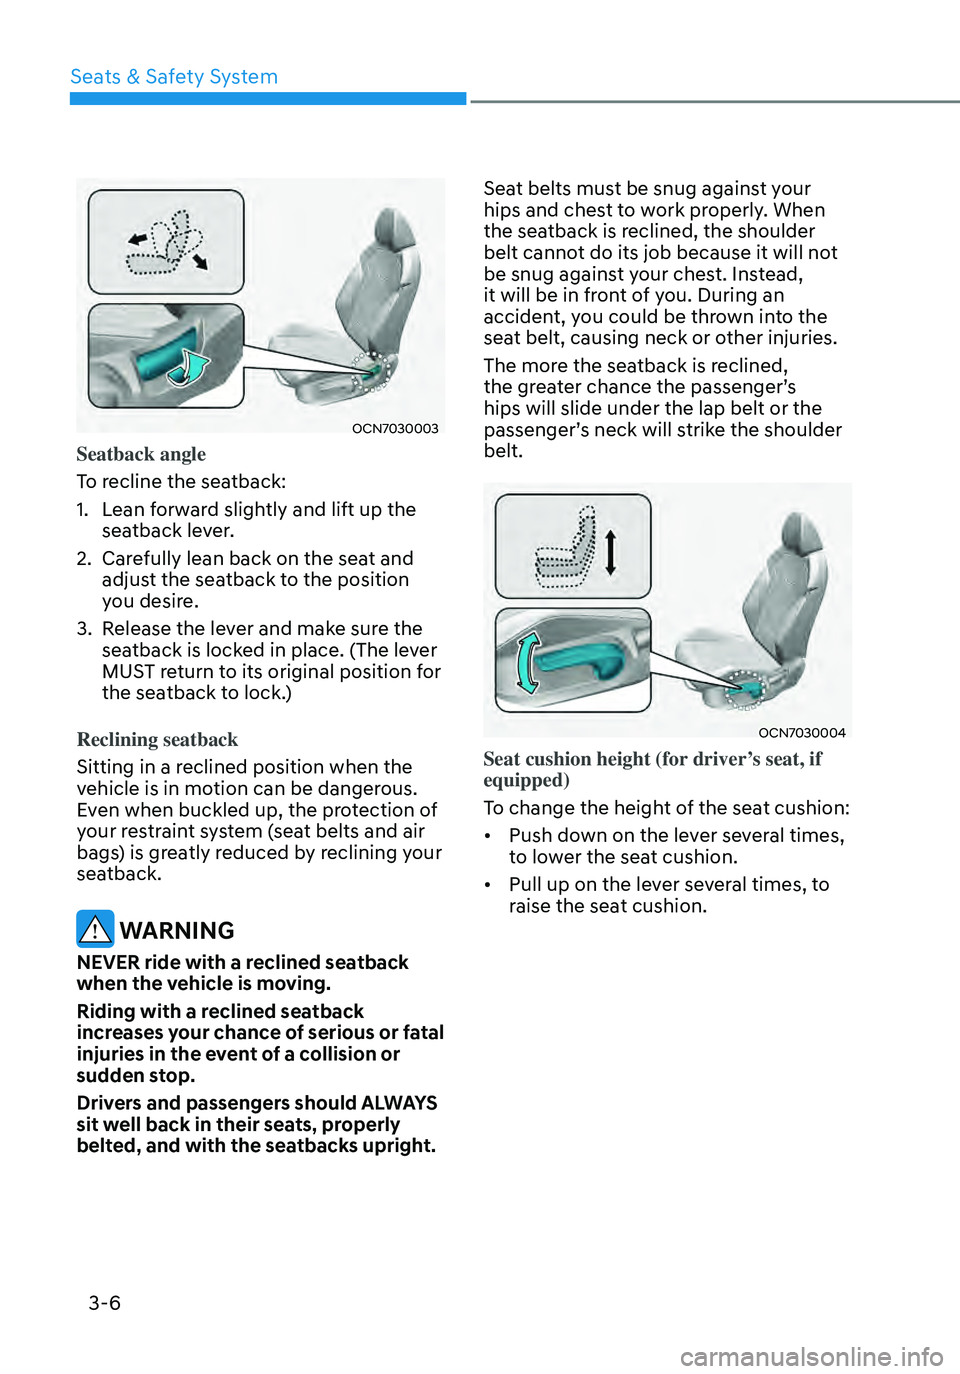
Seatback angle
To recline the seatback:
1. Lean forward slightly and lift up the
seatback lever.
2. Carefully lean back on the seat and
adjust the seatback to the position
you desire.
3. Release the lever and make sure the
seatback is locked in place. (The lever
MUST return to its original position for
the seatback to lock.)
Reclining seatback
Sitting in a reclined position when the
vehicle is in motion can be dangerous.
Even when buckled up, the protection of
your restraint system (seat belts and air
bags) is greatly reduced by reclining your
seatback.
WARNING
NEVER ride with a reclined seatback
when the vehicle is moving.
Riding with a reclined seatback
increases your chance of serious or fatal
injuries in the event of a collision or
sudden stop.
Drivers and passengers should ALWAYS
sit well back in their seats, properly
belted, and with the seatbacks upright. Seat belts must be snug against your
hips and chest to work properly. When
the seatback is reclined, the shoulder
belt cannot do its job because it will not
be snug against your chest. Instead,
it will be in front of you. During an
accident, you could be thrown into the
seat belt, causing neck or other injuries.
The more the seatback is reclined,
the greater chance the passenger’s
hips will slide under the lap belt or the
passenger’s neck will strike the shoulder
belt.
OCN7030004
Seat cushion height (for driver’s seat, if
equipped)
To change the height of the seat cushion:
•
Push down on the lever several times,
to lower the seat cushion.
• Pull up on the lever several times, to
raise the seat cushion.
Seats & Safety System
Page 55 of 555
3-10
Rear Seats
Folding the rear seat (if equipped)
The rear seatbacks can be folded to
facilitate carrying long items or to
increase the luggage capacity of the
vehicle.
WARNING
• Never allow passengers to sit on top
of the folded down seatback while
the vehicle is moving. This is not a
proper seating position and no seat
belts are available for use. This could
result in serious injury or death in
case of an accident or sudden stop.
• Objects carried on the folded down
seatback should not extend higher
than the top of the front seatbacks.
This could allow cargo to slide
forward and cause injury or damage
during sudden stops.
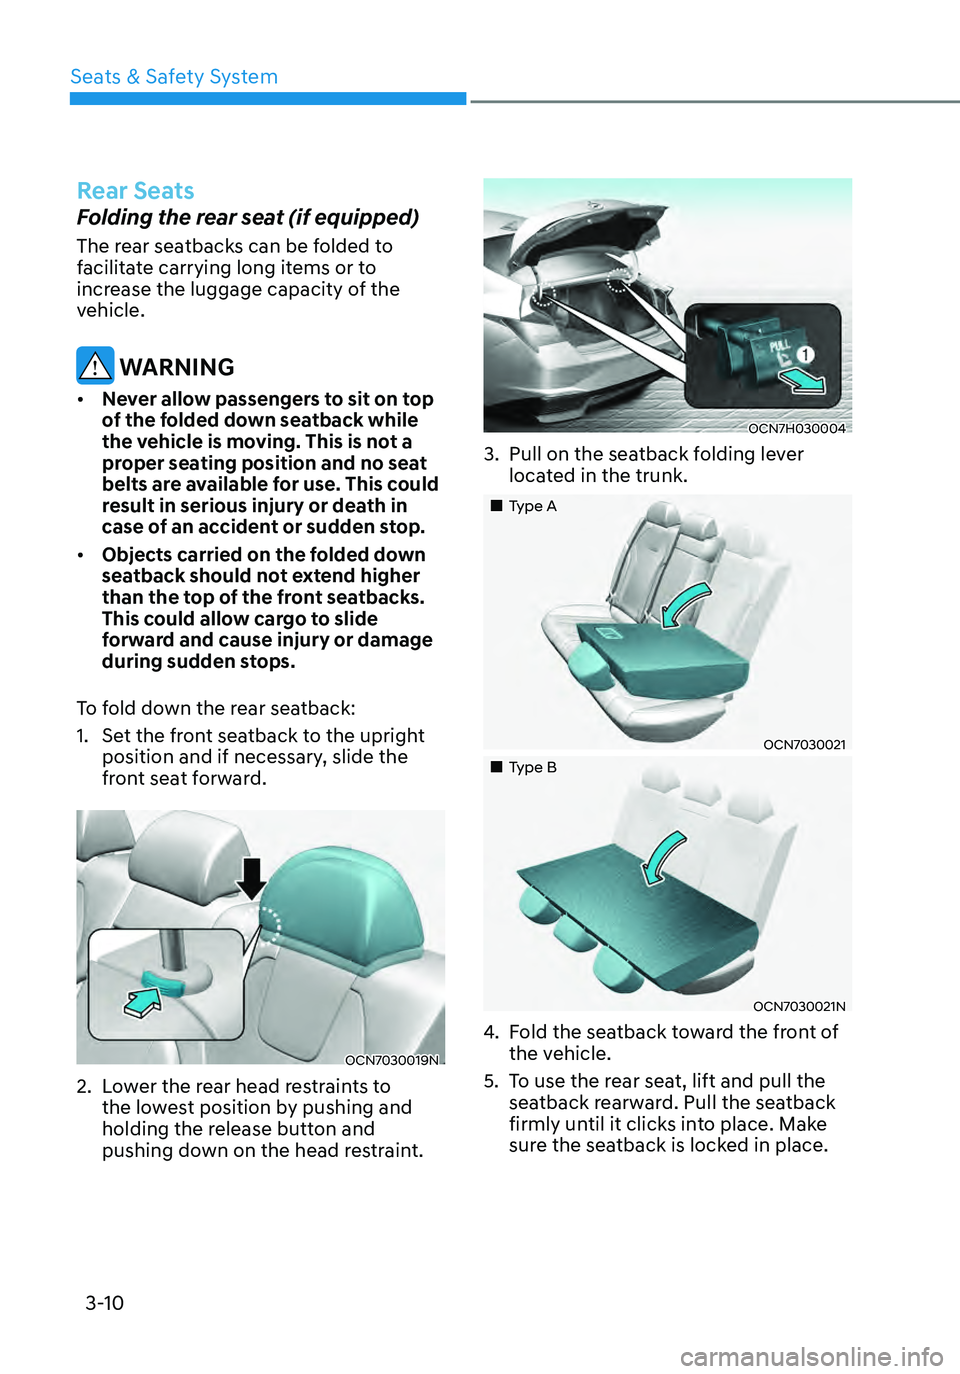
To fold down the rear seatback:
1. Set the front seatback to the upright
position and if necessary, slide the
front seat forward.
OCN7030019N
2. Lower the rear head restraints to
the lowest position by pushing and
holding the release button and
pushing down on the head restraint.
OCN7H030004
3. Pull on the seatback folding lever
located in the trunk.
„„Type A
OCN7030021
„„Type B
OCN7030021N
4. Fold the seatback toward the front of
the vehicle.
5. To use the rear seat, lift and pull the
seatback rearward. Pull the seatback
firmly until it clicks into place. Make
sure the seatback is locked in place.
Seats & Safety System
Page 56 of 555

03
3-11
WARNING
When returning the rear seatback from
a folded to an upright position, hold the
seatback and return it slowly. Ensure
that the seatback is completely locked
into its upright position by pushing on
the top of the seatback. In an accident
or sudden stop, an unlocked seatback
could allow cargo to move forward with
great force and enter the passenger
compartment, which could result in
serious injury or death.
WARNING
Do not place objects in the rear seats,
since they cannot be properly secured
and may hit vehicle occupants in a
collision causing serious injury or death.
WARNING
Make sure the vehicle is off, the shift
button is in P (Park), and the parking
brake is securely applied whenever
loading or unloading cargo. Failure
to take these steps may allow the
vehicle to move if the shift button
is inadvertently moved to another
position.
Armrest (if equipped)
OCN7030066L
The armrest is located in the center of
the rear seat. Pull the armrest down from
the seatback to use it.
Head Restraints
The vehicle’s front and rear seats
have adjustable head restraints. The
head restraints provide comfort for
passengers, but more importantly they
are designed to help protect passengers
from whiplash and other neck and spinal
injuries during an accident, especially in
a rear impact collision.
WARNING
To reduce the risk of serious injury or
death in an accident, take the following
precautions when adjusting your head
restraints:
• Always properly adjust the head
restraints for all passengers BEFORE
starting the vehicle.
• NEVER let anyone ride in a seat
with the head restraints removed or
reversed.
Page 57 of 555
3-12
OLF034072N
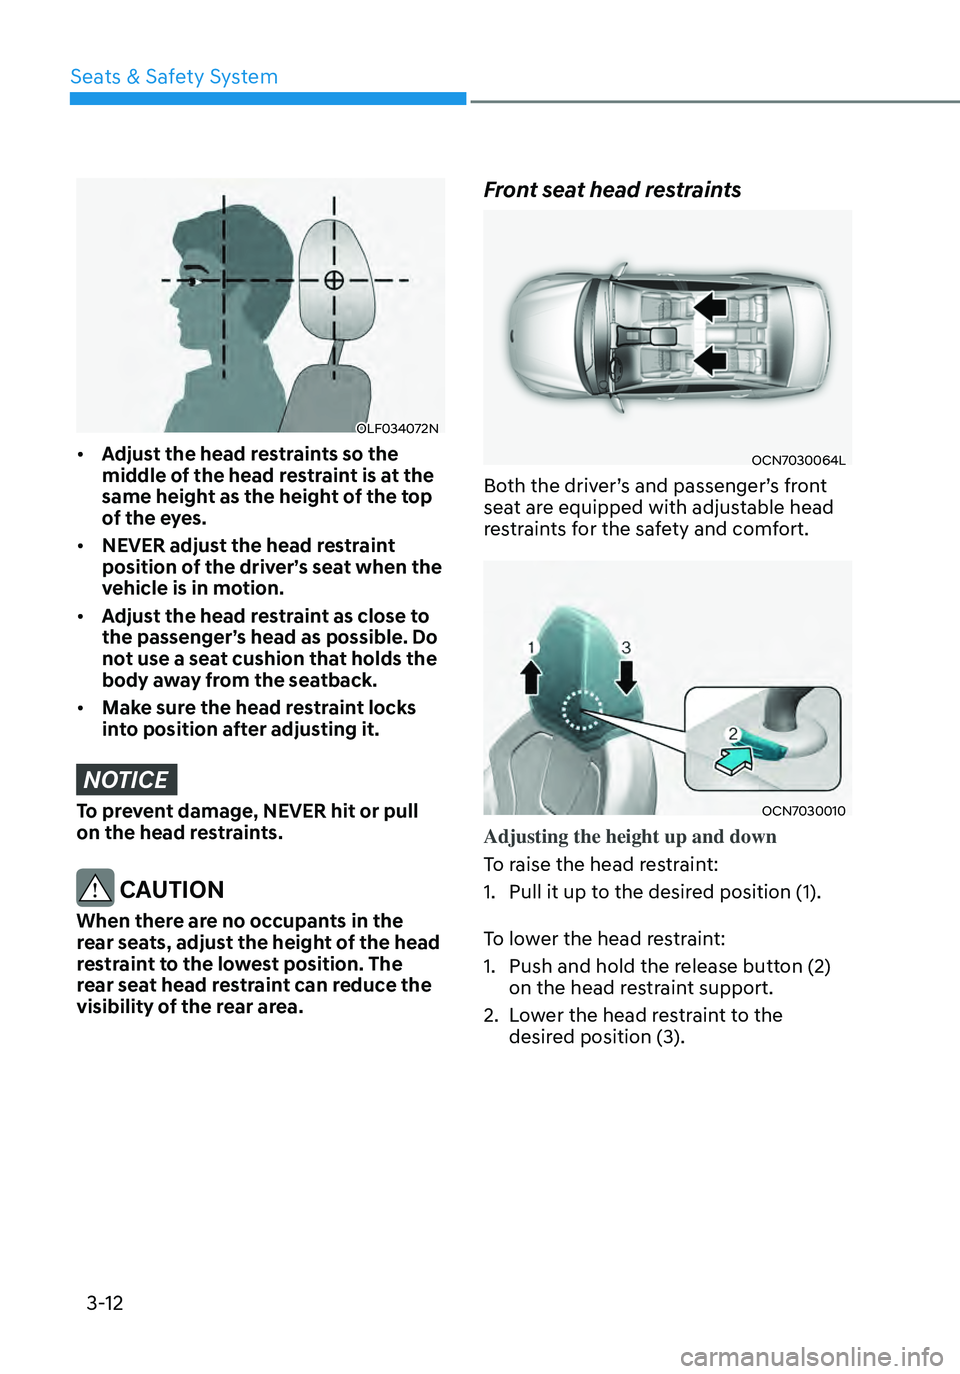
• Adjust the head restraints so the
middle of the head restraint is at the
same height as the height of the top
of the eyes.
• NEVER adjust the head restraint
position of the driver’s seat when the
vehicle is in motion.
• Adjust the head restraint as close to
the passenger’s head as possible. Do
not use a seat cushion that holds the
body away from the seatback.
• Make sure the head restraint locks
into position after adjusting it.
NOTICE
To prevent damage, NEVER hit or pull
on the head restraints.
CAUTION
When there are no occupants in the
rear seats, adjust the height of the head
restraint to the lowest position. The
rear seat head restraint can reduce the
visibility of the rear area.
Front seat head restraints
OCN7030064L
Both the driver’s and passenger’s front
seat are equipped with adjustable head
restraints for the safety and comfort.
OCN7030010
Adjusting the height up and down
To raise the head restraint:
1. Pull it up to the desired position (1).
To lower the head restraint:
1. Push and hold the release button (2)
on the head restraint support.
2. Lower the head restraint to the
desired position (3).
Seats & Safety System
Page 59 of 555
3-14
„„Type A
OCN7030014
„„Type B
OCN7030015
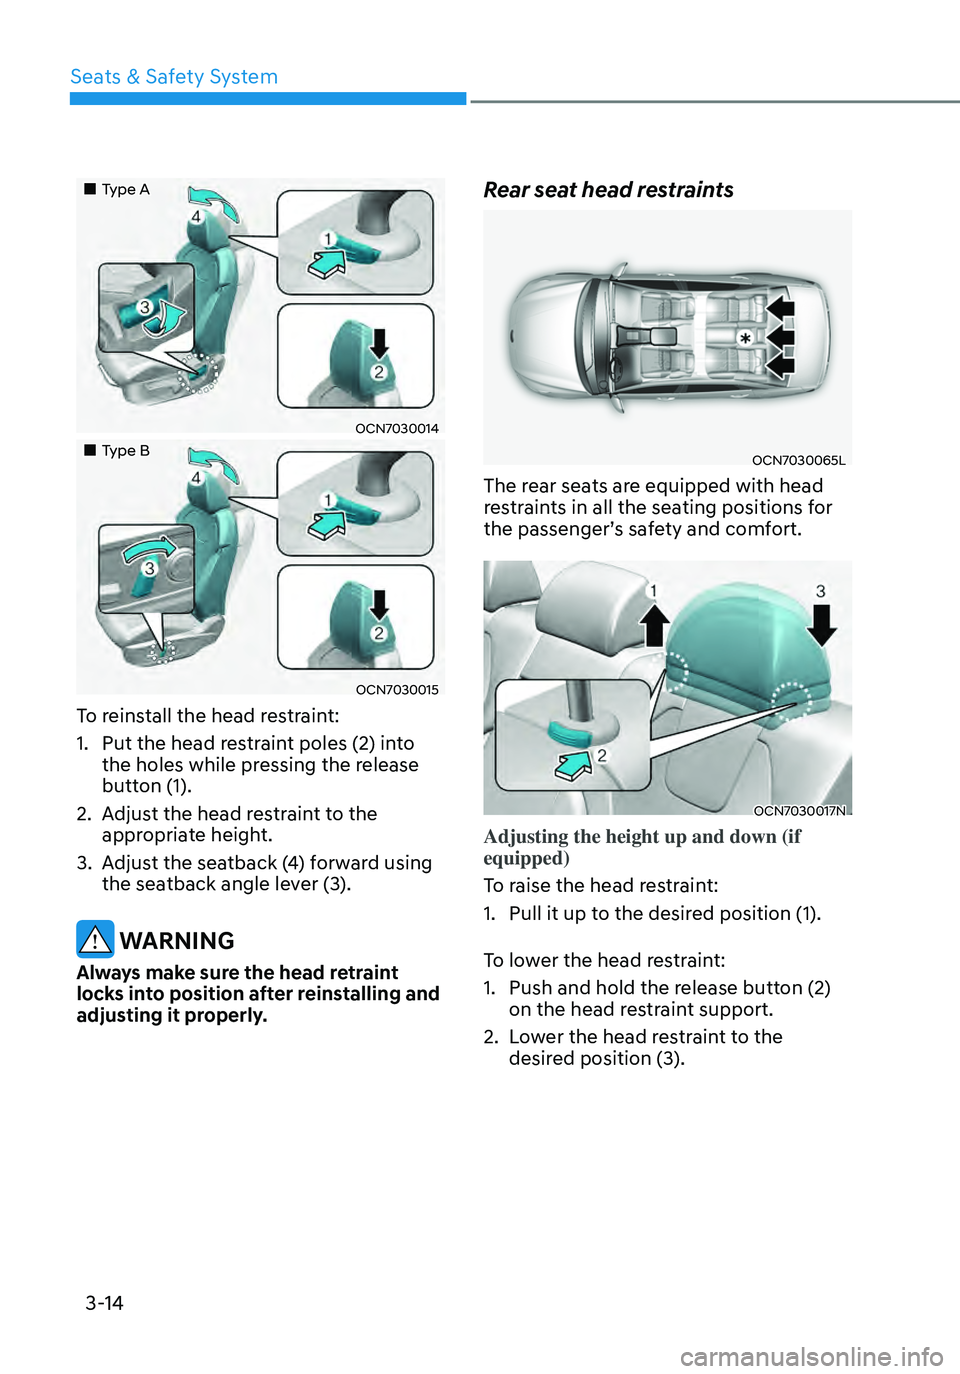
To reinstall the head restraint:
1. Put the head restraint poles (2) into
the holes while pressing the release
button (1).
2. Adjust the head restraint to the
appropriate height.
3. Adjust the seatback (4) forward using
the seatback angle lever (3).
WARNING
Always make sure the head retraint
locks into position after reinstalling and
adjusting it properly.
Rear seat head restraints
OCN7030065L
The rear seats are equipped with head
restraints in all the seating positions for
the passenger’s safety and comfort.
OCN7030017N
Adjusting the height up and down (if
equipped)
To raise the head restraint:
1. Pull it up to the desired position (1).
To lower the head restraint:
1. Push and hold the release button (2)
on the head restraint support.
2. Lower the head restraint to the
desired position (3).
Seats & Safety System
Page 62 of 555
03
3-17
Air ventilation seat (if equipped)
Front air ventilation seat
OCN7030026
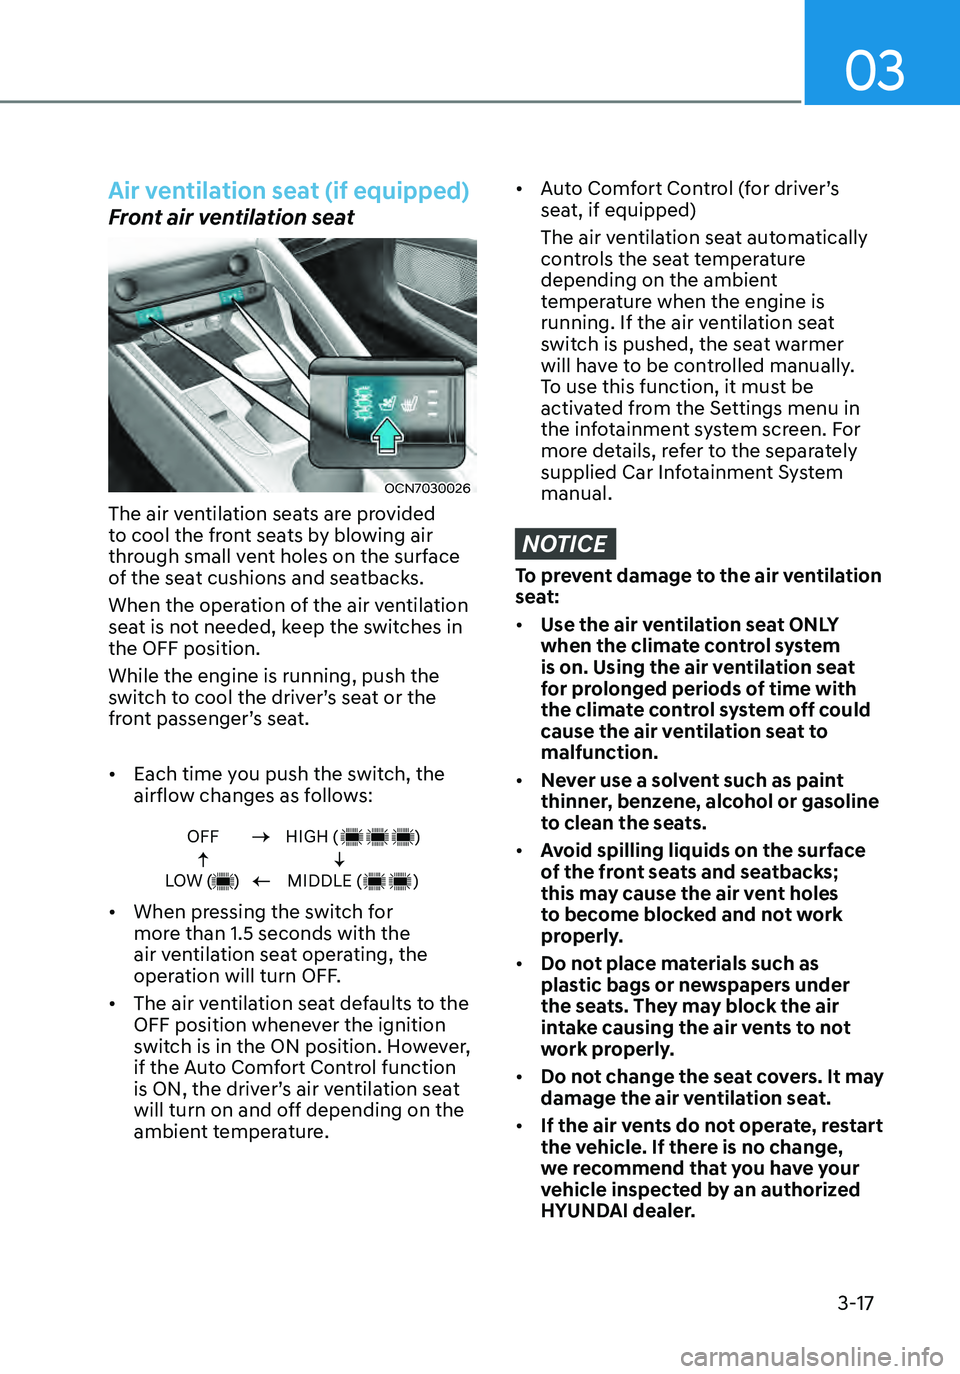
The air ventilation seats are provided
to cool the front seats by blowing air
through small vent holes on the surface
of the seat cushions and seatbacks.
When the operation of the air ventilation
seat is not needed, keep the switches in
the OFF position.
While the engine is running, push the
switch to cool the driver’s seat or the
front passenger’s seat.
• Each time you push the switch, the
airflow changes as follows:
OFF
LOW ( )HIGH ( )
MIDDLE ( )
• When pressing the switch for
more than 1.5 seconds with the
air ventilation seat operating, the
operation will turn OFF.
• The air ventilation seat defaults to the
OFF position whenever the ignition
switch is in the ON position. However,
if the Auto Comfort Control function
is ON, the driver’s air ventilation seat
will turn on and off depending on the
ambient temperature.
• Auto Comfort Control (for driver’s
seat, if equipped)
The air ventilation seat automatically
controls the seat temperature
depending on the ambient
temperature when the engine is
running. If the air ventilation seat
switch is pushed, the seat warmer
will have to be controlled manually.
To use this function, it must be
activated from the Settings menu in
the infotainment system screen. For
more details, refer to the separately
supplied Car Infotainment System
manual.
NOTICE
To prevent damage to the air ventilation
seat:
• Use the air ventilation seat ONLY
when the climate control system
is on. Using the air ventilation seat
for prolonged periods of time with
the climate control system off could
cause the air ventilation seat to
malfunction.
• Never use a solvent such as paint
thinner, benzene, alcohol or gasoline
to clean the seats.
• Avoid spilling liquids on the surface
of the front seats and seatbacks;
this may cause the air vent holes
to become blocked and not work
properly.
• Do not place materials such as
plastic bags or newspapers under
the seats. They may block the air
intake causing the air vents to not
work properly.
• Do not change the seat covers. It may
damage the air ventilation seat.
• If the air vents do not operate, restart
the vehicle. If there is no change,
we recommend that you have your
vehicle inspected by an authorized
HYUNDAI dealer.
Page 64 of 555

03
3-19
Seat Belt Warning Light
Seat belt warning
„„Instrument cluster (Driver and front passenger’s seat)
1GQA2083
Driver’s and Passenger’s front seat belt
warning
As a reminder, the seat belt warning
light will illuminate for approximately 6
seconds each time you turn the ignition
switch or ENGINE START/STOP button
ON regardless of belt fastening. If the
seatbelt is not fastened, the warning
chime will sound for about 6 seconds.
If you start to drive without the seat
belt fastened over approximately 5 mph
(9 km/h) and less than approximately
12 mph (20 km/h), the corresponding
warning light will illuminate. The warning
light will turn off when the vehicle speed
drops below approximately 5 mph (9
km/h).
If you start to drive without the seat belt
fastened or you unfasten the seat belt
when you drive approximately 12 mph
(20 km/h) and faster, the warning light
will blink and warning chime will sound
for approximately 100 seconds.
When the seat belt is unfastened
during driving, the warning light will
illuminate when the speed is over
approximately 5 mph (9 km/h) and less
than approximately 12 mph (20 km/h).
When the speed is approximately 12 mph
(20 km/h) and faster, the warning light
will blink and warning chime will sound
for approximately 100 seconds.
Seat Belt Restraint System
WARNING
Improperly positioned seat belts may
increase the risk of serious injury
in an accident. Take the following
precautions when adjusting the seat
belt:
• Position the lap portion of the seat
belt as low as possible across your
hips, not on your waist, so that it fits
snugly.
• Position one arm under the shoulder
belt and the other over the belt, as
shown in the illustration.
• Always position the shoulder belt
anchor into the locked position at the
appropriate height.
• NEVER position the shoulder belt
across your neck or face.
Page 65 of 555
3-20
Seat Belt-Driver’s 3-point system
with emergency locking retractor
OHI038140
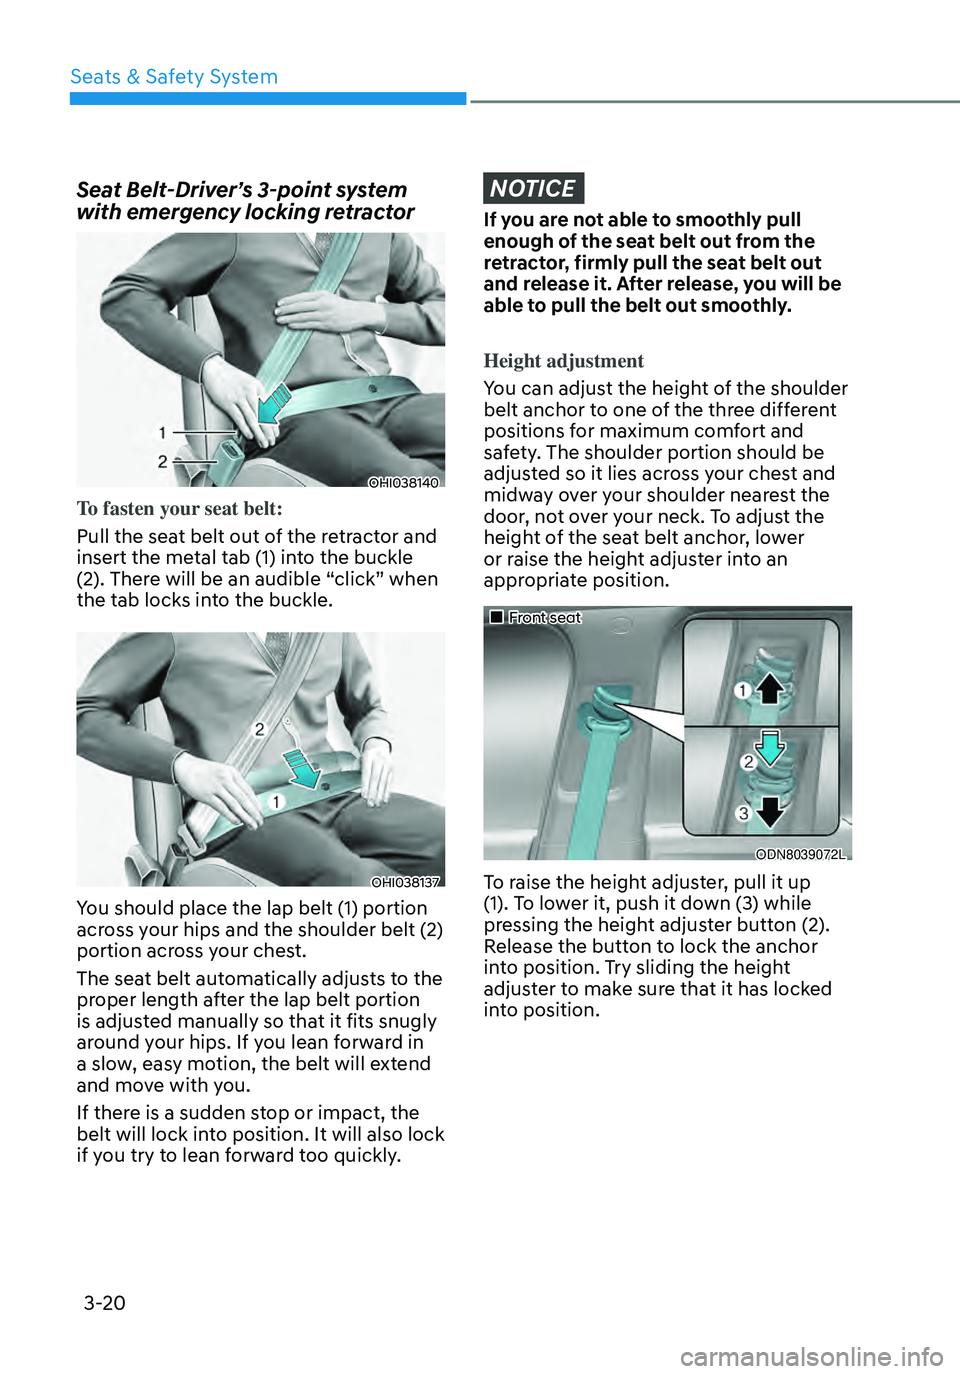
To fasten your seat belt:
Pull the seat belt out of the retractor and
insert the metal tab (1) into the buckle
(2). There will be an audible “click” when
the tab locks into the buckle.
OHI038137
You should place the lap belt (1) portion
across your hips and the shoulder belt (2)
portion across your chest.
The seat belt automatically adjusts to the
proper length after the lap belt portion
is adjusted manually so that it fits snugly
around your hips. If you lean forward in
a slow, easy motion, the belt will extend
and move with you.
If there is a sudden stop or impact, the
belt will lock into position. It will also lock
if you try to lean forward too quickly.
NOTICE
If you are not able to smoothly pull
enough of the seat belt out from the
retractor, firmly pull the seat belt out
and release it. After release, you will be
able to pull the belt out smoothly.
Height adjustment
You can adjust the height of the shoulder
belt anchor to one of the three different
positions for maximum comfort and
safety. The shoulder portion should be
adjusted so it lies across your chest and
midway over your shoulder nearest the
door, not over your neck. To adjust the
height of the seat belt anchor, lower
or raise the height adjuster into an
appropriate position.
„„Front seat
ODN8039072L
To raise the height adjuster, pull it up
(1). To lower it, push it down (3) while
pressing the height adjuster button (2).
Release the button to lock the anchor
into position. Try sliding the height
adjuster to make sure that it has locked
into position.
Seats & Safety System