Page 186 of 659

184
Controls
Security System
Immobilizer System
This system prevents a key that has not been pre-registered from starting the
engine.
Pay attention to the follo wing when pressing the ENGINE START/STOP button:
• Do not allow objects that emit strong radio waves near the ENGINE START/
STOP button.
• Make sure the key is not covered by or touching a metal object.
• Do not bring a key from another vehi cle’s immobilizer system near the ENGINE
START/STOP button.
Do not put the key near magnetic items. El ectronic device, such as televisions and
audio systems emit strong magnetic fields . Note that even a key chain can become
magnetic.1 Immobilizer System
NOTICE
Leaving the key in the vehicl e can result in theft or
accidental movement of the vehicle.
Always take the key with you whenever you leave the
vehicle unattended.
Do not alter the system or add other devices to it.
Doing so may damage the system and make your
vehicle inoperable.
Apply and hold the brake pedal before turning the
vehicle on the first time after the battery has been
disconnected.
Canadian models
Page 193 of 659
191Continued
Controls
Operating the Switches Around the Steering Wheel
ENGINE START/STOP Button
*1 : Continuously variable transmission models for Canadian models
*2 : U.S. models
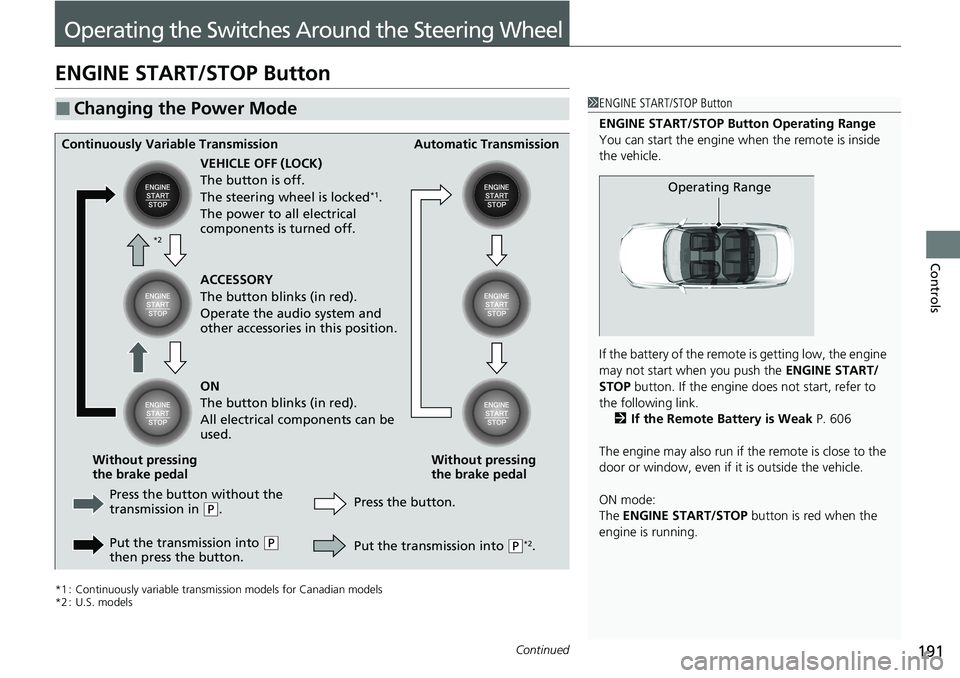
■Changing the Power Mode1ENGINE START/STOP Button
ENGINE START/STOP Button Operating Range
You can start the engine wh en the remote is inside
the vehicle.
If the battery of the remote is getting low, the engine
may not start when you push the ENGINE START/
STOP button. If the engine do es not start, refer to
the following link. 2 If the Remote Battery is Weak P. 606
The engine may also run if the remote is close to the
door or window, even if it is outside the vehicle.
ON mode:
The ENGINE START/STOP button is red when the
engine is running.
Operating Range
Continuously Variable Transmission Automatic Transmission
VEHICLE OFF (LOCK)
The button is off.
The steering wheel is locked
*1.
The power to all electrical
components is turned off.
Press the button without the
transmission in
( P.
Put the transmission into
( P
then press the button. Press the button.
Without pressing
the brake pedal
Without pressing
the brake pedal ACCESSORY
The button blinks (in red).
Operate the audio system and
other accessories in this position.
ON
The button blinks (in red).
All electrical components can be
used.
Put the transmission into (P*2.
*2
Page 209 of 659
207
uuOperating the Switches Around the Steering Wheel uDriving Position Memory System*
Continued
Controls
Driving Position Memory System*
You can store two driver’s seat positions (except for power lumbar) with the driving
position memory system.
When you unlock and open the driver’s door with a remote transmitter or smart
entry system, the seat adjust automatica lly to one of the two preset positions.
When you enter the vehicle, the driver in formation interface briefly shows you which
remote transmitter you used to unlock the vehicle.
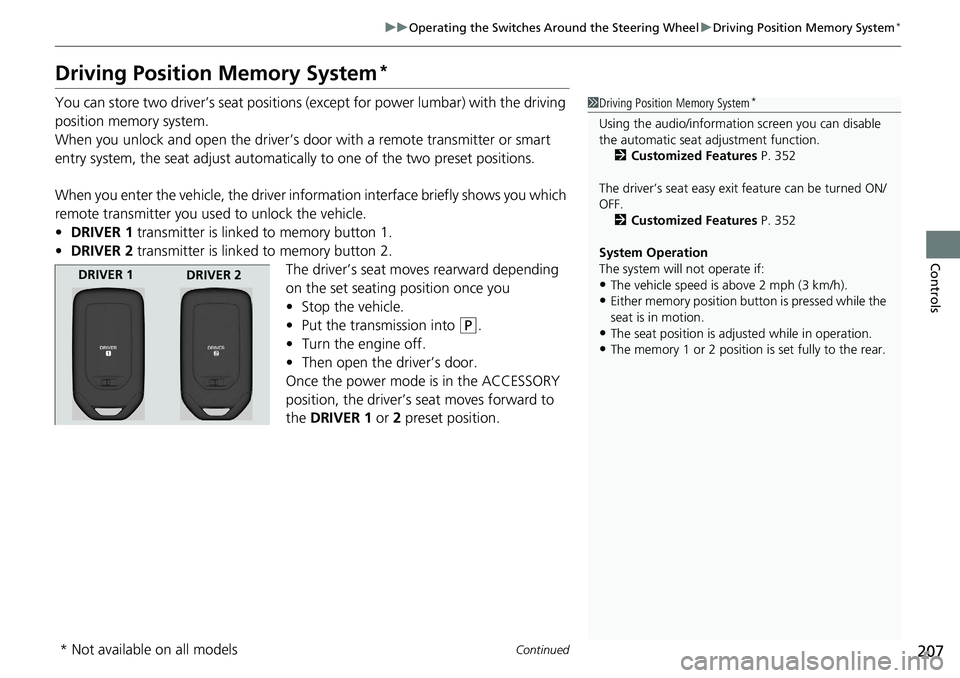
• DRIVER 1 transmitter is linked to memory button 1.
• DRIVER 2 transmitter is linked to memory button 2.
The driver’s seat moves rearward depending
on the set seating position once you
•Stop the vehicle.
• Put the transmission into
(P.
• Turn the engine off.
• Then open the driver’s door.
Once the power mode is in the ACCESSORY
position, the driver’s seat moves forward to
the DRIVER 1 or 2 preset position.
1 Driving Position Memory System*
Using the audio/informati on screen you can disable
the automatic seat adjustment function. 2 Customized Features P. 352
The driver’s seat easy exit feature can be turned ON/
OFF. 2 Customized Features P. 352
System Operation
The system will not operate if:
•The vehicle speed is above 2 mph (3 km/h).
•Either memory position button is pressed while the
seat is in motion.
•The seat position is adju sted while in operation.
•The memory 1 or 2 position is set fully to the rear.
DRIVER 1
DRIVER 2
* Not available on all models
Page 234 of 659
uuInterior Convenience Items uOther Interior Convenience Items
232
Controls
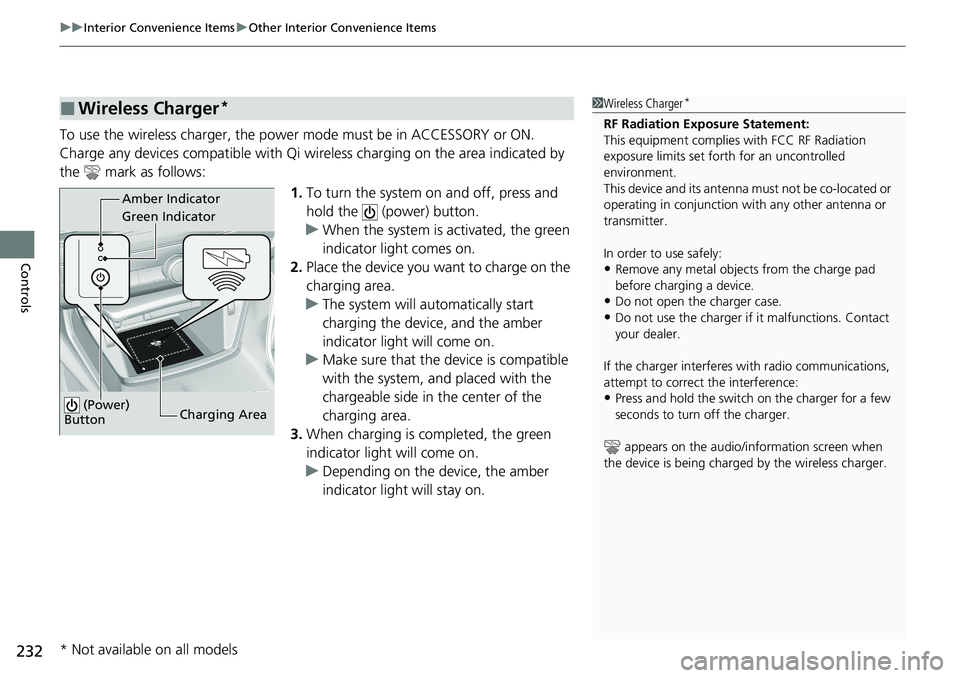
To use the wireless charger, the powe r mode must be in ACCESSORY or ON.
Charge any devices compatible with Qi wi reless charging on the area indicated by
the mark as follows:
1.To turn the system on and off, press and
hold the (power) button.
u When the system is activated, the green
indicator light comes on.
2. Place the device you want to charge on the
charging area.
u The system will automatically start
charging the device, and the amber
indicator light will come on.
u Make sure that the device is compatible
with the system, a nd placed with the
chargeable side in the center of the
charging area.
3. When charging is completed, the green
indicator light will come on.
u Depending on the device, the amber
indicator light will stay on.
■Wireless Charger*1Wireless Charger*
RF Radiation Exposure Statement:
This equipment complies with FCC RF Radiation
exposure limits set forth for an uncontrolled
environment.
This device and its antenna must not be co-located or
operating in conjunction with any other antenna or
transmitter.
In order to use safely:
•Remove any metal objects from the charge pad
before charging a device.
•Do not open the charger case.
•Do not use the charger if it malfunctions. Contact
your dealer.
If the charger interferes with radio communications,
attempt to correct the interference:
•Press and hold the switch on the charger for a few
seconds to turn off the charger.
appears on the audio/information screen when
the device is being charge d by the wireless charger.
Green Indicator Amber Indicator
Charging Area
(Power)
Button
* Not available on all models
Page 247 of 659
245
Features
This chapter describes how to operate technology features.
Audio SystemAbout Your Audio System ................ 246
USB Ports ......................................... 247
Audio System Theft Protection ......... 249
Audio Remote Controls .................... 250
Audio System Basic Operation ........ 253
Audio/Information Screen ................ 254
System Updates
*............................. 266
Adjusting the Sound ........................ 272
Display Setup ................................... 273
Voice Control Operation .................. 275
Playing AM/FM Radio ....................... 278
Playing SiriusXM ® Radio
*................. 282
Playing an iPod ................................ 293 Playing a USB Flash Drive ................. 296
Playing
Bluetooth ® Audio................. 299
HondaLink ®..................................... 301
HondaLink ® Service
*........................ 305
Wi-Fi Connection ............................. 310
AT&T Hotspot
*................................ 312
Siri Eyes Free*.................................. 313
Apple CarPlay .................................. 314
Android Auto................................... 321
Audio Error Messages ...................... 328
General Information on the Audio System ............................................. 330
Customized Features ........................ 352
HomeLink ® Universal Transceiver
*..... 372 Bluetooth®
HandsFreeLink® ............. 375
Refuel Recommend .............................. 401
* Not available on all models
Page 248 of 659
246
Features
Audio System
About Your Audio System
The audio system features AM/FM radio and SiriusXM® Radio* service. It can also
play USB flash drives, iPod, iPhone and Bluetooth® devices.
You can operate the audio system from the buttons and knobs on the panel, the
remote controls on the steering wheel, or the icons on the touchscreen interface.1 About Your Audio System
iPod ®, iPhone ® and iTunes are trad emarks of Apple
Inc.
State or local laws may pr ohibit the operation of
handheld electronic devices while operating a
vehicle.
SiriusXM ® Radio
* is available on a subscription basis
only. For more information on SiriusXM ® Radio*,
contact a dealer. 2 General Information on the Audio System
P. 330
SiriusXM ® Radio
* is available in the United States and
Canada, except Ha waii, Alaska, and Puerto Rico.
SiriusXM ®
* is a registered tra demark of SiriusXM
Radio, Inc.
Remote Controls
iPod
USB Flash Drive
* Not available on all models
Page 249 of 659
247
uuAudio System uUSB Ports
Continued
Features
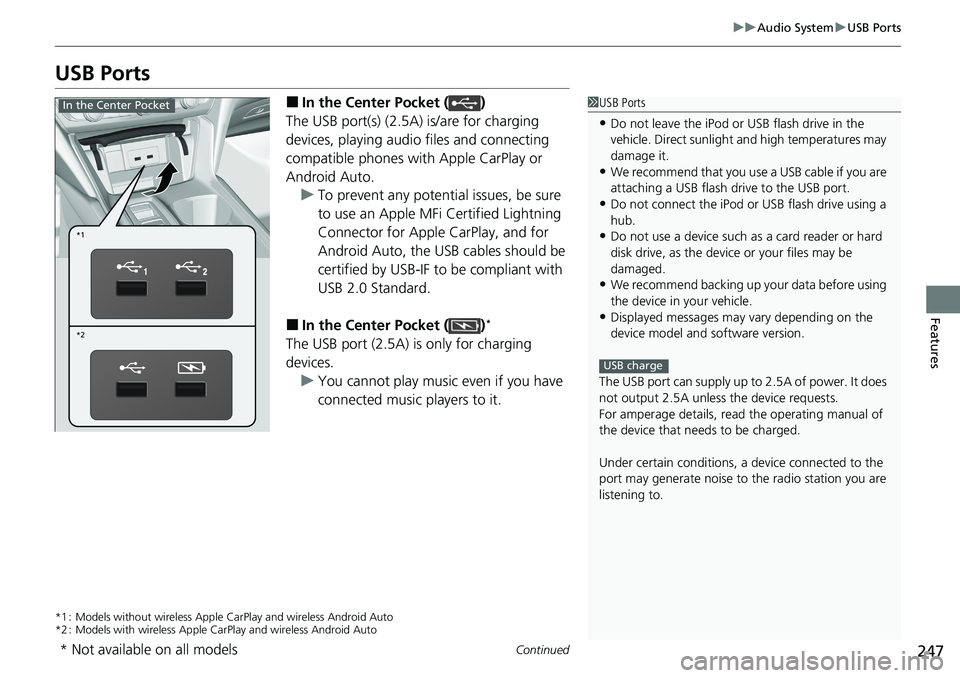
USB Ports
■In the Center Pocket ( )
The USB port(s) (2.5A) is/are for charging
devices, playing audio files and connecting
compatible phones with Apple CarPlay or
Android Auto. u To prevent any potenti al issues, be sure
to use an Apple MFi Certified Lightning
Connector for Apple CarPlay, and for
Android Auto, the USB cables should be
certified by USB-IF to be compliant with
USB 2.0 Standard.
■In the Center Pocket ( )*
The USB port (2.5A) is only for charging
devices. u You cannot play music even if you have
connected music players to it.
*1 : Models without wireless Apple Ca rPlay and wireless Android Auto
*2 : Models with wireless Apple CarPlay and wireless Android Auto
1USB Ports
•Do not leave the iPod or USB flash drive in the
vehicle. Direct sunlight and high temperatures may
damage it.
•We recommend that you us e a USB cable if you are
attaching a USB flash drive to the USB port.
•Do not connect the iPod or USB flash drive using a
hub.
•Do not use a device such as a card reader or hard
disk drive, as the device or your files may be
damaged.
•We recommend backing up yo ur data before using
the device in your vehicle.
•Displayed messages may vary depending on the
device model and software version.
The USB port can supply up to 2.5A of power. It does
not output 2.5A unless the device requests.
For amperage details, read the operating manual of
the device that ne eds to be charged.
Under certain condi tions, a device connected to the
port may generate noise to the radio station you are
listening to.
USB charge
*1
*2
In the Center Pocket
* Not available on all models
Page 250 of 659
248
uuAudio System uUSB Ports
Features
■Rear of the center console*
The USB ports (2.5A) are only for charging
devices.
u You cannot play music even if you have
connected music players to them.
Rear of the center console*
* Not available on all models