Page 165 of 659
163
uuGauges and Displays uHead-Up Display*
Instrument Panel
■Compass
Shows the compass screen.
■Turn-by-Turn Directions
When driving guidance is provided by the navigation system, Android Auto or Apple
CarPlay, turn-by-turn directions to your destination appear.
2Refer to the Navigation System Manual
2 Android Auto P. 321
2 Apple CarPlay P. 314
Shows the traffic sign recognition system.
2Traffic Sign Recognition System P. 500
■Navigation
■Traffic Sign Recognition System
1Navigation
You can select whether th e turn-by-turn display
comes on during the route guidance.
2 Customized Features P. 352
Page 187 of 659

185
uuSecurity System uSecurity System Alarm
Continued
Controls
Security System Alarm
The security system alarm activates when the trunk, hood or doors are forcibly
opened. The alarm does not activate if the trunk or doors are opened with the key,
remote transmitter, or smart entry system
*.
However, the alarm activates if a door is opened with the key and then the
transmission is taken out of
(P (continuously variable transmission models) or the
hood is opened before the power mode is in ON.
■When the security system alarm activates
The horn sounds intermittently, and some exterior lights flash.
■To deactivate the security system alarm
Unlock the vehicle using the key, remo te transmitter or smart entry system*, or set
the power mode to ON. The system, along with the horn and flashing lights, is
deactivated.
■Setting the security system alarm
The security system alarm automatically sets when the following conditions have
been met:
• The power mode is set to VEHICLE OFF (LOCK).
• The hood is closed.
• All doors and trunk are locked from outsid e with the key, remote transmitter, or
smart entry system
*.
■When the security system alarm sets
The security system alarm in dicator in the instrument panel blinks and the blinking
interval changes after about 15 seconds.
■To cancel the security system alarm
The security system alarm is canceled wh en the vehicle is unlocked using the key,
remote transmitter or smart entry system
*, or when the power mode is set to ON. The
security system alarm indicato r goes off at the same time.
1Security System Alarm
Do not alter the system or add other devices to it.
Doing so may damage the system and make your
vehicle inoperable.
The security system alarm continues for a maximum
of two minutes until the security system alarm
deactivates.
Do not set the security system alarm when someone
is in the vehicle or a window is open. The system can
accidentally activate when:
•Unlocking the door with the lock tab.
•Opening the trunk with the trunk opener or the
emergency trunk opener.
•Opening the hood with the hood release.
•Taking the transmission out of ( P.
If the battery goes dead after you have set the
security system alarm, the security alarm may go off
once the battery is re charged or replaced.
If this occurs, deactivate the security system alarm by
unlocking a door using the ke y, remote transmitter,
or smart entry system
*.
Continuously variable transmission models
* Not available on all models
Page 195 of 659

193
uuOperating the Switches Around the Steering Wheel uENGINE START/STOP Button
Controls
When the power mode is set to any mode
other than OFF and yo u remove the remote
from the vehicle and shut the door, an alarm
will sound. If the alarm continues to sound,
place the remote in another location.
■When the power mode is in
ACCESSORY
The alarm will sound from outside the vehicle.
■When the power mode is in ON
An alarm will sound both inside and outside
the vehicle. In additi on, a warning indicator
will appear on the instrument panel.
■Remote Reminder1 Remote Reminder
When the remote is within the system’s operational
range, and the driver’s door is closed, the warning
function cancels.
If the remote is taken out of the vehicle after the
engine has been started, you can no longer change
the ENGINE START/STOP button mode or restart
the engin e. Always make sur e if t he remote is in your
vehicle when you operate the ENGINE START/STOP
button.
Removing the remote fr om the vehicle through a
window does not activate the warning buzzer.
Do not put the remote on the dashboard or in the
glove box. It may cause the warning buzzer to go off.
Under some other conditions that can prevent the
vehicle from locating the remote, the warning buzzer
may also go off even if the remote is within the
system’s operational range.
Page 196 of 659
194
uuOperating the Switches Around the Steering Wheel uTurn Signals
Controls
Turn Signals
The turn signals can be used when the power mode is in ON.
■(A): Turn signal
Push the lever up or down based on the
direction you want to turn, and the turn signal
will blink.
■(B): One-touc h turn signal
When you lightly push the lever up or down
and release it, the turn signal will blink 3 times.
1 Turn Signals
The turn signal indicator on the instrument panel will
blink when the external turn signal blinks.
2 Indicators P. 82
(A)
(B)
(A) (B)
Page 199 of 659

197
uuOperating the Switches Around the Steering Wheel uFog Lights*
Controls
The headlights automatically come on when th e wipers are used several times within
a certain number of intervals with the headlight switch in AUTO.
The headlights automatically go off a few mi nutes later if the wipers are stopped.
The headlights, all other exterior lights, and the instrument panel lights turn off 15
seconds after you set the power mode to VEHICLE OFF, take the remote with you,
and close the driver’s door.
If you set the power mode to VEHICLE OFF with the headlight switch on, but do not
open the door, the lights turn off after 10 minutes (three minutes, if the switch is in
the AUTO position).
The lights turn on again when you unlock or open the driver’s door. If you unlock
the door, but do not open it within 15 seconds, the lights go off. If you open the
driver’s door, you will hear a reminder chime alerting you that the lights are on.
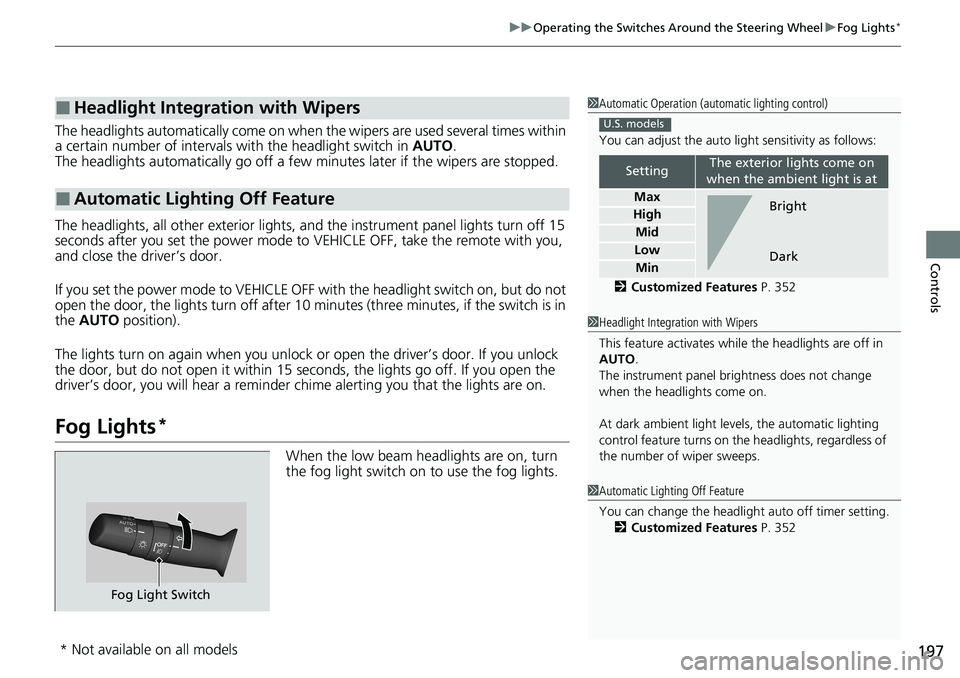
Fog Lights*
When the low beam headlights are on, turn
the fog light switch on to use the fog lights.
■Headlight Integration with Wipers
■Automatic Lighting Off Feature
1 Automatic Operation (aut omatic lighting control)
You can adjust the auto li ght sensitivity as follows:
2 Customized Features P. 352
SettingThe exterior lights come on
when the ambient light is at
Max
High
Mid
Low
Min
U.S. models
Bright
Dark
1 Headlight Integration with Wipers
This feature activates while the headlights are off in
AUTO .
The instrument panel br ightness does not change
when the headlights come on.
At dark ambient light leve ls, the automatic lighting
control feature turns on the headlights, regardless of
the number of wiper sweeps.
1 Automatic Lighting Off Feature
You can change the headlight auto off timer setting.
2 Customized Features P. 352
Fog Light Switch
* Not available on all models
Page 207 of 659
205
uuOperating the Switches Around the Steering Wheel uBrightness Control
Continued
Controls
Brightness Control
When the power mode is in ON, you can use
the brightness control dial to adjust
instrument panel brightness.
To brighten: Turn the dial up.
To dim: Turn the dial down.
You will hear a beep when the brightness
reaches minimum or maximum. Several
seconds after adjusting the brightness, you
will be returned to the previous screen.
■Brightness level indicator
The brightness level is shown on the driver
information interface while you are adjusting
it.
■Adjusting the Instrument Panel Brightness1 Brightness Control
The brightness of the in strument panel will be
reduced when the following conditions:
•The power mode is in ON.•The light switch is in any position other than off
and it is da rk outside.
The brightness can be set differently for when the
exterior lights are on, and when they are off.
Control Dial
Page 211 of 659

209
uuOperating the Switches Around the Steering Wheel uAdjusting the Steering Wheel
Controls
Adjusting the Steering Wheel
The steering wheel height and distance from your body can be adjusted so that you
can comfortably grip the steering wheel in an appropriate driving posture.
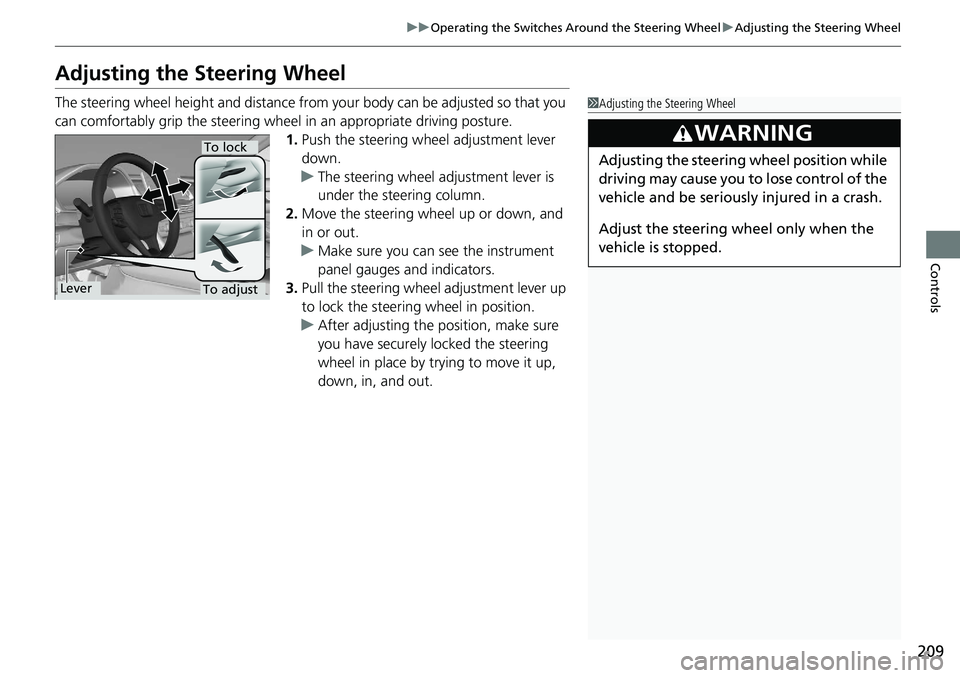
1. Push the steering wheel adjustment lever
down.
u The steering wheel adjustment lever is
under the steering column.
2. Move the steering wheel up or down, and
in or out.
u Make sure you can see the instrument
panel gauges and indicators.
3. Pull the steering wheel adjustment lever up
to lock the steering wheel in position.
u After adjusting the position, make sure
you have securely locked the steering
wheel in place by trying to move it up,
down, in, and out.1Adjusting the Steering Wheel
3WARNING
Adjusting the steering wheel position while
driving may cause you to lose control of the
vehicle and be seriously injured in a crash.
Adjust the steering wheel only when the
vehicle is stopped.
To adjust
To lock
Lever
Page 267 of 659
265
uuAudio System Basic Operation uAudio/Information Screen
Features
You can edit, show, or hide the meter co ntents on the driver information interface.
1. Press the button.
2. Select Settings .
3. Select System.
4. Select Config. of Instrument Panel .
5. Select the content you wish to show or
hide.
u The checked items are displayed on the
driver information interface.
6. Select Done.
■Editing order
You can change the order of the contents on the driver information interface.
1.Press the button.
2. Select Settings .
3. Select System.
4. Select Config. of Instrument Panel .
5. Select Reorder .
6. Select and hold the contents you want to
move.
7. Drag and drop the contents to where you
want it to be.
8. Select Done.
■Customizing the Meter1Customizing the Meter
You can store up to three customized configurations.
To select or customize a configuration, select Select
configuration .