Page 9 of 20
9F Optional equipment
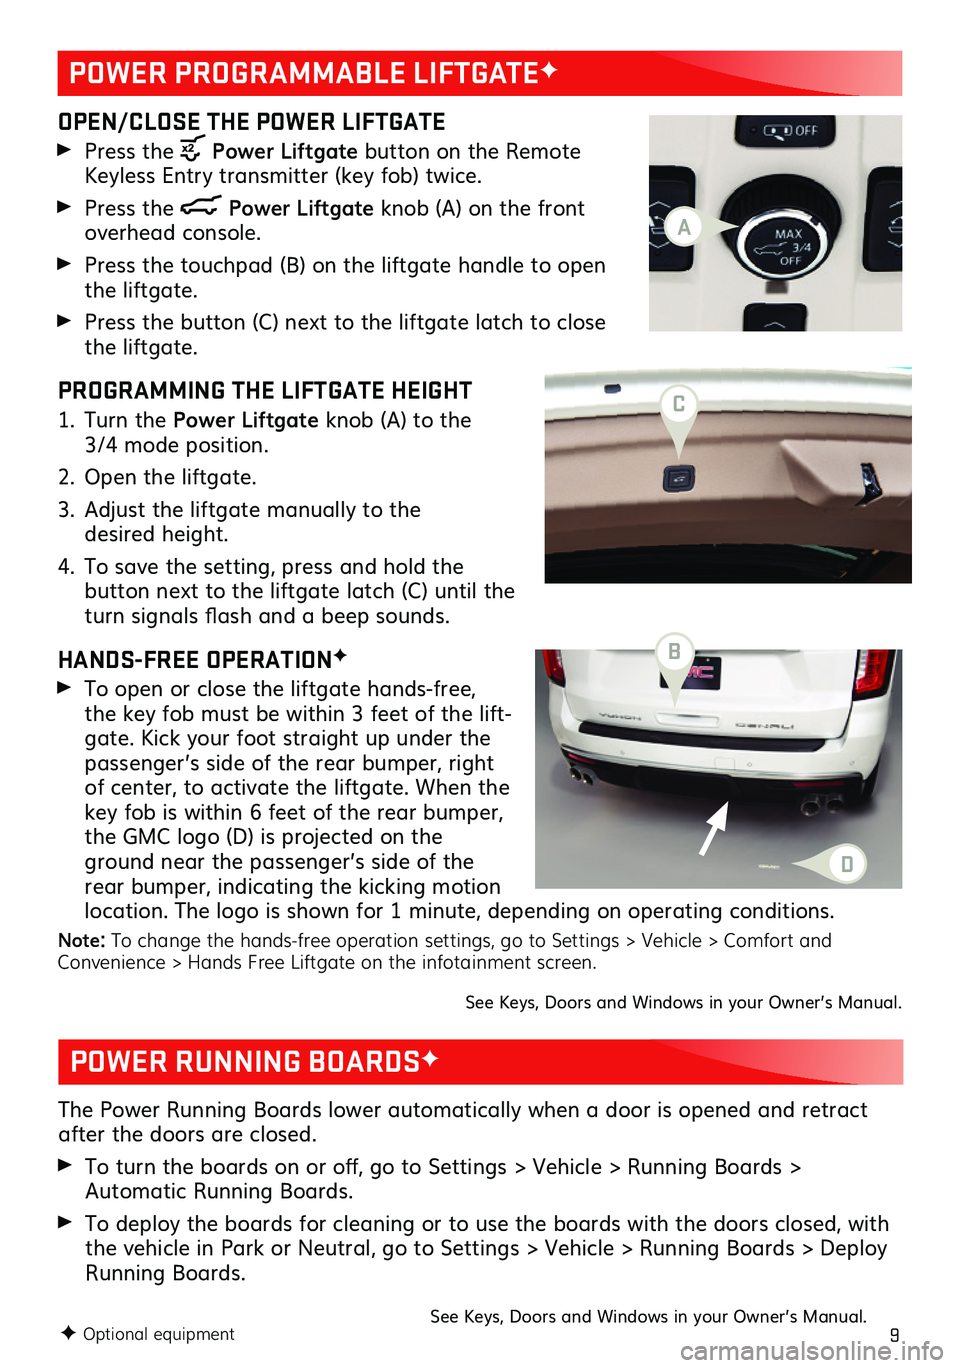
OPEN/CLOSE THE POWER LIFTGATE
Press the Power Liftgate button on the Remote Keyless Entry transmitter (key fob) twice.
Press the Power Liftgate knob (A) on the front overhead console.
Press the touchpad (B) on the liftgate handle to open the liftgate.
Press the button (C) next to the liftgate latch to close the liftgate.
PROGRAMMING THE LIFTGATE HEIGHT
1. Turn the Power Liftgate knob (A) to the 3/4 mode position.
2. Open the liftgate.
3. Adjust the liftgate manually to the desired height.
4. To save the setting, press and hold the
button next to the liftgate latch (C) until the turn signals flash and a beep sounds.
HANDS-FREE OPERATIONF
To open or close the liftgate hands-free, the key fob must be within 3 feet of the lift-gate. Kick your foot straight up under the passenger’s side of the rear bumper, right of center, to activate the liftgate. When the key fob is within 6 feet of the rear bumper, the GMC logo (D) is projected on the ground near the passenger’s side of the rear bumper, indicating the kicking motion location. The logo is shown for 1 minute, depending on operating conditions.
Note: To change the hands-free operation settings, go to Settings > Vehicle > Comfort and Convenience > Hands Free Liftgate on the infotainment screen.
The Power Running Boards lower automatically when a door is opened and retract after the doors are closed.
To turn the boards on or off, go to Settings > Vehicle > Running Boards > Automatic Running Boards.
To deploy the boards for cleaning or to use the boards with the doors closed, with the vehicle in Park or Neutral, go to Settings > Vehicle > Running Boards > Deploy Running Boards.
See Keys, Doors and Windows in your Owner’s Manual.
POWER PROGRAMMABLE LIFTGATEF
POWER RUNNING BOARDSF
See Keys, Doors and Windows in your Owner’s Manual.
D
A
C
B
Page 10 of 20
10F Optional equipment
INFOTAINMENT SYSTEM
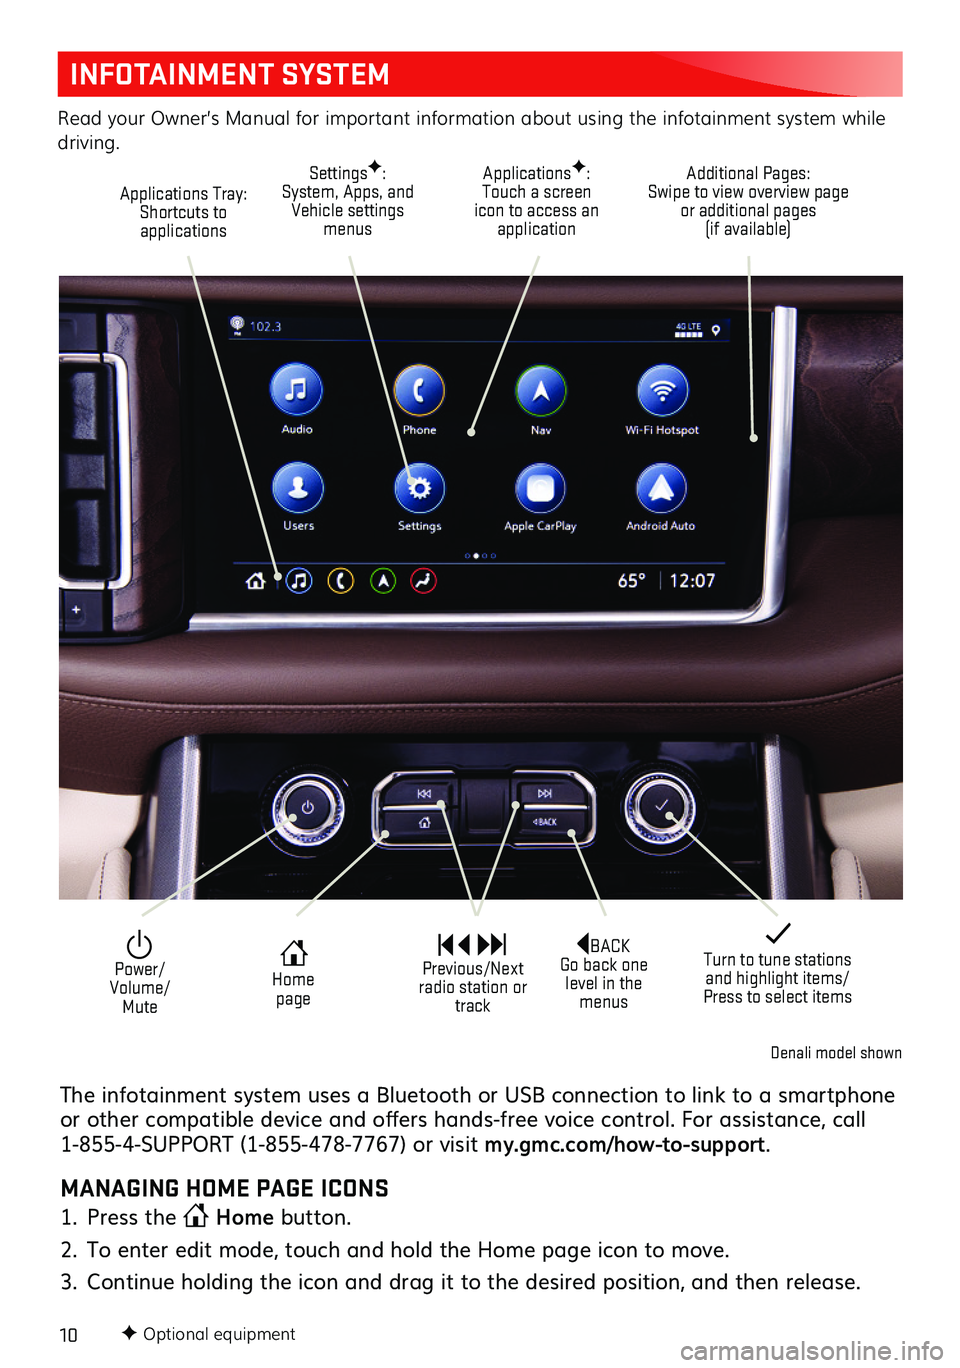
Read your Owner’s Manual for important information about using the infotainment system while driving.
Additional Pages: Swipe to view overview page or additional pages (if available)
Applications Tray: Shortcuts to applications
ApplicationsF: Touch a screen icon to access an application
SettingsF: System, Apps, and Vehicle settings menus
BACK Go back one level in the menus
Home page
Power/ Volume/Mute
Previous/Next radio station or track
Turn to tune stations and highlight items/Press to select items
Denali model shown
The infotainment system uses a Bluetooth or USB connection to link to a smartphone or other compatible device and offers hands-free voice control. For assistance, call 1-855-4-SUPPORT (1-855-478-7767) or visit my.gmc.com/how-to-support.
MANAGING HOME PAGE ICONS
1. Press the Home button.
2. To enter edit mode, touch and hold the Home page icon to move.
3. Continue holding the icon and drag it to the desired position, and then release.
Page 11 of 20
11F Optional equipment
INFOTAINMENT SYSTEM
STORING FAVORITES
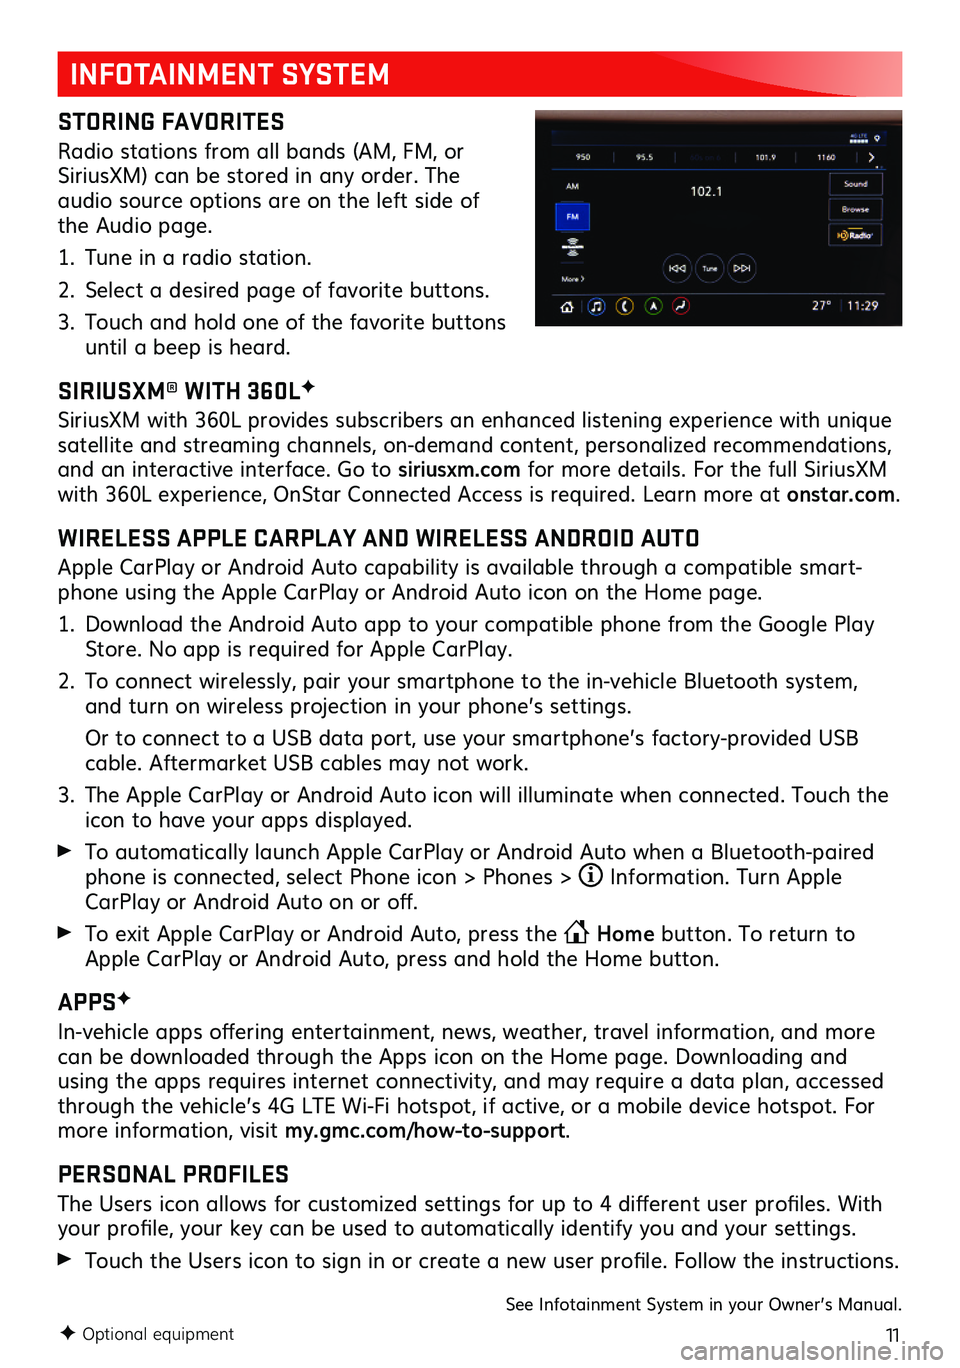
Radio stations from all bands (AM, FM, or SiriusXM) can be stored in any order. The audio source options are on the left side of the Audio page.
1. Tune in a radio station.
2. Select a desired page of favorite buttons.
3. Touch and hold one of the favorite buttons until a beep is heard.
SIRIUSXM® WITH 360LF
SiriusXM with 360L provides subscribers an enhanced listening experience with unique satellite and streaming channels, on-demand content, personalized recommendations, and an interactive interface. Go to siriusxm.com for more details. For the full SiriusXM with 360L experience, OnStar Connected Access is required. Learn more at onstar.com.
WIRELESS APPLE CARPLAY AND WIRELESS ANDROID AUTO
Apple CarPlay or Android Auto capability is available through a compatible smart-phone using the Apple CarPlay or Android Auto icon on the Home page.
1. Download the Android Auto app to your compatible phone from the Google Play Store. No app is required for Apple CarPlay.
2. To connect wirelessly, pair your smartphone to the in-vehicle Bluetooth system, and turn on wireless projection in your phone’s settings.
Or to connect to a USB data port, use your smartphone’s factory-provided USB cable. Aftermarket USB cables may not work.
3. The Apple CarPlay or Android Auto icon will illuminate when connected. Touch the icon to have your apps displayed.
To automatically launch Apple CarPlay or Android Auto when a Bluetooth-paired phone is connected, select Phone icon > Phones > Information. Turn Apple CarPlay or Android Auto on or off.
To exit Apple CarPlay or Android Auto, press the Home button. To return to Apple CarPlay or Android Auto, press and hold the Home button.
APPSF
In-vehicle apps offering entertainment, news, weather, travel information, and more can be downloaded through the Apps icon on the Home page. Downloading and using the apps requires internet connectivity, and may require a data plan, accessed through the vehicle’s 4G LTE Wi-Fi hotspot, if active, or a mobile device hotspot. For more information, visit my.gmc.com/how-to-support.
PERSONAL PROFILES
The Users icon allows for customized settings for up to 4 different user profiles. With your profile, your key can be used to automatically identify you and your settings.
Touch the Users icon to sign in or create a new user profile. Follow the instructions.
See Infotainment System in your Owner’s Manual.
Page 12 of 20
12
BLUETOOTH® SYSTEM
Read your Owner’s Manual for important information about using the Bluetooth system while driving.
Before using a Bluetooth-enabled device in the vehicle, it must be paired with the in-vehicle Bluetooth system. The vehicle must be stopped to pair a device. Not all devices will support all functions.
PAIR A PHONE
1. To use voice recognition, press the Press to Talk button; after the prompt, say “Pair phone.”
To use the infotainment screen, select Phone icon > Connect Phone > Add Phone.
2. Start the pairing process on your phone. From the phone’s Bluetooth settings, select the name shown on the infotainment screen.
3. Follow the pairing instructions.
4. When pairing is complete, the phone screen is displayed.
SECONDARY PHONE
Multiple phones can be paired to the Bluetooth system. The system connects to the phone that is set to First to Connect. A secondary phone can receive calls only.
To set the first and secondary phones, select the Phone icon > Phones > Information.See Infotainment System in your Owner’s Manual.
4G LTE WI-FI® HOTSPOTF
With the vehicle’s available 4G LTE Wi-Fi hotspot, up to 7 devices (smartphones, tab-lets and laptops) can be connected to high-speed internet. For more information on use and system limitations, visit my.gmc.com/how-to-support.
To retrieve the name and password for the hotspot, select the Wi-Fi Hotspot icon on the Home page or go to Settings > System > Wi-Fi Hotspot.
See Infotainment System in your Owner’s Manual.
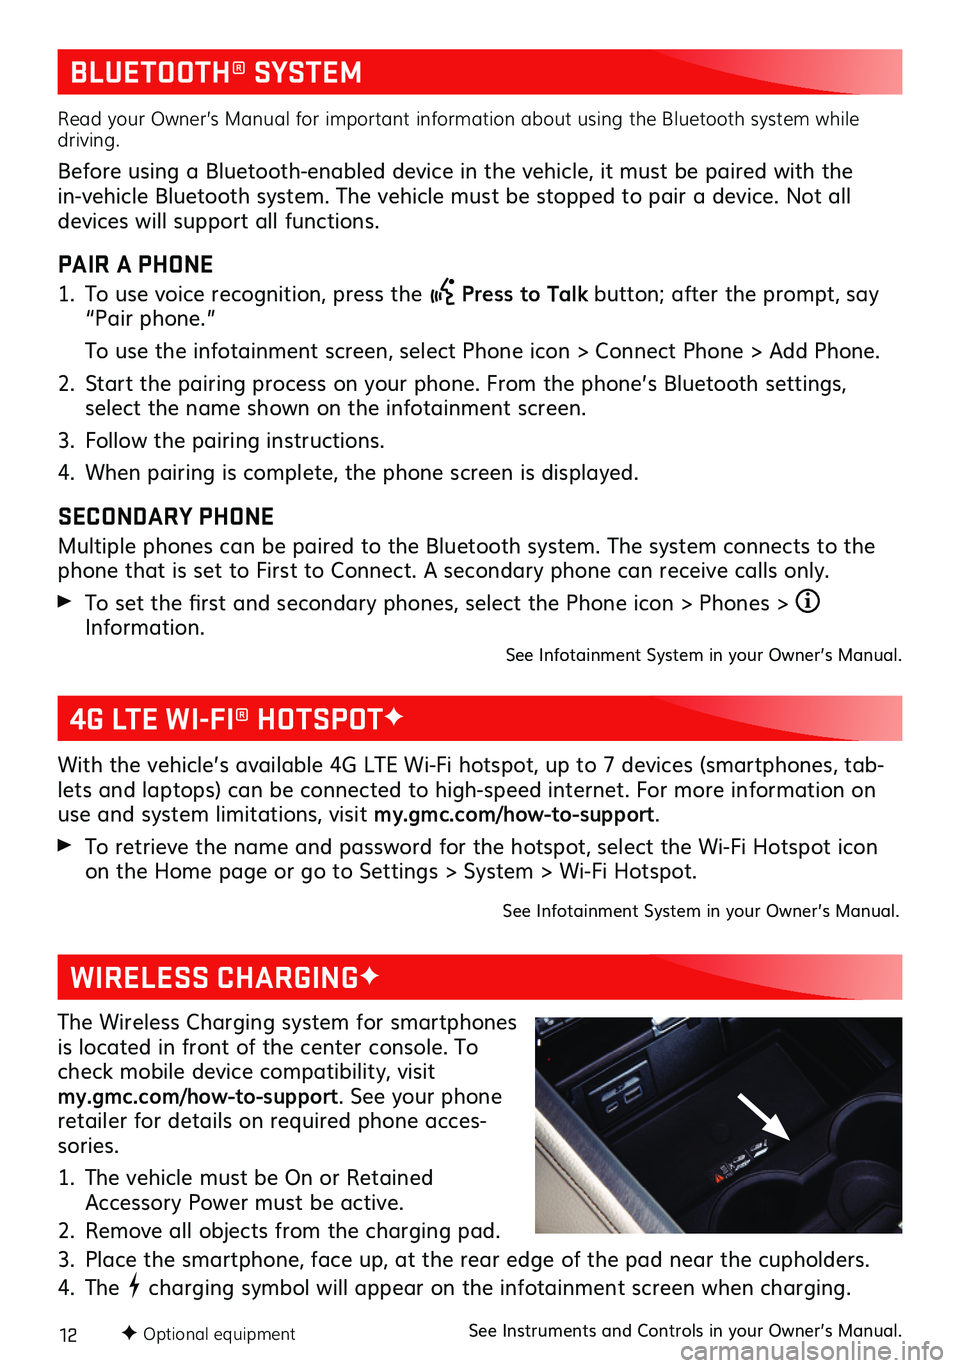
The Wireless Charging system for smartphones is located in front of the center console. To check mobile device compatibility, visit my.gmc.com/how-to-support. See your phone retailer for details on required phone acces-sories.
1. The vehicle must be On or Retained Accessory Power must be active.
2. Remove all objects from the charging pad.
3. Place the smartphone, face up, at the rear edge of the pad near the cupholders.
4. The charging symbol will appear on the infotainment screen when charging.
See Instruments and Controls in your Owner’s Manual.
WIRELESS CHARGINGF
F Optional equipment
Page 13 of 20
13
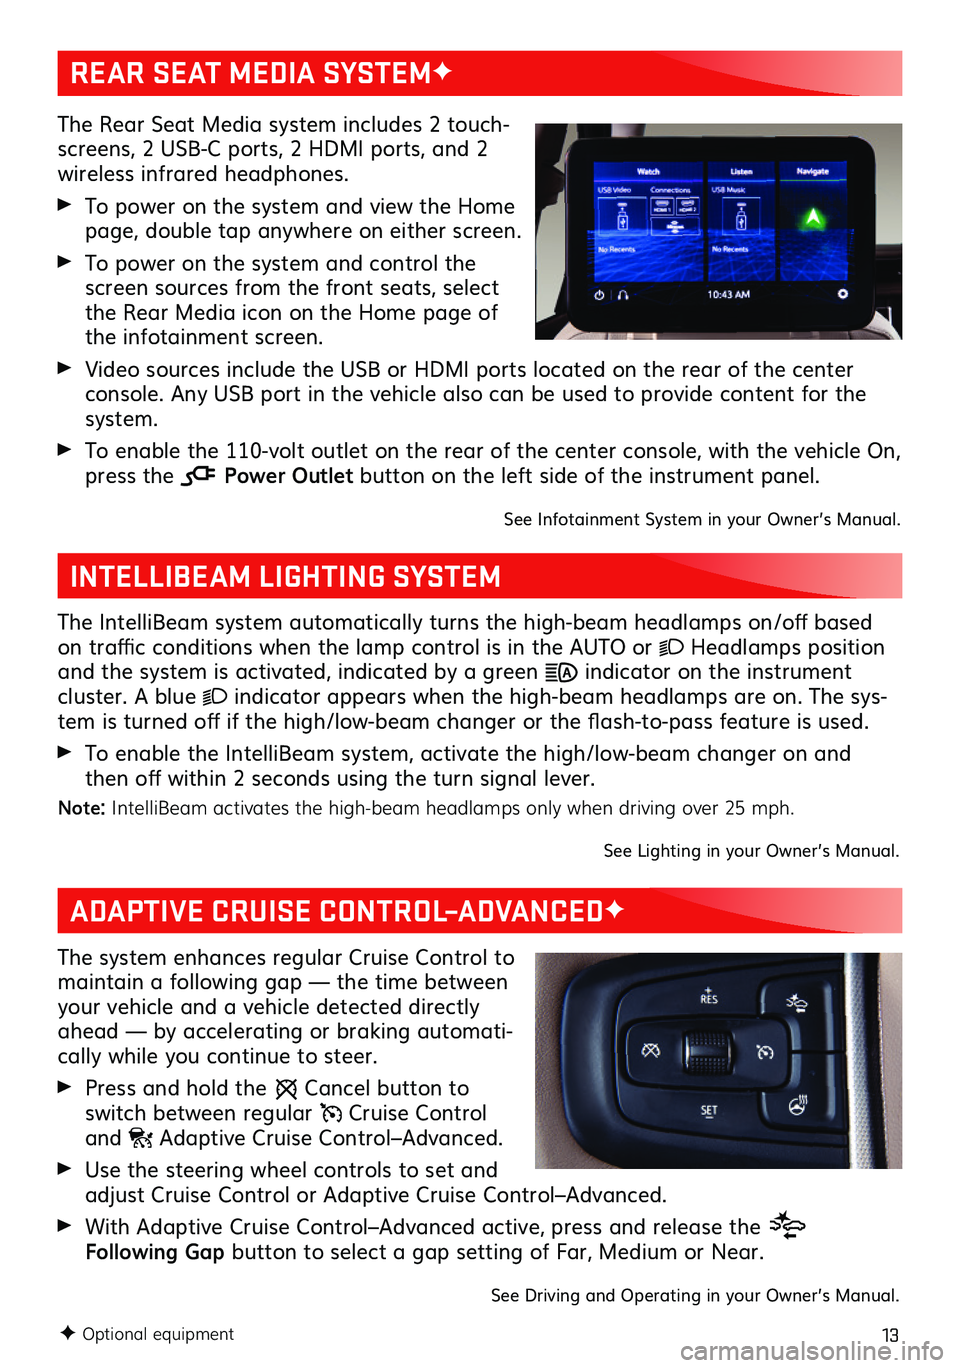
The Rear Seat Media system includes 2 touch-screens, 2 USB-C ports, 2 HDMI ports, and 2 wireless infrared headphones.
To power on the system and view the Home page, double tap anywhere on either screen.
To power on the system and control the screen sources from the front seats, select the Rear Media icon on the Home page of the infotainment screen.
Video sources include the USB or HDMI ports located on the rear of the center console. Any USB port in the vehicle also can be used to provide content for the system.
To enable the 110-volt outlet on the rear of the center console, with the vehicle On, press the Power Outlet button on the left side of the instrument panel.
See Infotainment System in your Owner’s Manual.
INTELLIBEAM LIGHTING SYSTEM
The IntelliBeam system automatically turns the high-beam headlamps on/off based on traffic conditions when the lamp control is in the AUTO or Headlamps position and the system is activated, indicated by a green indicator on the instrument cluster. A blue indicator appears when the high-beam headlamps are on. The sys-tem is turned off if the high/low-beam changer or the flash-to-pass feature is used.
To enable the IntelliBeam system, activate the high/low-beam changer on and then off within 2 seconds using the turn signal lever.
Note: IntelliBeam activates the high-beam headlamps only when driving over 25 mph.
See Lighting in your Owner’s Manual.
REAR SEAT MEDIA SYSTEMF
ADAPTIVE CRUISE CONTROL–ADVANCEDF
The system enhances regular Cruise Control to maintain a following gap — the time between your vehicle and a vehicle detected directly ahead — by accelerating or braking automati-cally while you continue to steer.
Press and hold the Cancel button to switch between regular Cruise Control and Adaptive Cruise Control–Advanced.
Use the steering wheel controls to set and adjust Cruise Control or Adaptive Cruise Control–Advanced.
With Adaptive Cruise Control–Advanced active, press and release the Following Gap button to select a gap setting of Far, Medium or Near.
See Driving and Operating in your Owner’s Manual.
F Optional equipment
Page 14 of 20
14
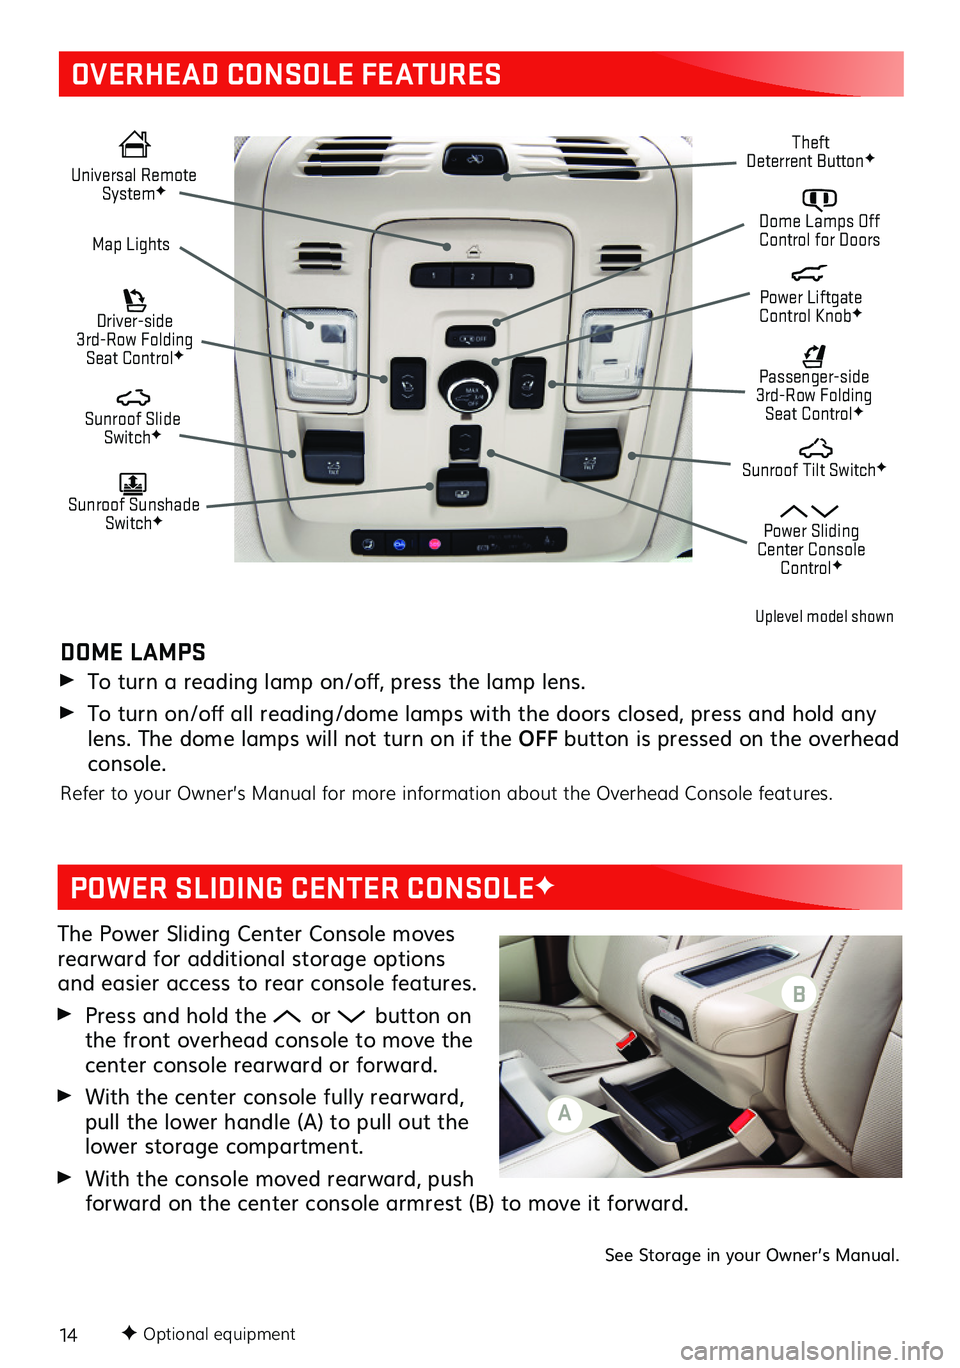
OVERHEAD CONSOLE FEATURES
Universal Remote SystemF Dome Lamps Off Control for DoorsMap Lights
Sunroof Slide SwitchF
Passenger-side 3rd-Row Folding Seat ControlF
Sunroof Sunshade SwitchF
Sunroof Tilt SwitchF
Theft Deterrent ButtonF
Power Sliding Center Console ControlF
Driver-side 3rd-Row Folding Seat ControlF
Power Liftgate Control KnobF
POWER SLIDING CENTER CONSOLEF
DOME LAMPS
To turn a reading lamp on/off, press the lamp lens.
To turn on/off all reading/dome lamps with the doors closed, press and hold any lens. The dome lamps will not turn on if the OFF button is pressed on the overhead console.
Refer to your Owner’s Manual for more information about the Overhead Console
features.
The Power Sliding Center Console moves rearward for additional storage options and easier access to rear console features.
Press and hold the or button on the front overhead console to move the center console rearward or forward.
With the center console fully rearward, pull the lower handle (A) to pull out the lower storage compartment.
With the console moved rearward, push forward on the center console armrest (B) to move it forward.
See Storage in your Owner’s Manual.
F Optional equipment
Uplevel model shown
A
B
Page 15 of 20
15F Optional equipment
DRIVER MODE CONTROLF/FOUR-WHEEL DRIVEF
DRIVER MODE CONTROL
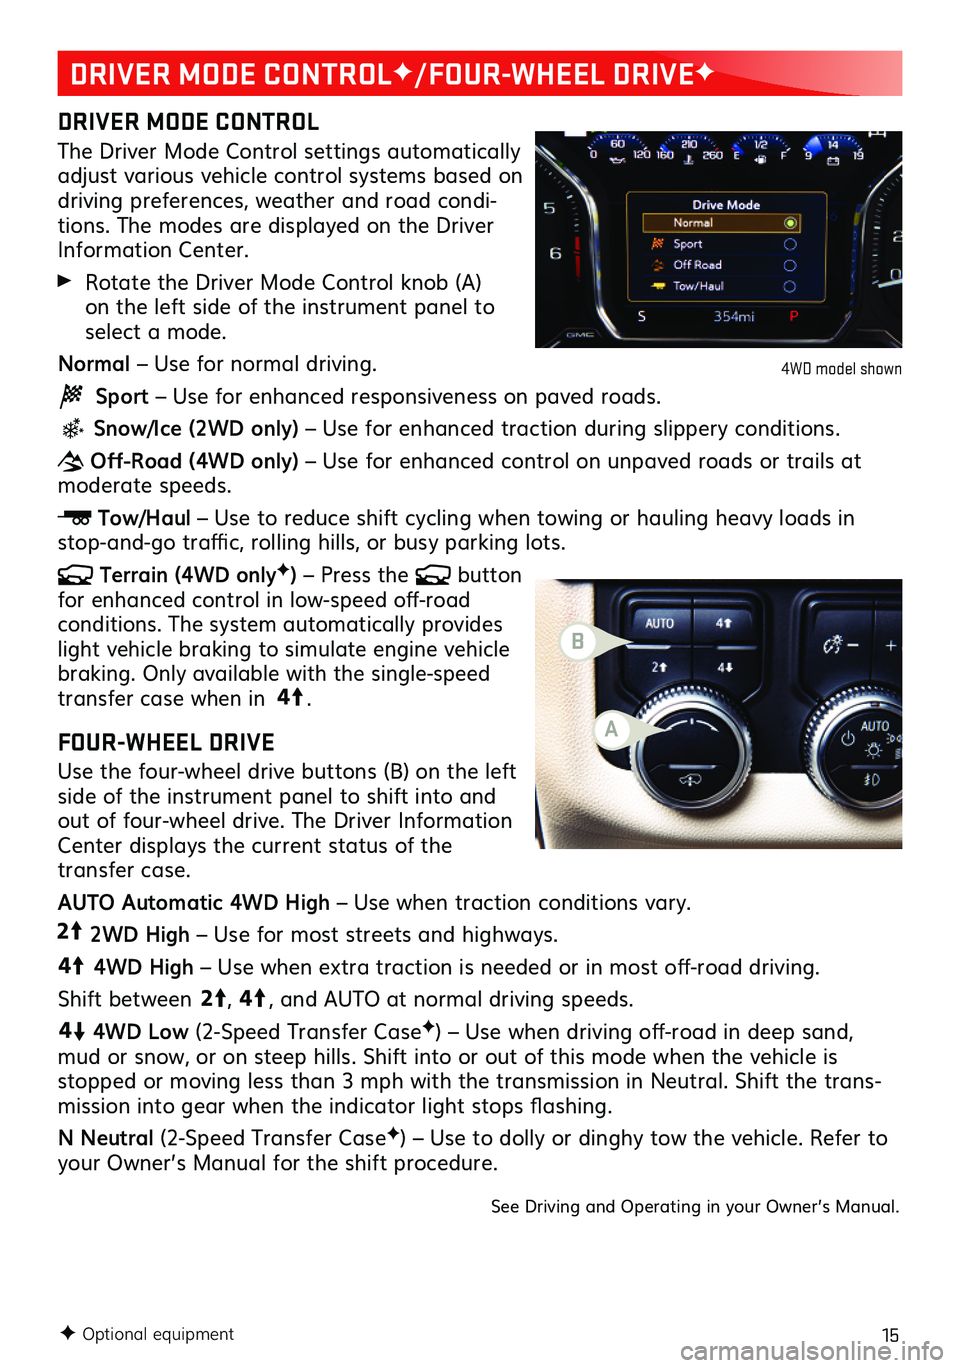
The Driver Mode Control settings automatically adjust various vehicle control systems based on driving preferences, weather and road condi-tions. The modes are displayed on the Driver Information Center.
Rotate the Driver Mode Control knob (A) on the left side of the instrument panel to select a mode.
Normal – Use for normal driving.
Sport – Use for enhanced responsiveness on paved roads.
Snow/Ice (2WD only) – Use for enhanced traction during slippery conditions.
Off-Road (4WD only) – Use for enhanced control on unpaved roads or trails at moderate speeds.
Tow/Haul – Use to reduce shift cycling when towing or hauling heavy loads in stop-and-go traffic, rolling hills, or busy parking lots.
Terrain (4WD onlyF) – Press the button for enhanced control in low-speed off-road conditions. The system automatically provides light vehicle braking to simulate engine vehicle braking. Only available with the single-speed transfer case when in 4
4
2
.
FOUR-WHEEL DRIVE
Use the four-wheel drive buttons (B) on the left side of the instrument panel to shift into and out of four-wheel drive. The Driver Information Center displays the current status of the transfer case.
AUTO Automatic 4WD High – Use when traction conditions vary.
4
4
2
2WD High – Use for most streets and highways.
4
4
2
4WD High – Use when extra traction is needed or in most off-road driving.
Shift between
44
2
, 4
4
2
, and AUTO at normal driving speeds.
44
2
4WD Low (2-Speed Transfer CaseF) – Use when driving off-road in deep sand, mud or snow, or on steep hills. Shift into or out of this mode when the vehicle is stopped or moving less than 3 mph with the transmission in Neutral. Shift the trans-mission into gear when the indicator light stops flashing.
N Neutral (2-Speed Transfer CaseF) – Use to dolly or dinghy tow the vehicle. Refer to your Owner’s Manual for the shift procedure.
See Driving and Operating in your Owner’s Manual.
4WD model shown
A
B
Page 16 of 20
16F Optional equipment
HILL DESCENT CONTROLF
Hill Descent Control sets and maintains vehicle speed from 1–19 mph while descend-ing a steep incline in a forward or reverse gear.
1. Press the Hill Descent Control button on the left side of the instrument panel. Vehicle speed must be below 37 mph to enable the system. The Hill Descent Control symbol will illuminate on the instrument cluster.
2. Increase or decrease speed by applying the accelerator or brake pedal or use the Cruise Control +/– switch on the steering wheel. The adjusted speed becomes the new set speed. The symbol flashes when the system is actively applying the brakes to maintain vehicle speed.
See Driving and Operating in your Owner’s Manual.
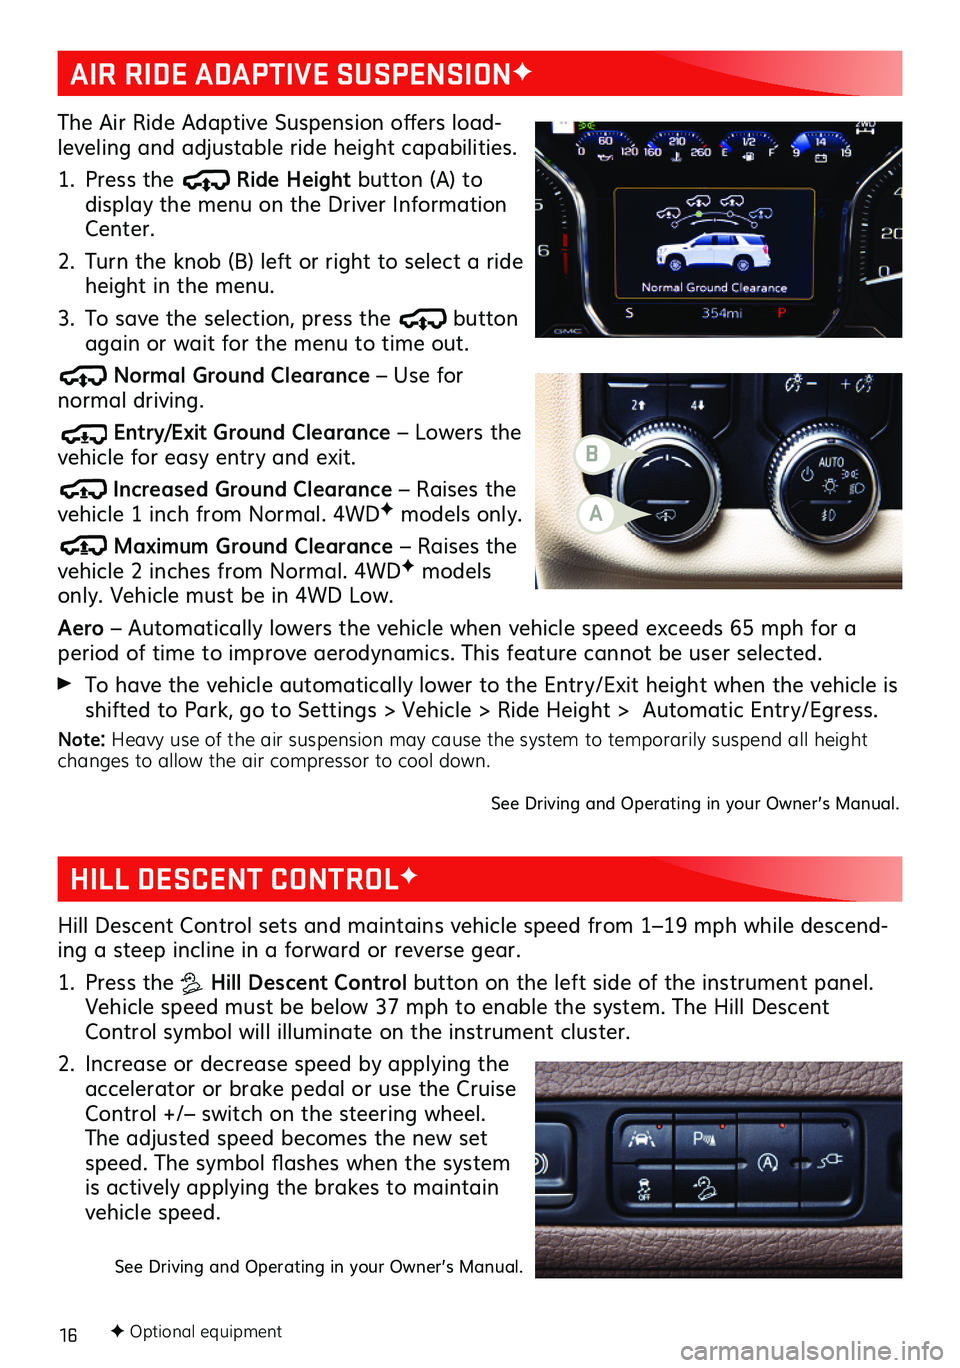
The Air Ride Adaptive Suspension offers load-leveling and adjustable ride height capabilities.
1. Press the Ride Height button (A) to display the menu on the Driver Information Center.
2. Turn the knob (B) left or right to select a ride height in the menu.
3. To save the selection, press the button again or wait for the menu to time out.
Normal Ground Clearance – Use for normal driving.
Entry/Exit Ground Clearance – Lowers the vehicle for easy entry and exit.
Increased Ground Clearance – Raises the vehicle 1 inch from Normal. 4WDF models only.
Maximum Ground Clearance – Raises the vehicle 2 inches from Normal. 4WDF models only. Vehicle must be in 4WD Low.
Aero – Automatically lowers the vehicle when vehicle speed exceeds 65 mph for a period of time to improve aerodynamics. This feature cannot be user selected.
To have the vehicle automatically lower to the Entry/Exit height when the vehicle is shifted to Park, go to Settings > Vehicle > Ride Height > Automatic Entry/Egress.
Note: Heavy use of the air suspension may cause the system to temporarily suspend all height changes to allow the air compressor to cool down.
See Driving and Operating in your Owner’s Manual.
AIR RIDE ADAPTIVE SUSPENSIONF
B
A