2021 GENESIS G70 ECO mode
[x] Cancel search: ECO modePage 112 of 516

3-27
Convenient features of your vehicle
3
4. Press the Original Transmitter
(OT) button until the indicator (4)
is turned continuously ON or
flashes in Green for approximately
10 seconds and it indicates the
programing is completed.
5. However, the indicator (4) flashes
in Green continuously, but if the
garage door opener does not
operate, please continue to follow
the step 6 and 7 (“Rolling Code
Programming” procedures).
6. Firmly press and release the
“Learn,” “Smart,” or “Program” but-
ton while the indicator (4) flashes
in Green. Once the button is
pressed, you have approximately
30 seconds to initiate the next
step.
Information
At the garage door opener motor,
(security gate motor, etc.) locate the
“Learn,” “Smart,” or “Program” but-
ton. This can usually be found where
the hanging antenna wire is attached
to the motor-head unit (see the
device’s manual to identify this but-
ton). The name and color of the button
may vary by manufacturer. A ladder
and/or second person may simplify
the following steps.
7. Return to the vehicle and firmly
press, hold for two seconds and
release the HomeLink button up to
three times. Do not press the
HomeLink button rapidly. At this
point programming is complete
and your device should operate
when the HomeLink button is
pressed and released.
Information
• Some garage door openers require
to press the programmed button on
the mirror up to three times right
after the programming is just com-
pleted to operate the garage door.
• The indicator (4) is turned ON in
Orange and flashes for about 60 sec-
onds, during the programing mode
and if a programing is not succeed-
ed within the 60 seconds, the pro-
graming mode will be abort.
HomeLink
®should now activate your
rolling code equipped device.
Gate operator & Canadian program-
ming
During programming, your handheld
transmitter may automatically stop
transmitting. Continue to press the
Integrated HomeLink
®Wireless
Control System button while you press
and re-press ("cycle") your handheld
transmitter every two seconds until the
frequency signal has been learned.
The indicator light will flash slowly and
then rapidly after several seconds
upon successful training.
ii
OIK047419N
Page 138 of 516

3-53
Convenient features of your vehicle
3
How to use the Smart Trunk
The trunk can be opened with no-
touch activation satisfying all the
conditions below.
• After 15 seconds when all doors
are closed and locked
• Positioned in the detecting area for
more than 3 seconds
Information
The Smart Trunk does not operate
when:
• The smart key is detected within 15
seconds after the doors are closed
and locked, and is continuously
detected.
• The smart key is detected within 15
seconds after the doors are closed
and locked, and within 60 inches (1.5
m) from the front door handles. (for
vehicles equipped with Welcome
Light)
• A door is not locked or closed.
• The smart key is in the vehicle. 1. Setting
To activate the Smart Trunk, go to
User Settings mode and select Smart
Trunk in the cluster LCD display.
For more details, refer to "LCD
Display" in this chapter.
2. Detect and Alert
If you are positioned in the detecting
area (20 ~ 40 inches (50 ~ 100 cm)
behind the vehicle) carrying a smart
key, the hazard warning lights will
blink and chime will sound to alert
you the smart key has been detected
and the trunk will open.
Information
Do not approach the detecting area if
you do not want the trunk to open. If
you have unintentionally entered the
detecting area and the hazard warn-
ing lights and chime starts to operate,
leave the detecting area with the
smart key. The trunk will stay closed.3. Automatic opening
The hazard warning lights will blink
and chime will sound several times
and then the trunk will slowly open.
i
i
•Make sure you close the trunk
before driving your vehicle.
•Make sure there are no people
or objects around the trunk
before opening or closing the
trunk.
•Make sure objects in the trunk
do not come out when open-
ing the trunk on a slope. It
may cause serious injury.
•Make sure to deactivate the
Smart Trunk when washing
your vehicle. Otherwise, the
trunk may open inadvertently.
•The key should be kept out of
reach of children. Children
may inadvertently open the
Smart Trunk while playing
around the rear area of the
vehicle.
WARNING
Page 147 of 516

3-62
Convenient features of your vehicle
Outside temperature gauge
This gauge indicates the current out-
side air temperature by 1°F (1°C).
- Temperature range :-40°F ~ 140°F
(-40°C ~ 60°C)
Note that the temperature indicated
on the LCD display may not change
as quickly as the outside tempera-
ture (there may be a slight delay
before the temperature changes.) You can change the temperature unit
from °F to °C or °C to °F in the User
Settings mode in the cluster:
- Go to User Settings Mode ➝Other
➝Temperature Unit.
For vehicles equipped with Automatic
Climate Control, you can also:
- Press the AUTO button while press-
ing the OFF button on the climate
control unit for 3 seconds
Both the temperature unit on the
cluster LCD display and climate con-
trol screen will change.
Odometer
The odometer indicates the total dis-
tance that the vehicle has been driv-
en and should be used to determine
when periodic maintenance should
be performed.
OIK047162N/OIK047139N
■Type A■Type B
OIK047182N/OIK047143N
■Type A■Type B
Page 149 of 516

3-64
Convenient features of your vehicle
For example
: Indicates that shifting up to the
3
rdgear is desired (currently
the shift lever is in the 2ndor 1st
gear).
: Indicates that shifting down to
the 3
rdgear is desired (current-
ly the shift lever is in the 4th, 5th,
or 6thgear).
When the system is not working
properly, the indicator is not dis-
played.
Automatic transmission shift
indicator (if equipped)
This indicator displays the gear posi-
tion of the shift lever.
•Park :P
• Reverse : R
• Neutral : N
•Drive :D
• Manual shift mode : 1, 2, 3, 4, 5, 6,
7, 8
Shift indicator pop-up (if equipped)
The pop-up indicates the current
gear position displayed in the cluster
for about 2 seconds when shifting
into other positions (P/R/N/D).OIG046112/OIK047140
■Type A■Type B
■Type A■Type B
OIK047141/OIK047142
Page 156 of 516

3-71
Convenient features of your vehicle
3
This warning light remains ON after
blinking for approximately 60 sec-
onds, or repeatedly blinks ON and
OFF in 3 second intervals:
• When there is a malfunction with
the TPMS.
In this case, have the vehicle
inspected by an authorized retailer
of Genesis Branded products as
soon as possible.
For more details, refer to "Tire
Pressure Monitoring System
(TPMS)" in chapter 6.
All Wheel Drive (AWD)
Warning Light
(if equipped)
This warning light illuminates:
• When there is a malfunction with
the AWD system.
In this case, have your vehicle
inspected by an authorized retailer
of Genesis Branded products.
Icy Road Warning Light
(if equipped)
This warning light is to warn the driver
the road may be icy.
When the temperature on the out-
side temperature gauge is approxi-
mately below 40°F (4°C), the Icy
Road Warning Light and Outside
Temperature Gauge blinks and then
illuminates. Also, the warning chime
sounds 1 time.
You can activate or deactivate Icy
Road Warning function from the User
Settings mode in the cluster LCD dis-
play.
Information
If the icy road warning light appears
while driving, you should drive more
attentively and safely refraining from
over-speeding, rapid acceleration, sud-
den braking or sharp turning, etc.
i
Safe Stopping
•The TPMS cannot alert you to
severe and sudden tire dam-
age caused by external fac-
tors.
•If you notice any vehicle insta-
bility, immediately take your
foot off the accelerator pedal,
apply the brakes gradually
with light force, and slowly
move to a safe position off the
road.
WARNING
Page 161 of 516

3-76
Convenient features of your vehicle
Cruise Indicator Light
(if equipped)
This indicator light illuminates:
• When the cruise control system is
enabled.
For more details, refer to "Cruise
Control System" in chapter 5.
COMFORT Mode
Indicator Light
This indicator light illuminates:
• When you select "COMFORT"
mode as drive mode.
For more details, refer to "Drive
Mode Integrated Control System"
in chapter 5.
SPORT Mode Indicator
Light
This indicator light illuminates:
• When you select "SPORT" mode
as drive mode.
For more details, refer to "Drive
Mode Integrated Control System"
in chapter 5.
ECO Mode Indicator
Light
This indicator light illuminates :
• When you select "ECO" mode as
drive mode.
For more details, refer to "Drive
Mode Integrated Control System"
in chapter 5.
SMART Mode Indicator
Light
This indicator light illuminates:
• When you select ''SMART" mode
as drive mode.
For more details, refer to "Drive
Mode Integrated Control System''
in chapter 5.
CUSTOM Mode
Indicator Light
(if equipped)
This indicator light illuminates:
• When you select ''CUSTOM" mode
as drive mode.
For more details, refer to "Drive
Mode Integrated Control System''
in chapter 5.
�6�0�$�5�7�&�5�8�,�6�(
Page 169 of 516

3-84
Convenient features of your vehicle
Modes SymbolExplanation
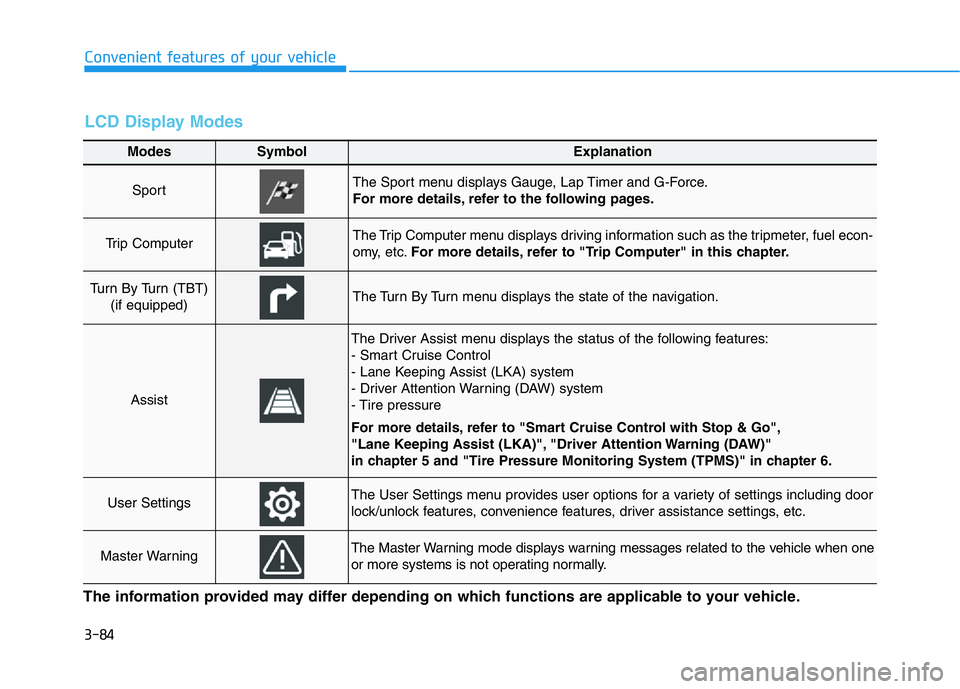
Sport The Sport menu displays Gauge, Lap Timer and G-Force.
For more details, refer to the following pages.
Trip Computer The Trip Computer menu displays driving information such as the tripmeter, fuel econ-
omy, etc.For more details, refer to "Trip Computer" in this chapter.
Turn By Turn (TBT)
(if equipped)The Turn By Turn menu displays the state of the navigation.
Assist
The Driver Assist menu displays the status of the following features:
- Smart Cruise Control
- Lane Keeping Assist (LKA) system
- Driver Attention Warning (DAW) system
- Tire pressure
For more details, refer to "Smart Cruise Control with Stop & Go",
"Lane Keeping Assist (LKA)", "Driver Attention Warning (DAW)"
in chapter 5 and "Tire Pressure Monitoring System (TPMS)" in chapter 6.
User SettingsThe User Settings menu provides user options for a variety of settings including door
lock/unlock features, convenience features, driver assistance settings, etc.
Master WarningThe Master Warning mode displays warning messages related to the vehicle when one
or more systems is not operating normally.
The information provided may differ depending on which functions are applicable to your vehicle.
LCD Display Modes
Page 170 of 516

3-85
Convenient features of your vehicle
3
Sport mode
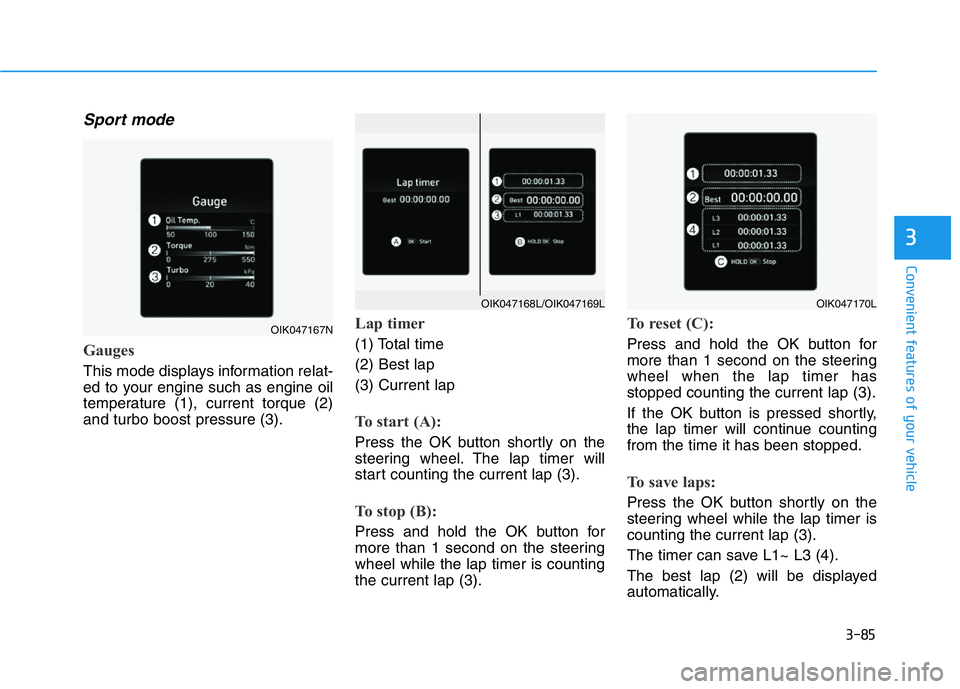
Gauges
This mode displays information relat-
ed to your engine such as engine oil
temperature (1), current torque (2)
and turbo boost pressure (3).
Lap timer
(1) Total time
(2) Best lap
(3) Current lap
To start (A):
Press the OK button shortly on the
steering wheel. The lap timer will
start counting the current lap (3).
To stop (B):
Press and hold the OK button for
more than 1 second on the steering
wheel while the lap timer is counting
the current lap (3).
To reset (C):
Press and hold the OK button for
more than 1 second on the steering
wheel when the lap timer has
stopped counting the current lap (3).
If the OK button is pressed shortly,
the lap timer will continue counting
from the time it has been stopped.
To save laps:
Press the OK button shortly on the
steering wheel while the lap timer is
counting the current lap (3).
The timer can save L1~ L3 (4).
The best lap (2) will be displayed
automatically.
OIK047167N
OIK047170LOIK047168L/OIK047169L