2021 FORD POLICE INTERCEPTOR steering wheel
[x] Cancel search: steering wheelPage 166 of 412

Camera Guide Lines
Active guide lines.
A
Centerline.
B
Fixed guideline: Green zone.
C
Fixed guideline: Yellow zone.
D
Fixed guideline: Red zone.
E
Rear bumper.
F
Active guide lines are only shown with fixed
guide lines. To use active guide lines, turn
the steering wheel to point the guide lines
toward an intended path. If you change the
steering wheel position when reversing,
your vehicle could deviate from the original
intended path. The fixed and active guide lines fade in and
out depending on the steering wheel
position. The active guide lines do not
display when the steering wheel position
is straight.
Use caution when reversing. Objects in the
red zone are closest to your vehicle and
objects in the green zone are farther away.
Objects are getting closer to your vehicle
as they move from the green zone to the
yellow or red zones. Use the side view
mirrors and rear view mirror to get better
coverage on both sides and rear of the
vehicle.
Note:
Guide lines are not available on some
vehicles.
Note: Active guide lines are only available
when the transmission is in reverse (R).
Obstacle Distance Indicator (If
Equipped) The system provides an image of your
vehicle and the sensor zones. The zones
highlight green, yellow and red when the
parking aid sensors detect an object in the
coverage area.
163
Explorer (CTW) Police, Canada/United States of America, Police, enUSA, Edition date: 202007, Second-Printing Parking AidsABCD
F
E
E142436 E190459
Page 168 of 412
WHAT IS CRUISE CONTROL
Cruise control lets you maintain a set
speed without keeping your foot on the
accelerator pedal.
Requirements
Use cruise control when the vehicle speed
is greater than 20 mph (30 km/h).
SWITCHING CRUISE CONTROL
ON AND OFF WARNING:
Do not use cruise
control on winding roads, in heavy traffic
or when the road surface is slippery. This
could result in loss of vehicle control,
serious injury or death.
The cruise controls are on the steering
wheel.
Switching Cruise Control On Press the button to put the
system in standby mode.
Switching Cruise Control Off Press the button when in
standby mode or switch the
ignition off.
Note: When you switch cruise control off
the set speed clears. SETTING THE CRUISE
CONTROL SPEED WARNING:
When you are going
downhill, your vehicle speed could
increase above the set speed. The
system does not apply the brakes.
Drive to the speed you prefer. Press the toggle button upward
or downward to set the current
speed.
Take your foot off the accelerator pedal.
Note: The indicator changes color in the
information display.
Changing the Set Speed Press and release the toggle
button upward to increase the
set speed in small increments.
Press and hold the toggle button upward
to accelerate. Release the button when
you have reached your preferred speed. Press and release the toggle
button downward to decrease
the set speed in small
increments.
Press and hold the toggle button
downward to decelerate. Release the
button when you have reached your
preferred speed.
Note: If you accelerate by pressing the
accelerator pedal, the set speed does not
change. When you release the accelerator
pedal, your vehicle returns to the speed that
you previously set.
165
Explorer (CTW) Police, Canada/United States of America, Police, enUSA, Edition date: 202007, Second-Printing Cruise ControlE71340 E71340
Page 181 of 412
WHAT IS DRIVE MODE
CONTROL
The system delivers a driving experience
through a suite of sophisticated electronic
vehicle systems. These systems optimize
steering, handling and powertrain
response. This provides a single location
to control multiple systems performance
settings.
Changing the drive mode changes the
functionality of the following systems:
•
Electric power-assisted steering
system adjusts steering effort and feel
based on the mode you select. See
Steering (page 174).
• Electronic stability control and traction
control maintain your vehicle control
in adverse conditions or high
performance driving. See
Stability
Control (page 157).
• Electronic throttle control enhances
the powertrain response to your driving
inputs.
• Transmission controls become
optimized with shift schedules tuned
to each mode.
• Four-wheel drive settings are optimized
and tuned to each mode.
• Electric vehicle mode selections may
be limited. See
Hybrid Vehicle
Operation (page 123).
The system tailors your vehicle
configuration for each mode you select.
Note: Not all settings may be available.
Note: The system has diagnostic checks
that continuously monitor the system for
proper operation. If a mode is unavailable
due to a system fault or change in gear
shifter position, the mode defaults to
Normal. SELECTING A DRIVE MODE
Police Pursuit Mode This mode does not use a switch.
This system is a temporary
driving enhancement that senses
the driver is demanding high performance
from the vehicle. On all Police Interceptor
applications, the transmission holds lower
gears and the engine holds higher engine
speeds longer than normal driving. The
mode terminates when the vehicle senses
the driver is no longer in high performance
demand. The vehicle then returns to
normal operation.
Note: Drive mode changes may not be
available when the ignition is off or when
the engine is not running. Press the drive mode button underneath
the information display to select or change
a drive mode.
DRIVE MODES
Deep Snow/Sand
For snow or soft dry sand. When
stuck in deep snow, use this
mode to help get unstuck.
Note: Using deep snow/sand mode on dry,
hard surfaces could produce some vibration,
driveline bind up, and potential excessive
tire wear. This mode is for slippery and loose
surfaces.
178
Explorer (CTW) Police, Canada/United States of America, Police, enUSA, Edition date: 202007, Second-Printing Drive Mode ControlE271854 E298239 E295420
Page 192 of 412
Before Towing a Trailer
Practice turning, stopping and backing up
to get the feel of your vehicle-trailer
combination before starting on a trip.
When turning, make wider turns so the
trailer wheels clear curbs and other
obstacles.
When Towing a Trailer
•
Do not drive faster than 70 mph
(113 km/h) during the first 500 mi
(800 km).
• Do not make full-throttle starts.
• Check your hitch, electrical connections
and trailer wheel lug nuts thoroughly
after you have traveled 50 mi (80 km).
• When stopped in congested or heavy
traffic during hot weather, place the
gearshift in park (P) to aid engine and
transmission cooling and to help A/C
performance.
• Turn off the speed control with heavy
loads or in hilly terrain. The speed
control may turn off automatically
when you are towing on long, steep
grades.
• Shift to a lower gear when driving down
a long or steep hill. Do not apply the
brakes continuously, as they may
overheat and become less effective.
• If your transmission is equipped with a
Grade Assist or Tow/Haul feature, use
this feature when towing. This provides
engine braking and helps eliminate
excessive transmission shifting for
optimum fuel economy and
transmission cooling.
• Allow more distance for stopping with
a trailer attached. Anticipate stops and
brake gradually.
• Avoid parking on a grade. However, if
you must park on a grade:
1. Turn the steering wheel to point your vehicle tires away from traffic flow. 2. Set your vehicle parking brake.
3. Place the automatic transmission in
park (P).
4. Place wheel chocks in front and back of the trailer wheels. (Chocks not
included with vehicle.)
Launching or Retrieving a Boat or
Personal Watercraft (PWC)
Note: Disconnect the wiring to the trailer
before backing the trailer into the water.
Note: Reconnect the wiring to the trailer
after
removing the trailer from the water.
When backing down a ramp during boat
launching or retrieval:
• Do not allow the static water level to
rise above the bottom edge of the rear
bumper.
• Do not allow waves to break higher
than
6 in (15 cm) above the bottom
edge of the rear bumper.
Exceeding these limits may allow water to
enter vehicle components:
• Causing internal damage to the
components.
• Affecting driveability, emissions, and
reliability.
Replace the rear axle lubricant anytime
the rear axle has been submerged in water.
Water may have contaminated the rear
axle lubricant, which is not normally
checked or changed unless a leak is
suspected or other axle repair is required.
189
Explorer (CTW) Police, Canada/United States of America, Police, enUSA, Edition date: 202007, Second-Printing Towing
Page 193 of 412
TOWING THE VEHICLE ON
FOUR WHEELS
Emergency Towing
WARNING: If your vehicle has a
steering wheel lock make sure the
ignition is in the accessory or on position
when being towed.
If your vehicle becomes inoperable without
access to wheel dollies or a vehicle
transport trailer, it can be flat-towed with
all wheels on the ground, regardless of the
powertrain and transmission configuration,
under the following conditions:
• Your vehicle is facing forward for
towing in a forward direction.
• Place the transmission in neutral (N).
If you cannot shift the transmission into
neutral (N), you may need to override
the gear shifter. See
Transmission
(page 142). Failing to do so may result
in damage to the transmission.
• Maximum speed is 35 mph (56 km/h).
• Maximum distance is
50 mi (80 km).
Recreational Towing
You cannot recreational tow your vehicle
with all wheels on the ground because
vehicle or transmission damage could
occur. You must recreational tow your
vehicle with all four wheels off the ground
such as when using a car-hauling trailer.
Otherwise, you cannot recreational tow
your vehicle.
190
Explorer (CTW) Police, Canada/United States of America, Police, enUSA, Edition date: 202007, Second-Printing Towing
Page 196 of 412
When driving through standing water, drive
very slowly and do not stop your vehicle.
Your brake performance and traction may
be limited. After driving through water and
as soon as it is safe to do so:
•
Lightly press the brake pedal to dry the
brakes and to check that they work.
• Check that the horn works.
• Check that the exterior lights work.
• Turn the steering wheel to check that
the steering power assist works.
FLOOR MATS WARNING: Use a floor mat
designed to fit the footwell of your
vehicle that does not obstruct the pedal
area. Failure to follow this instruction
could result in the loss of control of your
vehicle, personal injury or death. WARNING:
Pedals that cannot
move freely can cause loss of vehicle
control and increase the risk of serious
personal injury. WARNING:
Secure the floor mat
to both retention devices so that it
cannot slip out of position and interfere
with the pedals. Failure to follow this
instruction could result in the loss of
control of your vehicle, personal injury or
death. WARNING: Do not place additional
floor mats or any other covering on top
of the original floor mats. This could
result in the floor mat interfering with the
operation of the pedals. Failure to follow
this instruction could result in the loss of
control of your vehicle, personal injury or
death. WARNING:
Always make sure that
objects cannot fall into the driver foot
well while your vehicle is moving. Objects
that are loose can become trapped
under the pedals causing a loss of
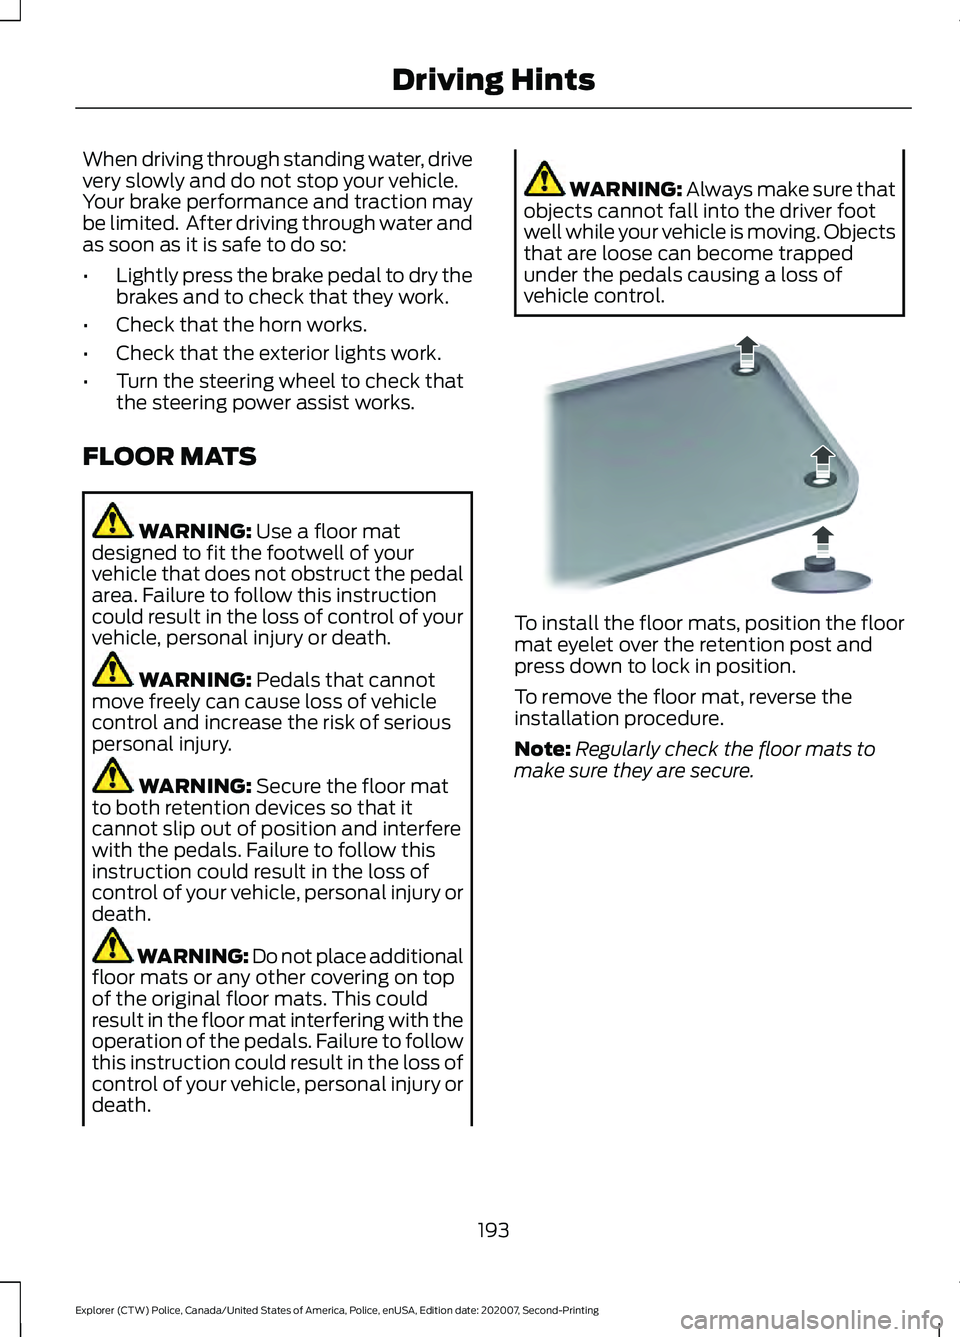
vehicle control. To install the floor mats, position the floor
mat eyelet over the retention post and
press down to lock in position.
To remove the floor mat, reverse the
installation procedure.
Note:
Regularly check the floor mats to
make sure they are secure.
193
Explorer (CTW) Police, Canada/United States of America, Police, enUSA, Edition date: 202007, Second-Printing Driving HintsE142666
Page 218 of 412

Protected Component
Fuse Rating
Fuse or Relay
Number
Not used.
—
10
Not used.
—
11
Climate control head.
7.5A
12
Gear shift module.
Steering column control module.
7.5A
13
Smart datalink connector.
Instrument cluster.
Not used (spare).
15A
14
SYNC.
15A
15
Integrated control panel.
Not used.
—
16
Headlamp control module.
7.5A
17
Steering wheel interface.
7.5A
18
Headlamp switch.
5A
19
Ignition switch.
5A
20
Telematics control unit module.
Key inhibit solenoid lock.
Not used.
5A
21
Not used (spare).
5A
22
Not used (spare).
30A
23
Moonroof.
30A
24
Not used (spare).
20A
25
Not used (spare).
30A
26
Not used (spare).
30A
27
Not used (spare).
30A
28
Integrated computer screen.
15A
29
Brake switch signal.
5A
30
Terrain management switch.
10A
31
Selectable drive mode switch.
Transceiver module.
215
Explorer (CTW) Police, Canada/United States of America, Police, enUSA, Edition date: 202007, Second-Printing Fuses
Page 226 of 412

Only use oils certified for gasoline engines
by the American Petroleum Institute (API).
An oil with this trademark symbol
conforms to the current engine and
emission system protection standards and
fuel economy requirements of the
International Lubricants Specification
Advisory Committee (ILSAC).
To top up the engine oil level do the
following:
1. Clean the area surrounding the engine
oil filler cap before you remove it.
2. Remove the engine oil filler cap. See Under Hood Overview (page 220).
Turn it counterclockwise and remove
it.
3. Add engine oil that meets our specifications. See
Capacities and
Specifications (page 279). You may
have to use a funnel to pour the engine
oil into the opening.
4. Recheck the oil level.
5. If the oil level is correct, replace the dipstick and make sure it is fully seated.
6. Replace the engine oil filler cap. Turn it clockwise until you feel a strong
resistance.
Note: Do not add oil further than the
maximum mark. Oil levels above the
maximum mark may cause engine damage. Note:
Make sure you install the oil filler cap
correctly.
Note: Soak up any spillage with an
absorbent cloth immediately.
OIL CHANGE INDICATOR
RESET
Use the information display controls on
the steering wheel to reset the oil change
indicator.
From the main menu scroll to: Action and description
Message
Press the right arrow button,
then from this menu scroll
to the following message.
Settings
Press the right arrow button,
then from this menu scroll
to the following message.
Informa-
tion
Press the right arrow button,
then from this menu scroll
to the following message.
Oil Life
Press and hold the
OK
button until the instrument
cluster displays the
following message.
Hold OK to
Reset
Reset Successful
When the oil change indic-
ator resets the instrument
cluster displays 100%.
Remaining Life
{00}%
223
Explorer (CTW) Police, Canada/United States of America, Police, enUSA, Edition date: 202007, Second-Printing MaintenanceE142732