2021 FORD POLICE INTERCEPTOR parking brake
[x] Cancel search: parking brakePage 225 of 412

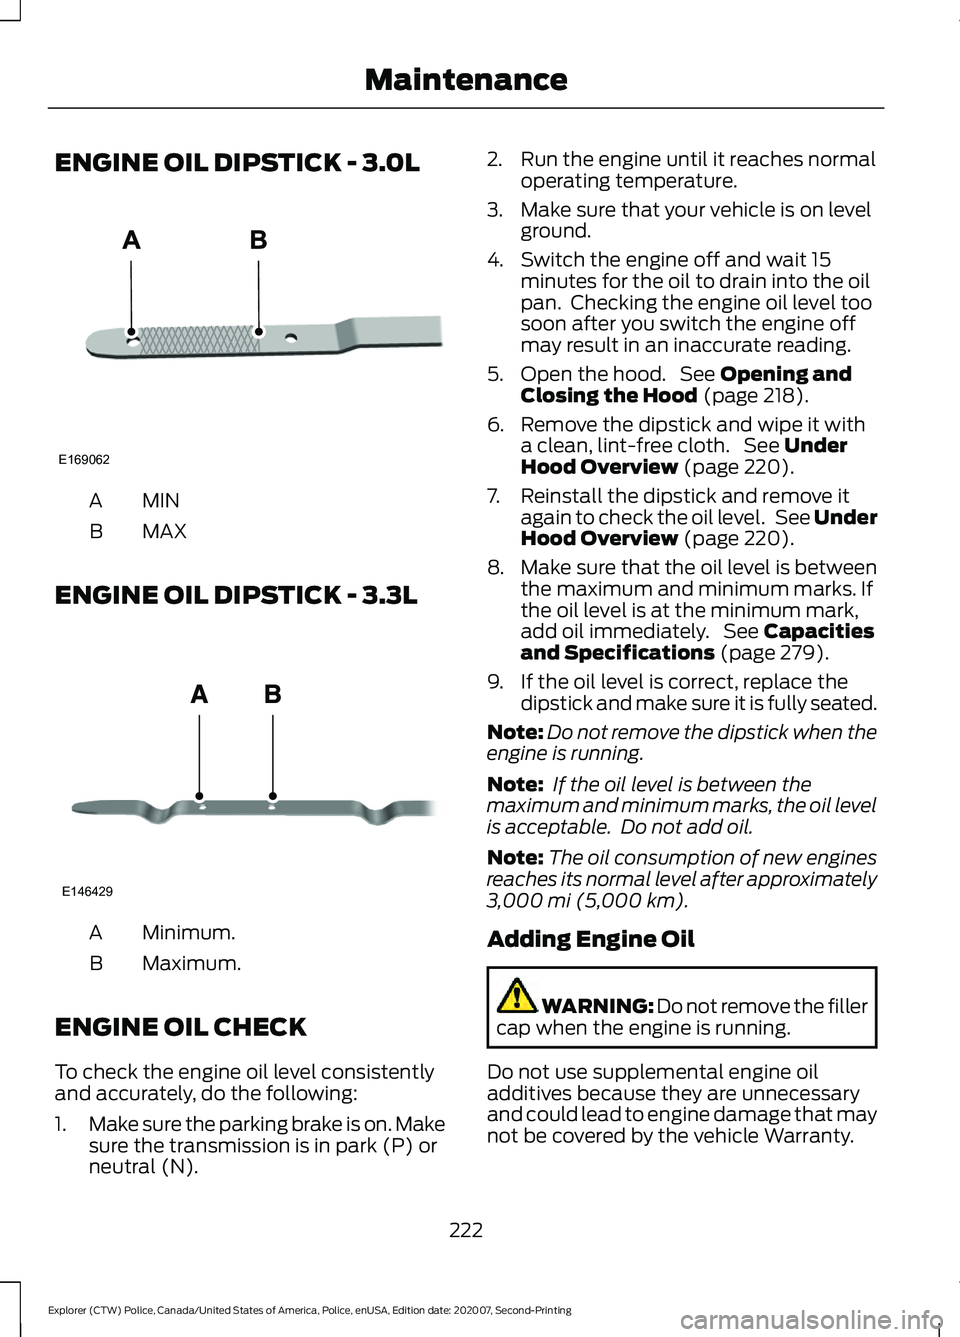
ENGINE OIL DIPSTICK - 3.0L
MINA
MAX
B
ENGINE OIL DIPSTICK - 3.3L Minimum.
A
Maximum.
B
ENGINE OIL CHECK
To check the engine oil level consistently
and accurately, do the following:
1. Make sure the parking brake is on. Make
sure the transmission is in park (P) or
neutral (N). 2. Run the engine until it reaches normal
operating temperature.
3. Make sure that your vehicle is on level ground.
4. Switch the engine off and wait 15 minutes for the oil to drain into the oil
pan. Checking the engine oil level too
soon after you switch the engine off
may result in an inaccurate reading.
5. Open the hood. See Opening and
Closing the Hood (page 218).
6. Remove the dipstick and wipe it with a clean, lint-free cloth. See
Under
Hood Overview (page 220).
7. Reinstall the dipstick and remove it again to check the oil level. See Under
Hood Overview
(page 220).
8. Make sure that the oil level is between
the maximum and minimum marks. If
the oil level is at the minimum mark,
add oil immediately. See
Capacities
and Specifications (page 279).
9. If the oil level is correct, replace the dipstick and make sure it is fully seated.
Note: Do not remove the dipstick when the
engine is running.
Note: If the oil level is between the
maximum and minimum marks, the oil level
is acceptable. Do not add oil.
Note: The oil consumption of new engines
reaches its normal level after approximately
3,000 mi (5,000 km)
.
Adding Engine Oil WARNING: Do not remove the filler
cap when the engine is running.
Do not use supplemental engine oil
additives because they are unnecessary
and could lead to engine damage that may
not be covered by the vehicle Warranty.
222
Explorer (CTW) Police, Canada/United States of America, Police, enUSA, Edition date: 202007, Second-Printing MaintenanceE169062 E146429
Page 233 of 412

1. Stop your vehicle as soon as it is safe
to do so. Fully apply the parking brake,
shift into park (P) or neutral (N).
2. Leave the engine running until the coolant temperature gauge needle
returns to the normal position. If the
temperature does not drop after
several minutes, follow the remaining
steps.
3. Switch the engine off and wait for it to
cool. Check the coolant level.
4. If the coolant level is at or below the minimum mark, add prediluted coolant
immediately.
5. If the coolant level is normal, restart the engine and continue.
AUTOMATIC TRANSMISSION
FLUID CHECK
If required, have an authorized dealer check
and change the transmission fluid at the
correct service interval. See Scheduled
Maintenance (page 326).
The automatic transmission does not have
a transmission fluid dipstick.
Refer to your scheduled maintenance
information for scheduled intervals for fluid
checks and changes. Your transmission
does not consume fluid. However, if the
transmission slips, shifts slowly or if you
notice a sign of leaking fluid, contact an
authorized dealer.
Do not use supplemental transmission
fluid additives, treatments or cleaning
agents. The use of these materials may
affect transmission operation and result
in damage to internal transmission
components. BRAKE FLUID CHECK WARNING:
Do not use any fluid
other than the recommended brake fluid
as this will reduce brake efficiency. Use
of incorrect fluid could result in the loss
of vehicle control, serious personal injury
or death. WARNING:
Only use brake fluid
from a sealed container. Contamination
with dirt, water, petroleum products or
other materials may result in brake
system damage or failure. Failure to
adhere to this warning could result in the
loss of vehicle control, serious personal
injury or death. WARNING:
Do not allow the fluid
to touch your skin or eyes. If this
happens, rinse the affected areas
immediately with plenty of water and
contact your physician. WARNING:
The brake system
could be affected if the brake fluid level
is below the MIN mark or above the MAX
mark on the brake fluid reservoir.
230
Explorer (CTW) Police, Canada/United States of America, Police, enUSA, Edition date: 202007, Second-Printing Maintenance
Page 236 of 412

After battery replacement, or in some
cases after charging the battery with an
external charger, the battery management
system requires eight hours of vehicle sleep
time to relearn the battery state of charge.
During this time your vehicle must remain
fully locked with the ignition switched off.
Note:
Prior to relearning the battery state
of charge, the battery management system
may temporarily disable some electrical
systems.
Electrical Accessory Installation
To make sure the battery management
system works correctly, do not connect an
electrical device ground connection
directly to the battery negative post. This
can cause inaccurate measurements of
the battery condition and potential
incorrect system operation.
Note: If you add electrical accessories or
components to the vehicle, it may adversely
affect battery performance and durability.
This may also affect the performance of
other electrical systems in the vehicle.
Remove and Reinstall the Battery
To disconnect or remove the battery, do
the following:
1. Apply the parking brake and switch the
ignition off.
2. Switch all electrical equipment off, for
example lights and radio.
3. Wait a minimum of two minutes before
disconnecting the battery.
Note: The engine management system has
a power hold function and remains powered
for a period of time after you switch the
ignition off. This is to allow diagnostic and
adaptive tables to be stored. Disconnecting
the battery without waiting can cause
damage not covered by the vehicle
Warranty. 4. Disconnect the negative battery cable
terminal.
5. Disconnect the positive battery cable terminal.
6. Remove the battery securing clamp.
7. Remove the battery.
8. To install, reverse the removal procedure.
Note: Before reconnecting the battery,
make sure the ignition remains switched off.
Note: Make sure the battery cable terminals
are fully tightened.
If you disconnect or replace the vehicle
battery, you must reset the following
features:
• Window bounce-back. See Power
Windows (page 74).
• Clock Settings.
• Pre-set radio stations.
Battery Disposal Make sure that you dispose of
old batteries in an
environmentally friendly way.
Seek advice from your local authority
about recycling old batteries.
ADJUSTING THE HEADLAMPS
Vertical Aim Adjustment
If your vehicle has been involved in a crash,
have the aim of the headlamp beam
checked by an authorized dealer.
233
Explorer (CTW) Police, Canada/United States of America, Police, enUSA, Edition date: 202007, Second-Printing MaintenanceE107998
Page 246 of 412

2. Remove dirt and brake dust with a
sponge.
3. Remove tar and grease with a bug and
tar remover. We recommend that you
use Ford approved bug and tar remover
if available.
4. Thoroughly rinse the wheels with water
after cleaning.
If you intend on parking your vehicle for an
extended period after cleaning the wheels
with a wheel cleaner, drive your vehicle for
a few minutes before doing so. This
reduces the risk of corrosion of the brake
discs, brake pads and linings.
Do not clean the wheels when they are hot.
Note: Some car washes could damage
wheel rims and covers.
Note: Using non-recommended cleaners,
harsh cleaning products, chrome wheel
cleaners or abrasive materials could
damage wheel rims and covers.
VEHICLE STORAGE
If you plan on storing your vehicle for 30
days or more, read the following
maintenance recommendations to make
sure your vehicle stays in good operating
condition.
We engineer and test all motor vehicles
and their components for reliable, regular
driving. Under various conditions,
long-term storage may lead to degraded
engine performance or failure unless you
use specific precautions to preserve engine
components. General
•
Store all vehicles in a dry, ventilated
place.
• Protect from sunlight, if possible.
• If vehicles are stored outside, they
require regular maintenance to protect
against rust and damage.
Body
• Wash your vehicle thoroughly to
remove dirt, grease, oil, tar or mud from
exterior surfaces, rear-wheel housing
and the underside of front fenders.
• Periodically wash your vehicle if it is
stored in exposed locations.
• Touch-up exposed or primed metal to
prevent rust.
• Cover chrome and stainless steel parts
with a thick coat of auto wax to prevent
discoloration. Re-wax as necessary
when you wash your vehicle.
• Lubricate all hood, door and luggage
compartment hinges and latches with
a light grade oil.
• Cover interior trim to prevent fading.
• Keep all rubber parts free from oil and
solvents.
Engine
• Change the engine oil and filter prior to
storage because used engine oil
contains contaminates which may
cause engine damage.
• Start the engine every 15 days for a
minimum of 15 minutes. Run at fast
idle with the climate controls set to
defrost until the engine reaches normal
operating temperature.
243
Explorer (CTW) Police, Canada/United States of America, Police, enUSA, Edition date: 202007, Second-Printing Vehicle Care
Page 247 of 412

•
With your foot on the brake, shift
through all the gears while the engine
is running.
• We recommend that you change the
engine oil before you use your vehicle
again.
Fuel system
• Fill the fuel tank with high-quality fuel
until the first automatic shutoff of the
fuel pump nozzle.
Cooling system
• Protect against freezing temperatures.
• When removing your vehicle from
storage, check coolant fluid level.
Confirm that there are no cooling
system leaks and that fluid is at the
recommended level.
Disconnecting Your 12 Volt Battery
• Check and recharge as necessary. Keep
connections clean.
• If storing your vehicle for more than 30
days without recharging the battery,
we recommend that you disconnect
the battery cables to maintain battery
charge for quick starting.
Note: It is necessary to reset memory
features if you disconnect the battery
cables. Plugging in Your HYBRID
We recommend the following options for
your plug-in vehicle (PHEV) :
•
Leave your vehicle plugged in. The 12
volt battery maintains power if left
plugged in. However, this periodically
uses electricity from the household
outlet.
• Connect a battery charger to your 12
volt battery and leave it on a
continuous, slow charge.
• Disconnect the 12 volt battery. If your
12 volt battery is located in the luggage
compartment, do not fully shut the
luggage compartment after
disconnecting the 12 volt battery. Only
leave the luggage compartment open
if your vehicle is stored in a locked
location.
Brakes
• Make sure the brakes and parking brake
release fully.
Tires
• Maintain recommended air pressure.
Miscellaneous
• Make sure all linkages, cables, levers
and pins under your vehicle are covered
with grease to prevent rust.
• Move vehicles at least 25 ft (7.5 m)
every 15 days to lubricate working parts
and prevent corrosion.
Removing Vehicle From Storage
When your vehicle is ready to come out of
storage, do the following:
• Wash your vehicle to remove any dirt
or grease film build-up on window
surfaces.
• Check windshield wipers for any
deterioration.
244
Explorer (CTW) Police, Canada/United States of America, Police, enUSA, Edition date: 202007, Second-Printing Vehicle Care
Page 273 of 412

Drive cautiously when using a full-size
dissimilar spare wheel and tire assembly
and seek service as soon as possible.
Tire Change Procedure
WARNING: To reduce the risk of
possible serious injury or death, do not
remove the full size spare tire from the
factory secured location. This location
is necessary to achieve police-rated
75 mph (120 km/h)
rear impact
crash-test performance. Removal
increases the risk of fuel leak in
high-speed rear impacts. WARNING:
The jack supplied with
this vehicle is only intended for changing
wheels. Do not use the vehicle jack other
than when you are changing a wheel in
an emergency. WARNING: Check that the vehicle
jack is not damaged or deformed and
the thread is lubricated and clean. WARNING:
To help prevent your
vehicle from moving when changing a
wheel, shift the transmission into park
(P), set the parking brake and use an
appropriate block or wheel chock to
secure the wheel diagonally opposite to
the wheel being changed. For example,
when changing the front left wheel,
place an appropriate block or wheel
chock on the right rear wheel. WARNING:
Always use the jack
provided as original equipment with your
vehicle. If using a jack other than the one
provided, make sure the jack capacity is
adequate for the vehicle weight,
including any vehicle cargo or
modifications. If you are unsure if the jack
capacity is adequate, contact the
authorized dealer. WARNING:
Do not work on your
vehicle when the jack is the only support
as your vehicle could slip off the jack.
Failure to follow this instruction could
result in personal injury or death. WARNING:
Use only the specified
jacking points. If you use other positions,
you may damage the body, steering,
suspension, engine, braking system or
the fuel lines. WARNING:
Never place anything
between the vehicle jack and your
vehicle. WARNING:
Never place anything
between the vehicle jack and the ground. WARNING:
Park your vehicle so
that you do not obstruct the flow of
traffic or place yourself in any danger and
set up a warning triangle. WARNING:
Do not attempt to
change a tire on the side of the vehicle
close to moving traffic. Pull far enough
off the road to avoid the danger of being
hit when operating the jack or changing
the wheel.
Note: Passengers should not remain in your
vehicle when the vehicle is being jacked.
Note: Jack at the specified locations to
avoid damage to the vehicle. 270
Explorer (CTW) Police, Canada/United States of America, Police, enUSA, Edition date: 202007, Second-Printing Wheels and TiresE166722
Page 274 of 412

Note:
No maintenance or additional
lubrication of your jack is required over the
service life of your vehicle.
1. Park on a level surface, set the parking
brake and switch on the hazard
flashers.
2. Apply the parking brake, place the transmission in park (P) or reverse (R)
for manual transmission. Turn the
engine off. 3. Block the wheel diagonally opposite
the flat tire. For example, if the left
front tire is flat, block the right rear
wheel. 4. Turn the wing nut securing the spare
tire counterclockwise, remove the wing
nut.
5. Remove the spare tire, jack and wrench
from the spare tire storage
compartment under the trunk load
floor. 6. Turn the hex nut on the jack
counterclockwise to remove the lug
wrench from jack. This lowers the jack
and loosens the mechanical lock.
271
Explorer (CTW) Police, Canada/United States of America, Police, enUSA, Edition date: 202007, Second-Printing Wheels and TiresE142551 E288598 E175694
Page 331 of 412

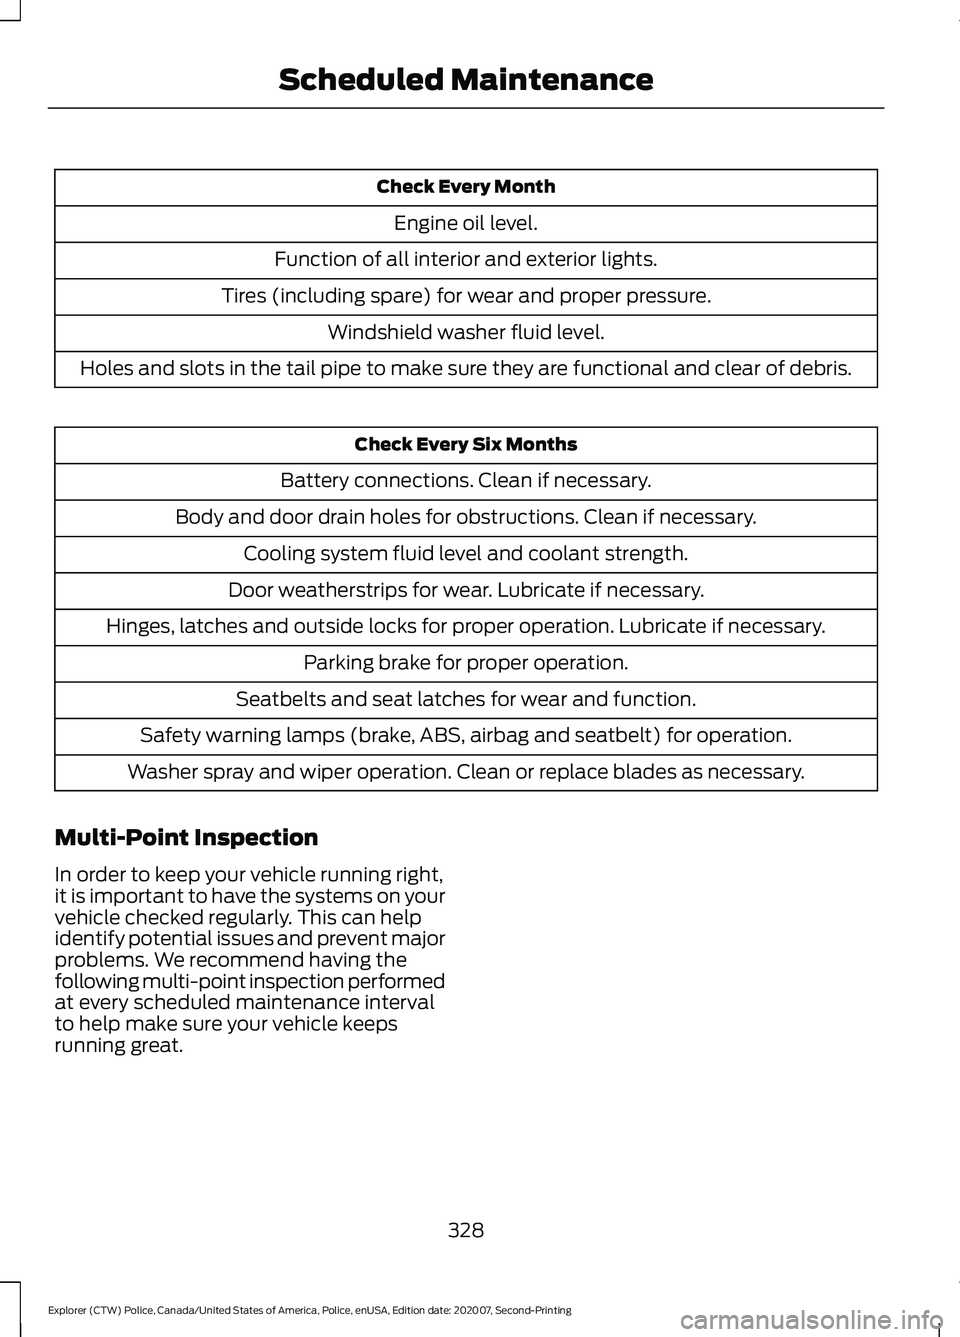
Check Every Month
Engine oil level.
Function of all interior and exterior lights.
Tires (including spare) for wear and proper pressure. Windshield washer fluid level.
Holes and slots in the tail pipe to make sure they are functional and clear of debris. Check Every Six Months
Battery connections. Clean if necessary.
Body and door drain holes for obstructions. Clean if necessary. Cooling system fluid level and coolant strength.
Door weatherstrips for wear. Lubricate if necessary.
Hinges, latches and outside locks for proper operation. Lubricate if necessary. Parking brake for proper operation.
Seatbelts and seat latches for wear and function.
Safety warning lamps (brake, ABS, airbag and seatbelt) for operation.
Washer spray and wiper operation. Clean or replace blades as necessary.
Multi-Point Inspection
In order to keep your vehicle running right,
it is important to have the systems on your
vehicle checked regularly. This can help
identify potential issues and prevent major
problems. We recommend having the
following multi-point inspection performed
at every scheduled maintenance interval
to help make sure your vehicle keeps
running great.
328
Explorer (CTW) Police, Canada/United States of America, Police, enUSA, Edition date: 202007, Second-Printing Scheduled Maintenance