2021 FORD POLICE INTERCEPTOR air filter
[x] Cancel search: air filterPage 224 of 412

UNDER HOOD OVERVIEW - 3.3L
Battery. See Changing the 12V Battery (page 231).
A.
Engine oil filler cap.
See Engine Oil Check (page 222).
B.
Engine oil dipstick.
See Engine Oil Dipstick (page 222).
C.
Brake fluid reservoir.
See Brake Fluid Check (page 230).
D.
Engine compartment fuse box.
See Fuses (page 208).
E.
Engine coolant reservoir cap.
See Engine Coolant Check (page 226).
F.
Air filter assembly. See
Changing the Engine Air Filter (page 225).
G.
Inverter system controller coolant reservoir cap- HEV only.
H.
Washer fluid reservoir. See
Washer Fluid Check (page 235).
I.
221
Explorer (CTW) Police, Canada/United States of America, Police, enUSA, Edition date: 202007, Second-Printing MaintenanceE288595
Page 227 of 412

Action and description
Message
If the instrument cluster
displays one of the following
messages, repeat the
process.
Not Reset
Reset Cancelled
CHANGING THE ENGINE AIR
FILTER - 3.0L WARNING: To reduce the risk of
vehicle damage and personal burn
injuries, do not start your engine with the
air cleaner removed and do not remove
it while the engine is running.
When changing the engine air filter, do not
allow debris or foreign material to enter
the air induction system. Engine
components are susceptible to damage
not covered by the vehicle Warranty.
Change the air filter element at the correct
interval. See
Scheduled Maintenance
(page 326).
Incorrect component use can cause
damage not covered by the vehicle
Warranty.
See Motorcraft Parts (page
277).
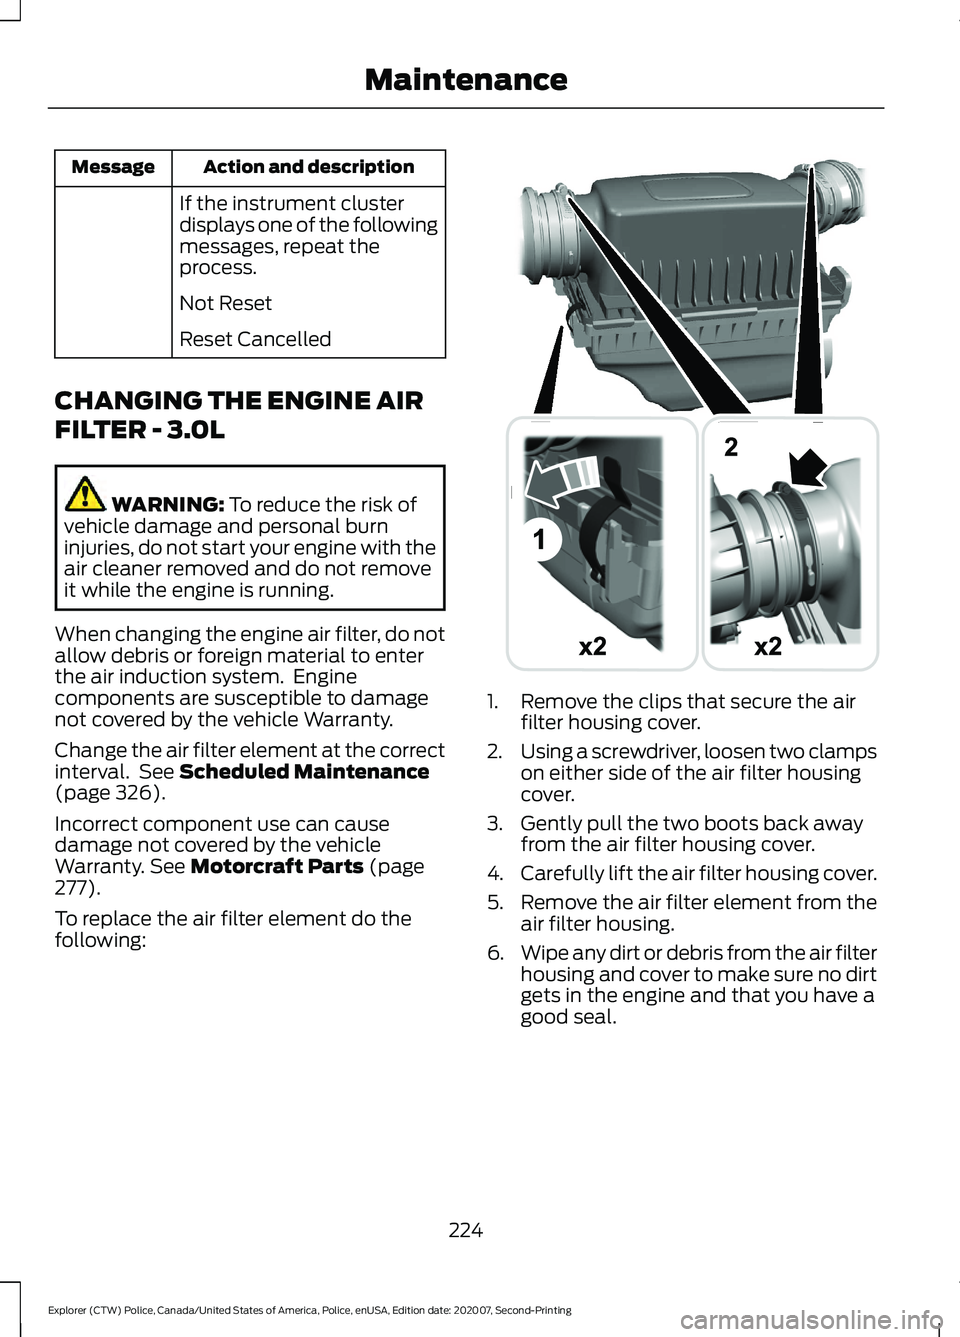
To replace the air filter element do the
following: 1. Remove the clips that secure the air
filter housing cover.
2. Using a screwdriver, loosen two clamps
on either side of the air filter housing
cover.
3. Gently pull the two boots back away from the air filter housing cover.
4. Carefully lift the air filter housing cover.
5. Remove the air filter element from the
air filter housing.
6. Wipe any dirt or debris from the air filter
housing and cover to make sure no dirt
gets in the engine and that you have a
good seal.
224
Explorer (CTW) Police, Canada/United States of America, Police, enUSA, Edition date: 202007, Second-Printing MaintenanceE294778
Page 228 of 412

7. Install a new air filter element. Be
careful not to crimp the filter element
edges between the air filter housing
and cover. This could cause filter
damage and allow unfiltered air to
enter the engine if it is not properly
seated.
8. Install the air filter housing cover.
9. Engage the clips to secure the air filter housing cover to the air filter housing.
10. Reconnect the two boots on the air filter housing cover and torque to
3.69 lb.ft (5 Nm).
CHANGING THE ENGINE AIR
FILTER - 3.3L WARNING:
To reduce the risk of
vehicle damage and personal burn
injuries, do not start your engine with the
air cleaner removed and do not remove
it while the engine is running.
Note: Failure to use the correct air filter
element may result in severe engine
damage. Resulting component damage
may not be covered by the vehicle Warranty.
Note: When servicing the air cleaner, do
not allow foreign material to enter the air
induction system. The engine is susceptible
to damage from even small particles.
When changing the air filter element, use
only the air filter element listed.
Change the air filter element at the proper
intervals. See
Scheduled Maintenance
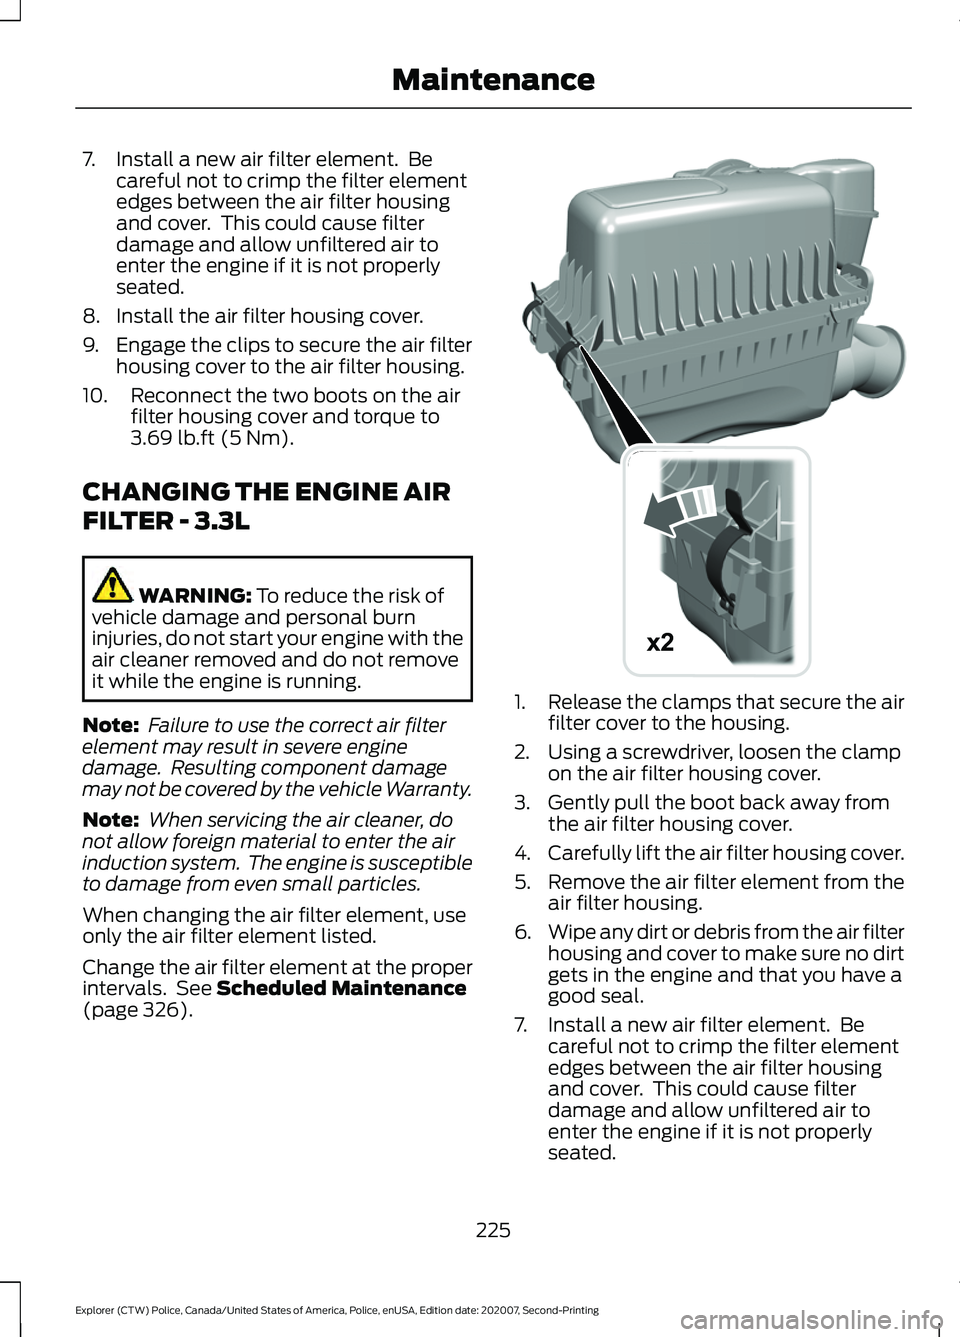
(page 326). 1.
Release the clamps that secure the air
filter cover to the housing.
2. Using a screwdriver, loosen the clamp on the air filter housing cover.
3. Gently pull the boot back away from the air filter housing cover.
4. Carefully lift the air filter housing cover.
5. Remove the air filter element from the
air filter housing.
6. Wipe any dirt or debris from the air filter
housing and cover to make sure no dirt
gets in the engine and that you have a
good seal.
7. Install a new air filter element. Be careful not to crimp the filter element
edges between the air filter housing
and cover. This could cause filter
damage and allow unfiltered air to
enter the engine if it is not properly
seated.
225
Explorer (CTW) Police, Canada/United States of America, Police, enUSA, Edition date: 202007, Second-Printing MaintenanceE295061
x2
Page 229 of 412

8. Install the air filter housing cover.
9. Engage the clips to secure the air filter
housing cover to the air filter housing.
10. Reconnect the boot to the air filter housing cover and torque to 3.69 lb.ft
(5 Nm).
ENGINE COOLANT CHECK WARNING:
Do not remove the
coolant reservoir cap when the engine is
on or the cooling system is hot. Wait 10
minutes for the cooling system to cool
down. Cover the coolant reservoir cap
with a thick cloth to prevent the
possibility of scalding and slowly remove
the cap. Failure to follow this instruction
could result in personal injury. WARNING:
Do not put coolant in
the windshield washer reservoir. If
sprayed on the windshield, coolant could
make it difficult to see through the
windshield. WARNING:
To reduce the risk of
personal injury, make sure the engine is
cool before unscrewing the coolant
pressure relief cap. The cooling system
is under pressure. Steam and hot liquid
can come out forcefully when you loosen
the cap slightly. WARNING:
Do not add coolant
further than the MAX mark.
When the engine is cold, check the
concentration and level of the coolant at
the intervals listed in the scheduled
maintenance information. See Scheduled
Maintenance
(page 326).
Note: Make sure that the coolant level is
between the
MIN and MAX marks on the
coolant reservoir. Note:
Coolant expands when it is hot. The
level may extend beyond the
MAX mark.
Maintain coolant concentration within
48% to 50%, which equates to a freeze
point between
-29°F (-34°C) and -35°F
(-37°C). Coolant concentration should be
checked using a refractometer. We do not
recommend the use of hydrometers or
coolant test strips for measuring coolant
concentration.
Adding Coolant WARNING:
Do not add engine
coolant when the engine is on or the
cooling system is hot. Failure to follow
this instruction could result in personal
injury. WARNING:
Do not remove the
coolant reservoir cap when the engine is
on or the cooling system is hot. Wait 10
minutes for the cooling system to cool
down. Cover the coolant reservoir cap
with a thick cloth to prevent the
possibility of scalding and slowly remove
the cap. Failure to follow this instruction
could result in personal injury. WARNING:
Do not put coolant in
the windshield washer reservoir. If
sprayed on the windshield, coolant could
make it difficult to see through the
windshield.
Note: Do not use stop leak pellets, cooling
system sealants, or non-specified additives
as they can cause damage to the engine
cooling or heating systems. Resulting
component damage may not be covered by
the vehicle Warranty.
Note: Automotive fluids are not
interchangeable.
226
Explorer (CTW) Police, Canada/United States of America, Police, enUSA, Edition date: 202007, Second-Printing Maintenance
Page 238 of 412

5. Use a suitable tool, for example a
screwdriver or socket wrench, to turn
the adjuster clockwise or
counterclockwise to adjust the vertical
aim of the headlamp. The horizontal
edge of the brighter light should touch
the horizontal reference line.
6. Close the hood and switch off the lamps.
WASHER FLUID CHECK WARNING: If you operate your
vehicle in temperatures below 41.0°F
(5°C), use washer fluid with antifreeze
protection. Failure to use washer fluid
with antifreeze protection in cold
weather could result in impaired
windshield vision and increase the risk
of injury or accident.
Note: The front and rear washer systems
are supplied from the same reservoir.
Add fluid to fill the reservoir if the level is
low. Only use a washer fluid that meets
our specifications. See
Capacities and
Specifications (page 279).
State or local regulations on volatile
organic compounds may restrict the use
of methanol, a common windshield washer
antifreeze additive. Washer fluids
containing non-methanol antifreeze
agents should be used only if they provide
cold weather protection without damaging
the vehicle ’s paint finish, wiper blades or
washer system.
FUEL FILTER
Your vehicle is equipped with a lifetime
fuel filter that is integrated with the fuel
tank. Regular maintenance or replacement
is not needed. CHECKING THE WIPER
BLADES
Run the tip of your fingers over the edge of
the blade to check for roughness.
Clean the wiper blades with washer fluid
or water applied with a soft sponge or
cloth.
CHANGING THE FRONT WIPER
BLADES
You can improve poor wiper quality by
cleaning the wiper blades and the
windshield.
Replace the wiper blades at least annually
for optimum performance.
1. Lift the wiper arm and then press the
wiper blade locking buttons together.
Note: Do not hold the wiper blade to lift the
wiper arm.
235
Explorer (CTW) Police, Canada/United States of America, Police, enUSA, Edition date: 202007, Second-Printing MaintenanceE142463 E129990
Page 244 of 412

•
Never wash or rinse the engine while it
is hot or running; water in the running
engine may cause internal damage.
• Never wash or rinse any ignition coil,
spark plug wire or spark plug well, or
the area in and around these locations.
• Cover the battery, power distribution
box, and air filter assembly to prevent
water damage when cleaning the
engine.
CLEANING THE WINDOWS AND
WIPER BLADES
Car wash chemicals and environmental
fallout can result in windshield and wiper
blade contamination. Dirty windshield and
wipers will result in poor windshield wiper
operation. Keep the windshield and wiper
blades clean to maintain windshield wiper
performance.
To clean the windshield and wiper blades:
• Clean the windshield with a
non-abrasive glass cleaner. When
cleaning the interior of the windshield,
avoid getting any glass cleaner on the
instrument panel or door panels. Wipe
any glass cleaner off these surfaces
immediately.
• For windshields contaminated with
tree sap, chemicals, wax or bugs, clean
the entire windshield using steel wool
(no greater than 0000 grade) in a
circular motion and rinse with water.
• Clean the wiper blades with isopropyl
rubbing alcohol or windshield washer
concentrate.
Note: Do not use razor blades or other
sharp objects to clean or remove decals
from the inside of the heated rear window.
The vehicle warranty does not cover
damage caused to the heated rear window
grid lines. CLEANING THE INTERIOR WARNING: Do not use cleaning
solvents, bleach or dye on the vehicle's
seatbelts, as these actions may weaken
the belt webbing. WARNING:
On vehicles equipped
with seat-mounted airbags, do not use
chemical solvents or strong detergents.
Such products could contaminate the
side airbag system and affect
performance of the side airbag in a crash.
For fabric, carpets, cloth seats and seats
equipped with side airbags:
• Remove dust and loose dirt with a
vacuum cleaner.
• Remove light stains and soil with
Motorcraft Professional Strength
Carpet & Upholstery Cleaner.
• If grease or tar is present on the
material, spot-clean the area first with
Motorcraft Spot and Stain Remover. In
Canada, use Motorcraft Multi-Purpose
Cleaner.
• If a ring forms on the fabric after spot
cleaning, clean the entire area
immediately (but do not oversaturate)
or the ring will set.
• Do not use household cleaning
products or glass cleaners, which can
stain and discolor the fabric and affect
the flame retardant abilities of the seat
materials.
Mirrors
Do not clean the housing or glass of any
mirror with harsh abrasives, fuel or other
petroleum or ammonia-based cleaning
products.
241
Explorer (CTW) Police, Canada/United States of America, Police, enUSA, Edition date: 202007, Second-Printing Vehicle Care
Page 280 of 412

MOTORCRAFT PARTS - 3.0L
Part Number
Component
FA-1884
Air filter.
FL-2062
Oil filter. 1
BXT-94RH7-730
Battery. 2
BAGM-49H8-850SP-578
Spark plugs. 3
FP-89
Cabin air filter.
WW-2616 (driver side)
Windshield wiper blade.
WW-2113 (passenger side)
WW-1110
Rear window wiper blade.
1 If a Motorcraft oil filter is not available, use an oil filter that meets industry performance
specification SAE/USCAR-36.
2 See your authorized dealer for correct replacement.
3 For spark plug replacement, contact your authorized dealer. Replace the spark plugs
at the appropriate intervals. See Scheduled Maintenance (page 326).
We recommend Motorcraft replacement parts available at your authorized dealer or at
fordparts.com for scheduled maintenance. These parts engineered for your vehicle meet
or exceed our specifications. Use of other parts could impact vehicle performance,
emissions and durability. Your warranty could be void for any damage related to use of
other parts.
277
Explorer (CTW) Police, Canada/United States of America, Police, enUSA, Edition date: 202007, Second-Printing Capacities and Specifications
Page 281 of 412

MOTORCRAFT PARTS - 3.3L
Part Number
Component
FA-1947
Air filter.
FL-500-S
Oil filter. 1
BXT-94RH7-730
Battery. 2
BAGM-94RH7-800BAGM-49H8-850 SP-520
Spark plugs. 3
FP-89
Cabin air filter.
WW-2616 (driver side)
Windshield wiper blade.
WW-2113 (passenger side)
WW-1110
Rear window wiper blade.
1 If a Motorcraft oil filter is not available, use an oil filter that meets industry performance
specification SAE/USCAR-36.
2 See your authorized dealer for correct replacement.
3 For spark plug replacement, contact an authorized dealer Replace the spark plugs at
the appropriate intervals. See Scheduled Maintenance (page 326).
We recommend Motorcraft replacement parts available at your authorized dealer or at
fordparts.com for scheduled maintenance. These parts engineered for your vehicle meet
or exceed our specifications. Use of other parts could impact vehicle performance,
emissions and durability. Your warranty could be void for any damage related to use of
other parts.
278
Explorer (CTW) Police, Canada/United States of America, Police, enUSA, Edition date: 202007, Second-Printing Capacities and Specifications