2021 FORD MUSTANG check engine
[x] Cancel search: check enginePage 268 of 530

It is very important to use prediluted
coolant approved to the correct
specification in order to avoid plugging the
small passageways in the engine cooling
system. See Capacities and
Specifications (page 335). Do not mix
different colors or types of coolant in your
vehicle. Mixing of engine coolants or using
an incorrect coolant may harm the engine
or cooling system components and may
not be covered by the vehicle Warranty.
Note: If prediluted coolant is not available,
use the approved concentrated coolant
diluting it to 50/50 with distilled water. See
Capacities and Specifications (page 335).
Using water that has not been deionised
may contribute to deposit formation,
corrosion and plugging of the small cooling
system passageways.
Note: Coolants marketed for all makes and
models may not be approved to our
specifications and may cause damage to
the cooling system. Resulting component
damage may not be covered by the vehicle
Warranty.
If the coolant level is at or below the
minimum mark, add prediluted coolant
immediately.
To top up the coolant level do the
following:
1. Unscrew the cap slowly. Any pressure escapes as you unscrew the cap.
2. Add prediluted coolant approved to the correct specification. See
Capacities and Specifications (page
335
).
3. Add enough prediluted coolant to reach the correct level.
4. Replace the coolant reservoir cap. Turn
the cap clockwise until it contacts the
hard stop. 5. Check the coolant level in the coolant
reservoir the next few times you drive
your vehicle. If necessary, add enough
prediluted engine coolant to bring the
coolant level to the correct level.
If you have to add more than
1.1 qt (1 L) of
engine coolant per month, have your
vehicle checked as soon as possible.
Operating an engine with a low level of
coolant can result in engine overheating
and possible engine damage.
In case of emergency, you can add a large
amount of water without engine coolant
in order to reach a vehicle service location.
In this instance, qualified personnel:
1. Must drain the cooling system.
2. Chemically clean the coolant system.
3. Refill with engine coolant as soon as possible.
Water alone, without engine coolant, can
cause engine damage from corrosion,
overheating or freezing.
Do not use the following as a coolant
substitute:
• Alcohol.
• Methanol.
• Brine.
• Any coolant mixed with alcohol or
methanol antifreeze.
Alcohol and other liquids can cause engine
damage from overheating or freezing.
Do not add extra inhibitors or additives to
the coolant. These can be harmful and
compromise the corrosion protection of
the coolant.
Recycled Coolant
We do not recommend the use of recycled
coolant as an approved recycling process
is not yet available.
Note: Dispose of used coolant in the
appropriate manner.
265
Mustang (CZG) Canada/United States of America, Vehicles Built From: 14-09-2020, enUSA, Edition date: 202010, Second-Printing Maintenance
Page 269 of 530

Follow your community's regulations and
standards for recycling and disposing of
automotive fluids.
Severe Climates
If you drive in extremely cold climates:
•
It may be necessary to increase the
coolant concentration above 50%.
• A coolant concentration of 60%
provides improved freeze point
protection.
• Coolant concentrations above 60%
decrease the overheat protection
characteristics of the coolant and may
cause engine damage.
If you drive in extremely hot climates:
• You can decrease the coolant
concentration to 40%.
• A coolant concentration of 40%
provides improved overheat protection.
• Coolant concentrations below 40%
decrease the overheat and corrosion
protection characteristics of the
coolant and may cause engine
damage.
Vehicles driven year-round in non-extreme
climates should use prediluted coolant for
optimum cooling system and engine
protection.
Coolant Change
At specific mileage intervals, as listed in
the scheduled maintenance information,
the coolant should be changed. Add
prediluted coolant approved to the correct
specification. See Capacities and
Specifications (page 335). Fail-Safe Cooling
Fail-safe cooling allows you to temporarily
drive your vehicle before any incremental
component damage occurs. The fail-safe
distance depends on ambient
temperature, vehicle load and terrain.
How Fail-Safe Cooling Works If the engine begins to overheat,
the coolant temperature gauge
moves toward the red zone:
A warning lamp illuminates and
a message may appear in the
information display.
If the engine reaches a preset
over-temperature condition, the engine
automatically switches to alternating
cylinder operation. Each disabled cylinder
acts as an air pump and cools the engine.
When this occurs, your vehicle still
operates, however:
• Engine power is limited.
• The air conditioning system turns off.
Continued operation increases the engine
temperature, causing the engine to
completely shut down. Your steering and
braking effort increases in this situation.
When the engine temperature cools, you
can re-start the engine. Have your vehicle
checked as soon as possible to minimize
engine damage.
When Fail-Safe Mode Is Activated WARNING: Fail-safe mode is for
use during emergencies only. Operate
your vehicle in fail-safe mode only as
long as necessary to bring your vehicle
to rest in a safe location and seek
immediate repairs. When in fail-safe
mode, your vehicle will have limited
power, will not be able to maintain
266
Mustang (CZG) Canada/United States of America, Vehicles Built From: 14-09-2020, enUSA, Edition date: 202010, Second-Printing Maintenance
Page 270 of 530

high-speed operation, and may
completely shut down without warning,
potentially losing engine power, power
steering assist, and power brake assist,
which may increase the possibility of a
crash resulting in serious injury.
WARNING: Do not remove the
coolant reservoir cap when the engine is
on or the cooling system is hot. Wait 10
minutes for the cooling system to cool
down. Cover the coolant reservoir cap
with a thick cloth to prevent the
possibility of scalding and slowly remove
the cap. Failure to follow this instruction
could result in personal injury.
Your vehicle has limited engine power
when in the fail-safe mode, drive your
vehicle with caution. Your vehicle does not
maintain high-speed operation and the
engine may operate poorly.
Remember that the engine is capable of
automatically shutting down to prevent
engine damage. In this situation:
1. Pull off the road as soon as safely possible and switch the engine off.
2. If you are a member of a roadside assistance program, we recommend
that you contact your roadside
assistance service provider.
3. If this is not possible, wait for a short period of time for the engine to cool.
4. Check the coolant level. If the coolant level is at or below the minimum mark,
add prediluted coolant immediately.
5. When the engine temperature cools, you can re-start the engine. Have your
vehicle checked as soon as possible to
minimize engine damage.
Note: Driving your vehicle without repair
increases the chance of engine damage. Engine Coolant Temperature
Management
(If Equipped) WARNING:
To reduce the risk of
crash and injury, be prepared that the
vehicle speed may reduce and the
vehicle may not be able to accelerate
with full power until the coolant
temperature reduces.
If you tow a trailer with your vehicle, the
engine may temporarily reach a higher
temperature during severe operating
conditions, for example ascending a long
or steep grade in high ambient
temperatures.
At this time, you may notice the coolant
temperature gauge moves toward the red
zone and a message may appear in the
information display.
You may notice a reduction in vehicle
speed caused by reduced engine power in
order to manage the engine coolant
temperature. Your vehicle may enter this
mode if certain high-temperature and
high-load conditions take place. The
amount of speed reduction depends on
vehicle loading, grade and ambient
temperature. If this occurs, there is no
need to stop your vehicle. You can
continue to drive.
The air conditioning may automatically
turn on and off during severe operating
conditions to protect the engine from
overheating. When the coolant
temperature decreases to the normal
operating temperature, the air conditioning
turns on.
If the coolant temperature gauge moves
fully into the red zone, or if the coolant
temperature warning or service engine
soon messages appear in your information
display, do the following:
267
Mustang (CZG) Canada/United States of America, Vehicles Built From: 14-09-2020, enUSA, Edition date: 202010, Second-Printing Maintenance
Page 271 of 530

1. Stop your vehicle as soon as it is safe
to do so. Fully apply the parking brake,
shift into park (P) or neutral (N).
2. Leave the engine running until the coolant temperature gauge needle
returns to the normal position. If the
temperature does not drop after
several minutes, follow the remaining
steps.
3. Switch the engine off and wait for it to
cool. Check the coolant level.
4. If the coolant level is at or below the minimum mark, add prediluted coolant
immediately.
5. If the coolant level is normal, restart the engine and continue.
MANUAL TRANSMISSION
FLUID CHECK - 6-SPEED
MANUAL TRANSMISSION –
3160
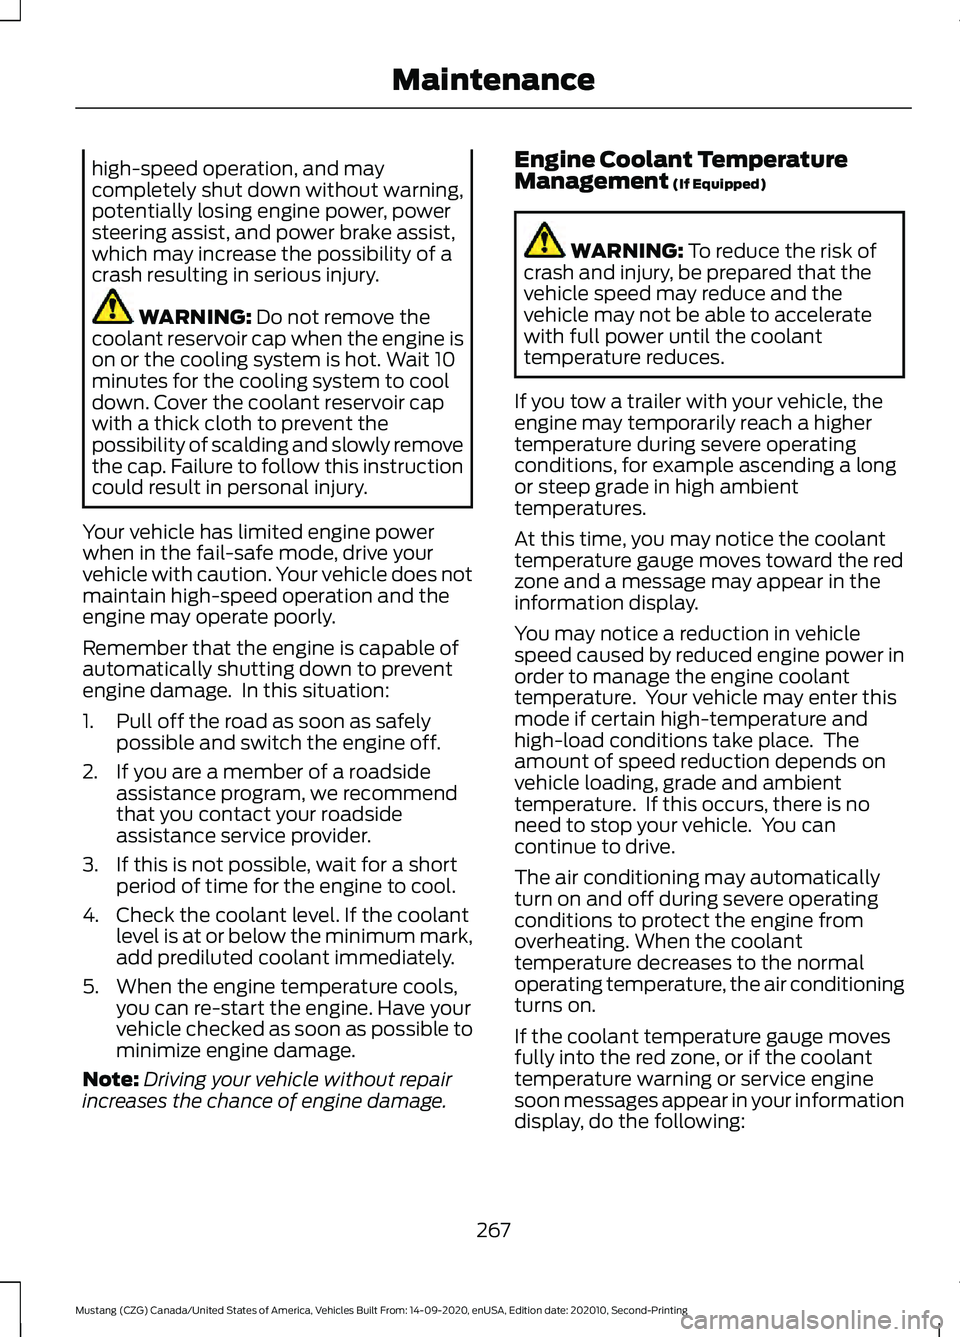
Note: Make sure the vehicle is on a level
surface.
1. Clean the filler plug. 2. Remove the filler plug.
3.
Start the engine and allow it to idle for
two minutes with the clutch engaged.
4. Add fluid through the filler hole.
5. The correct fluid fill level is 0.0–0.1 in
(0– 3 mm) below the bottom edge of
the filler hole.
6. Install the filler plug.
7. Tighten the filler plug until you feel a strong resistance.
Only use fluid that meets our
specifications. See
Capacities and
Specifications (page 335).
MANUAL TRANSMISSION
FLUID CHECK - 6-SPEED
MANUAL TRANSMISSION –
MT82
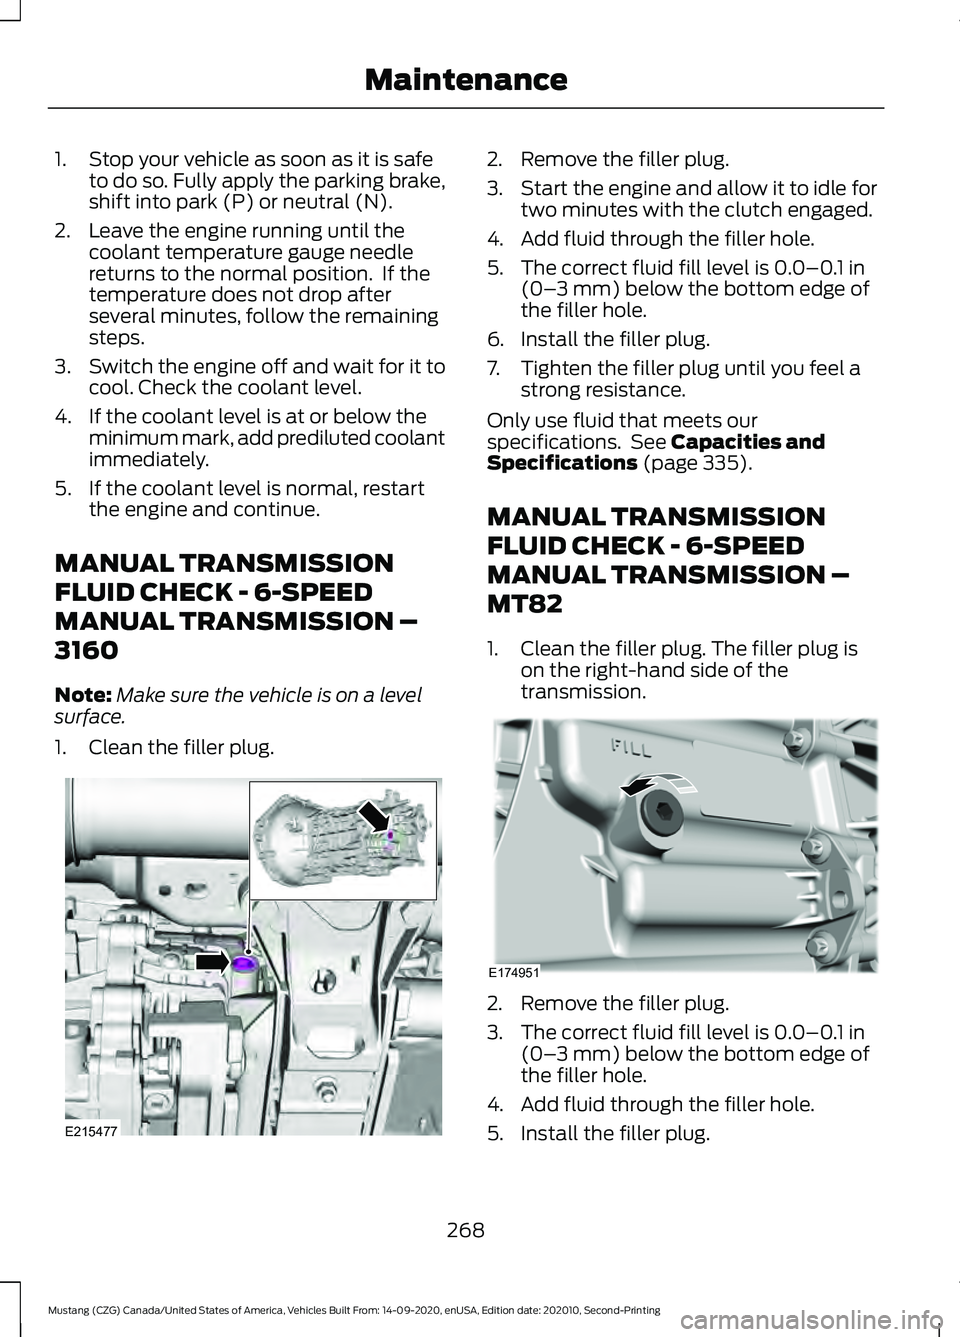
1. Clean the filler plug. The filler plug is on the right-hand side of the
transmission. 2. Remove the filler plug.
3. The correct fluid fill level is
0.0–0.1 in
(0– 3 mm) below the bottom edge of
the filler hole.
4. Add fluid through the filler hole.
5. Install the filler plug.
268
Mustang (CZG) Canada/United States of America, Vehicles Built From: 14-09-2020, enUSA, Edition date: 202010, Second-Printing MaintenanceE215477 E174951
Page 275 of 530

Note:
Prior to relearning the battery state
of charge, the battery management system
may temporarily disable some electrical
systems.
Electrical Accessory Installation
To make sure the battery management
system works correctly, do not connect an
electrical device ground connection
directly to the battery negative post. This
can cause inaccurate measurements of
the battery condition and potential
incorrect system operation.
Note: If you add electrical accessories or
components to the vehicle, it may adversely
affect battery performance and durability.
This may also affect the performance of
other electrical systems in the vehicle.
Remove and Reinstall the Battery
To disconnect or remove the battery, do
the following:
1. Apply the parking brake and switch the
ignition off.
2. Switch all electrical equipment off, for
example lights and radio.
3. Wait a minimum of two minutes before
disconnecting the battery.
Note: The engine management system has
a power hold function and remains powered
for a period of time after you switch the
ignition off. This is to allow diagnostic and
adaptive tables to be stored. Disconnecting
the battery without waiting can cause
damage not covered by the vehicle
Warranty.
4. Disconnect the negative battery cable terminal.
5. Disconnect the positive battery cable terminal.
6. Remove the battery securing clamp.
7. Remove the battery. 8. To install, reverse the removal
procedure.
Note: Before reconnecting the battery,
make sure the ignition remains switched off.
Note: Make sure the battery cable terminals
are fully tightened.
If you disconnect or replace the vehicle
battery, you must reset the following
features:
• Window bounce-back. See Power
Windows (page 86).
• Clock Settings.
• Pre-set radio stations.
Battery Disposal Make sure that you dispose of
old batteries in an
environmentally friendly way.
Seek advice from your local authority
about recycling old batteries.
ADJUSTING THE HEADLAMPS
Vertical Aim Adjustment
The headlamps on your vehicle are
properly aimed at the assembly plant. If
your vehicle has been in an accident, have
the alignment of your headlamps checked
by an authorized dealer.
272
Mustang (CZG) Canada/United States of America, Vehicles Built From: 14-09-2020, enUSA, Edition date: 202010, Second-Printing MaintenanceE107998
Page 279 of 530

TRACK USE - MACH 1
Operating at High Speeds and
Track Days
Your vehicle is capable of sustained high
speeds and track day driving.
Before operating your vehicle at high
speeds:
•
Verify your tires have the correct
pressures.
• Inspect wheels and tires for wear and
damage. Replace any damaged wheels
and tires.
• Check and set lug nut torque. See
Technical Specifications (page 334).
• Verify fluid levels for oil, coolant, brake
and hydraulic fluid. See
Capacities
and Specifications (page 335).
• Change the engine oil and replace the
engine oil filter prior to use on the track.
Change the engine oil and filter again
after every four hours of track time.
Maintain the engine oil level at or near
the max mark on the engine oil dipstick.
See
Engine Oil Check (page 261).
• Replace the brake fluid with fresh
Motorcraft/Ford DOT 4 LV High
Performance Brake Fluid or other DOT
compliant fluid with a dry boiling point
greater than
500°F (260°C) from a
sealed container. Do not use silicone
or DOT 5 brake fluids. •
If you are operating your Mach 1 on a
drag strip, use drag strip selectable
drive mode in addition to using line lock
and launch control to provide a specific
set-up tuned for the quickest straight
line elapsed times.
• If you are operating your Mach 1 on a
road course, use sport or track
selectable drive modes to provide a
specific set-up tuned for optimal shift
and suspension set-up that is tuned
towards handling prowess on closed
course surfaces.
After operating your vehicle at high speeds
or track day driving, do the following:
• Set the tire pressure to the proper
specification.
• Check and set the lug nut torque. See
Technical Specifications
(page 334).
• Check all fluid levels.
• Refer to the track maintenance interval
chart. See
Normal Scheduled
Maintenance (page 444).
• Check the front and rear wheel
bearings for abnormal wear.
• Inspect brake caliper dust boots for
abnormal wear.
Track Apps WARNING:
Track Apps™
is for
track use only. Remember that even
advanced technology cannot defy the
laws of physics. It is always possible to
lose control of a vehicle due to
inappropriate driver input for the
conditions. Aggressive driving on any
road condition can cause you to lose
control of your vehicle increasing the risk
of personal injury or property damage.
276
Mustang (CZG) Canada/United States of America, Vehicles Built From: 14-09-2020, enUSA, Edition date: 202010, Second-Printing Track Use
Page 286 of 530

TRACK USE
Appropriately change the engine oil for
racing and other track events:
•
2.3L: Prior to the track event, drain the
engine oil, replace the oil filter and
change the engine oil to 5W-50. After
the track event, drain the engine oil,
replace the oil filter and refill the engine
oil with 5W-30. See Capacities and
Specifications (page 343).
• 5.0L: Prior to the track event, drain the
engine oil, replace the oil filter and
change the engine oil to 5W-30. After
the track event, drain the engine oil,
replace the oil filter and refill the engine
oil with 5W-20.
See Capacities and
Specifications (page 343).
Regularly check the engine oil level during
the event. Maintain the engine oil level at
or near the max mark on the engine oil
dipstick. See Engine Oil Check (page 261).
Operating at High Speeds and
Track Days
Your vehicle is capable of sustained high
speeds and track day driving.
Before operating your vehicle at high
speeds:
• Verify your tires have the correct
pressures.
• Inspect wheels and tires for wear and
damage. Replace any damaged wheels
and tires.
• Check and set lug nut torque. See
Technical Specifications
(page 334).
• Verify fluid levels for oil, coolant, brake
and hydraulic fluid. See
Capacities
and Specifications (page 335).
• Change the oil and filter prior to use on
the track. After operating your vehicle at high speeds
or track day driving, do the following:
•
Set the tire pressure to the proper
specification.
• Check and set the lug nut torque. See
Technical Specifications
(page 334).
• Check all fluid levels.
• Refer to the track maintenance interval
chart. See
Normal Scheduled
Maintenance (page 444).
• Check the front and rear wheel
bearings for abnormal wear.
• Inspect brake caliper dust boots for
abnormal wear.
Track Apps WARNING:
Track Apps™
is for
track use only. Remember that even
advanced technology cannot defy the
laws of physics. It is always possible to
lose control of a vehicle due to
inappropriate driver input for the
conditions. Aggressive driving on any
road condition can cause you to lose
control of your vehicle increasing the risk
of personal injury or property damage.
This information display driven feature
provides a suite of menu options to record
and optimize your track performances.
See
General Information (page 99).
Note: Track Apps are for track use only. Do
not use them under any other driving
conditions.
Note: You cannot view or clear your results
unless your vehicle is at a complete stop
with the right arrow on the display menu
inactive. If your vehicle does not reach
100 mph (160 km/h)
during the track run,
your display may not show your selected
interval's results.
283
Mustang (CZG) Canada/United States of America, Vehicles Built From: 14-09-2020, enUSA, Edition date: 202010, Second-Printing Track Use
Page 289 of 530

Start Option
Allows you to select the type of countdown
the information display shows before
starting an event.
Status Screen
Provides the status of your chosen
performance-related settings.
View/Clear Results
Allows you to view and clear the last and
saved results of the Acceleration Timer,
Brake Performance, and All Time Best
results.
Track Use Maintenance Intervals
Follow these maintenance intervals for
when you use your vehicle on a track or in
a high speed event. Vehicle Use and Example
Interval
Change the engine oil and filter
One track weekend or approximately 4
hours of track use
Change the rear axle fluid
Every 500 mi (800 km) 1
1 Change the fluid every 500 mi (800 km) or when a message appears in the information
display stating that the axle fluid is over temperature.
Timing Chain
If you use your vehicle extensively at a race
track or at high rpm, it is possible to exceed
the service life of the engine timing chain.
A wrench indicator light illuminates when
it is time for you to replace your chain.
Have your vehicle checked as soon as
possible.
Adjustable Camber Front Strut
Top Mounts
(If Equipped)
Your vehicle has adjustable strut mounts
which you can use to adjust the camber of
your vehicle before and after a track event
to the specifications listed in the Road
Course Alignment Recommendations table
previously shown.
Note: After your track day is complete,
return your car to the street alignment and
tire pressures. Aerodynamics
(If Equipped)
Adjustable Rear Wing
The rear wing generates aerodynamic
down-force at speeds greater than 50 mph
(80 km/h)
.
Regularly inspect the rear wing panel and
attachment points for damage or
looseness.
You can adjust the wing using the hole
pattern at the top of the stanchion.
Moving the wing up increases rear down
force and overall understeer. Moving the
wing down decreases the rear down force
and overall understeer.
286
Mustang (CZG) Canada/United States of America, Vehicles Built From: 14-09-2020, enUSA, Edition date: 202010, Second-Printing Track Use