2021 FORD F650/750 Spare
[x] Cancel search: SparePage 54 of 390
PASSIVE ANTI-THEFT
SYSTEM (IF EQUIPPED)
Note: The system is not compatible with
non-Ford aftermarket remote start systems.
Use of these systems could result in engine
starting problems and a loss of security
protection.
Note: Prevent these objects from touching
the coded key when starting your vehicle.
Metallic objects, electronic devices or a
second coded key on the same key chain
could result in vehicle starting problems,
especially if they are too close to the key
when starting your vehicle. Switch the
ignition off, move all objects on the key
chain away from the coded key and restart
your vehicle if a problem occurs.
Note: Do not leave a duplicate coded key
in your vehicle. Always take your keys and
lock all doors when leaving your vehicle.
SecuriLock®
The system helps prevent the engine from
starting unless you use a coded key
programmed to your vehicle. Using the
wrong key may prevent your vehicle from
starting. A message may appear in the
information display.
If you are unable to start your vehicle with
a coded key, it is not operating correctly.
A message may appear in the information
display.
Automatic Arming
The system arms when you switch the
ignition off.
Automatic Disarming
The system disarms when you switch the
ignition on with a coded key. Replacement Keys
Your vehicle may have two integrated
keyhead transmitters.
The integrated keyhead transmitter
functions as a programmed ignition key
that starts your vehicle.
If your programmed transmitters or
standard SecuriLock coded keys become
lost or stolen and you do not have an extra
coded key, you need to have your vehicle
towed to an authorized dealer. You need
to erase the key codes from your vehicle
and program new coded keys.
Store an extra programmed key away from
your vehicle in a safe place. To purchase
additional spare or replacement keys,
contact an authorized dealer.
If you have a spare key, you need to
program it.
See Replacing a Lost Key or
Remote Control (page 48).
51
F650750 (TBC) , enUSA, Edition date: 202010, Second-Printing Security
Page 184 of 390
ROADSIDE ASSISTANCE
Vehicles Sold in the United States:
Getting Roadside Assistance
To fully assist you should you have a
vehicle concern, Ford Motor Company
offers a complimentary roadside
assistance program. This program is
separate from the New Vehicle Limited
Warranty.
The service is available:
•
24 hours a day, seven days a week.
• For the coverage period supplied with
your vehicle.
Roadside Assistance covers:
• A flat tire change with a good spare
(except vehicles supplied with a tire
inflation kit).
• Battery jump start.
• Lock-out assistance (key replacement
cost is the customer's responsibility).
• Fuel delivery — independent service
contractors, if not prohibited by state,
local or municipal law, shall deliver up
to 2 gal (8 L) of gasoline or 5 gal (20 L)
of diesel fuel to a disabled vehicle.
Roadside Assistance limits fuel delivery
service to two no-charge occurrences
within a 12-month period.
• Winch out — available within 100 ft
(30 m) of a paved or county
maintained road, no recoveries. •
Towing — independent service
contractors, if not prohibited by state,
local or municipal law, shall tow Ford
eligible vehicles to an authorized dealer
within
35 mi (56 km) of the
disablement location or to the nearest
authorized dealer. If a member
requests a tow to an authorized dealer
that is more than
35 mi (56 km) from
the disablement location, the member
shall be responsible for any mileage
costs in excess of
35 mi (56 km).
• Roadside Assistance includes up to
$200 for a towed trailer if the disabled
eligible vehicle requires service at the
nearest authorized dealer. If the towing
vehicle is operational but the trailer is
not, then the trailer does not qualify for
any roadside services.
Vehicles Sold in the United States:
Using Roadside Assistance
Complete the roadside assistance
identification card and place it in your
wallet for quick reference. This card is in
the Owner's Manual kit.
United States vehicle customers who
require Roadside Assistance, call
1-800-241-3673.
If you need to arrange roadside assistance
for yourself, Ford Motor Company
reimburses a reasonable amount for
towing to the nearest dealership within
35 mi (56 km)
. To obtain reimbursement
information, United States vehicle
customers call 1-800-241-3673.
Customers need to submit their original
receipts.
181
F650750 (TBC) , enUSA, Edition date: 202010, Second-Printing Roadside Emergencies
Page 197 of 390
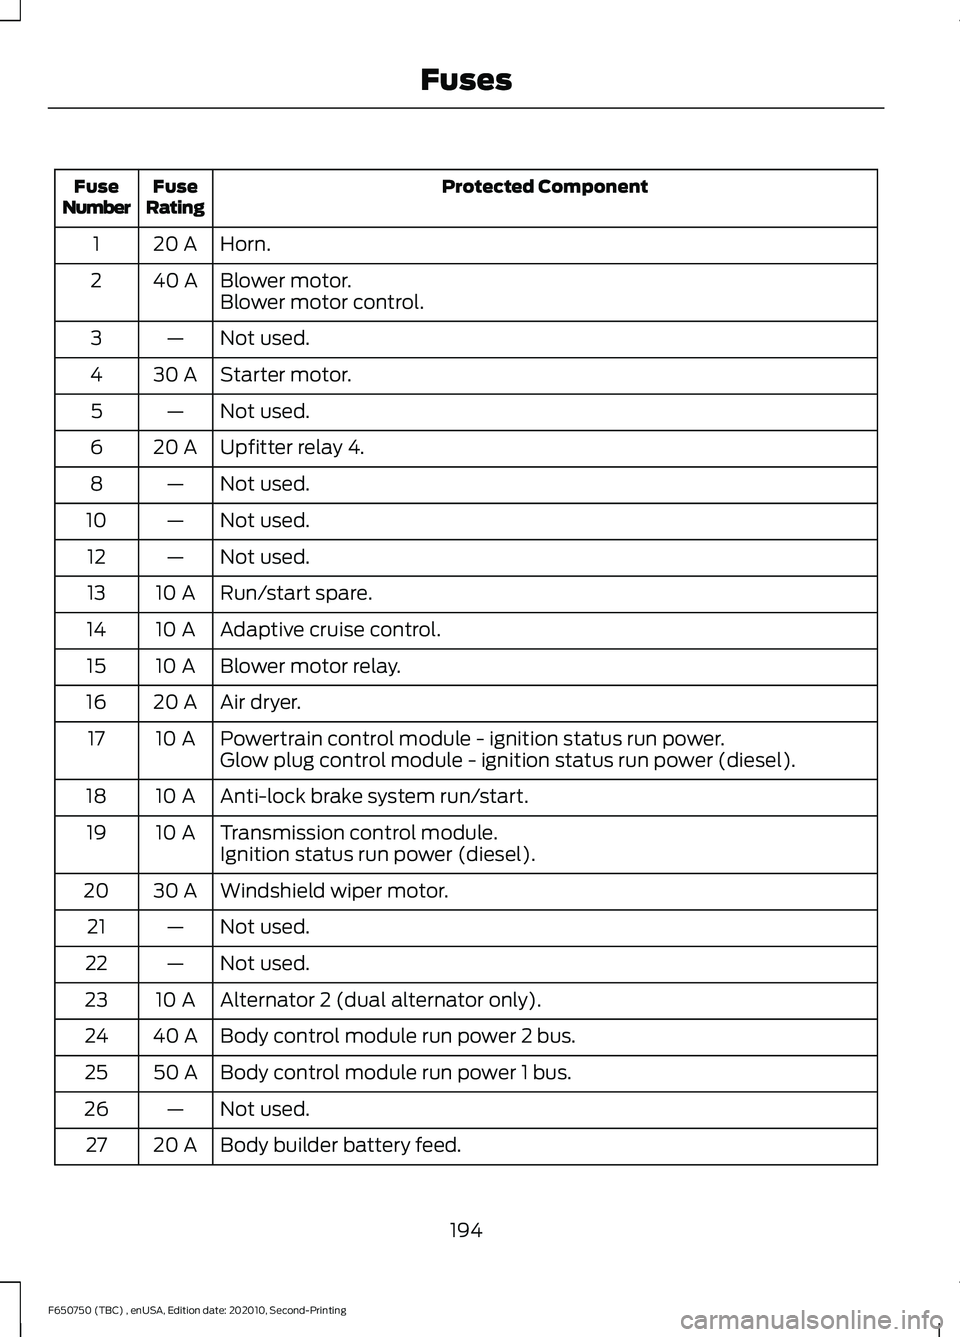
Protected Component
Fuse
Rating
Fuse
Number
Horn.
20 A
1
Blower motor.
40 A
2
Blower motor control.
Not used.
—
3
Starter motor.
30 A
4
Not used.
—
5
Upfitter relay 4.
20 A
6
Not used.
—
8
Not used.
—
10
Not used.
—
12
Run/start spare.
10 A
13
Adaptive cruise control.
10 A
14
Blower motor relay.
10 A
15
Air dryer.
20 A
16
Powertrain control module - ignition status run power.
10 A
17
Glow plug control module - ignition status run power (diesel).
Anti-lock brake system run/start.
10 A
18
Transmission control module.
10 A
19
Ignition status run power (diesel).
Windshield wiper motor.
30 A
20
Not used.
—
21
Not used.
—
22
Alternator 2 (dual alternator only).
10 A
23
Body control module run power 2 bus.
40 A
24
Body control module run power 1 bus.
50 A
25
Not used.
—
26
Body builder battery feed.
20 A
27
194
F650750 (TBC) , enUSA, Edition date: 202010, Second-Printing Fuses
Page 201 of 390
Protected Component
Fuse
Rating
Fuse
Number
Not used.
—
104
Trailer tow stop and turn relay.
15 A
105
Note: Spare fuse amperage may vary. Protected Component
Fuse
Rating
Relay
Number
Not used.
—
R02
Not used.
—
R05
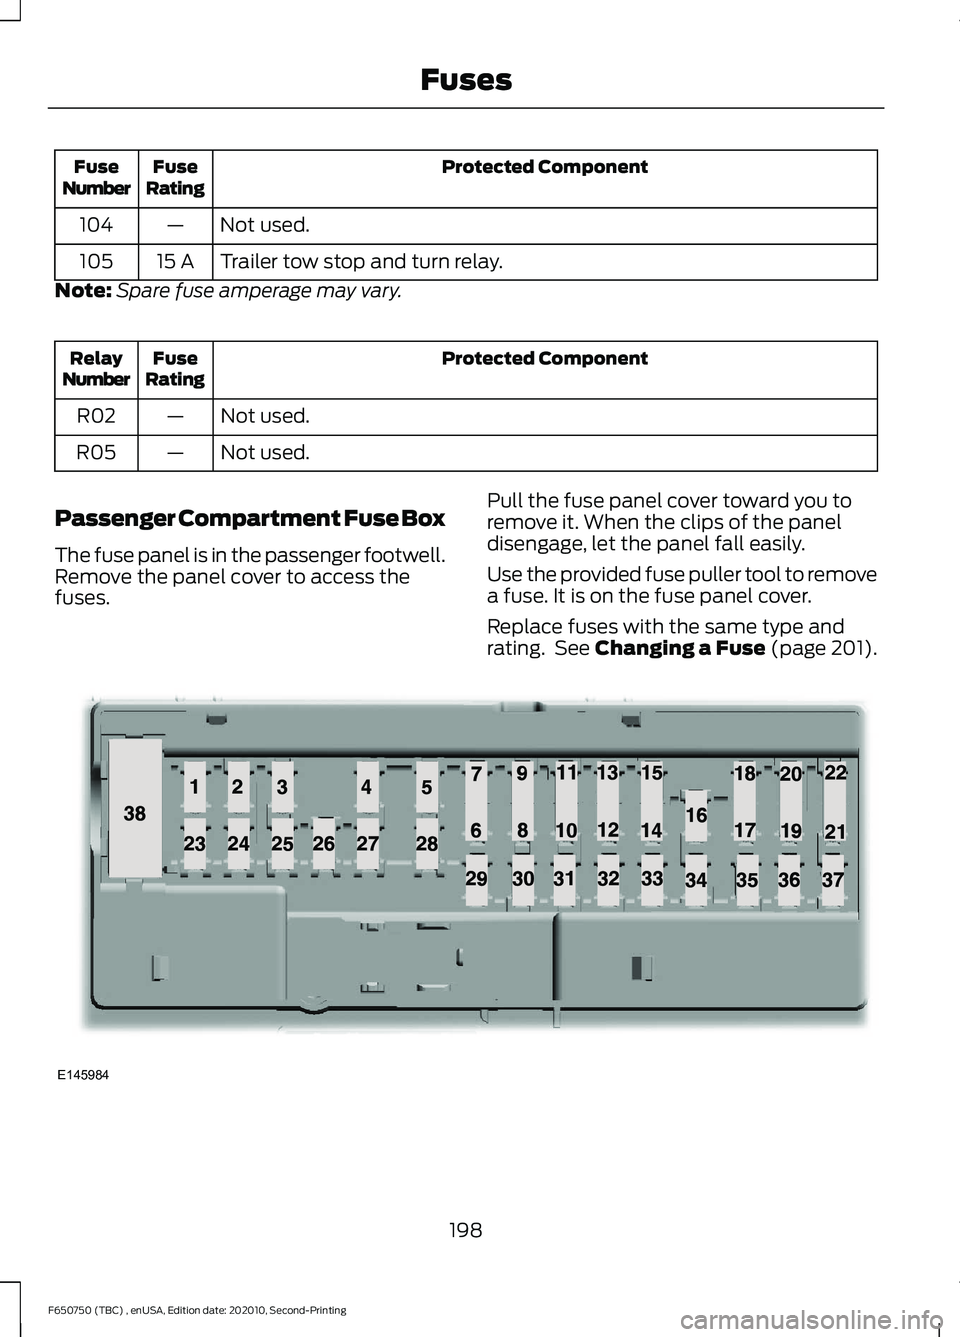
Passenger Compartment Fuse Box
The fuse panel is in the passenger footwell.
Remove the panel cover to access the
fuses. Pull the fuse panel cover toward you to
remove it. When the clips of the panel
disengage, let the panel fall easily.
Use the provided fuse puller tool to remove
a fuse. It is on the fuse panel cover.
Replace fuses with the same type and
rating. See Changing a Fuse (page 201).
198
F650750 (TBC) , enUSA, Edition date: 202010, Second-Printing FusesE145984
Page 203 of 390
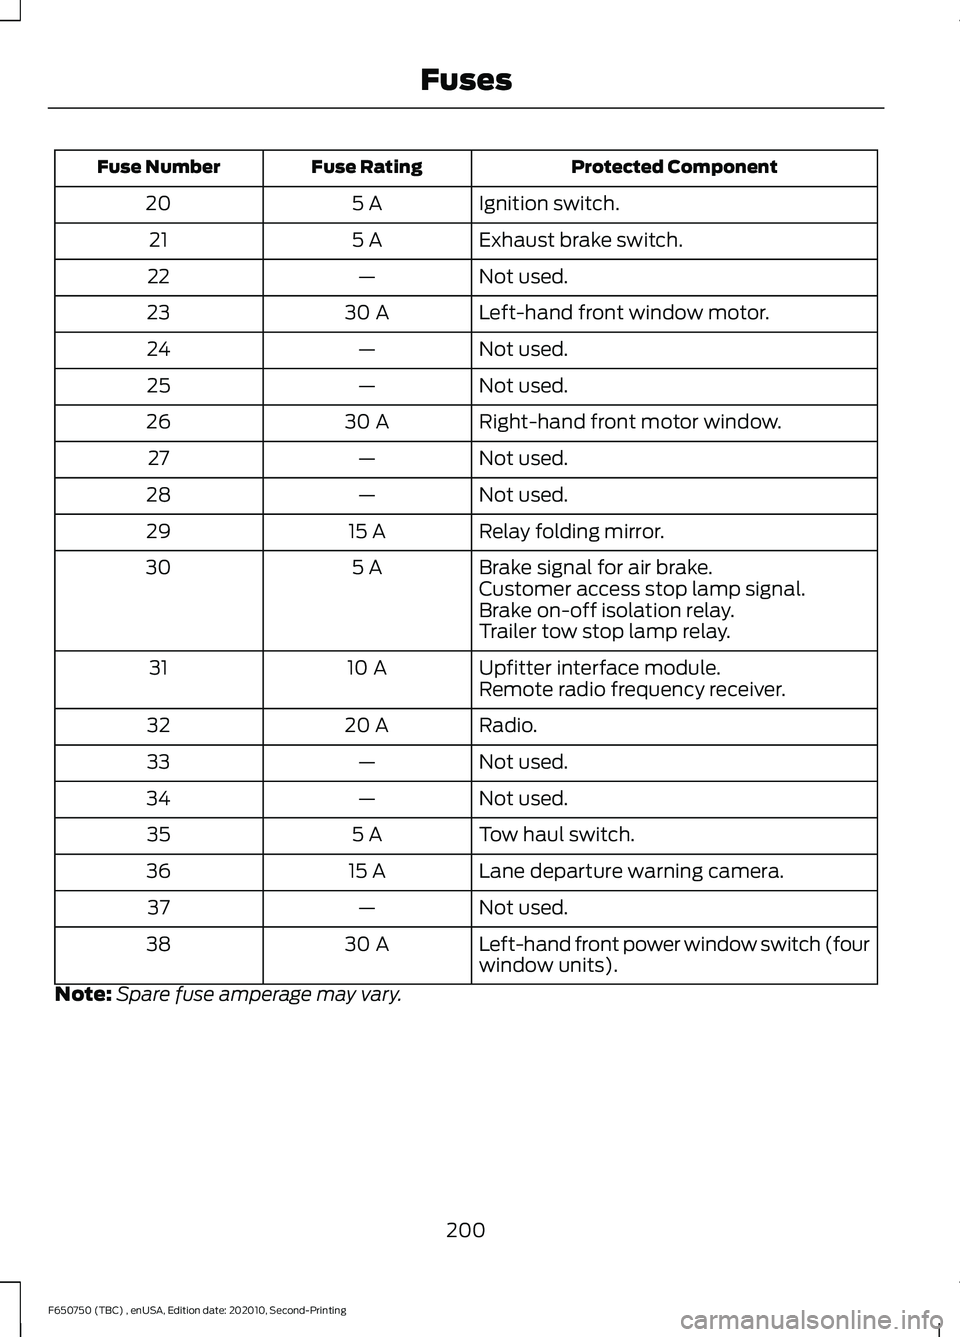
Protected Component
Fuse Rating
Fuse Number
Ignition switch.
5 A
20
Exhaust brake switch.
5 A
21
Not used.
—
22
Left-hand front window motor.
30 A
23
Not used.
—
24
Not used.
—
25
Right-hand front motor window.
30 A
26
Not used.
—
27
Not used.
—
28
Relay folding mirror.
15 A
29
Brake signal for air brake.
5 A
30
Customer access stop lamp signal.
Brake on-off isolation relay.
Trailer tow stop lamp relay.
Upfitter interface module.
10 A
31
Remote radio frequency receiver.
Radio.
20 A
32
Not used.
—
33
Not used.
—
34
Tow haul switch.
5 A
35
Lane departure warning camera.
15 A
36
Not used.
—
37
Left-hand front power window switch (four
window units).
30 A
38
Note: Spare fuse amperage may vary.
200
F650750 (TBC) , enUSA, Edition date: 202010, Second-Printing Fuses
Page 207 of 390
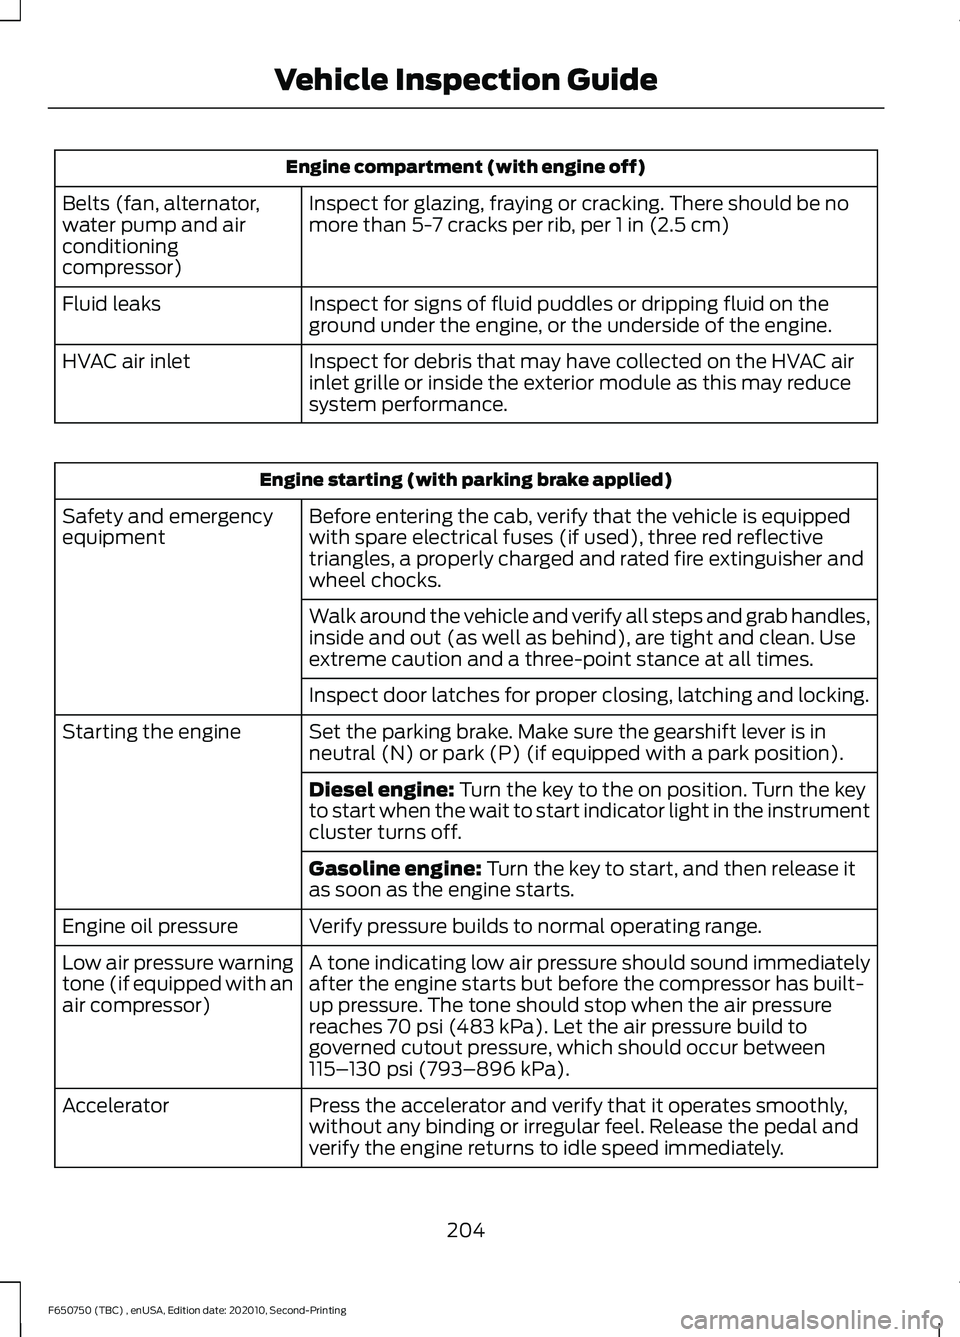
Engine compartment (with engine off)
Inspect for glazing, fraying or cracking. There should be no
more than 5-7 cracks per rib, per 1 in (2.5 cm)
Belts (fan, alternator,
water pump and air
conditioning
compressor)
Inspect for signs of fluid puddles or dripping fluid on the
ground under the engine, or the underside of the engine.
Fluid leaks
Inspect for debris that may have collected on the HVAC air
inlet grille or inside the exterior module as this may reduce
system performance.
HVAC air inlet Engine starting (with parking brake applied)
Before entering the cab, verify that the vehicle is equipped
with spare electrical fuses (if used), three red reflective
triangles, a properly charged and rated fire extinguisher and
wheel chocks.
Safety and emergency
equipment
Walk around the vehicle and verify all steps and grab handles,
inside and out (as well as behind), are tight and clean. Use
extreme caution and a three-point stance at all times.
Inspect door latches for proper closing, latching and locking.
Set the parking brake. Make sure the gearshift lever is in
neutral (N) or park (P) (if equipped with a park position).
Starting the engine
Diesel engine:
Turn the key to the on position. Turn the key
to start when the wait to start indicator light in the instrument
cluster turns off.
Gasoline engine:
Turn the key to start, and then release it
as soon as the engine starts.
Verify pressure builds to normal operating range.
Engine oil pressure
A tone indicating low air pressure should sound immediately
after the engine starts but before the compressor has built-
up pressure. The tone should stop when the air pressure
reaches
70 psi (483 kPa). Let the air pressure build to
governed cutout pressure, which should occur between
115– 130 psi (793–896 kPa)
.
Low air pressure warning
tone (if equipped with an
air compressor)
Press the accelerator and verify that it operates smoothly,
without any binding or irregular feel. Release the pedal and
verify the engine returns to idle speed immediately.
Accelerator
204
F650750 (TBC) , enUSA, Edition date: 202010, Second-Printing Vehicle Inspection Guide
Page 210 of 390
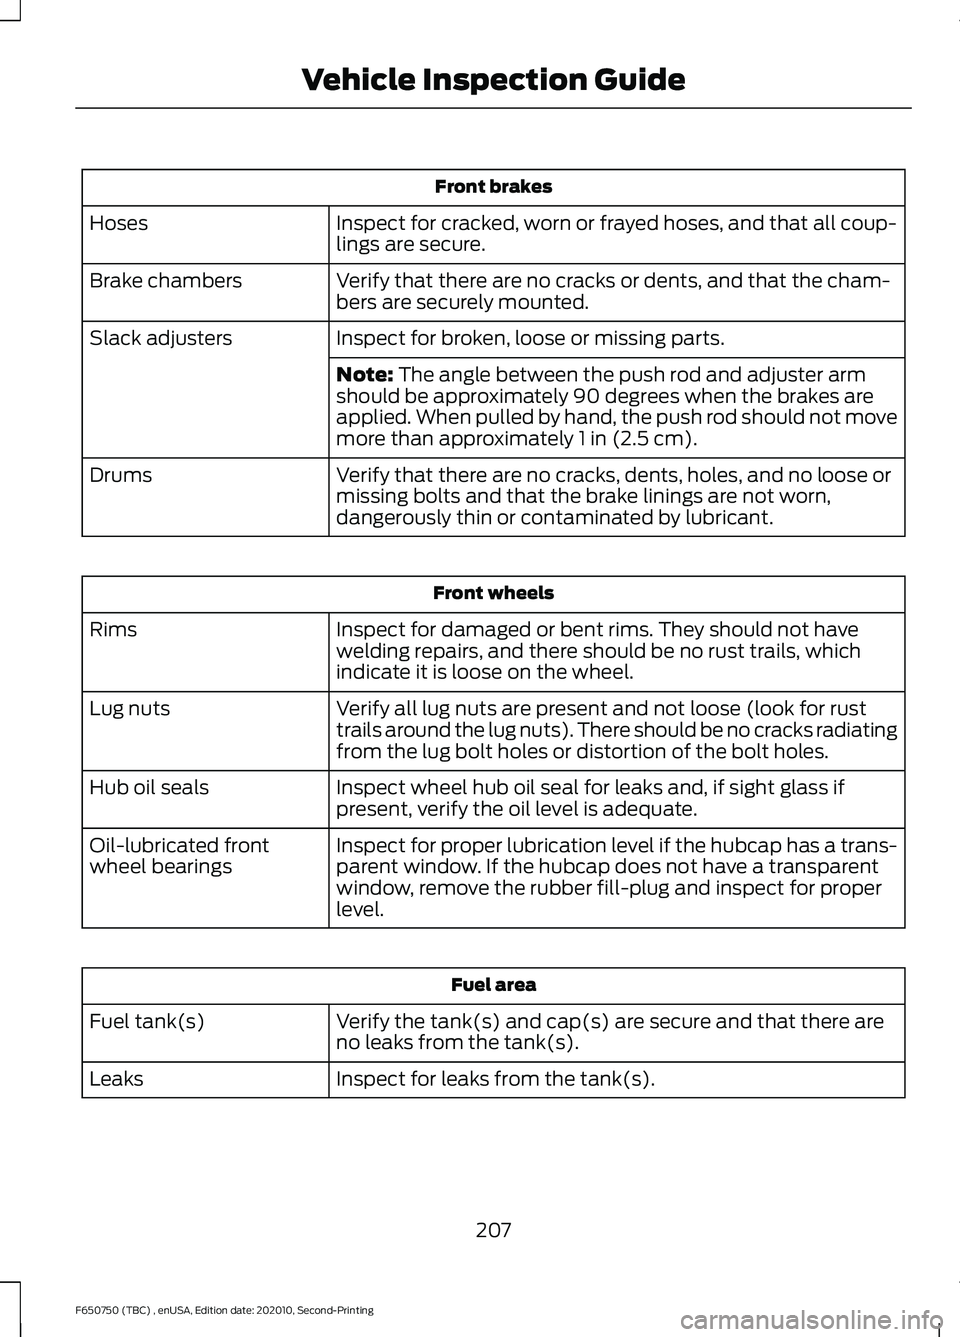
Front brakes
Inspect for cracked, worn or frayed hoses, and that all coup-
lings are secure.
Hoses
Verify that there are no cracks or dents, and that the cham-
bers are securely mounted.
Brake chambers
Inspect for broken, loose or missing parts.
Slack adjusters
Note: The angle between the push rod and adjuster arm
should be approximately 90 degrees when the brakes are
applied. When pulled by hand, the push rod should not move
more than approximately
1 in (2.5 cm).
Verify that there are no cracks, dents, holes, and no loose or
missing bolts and that the brake linings are not worn,
dangerously thin or contaminated by lubricant.
Drums Front wheels
Inspect for damaged or bent rims. They should not have
welding repairs, and there should be no rust trails, which
indicate it is loose on the wheel.
Rims
Verify all lug nuts are present and not loose (look for rust
trails around the lug nuts). There should be no cracks radiating
from the lug bolt holes or distortion of the bolt holes.
Lug nuts
Inspect wheel hub oil seal for leaks and, if sight glass if
present, verify the oil level is adequate.
Hub oil seals
Inspect for proper lubrication level if the hubcap has a trans-
parent window. If the hubcap does not have a transparent
window, remove the rubber fill-plug and inspect for proper
level.
Oil-lubricated front
wheel bearings Fuel area
Verify the tank(s) and cap(s) are secure and that there are
no leaks from the tank(s).
Fuel tank(s)
Inspect for leaks from the tank(s).
Leaks
207
F650750 (TBC) , enUSA, Edition date: 202010, Second-Printing Vehicle Inspection Guide
Page 270 of 390
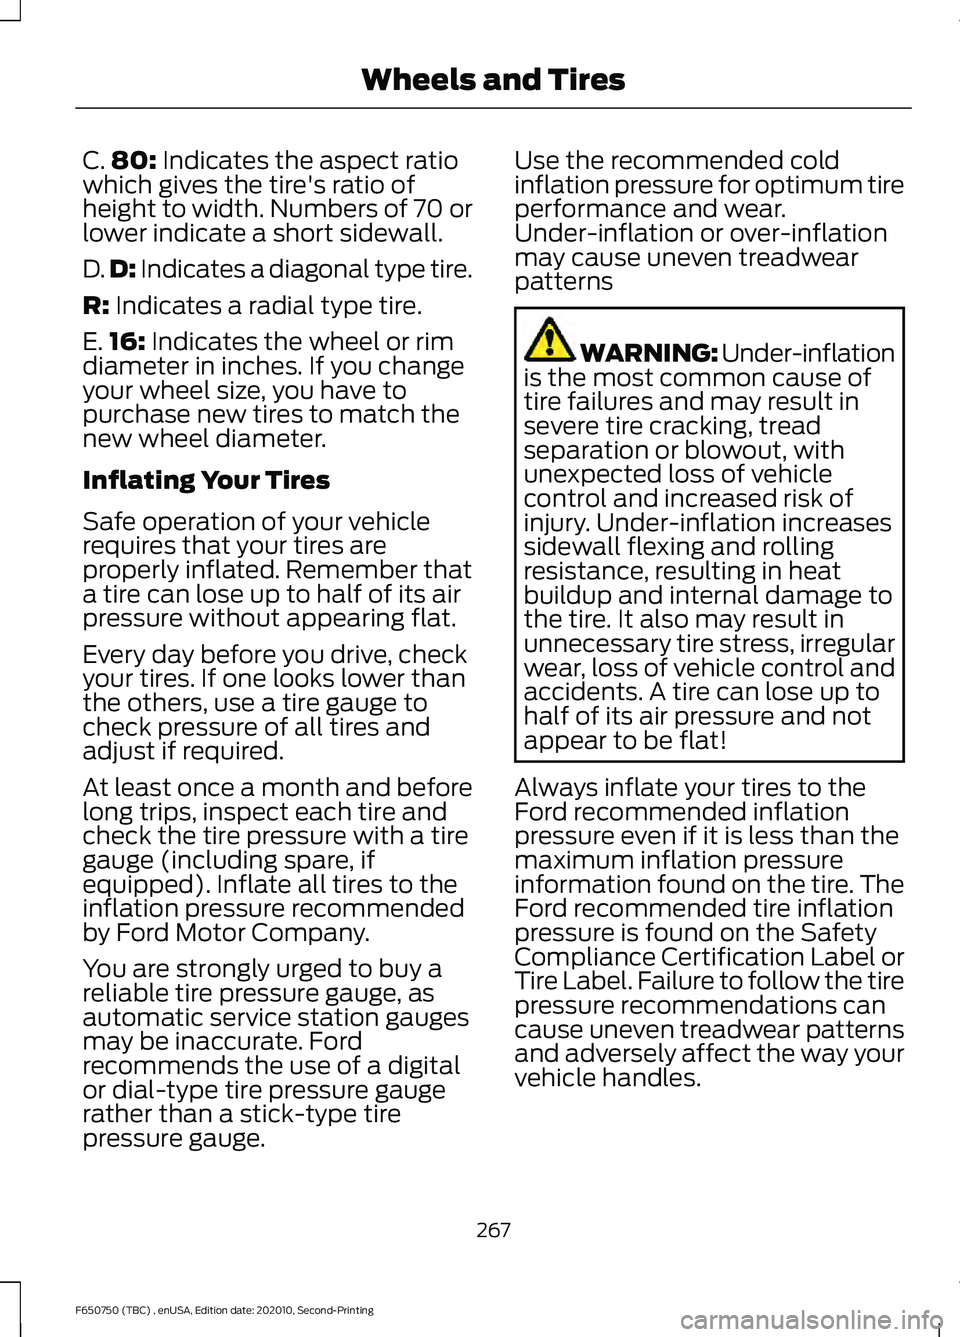
C.
80: Indicates the aspect ratio
which gives the tire's ratio of
height to width. Numbers of 70 or
lower indicate a short sidewall.
D. D:
Indicates a diagonal type tire.
R:
Indicates a radial type tire.
E. 16:
Indicates the wheel or rim
diameter in inches. If you change
your wheel size, you have to
purchase new tires to match the
new wheel diameter.
Inflating Your Tires
Safe operation of your vehicle
requires that your tires are
properly inflated. Remember that
a tire can lose up to half of its air
pressure without appearing flat.
Every day before you drive, check
your tires. If one looks lower than
the others, use a tire gauge to
check pressure of all tires and
adjust if required.
At least once a month and before
long trips, inspect each tire and
check the tire pressure with a tire
gauge (including spare, if
equipped). Inflate all tires to the
inflation pressure recommended
by Ford Motor Company.
You are strongly urged to buy a
reliable tire pressure gauge, as
automatic service station gauges
may be inaccurate. Ford
recommends the use of a digital
or dial-type tire pressure gauge
rather than a stick-type tire
pressure gauge. Use the recommended cold
inflation pressure for optimum tire
performance and wear.
Under-inflation or over-inflation
may cause uneven treadwear
patterns
WARNING: Under-inflation
is the most common cause of
tire failures and may result in
severe tire cracking, tread
separation or blowout, with
unexpected loss of vehicle
control and increased risk of
injury. Under-inflation increases
sidewall flexing and rolling
resistance, resulting in heat
buildup and internal damage to
the tire. It also may result in
unnecessary tire stress, irregular
wear, loss of vehicle control and
accidents. A tire can lose up to
half of its air pressure and not
appear to be flat!
Always inflate your tires to the
Ford recommended inflation
pressure even if it is less than the
maximum inflation pressure
information found on the tire. The
Ford recommended tire inflation
pressure is found on the Safety
Compliance Certification Label or
Tire Label. Failure to follow the tire
pressure recommendations can
cause uneven treadwear patterns
and adversely affect the way your
vehicle handles.
267
F650750 (TBC) , enUSA, Edition date: 202010, Second-Printing Wheels and Tires