2021 FORD F650/750 warning
[x] Cancel search: warningPage 77 of 390

Diesel Messages
WARNING: When the CLEANING
EXHAUST FILTER message appears in the information display, do not park near
flammable materials, vapors or
structures until filter cleaning is
complete.
Action
Message
The coolant additive needs checking.
CHECK COOLANT
ADDITIVE
Your vehicle has entered the cleaning mode. Various engine
actions raise the exhaust temperature in the diesel particulate filter system to burn off the particles (exhaust soot). After
the vehicle burns off the particles, the exhaust temperature returns to normal levels. This message is normal.
CLEANING EXHAUST
FILTER
The diesel particulate filter is full of particles (exhaust soot)
and you are not operating the vehicle in a manner that allows normal cleaning. One of these messages stays on until the
exhaust filter cleaning has begun, at which time the CLEANING EXHAUST FILTER message displays. We recommend you
drive the vehicle above 30 mph (48 km/h) until the CLEANING EXHAUST FILTER message turns off.
EXHAUST OVER-
LOADED DRIVE TO CLEAN
EXHAUST AT LIMIT
DRIVE TO CLEAN NOW
The diesel particulate filter continues to fill with particles
(exhaust soot) if you ignore this message. The service engine soon light illuminates and engine power may be limited, if
cleaning is not permitted. Your vehicle requires dealer service to restore it to full –power operation.
Your vehicle exhaust system temperature exceeds intended operating range. If this warning occurs, a chime sounds,
followed by reduced engine power. The engine shuts down
when your vehicle speed is below
3 mph (5 km/h). Stop the
vehicle as soon as safely possible. Have the system checked by an authorized dealer.
STOP SAFELY NOW
The diluted engine oil needs to be changed.
ENGINE OIL DILUTED
Your vehicle will have reduced engine torque until the engineis warmed sufficiently.
ENGINE WARMING
REDUCED POWER
The powertrain control module intentionally turns the engineoff due to your vehicle being in the final 30 seconds of a
countdown. The diesel engine shutdown for extended idling is an optional feature.
ENGINE TURNS OFF IN
XX SECONDS
Appears after the 30–second countdown.
ENGINE TURNED OFF
74
F650750 (TBC) , enUSA, Edition date: 202010, Second-Printing Information Displays
Page 79 of 390

Action
Message
The selective catalytic reduction system detects a fault. Thevehicle ’s top speed becomes limited upon restarting. Have
the system checked by an authorized dealer.
SPEED LIMITED TO 50
MPH UPON RESTART EXHAUST FLUIDSYSTEM FAULT
The selective catalytic reduction system detects a fault. Thevehicle ’s top speed is limited. Have the system checked by
an authorized dealer.
SPEED LIMITED TO 50
MPH EXHAUST FLUID SYSTEM FAULT
The selective catalytic reduction system detects a fault. Theengine enters into an idle–only mode. Have the system checked by an authorized dealer.
ENGINE IDLED SOON
EXHAUST FLUID
SYSTEM FAULT SEE MANUAL
The selective catalytic reduction system detects a fault. The
engine eventually enters into an idle–only mode. Press OK to override the idle mode. Have the system checked by an authorized dealer.
ENGINE IDLED - SEE
OWNER’ S MANUAL
EXHAUST FLUID SYSTEM FAULT
A fuel filter change is required.
FUEL FILTER CHANGE
REQUIRED
You must have your vehicle serviced by an authorized dealer
if approximately two hours after the EXHAUST OVERLOADED DRIVE TO CLEAN message has displayed and you have not
driven your vehicle above 30 mph (48 km/h) for at least 20
minutes to clean the diesel particulate filter.
EXHAUST OVER LIMIT
SERVICE NOW
You are responsible for assuring that you operate your vehiclein a manner that allows diesel particulate filter cleaning tooccur. Ignoring the EXHAUST OVER LIMIT SERVICE NOW warning message could lead to reduced drivability and
customer expense, including damage to the diesel particulate filter. Your new vehicle warranty may not cover this damage.
The water separator has reached a predetermined capacity and needs draining.
WATER IN FUEL DRAIN
FILTER SEE MANUAL
A low fuel pressure condition has occurred due to cold, lowfuel level or fuel filters need to be changed.
LOW FUEL PRESSURE
76
F650750 (TBC) , enUSA, Edition date: 202010, Second-Printing Information Displays
Page 80 of 390
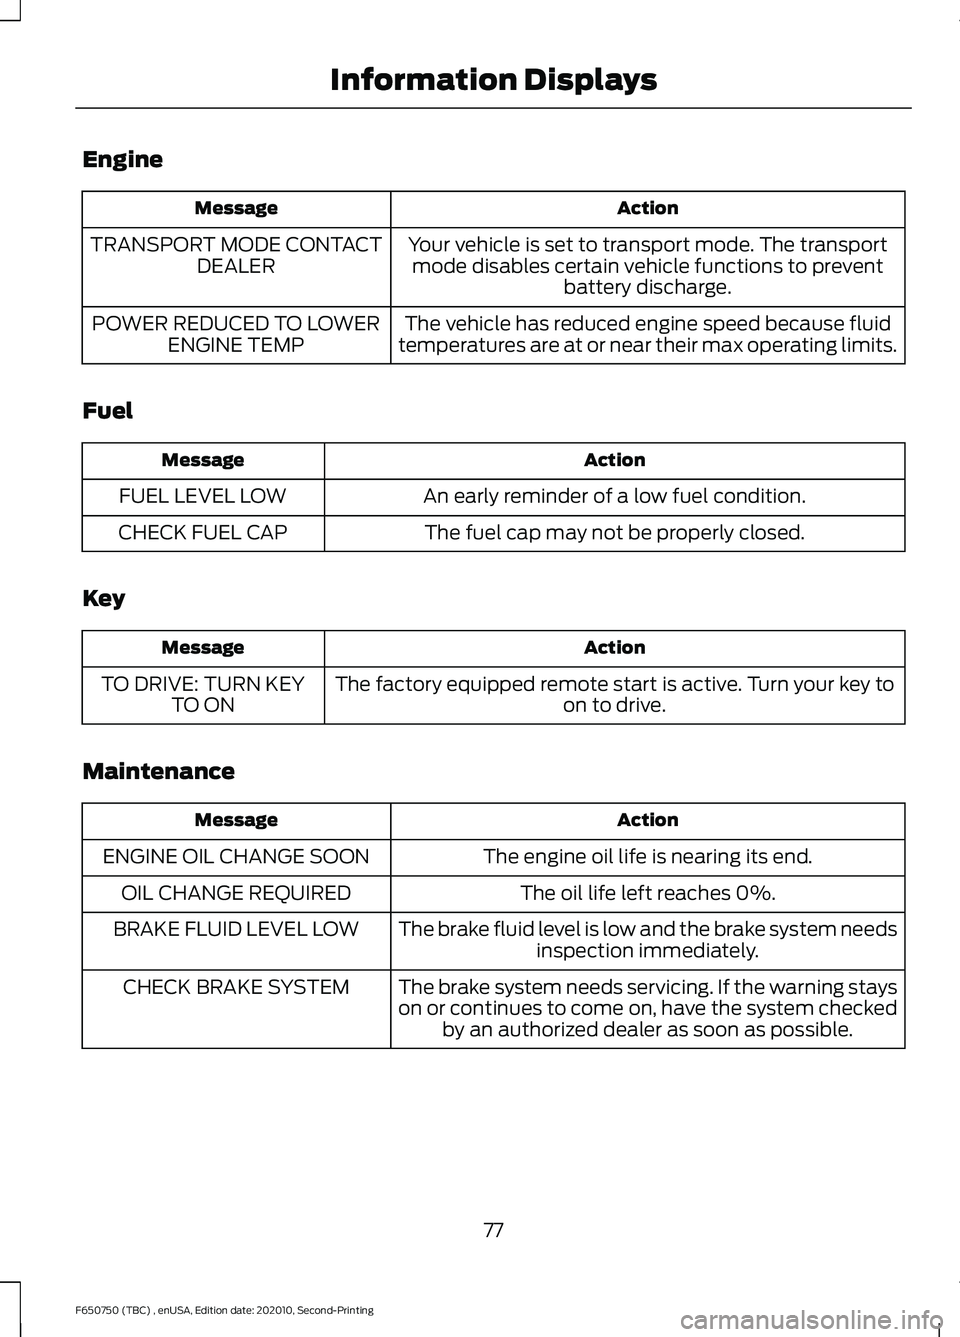
Engine
Action
Message
Your vehicle is set to transport mode. The transportmode disables certain vehicle functions to prevent battery discharge.
TRANSPORT MODE CONTACT
DEALER
The vehicle has reduced engine speed because fluid
temperatures are at or near their max operating limits.
POWER REDUCED TO LOWER
ENGINE TEMP
Fuel Action
Message
An early reminder of a low fuel condition.
FUEL LEVEL LOW
The fuel cap may not be properly closed.
CHECK FUEL CAP
Key Action
Message
The factory equipped remote start is active. Turn your key to on to drive.
TO DRIVE: TURN KEY
TO ON
Maintenance Action
Message
The engine oil life is nearing its end.
ENGINE OIL CHANGE SOON
The oil life left reaches 0%.
OIL CHANGE REQUIRED
The brake fluid level is low and the brake system needsinspection immediately.
BRAKE FLUID LEVEL LOW
The brake system needs servicing. If the warning stays
on or continues to come on, have the system checkedby an authorized dealer as soon as possible.
CHECK BRAKE SYSTEM
77
F650750 (TBC) , enUSA, Edition date: 202010, Second-Printing Information Displays
Page 85 of 390
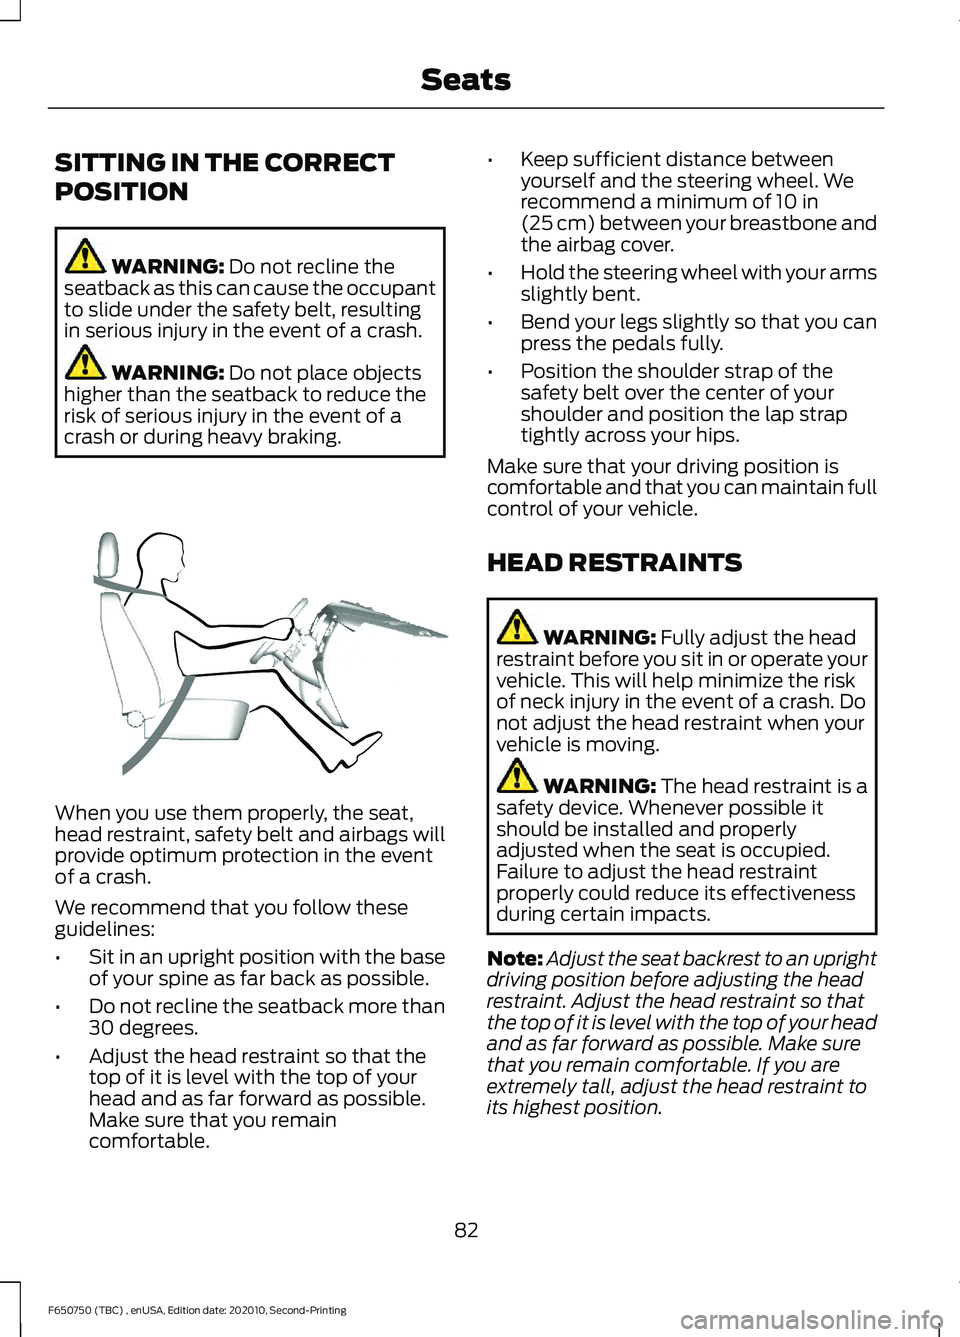
SITTING IN THE CORRECT
POSITION
WARNING: Do not recline the
seatback as this can cause the occupant
to slide under the safety belt, resulting
in serious injury in the event of a crash. WARNING:
Do not place objects
higher than the seatback to reduce the
risk of serious injury in the event of a
crash or during heavy braking. When you use them properly, the seat,
head restraint, safety belt and airbags will
provide optimum protection in the event
of a crash.
We recommend that you follow these
guidelines:
•
Sit in an upright position with the base
of your spine as far back as possible.
• Do not recline the seatback more than
30 degrees.
• Adjust the head restraint so that the
top of it is level with the top of your
head and as far forward as possible.
Make sure that you remain
comfortable. •
Keep sufficient distance between
yourself and the steering wheel. We
recommend a minimum of
10 in
(25 cm) between your breastbone and
the airbag cover.
• Hold the steering wheel with your arms
slightly bent.
• Bend your legs slightly so that you can
press the pedals fully.
• Position the shoulder strap of the
safety belt over the center of your
shoulder and position the lap strap
tightly across your hips.
Make sure that your driving position is
comfortable and that you can maintain full
control of your vehicle.
HEAD RESTRAINTS WARNING:
Fully adjust the head
restraint before you sit in or operate your
vehicle. This will help minimize the risk
of neck injury in the event of a crash. Do
not adjust the head restraint when your
vehicle is moving. WARNING:
The head restraint is a
safety device. Whenever possible it
should be installed and properly
adjusted when the seat is occupied.
Failure to adjust the head restraint
properly could reduce its effectiveness
during certain impacts.
Note: Adjust the seat backrest to an upright
driving position before adjusting the head
restraint. Adjust the head restraint so that
the top of it is level with the top of your head
and as far forward as possible. Make sure
that you remain comfortable. If you are
extremely tall, adjust the head restraint to
its highest position.
82
F650750 (TBC) , enUSA, Edition date: 202010, Second-Printing SeatsE68595
Page 87 of 390
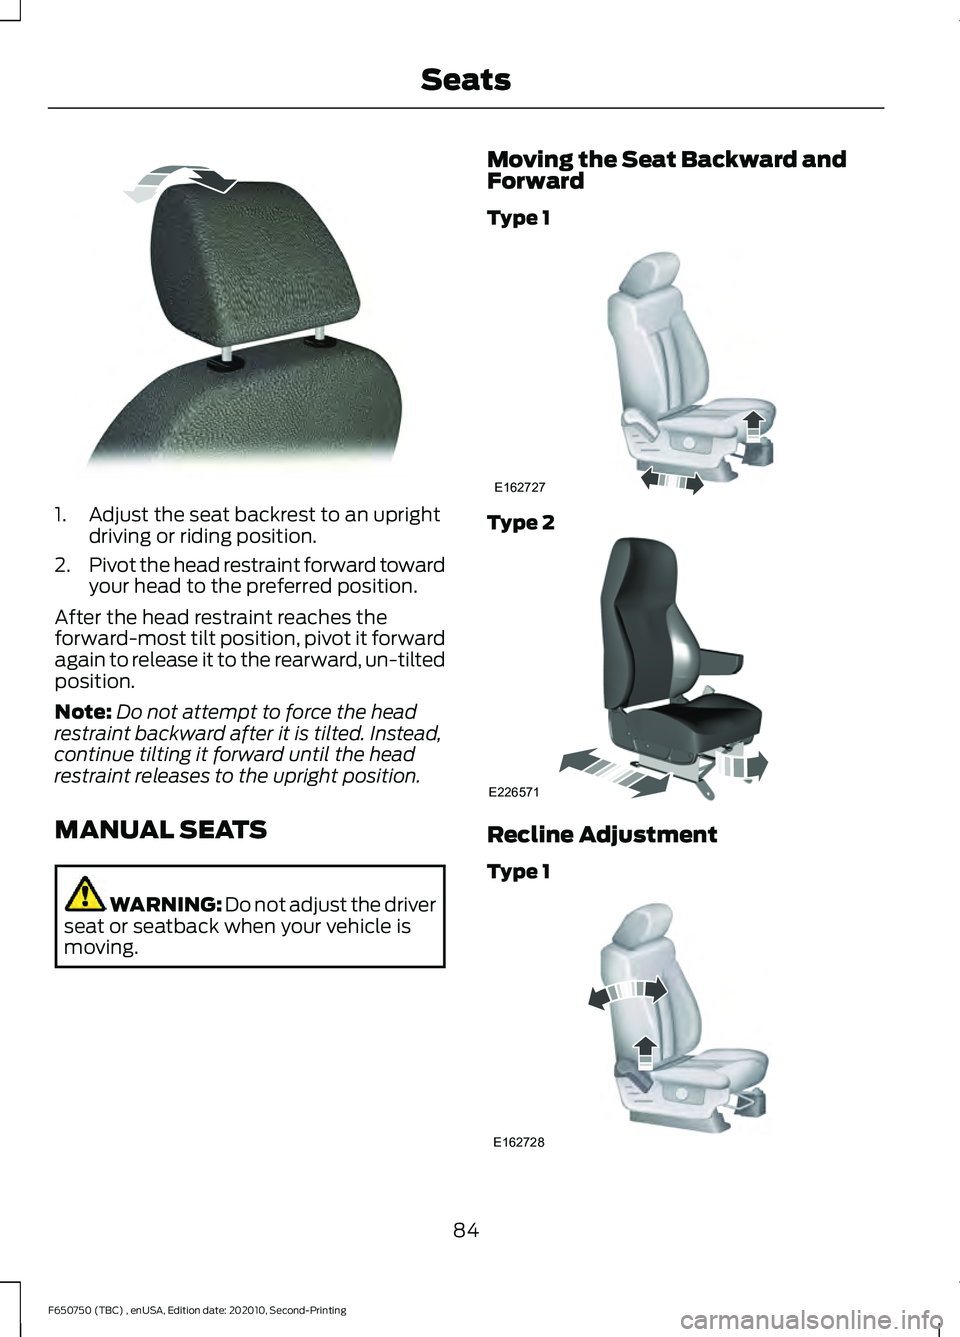
1. Adjust the seat backrest to an upright
driving or riding position.
2. Pivot the head restraint forward toward
your head to the preferred position.
After the head restraint reaches the
forward-most tilt position, pivot it forward
again to release it to the rearward, un-tilted
position.
Note: Do not attempt to force the head
restraint backward after it is tilted. Instead,
continue tilting it forward until the head
restraint releases to the upright position.
MANUAL SEATS WARNING: Do not adjust the driver
seat or seatback when your vehicle is
moving. Moving the Seat Backward and
Forward
Type 1
Type 2
Recline Adjustment
Type 1
84
F650750 (TBC) , enUSA, Edition date: 202010, Second-Printing SeatsE144727 E162727 E226571 E162728
Page 88 of 390
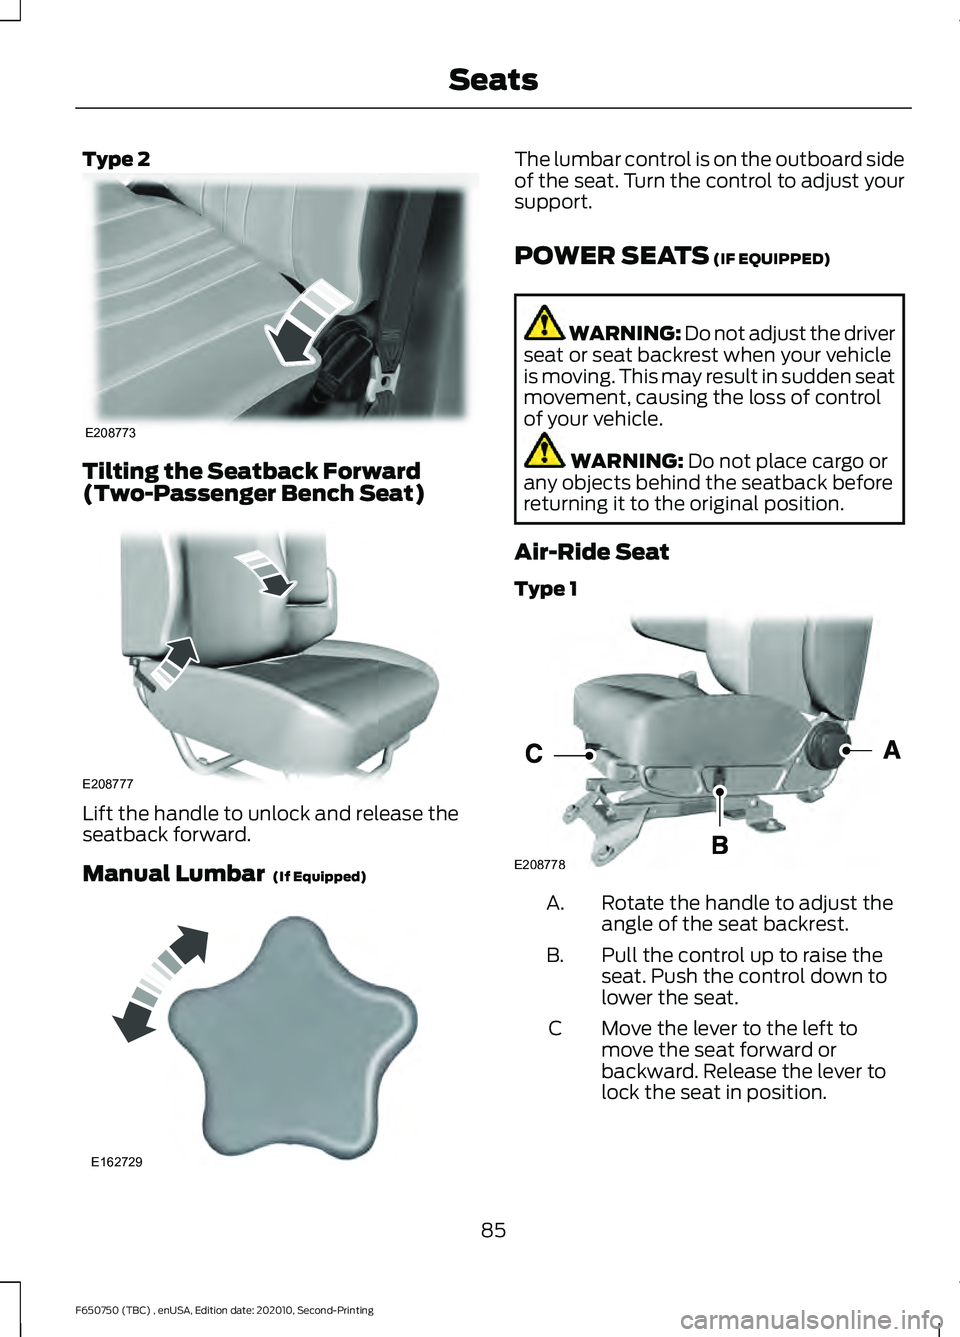
Type 2
Tilting the Seatback Forward
(Two-Passenger Bench Seat)
Lift the handle to unlock and release the
seatback forward.
Manual Lumbar (If Equipped) The lumbar control is on the outboard side
of the seat. Turn the control to adjust your
support.
POWER SEATS
(IF EQUIPPED)
WARNING: Do not adjust the driver
seat or seat backrest when your vehicle
is moving. This may result in sudden seat
movement, causing the loss of control
of your vehicle. WARNING:
Do not place cargo or
any objects behind the seatback before
returning it to the original position.
Air-Ride Seat
Type 1 Rotate the handle to adjust the
angle of the seat backrest.
A.
Pull the control up to raise the
seat. Push the control down to
lower the seat.
B.
Move the lever to the left to
move the seat forward or
backward. Release the lever to
lock the seat in position.
C
85
F650750 (TBC) , enUSA, Edition date: 202010, Second-Printing SeatsE208773 E208777 E162729 E208778
Page 90 of 390
2.
Rotate the seat cushion up until it locks
into the vertical storage position.
Returning the Seat to the Seating
Position WARNING: Make sure that cargo
or any objects are not trapped
underneath the seat cushion before
returning the seat cushion to its original
position, and that the seat cushion locks
into place. Failure to do so may prevent
the seat from operating properly in the
event of a crash, which could increase
the risk of serious injury.
1. Pull the control on the side of the seat to release the seat cushion from the
storage position.
2. Push the seat cushion down until it locks into the horizontal position.
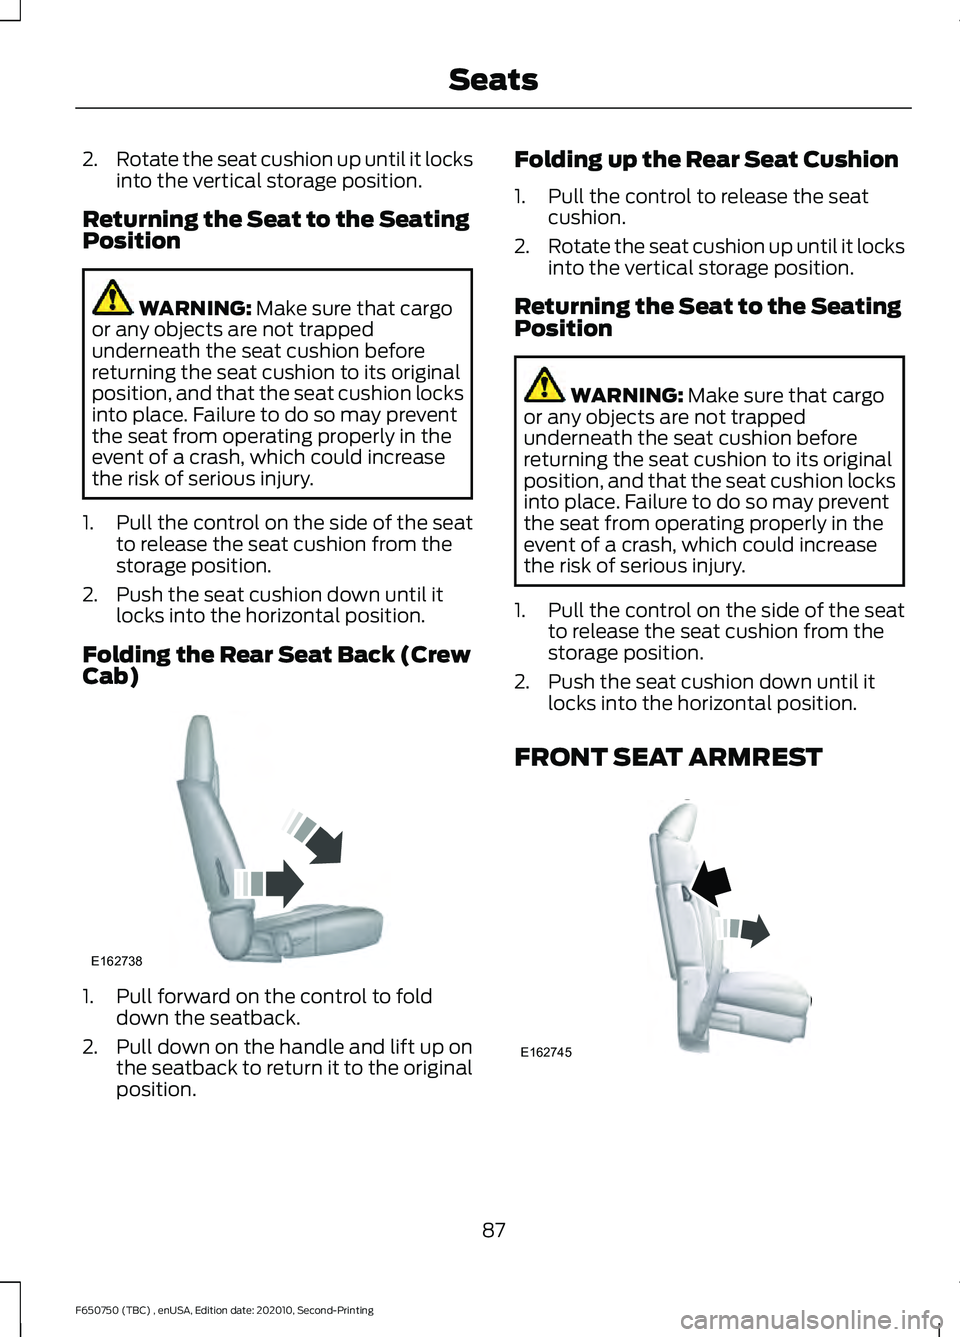
Folding the Rear Seat Back (Crew
Cab) 1. Pull forward on the control to fold
down the seatback.
2. Pull down on the handle and lift up on
the seatback to return it to the original
position. Folding up the Rear Seat Cushion
1. Pull the control to release the seat
cushion.
2. Rotate the seat cushion up until it locks
into the vertical storage position.
Returning the Seat to the Seating
Position WARNING:
Make sure that cargo
or any objects are not trapped
underneath the seat cushion before
returning the seat cushion to its original
position, and that the seat cushion locks
into place. Failure to do so may prevent
the seat from operating properly in the
event of a crash, which could increase
the risk of serious injury.
1. Pull the control on the side of the seat to release the seat cushion from the
storage position.
2. Push the seat cushion down until it locks into the horizontal position.
FRONT SEAT ARMREST 87
F650750 (TBC) , enUSA, Edition date: 202010, Second-Printing SeatsE162738 E162745
Page 92 of 390
12 Volt DC Power Point
WARNING: Do not plug optional
electrical accessories into the cigar
lighter socket. Incorrect use of the cigar
lighter can cause damage not covered
by the vehicle warranty, and can result
in fire or serious injury.
Note: When you switch the ignition on, you
can use the socket to power 12 volt
appliances with a maximum current rating
of 15 amps.
If the power supply does not work after you
switch the ignition off, switch the ignition
on.
Note: Do not hang any accessory from the
accessory plug.
Note: Do not use the power point over the
vehicle capacity of 12 volt DC 180 watts or
a fuse may blow.
Note: Always keep the power point caps
closed when not in use.
Do not insert objects other than an
accessory plug into the power point. This
damages the power point and may blow
the fuse.
Run the vehicle for full capacity use of the
power point.
To prevent the battery from running out of
charge:
• Do not use the power point longer than
necessary when the vehicle is not
running.
• Do not leave devices plugged in
overnight or when you park your vehicle
for extended periods. Locations
Power points may be in the following
locations:
•
On the instrument panel (two
locations).
• Inside the front under-seat storage
compartment.
• Inside the rear under-seat storage
compartment.
110 Volt AC Power Point
(If Equipped) WARNING:
Do not keep electrical
devices plugged in the power point
whenever the device is not in use. Do not
use any extension cord with the 110 volt
AC power point, since it will defeat the
safety protection design. Doing so may
cause the power point to overload due
to powering multiple devices that can
reach beyond the 150 watt load limit and
could result in fire or serious injury.
Note: The power point turns off when you
switch the ignition off, or when the battery
voltage drops below 11 volts.
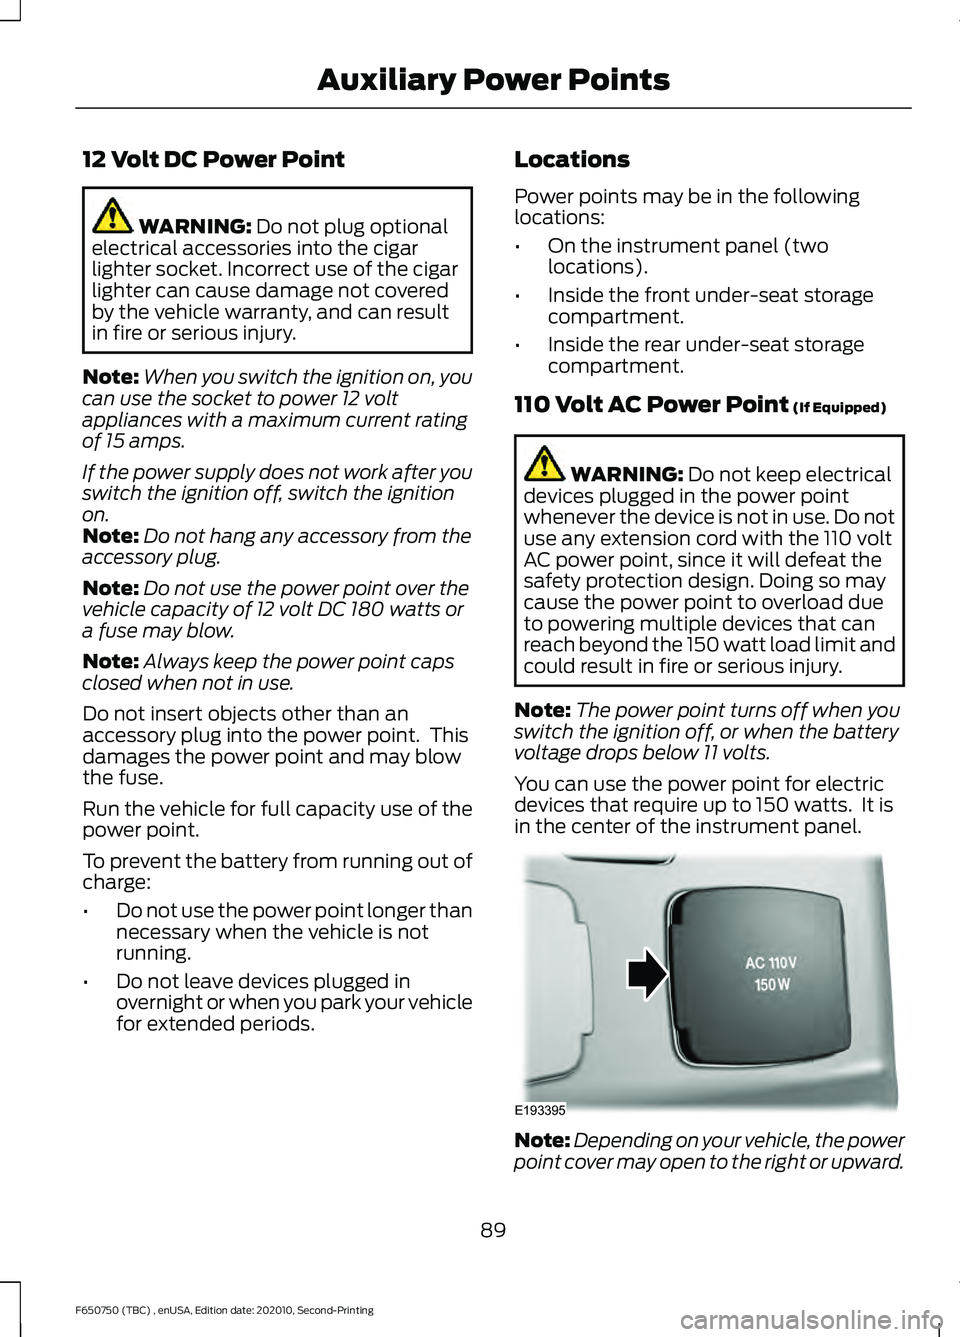
You can use the power point for electric
devices that require up to 150 watts. It is
in the center of the instrument panel. Note:
Depending on your vehicle, the power
point cover may open to the right or upward.
89
F650750 (TBC) , enUSA, Edition date: 202010, Second-Printing Auxiliary Power PointsE193395