2021 FORD F650/750 lock
[x] Cancel search: lockPage 86 of 390
Front Seat Adjustable Head Restraint
(If Equipped)
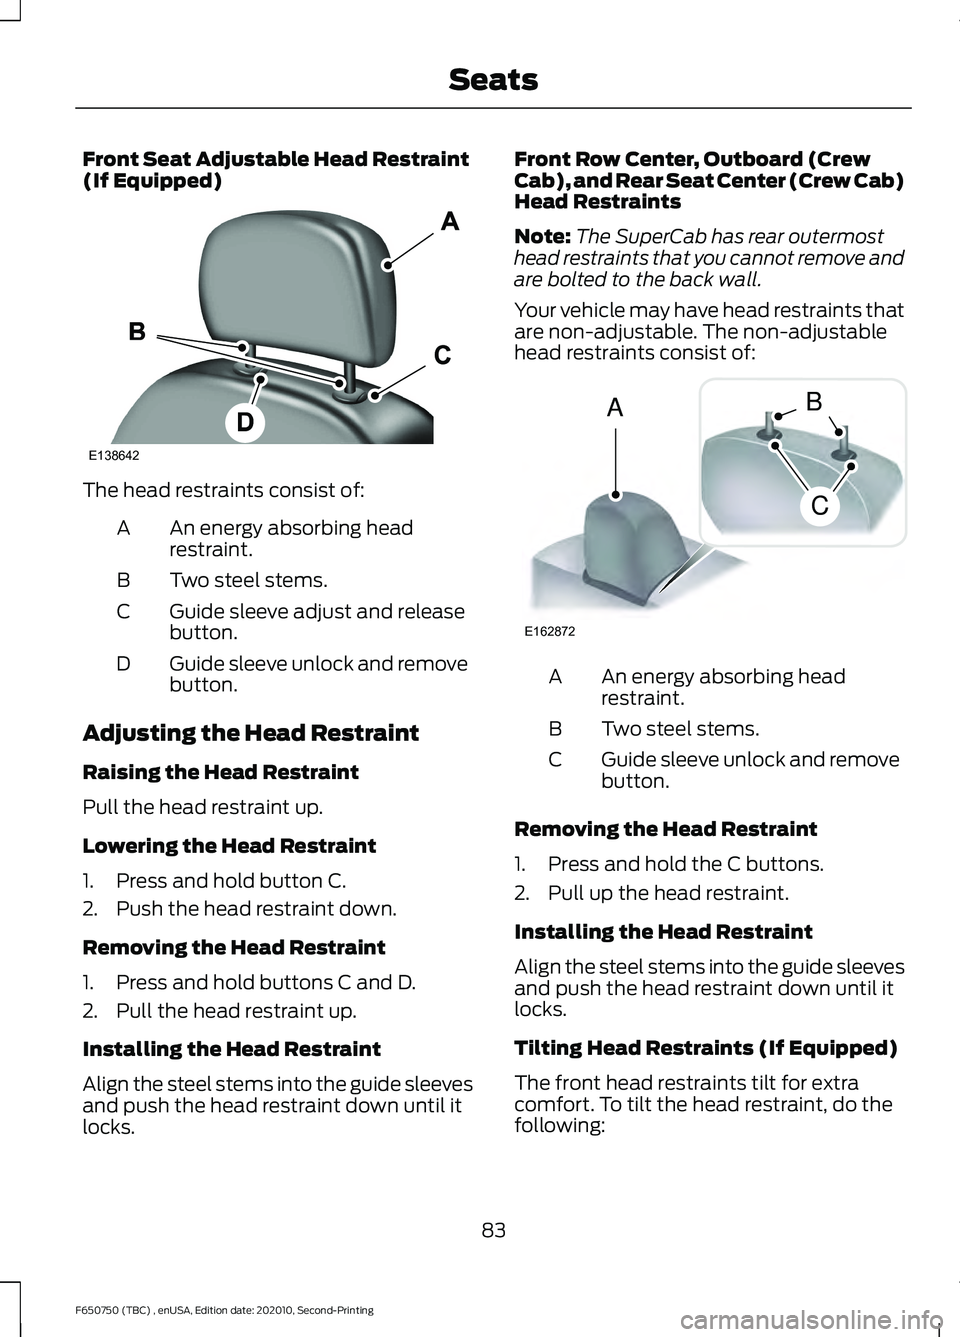
The head restraints consist of:
An energy absorbing head
restraint.
A
Two steel stems.
B
Guide sleeve adjust and release
button.
C
Guide sleeve unlock and remove
button.
D
Adjusting the Head Restraint
Raising the Head Restraint
Pull the head restraint up.
Lowering the Head Restraint
1. Press and hold button C.
2. Push the head restraint down.
Removing the Head Restraint
1. Press and hold buttons C and D.
2. Pull the head restraint up.
Installing the Head Restraint
Align the steel stems into the guide sleeves
and push the head restraint down until it
locks. Front Row Center, Outboard (Crew
Cab), and Rear Seat Center (Crew Cab)
Head Restraints
Note:
The SuperCab has rear outermost
head restraints that you cannot remove and
are bolted to the back wall.
Your vehicle may have head restraints that
are non-adjustable. The non-adjustable
head restraints consist of: An energy absorbing head
restraint.
A
Two steel stems.
B
Guide sleeve unlock and remove
button.
C
Removing the Head Restraint
1. Press and hold the C buttons.
2. Pull up the head restraint.
Installing the Head Restraint
Align the steel stems into the guide sleeves
and push the head restraint down until it
locks.
Tilting Head Restraints (If Equipped)
The front head restraints tilt for extra
comfort. To tilt the head restraint, do the
following:
83
F650750 (TBC) , enUSA, Edition date: 202010, Second-Printing SeatsE138642 E162872
A
C
B
Page 88 of 390
Type 2
Tilting the Seatback Forward
(Two-Passenger Bench Seat)
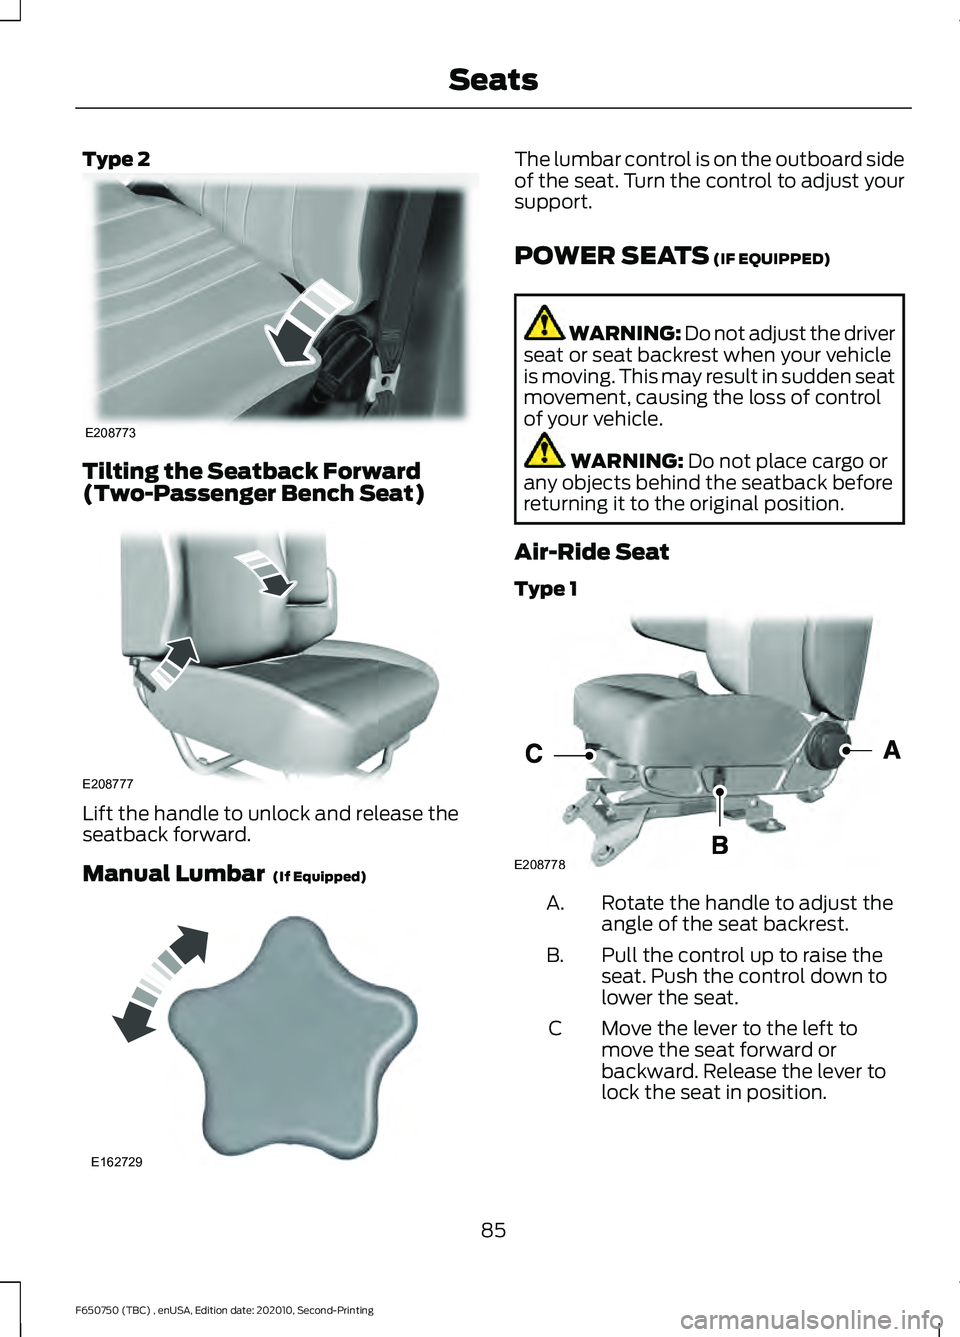
Lift the handle to unlock and release the
seatback forward.
Manual Lumbar (If Equipped) The lumbar control is on the outboard side
of the seat. Turn the control to adjust your
support.
POWER SEATS
(IF EQUIPPED)
WARNING: Do not adjust the driver
seat or seat backrest when your vehicle
is moving. This may result in sudden seat
movement, causing the loss of control
of your vehicle. WARNING:
Do not place cargo or
any objects behind the seatback before
returning it to the original position.
Air-Ride Seat
Type 1 Rotate the handle to adjust the
angle of the seat backrest.
A.
Pull the control up to raise the
seat. Push the control down to
lower the seat.
B.
Move the lever to the left to
move the seat forward or
backward. Release the lever to
lock the seat in position.
C
85
F650750 (TBC) , enUSA, Edition date: 202010, Second-Printing SeatsE208773 E208777 E162729 E208778
Page 89 of 390
Type 2
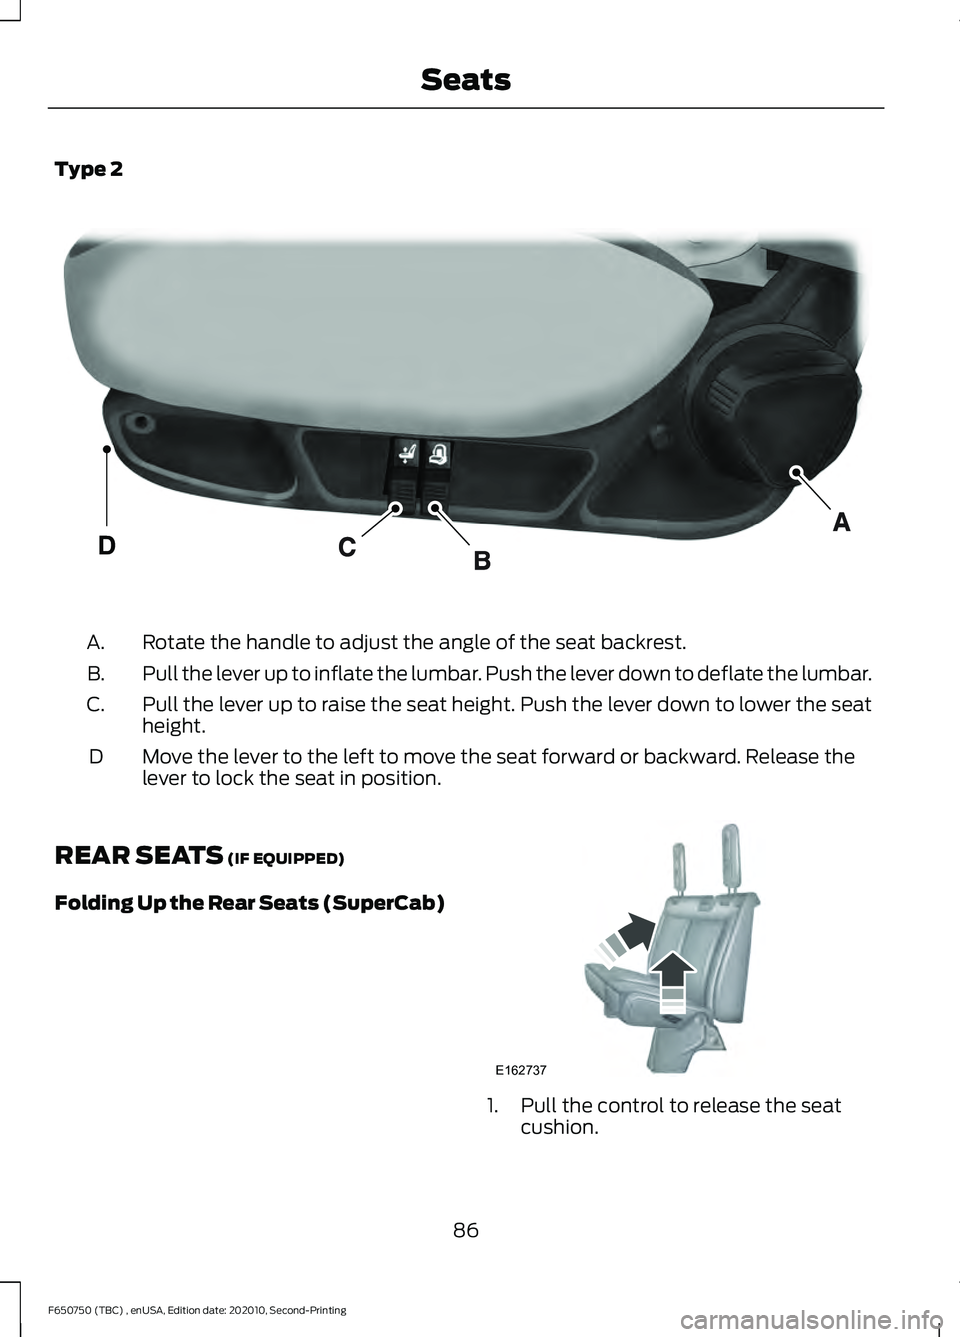
Rotate the handle to adjust the angle of the seat backrest.
A.
Pull the lever up to inflate the lumbar. Push the lever down to deflate the lumbar.
B.
Pull the lever up to raise the seat height. Push the lever down to lower the seat
height.
C.
Move the lever to the left to move the seat forward or backward. Release the
lever to lock the seat in position.
D
REAR SEATS (IF EQUIPPED)
Folding Up the Rear Seats (SuperCab) 1. Pull the control to release the seat
cushion.
86
F650750 (TBC) , enUSA, Edition date: 202010, Second-Printing SeatsE298809 E162737
Page 90 of 390
2.
Rotate the seat cushion up until it locks
into the vertical storage position.
Returning the Seat to the Seating
Position WARNING: Make sure that cargo
or any objects are not trapped
underneath the seat cushion before
returning the seat cushion to its original
position, and that the seat cushion locks
into place. Failure to do so may prevent
the seat from operating properly in the
event of a crash, which could increase
the risk of serious injury.
1. Pull the control on the side of the seat to release the seat cushion from the
storage position.
2. Push the seat cushion down until it locks into the horizontal position.
Folding the Rear Seat Back (Crew
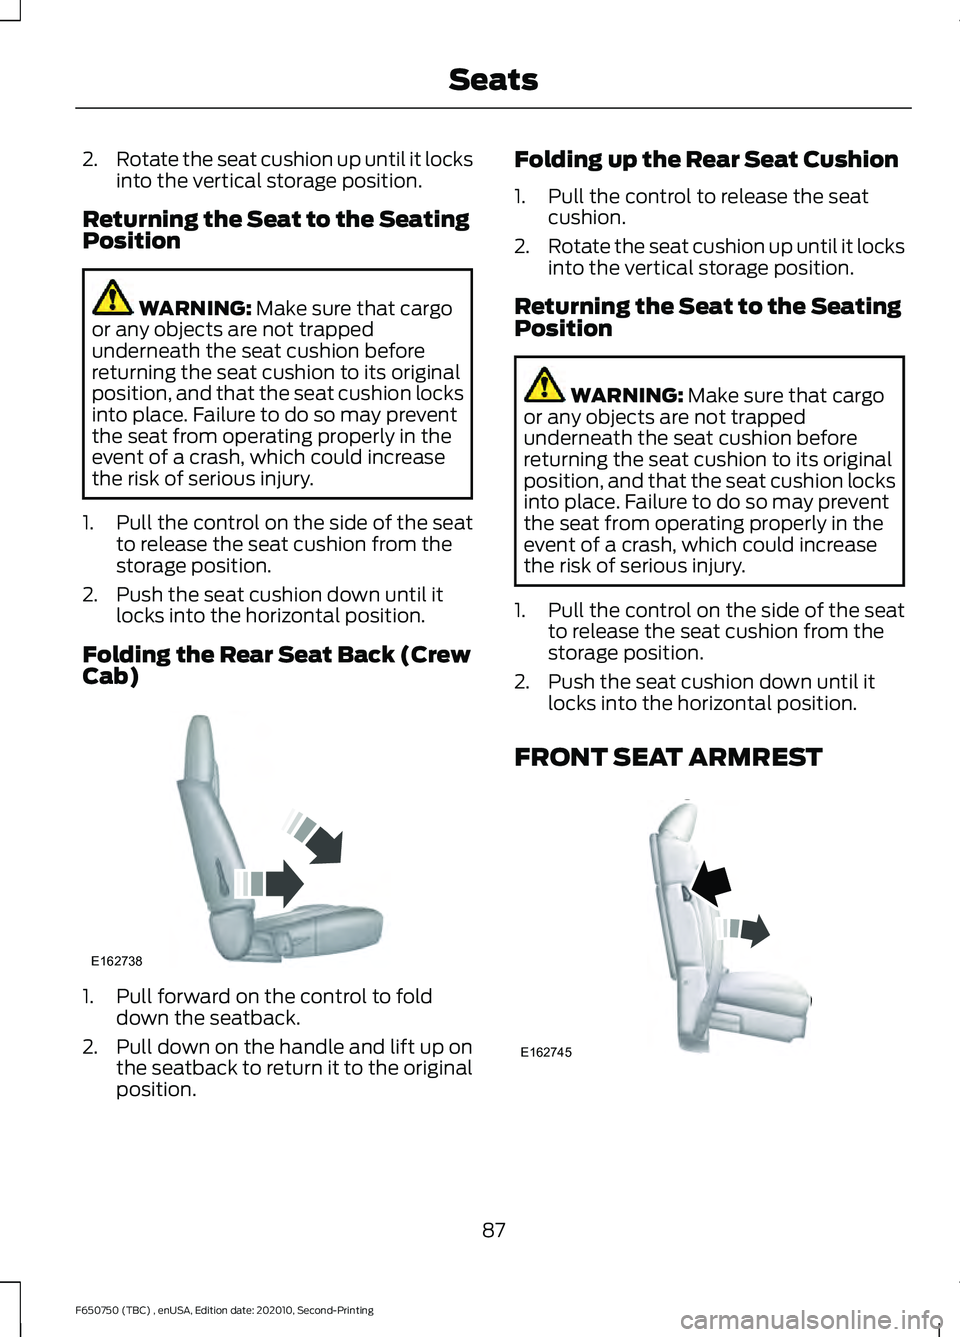
Cab) 1. Pull forward on the control to fold
down the seatback.
2. Pull down on the handle and lift up on
the seatback to return it to the original
position. Folding up the Rear Seat Cushion
1. Pull the control to release the seat
cushion.
2. Rotate the seat cushion up until it locks
into the vertical storage position.
Returning the Seat to the Seating
Position WARNING:
Make sure that cargo
or any objects are not trapped
underneath the seat cushion before
returning the seat cushion to its original
position, and that the seat cushion locks
into place. Failure to do so may prevent
the seat from operating properly in the
event of a crash, which could increase
the risk of serious injury.
1. Pull the control on the side of the seat to release the seat cushion from the
storage position.
2. Push the seat cushion down until it locks into the horizontal position.
FRONT SEAT ARMREST 87
F650750 (TBC) , enUSA, Edition date: 202010, Second-Printing SeatsE162738 E162745
Page 97 of 390

III (start) - Cranks the engine.
STARTING A GASOLINE
ENGINE
(IF EQUIPPED)
When you start the engine, the idle speed
increases, this helps to warm up the
engine. If the engine idle speed does not
slow down automatically, have your
vehicle checked by an authorized dealer.
Before starting the engine check the
following:
• Make sure all occupants have fastened
their safety belts.
• Make sure the headlamps and
electrical accessories are off.
• Make sure the parking brake is on.
• Make sure the transmission is in park
(P) or neutral (N).
• Turn the ignition key to the on position.
Note: Do not touch the accelerator pedal.
1. Fully press the brake pedal.
2. Turn the key to the start position to start the engine. Release the key when
the engine starts.
Note: The engine may continue cranking
for up to 15 seconds or until it starts.
Note: If you cannot start the engine on the
first try, wait for a short period and try again.
Failure to Start
If you cannot start the engine after three
attempts, wait 10 seconds and follow this
procedure:
1. Fully press the brake pedal.
2. Fully press the accelerator pedal and hold it there.
3. Start the engine. Stopping the Engine When Your
Vehicle is Stationary
1. Shift into park (P) or neutral (N).
2. Turn the key to the off position.
3. Apply the parking brake.
Stopping the Engine When Your
Vehicle is Moving
WARNING:
Switching off the
engine when the vehicle is still moving
will result in a loss of brake and steering
assistance. The steering will not lock, but
higher effort will be required. When the
ignition is switched off, some electrical
circuits, including air bags, warning lamps
and indicators may also be off. If the
ignition was turned off accidentally, you
can shift into neutral (N) and re-start the
engine.
1. Put the transmission into neutral (N) and use the brakes to bring your vehicle
to a safe stop.
2. When your vehicle has stopped, shift into park (P) or neutral (N) and switch
the ignition off.
3. Apply the parking brake.
Guarding Against Exhaust Fumes WARNING:
If you smell exhaust
fumes inside your vehicle, have your
vehicle checked by your authorized
dealer immediately. Do not drive your
vehicle if you smell exhaust fumes.
Carbon monoxide is present in exhaust
fumes. Take precautions to avoid its
dangerous effects.
94
F650750 (TBC) , enUSA, Edition date: 202010, Second-Printing Starting and Stopping the Engine
Page 98 of 390

Important Ventilating Information
If you stop your vehicle and then leave the
engine idling for long periods of time, we
recommend that you do one of the
following:
•
Open the windows at least 1 in (3 cm).
• Set your climate control to outside air.
STARTING A DIESEL ENGINE (IF
EQUIPPED)
Read all starting instructions carefully
before you start your vehicle.
Diesel Engine Fast Start Glow Plug
System
The diesel engine glow system consists of:
• Eight glow plugs (one per cylinder)
• Glow Plug Control Module
• Engine Coolant Temperature sensor
• Barometric pressure sensor
• Environmental temperature sensor
The powertrain and glow plug control
modules electronically control the glow
plug system. After you switch the ignition
on the glow plug control module
immediately energizes the glow plugs. The
glow plug control module using the engine
coolant temperature, barometric pressure
sensor and environmental temperature
sensor will determine how long the glow
plugs stay energized. The required time for
the glow plugs to be energized decreases
as the coolant temperature, barometric
pressure and environmental temperature
increase. Before starting the engine, check the
following:
•
Make sure all occupants fasten their
seatbelt.
• Make sure the headlamps and
electrical accessories are off.
• Make sure the parking brake is on.
• Make sure the transmission is in park
(P) or neutral (N).
• Turn the ignition key to the on position.
Note: Do not press the accelerator during
starting.
Cold Weather Starting WARNING: Do not use starting
fluid, for example ether, in the air intake
system. Such fluid could cause
immediate explosive damage to the
engine and possible personal injury. WARNING:
Do not mix diesel with
gasoline, gasohol or alcohol. This could
cause an explosion.
We recommend using the engine block
heater for starting when the ambient
temperature is at or below
-9°F (-23°C)
See Engine Block Heater (page 97).
When operating in cold weather, you can
use Motorcraft® cetane improvers or
non-alcohol-based cetane improvers from
a reputable manufacturer as needed.
Do not crank the engine for more than 10
seconds as starter damage may occur. If
the engine fails to start, turn the key to the
off position and wait 30 seconds before
trying again.
95
F650750 (TBC) , enUSA, Edition date: 202010, Second-Printing Starting and Stopping the Engine
Page 100 of 390

•
Shortly after the engine has shut down,
the electrical system simulates a key
off and even though the ignition is still
on, the electrical system simulates a
normal accessory delay period before
shutting down.
• You must switch the ignition off to
reset the system before restarting your
vehicle.
The engine idle shutdown timer does not
start if:
• The engine is operating in battery
charge protect or power take-off mode.
• The exhaust emission control device is
regenerating.
ENGINE BLOCK HEATER (IF
EQUIPPED) WARNING:
Failure to follow engine
block heater instructions could result in
property damage or serious personal
injury. WARNING: Do not use your heater
with ungrounded electrical systems or
two-pronged adapters. There is a risk of
electrical shock.
Note: The heater is most effective when
outdoor temperatures are below
0°F
(-18°C).
The heater acts as a starting aid by
warming the engine coolant. This allows
the climate control system to respond
quickly. The equipment includes a heater
element (installed in the engine block) and
a wire harness. You can connect the
system to a grounded 120-volt AC
electrical source. We recommend that you do the following
for a safe and correct operation:
•
Use a 16-gauge outdoor extension cord
that is product certified by
Underwriter ’s Laboratory (UL) or
Canadian Standards Association
(CSA). This extension cord must be
suitable for use outdoors, in cold
temperatures, and be clearly marked
Suitable for Use with Outdoor
Appliances. Do not use an indoor
extension cord outdoors. This could
result in an electric shock or become a
fire hazard.
• Use as short an extension cord as
possible.
• Do not use multiple extension cords.
• Make sure that when in operation, the
extension cord plug and heater cord
plug connections are free and clear of
water. This could cause an electric
shock or fire.
• Make sure your vehicle is parked in a
clean area, clear of combustibles.
• Make sure the heater, heater cord and
extension cord are firmly connected.
• Check for heat anywhere in the
electrical hookup once the system has
been operating for approximately 30
minutes.
• Make sure the system is unplugged and
properly stowed before starting and
driving your vehicle. Make sure the
protective cover seals the prongs of the
block heater cord plug when not in use.
• Make sure the heater system is
checked for proper operation before
winter.
Using the Engine Block Heater
Make sure the receptacle terminals are
clean and dry prior to use. Clean them with
a dry cloth if necessary.
97
F650750 (TBC) , enUSA, Edition date: 202010, Second-Printing Starting and Stopping the Engine
Page 108 of 390
Fuel Filler Cap
WARNING: The fuel system may
be under pressure. If you hear a hissing
sound near the fuel filler inlet, do not
refuel until the sound stops. Otherwise,
fuel may spray out, which could cause
serious personal injury.
Note: If you do not use the correct fuel filler
cap, excessive pressure or vacuum in the
fuel tank may damage the fuel system or
cause the fuel cap to disengage in a crash.
The fuel tank has a threaded fuel filler cap.
Note: If you must replace the fuel filler cap,
replace it with a fuel filler cap that is
designed for your vehicle. The vehicle
Warranty may be void for any damage to
the fuel tank or fuel system if the correct
genuine Ford, Motorcraft or other certified
fuel filler cap is not used.
When refueling the vehicle fuel tank do the
following.
1. When your vehicle has stopped, shift into neutral (N) or park (P).
2. Apply the parking brake and switch the
ignition off.
3. Turn the fuel filler cap counterclockwise and remove it.
4. Refuel your vehicle as required.
5. Replace the fuel filler cap, turn it clockwise until you feel a strong
resistance.
Fuel Fill Rate
Your vehicle has a fuel fill pipe that is able
to accept fuel up to
20 gal (75 L) per
minute from a fuel-dispensing nozzle.
Pumping fuel at greater flow rates may
result in premature nozzle shut-off or spit
back. Truck stops have fuel pumps and nozzles
designed for larger, heavy-duty trucks. If
you are refueling your vehicle at a truck
stop and the nozzle shuts off repeatedly,
wait 5-10 seconds, then use a slower fill
rate.
REFUELING - GASOLINE
WARNING:
Fuel vapor burns
violently and a fuel fire can cause severe
injuries. WARNING: Read and follow all the
instructions on the pump island. WARNING: When refueling always
shut the engine off and never allow
sparks or open flames near the fuel tank
filler valve. Never smoke or use a cell
phone while refueling. Fuel vapor is
extremely hazardous under certain
conditions. Avoid inhaling excess fumes. WARNING:
Stay outside your
vehicle and do not leave the fuel pump
unattended when refueling your vehicle. WARNING:
Keep children away
from the fuel pump; never let children
pump fuel. WARNING:
Wait at least 10
seconds before removing the fuel pump
nozzle to allow any residual fuel to drain
into the fuel tank. WARNING: Stop refueling after the
fuel pump nozzle automatically shuts
off for the second time. Failure to follow
this will fill the expansion space in the
fuel tank and could lead to fuel
overflowing.
105
F650750 (TBC) , enUSA, Edition date: 202010, Second-Printing Fuel and Refueling