2021 FORD F650/750 ignition
[x] Cancel search: ignitionPage 5 of 390
Interior Mirror
..................................................62
Sun Visors ........................................................
62
Instrument Cluster
Gauges ..............................................................
63
Warning Lamps and Indicators ...............
66
Audible Warnings and Indicators ............
69
Information Displays
General Information .....................................
70
Information Messages .................................
73
Climate Control
Manual Climate Control .............................
79
Hints on Controlling the Interior Climate ........................................................................\
..
80
Heated Exterior Mirrors ................................
81
Seats
Sitting in the Correct Position ..................
82
Head Restraints .............................................
82
Manual Seats .................................................
84
Power Seats ....................................................
85
Rear Seats .......................................................
86
Front Seat Armrest .......................................
87
Rear Seat Armrest ........................................
88
Auxiliary Power Points
Auxiliary Power Points ................................
89
USB Ports
Locating the USB Ports ...............................
91
Charging a Device ..........................................
91
Storage Compartments
Overhead Console ........................................
92
Starting and Stopping the Engine
General Information .....................................
93Ignition Switch
...............................................
93
Starting a Gasoline Engine ........................
94
Starting a Diesel Engine .............................
95
Switching Off the Engine ...........................
96
Engine Idle Shutdown .................................
96
Engine Block Heater .....................................
97
Fuel and Refueling
Safety Precautions .......................................
99
Fuel Quality - Diesel ...................................
100
Fuel Quality - Gasoline ..............................
103
Running Out of Fuel - Diesel ...................
103
Running Out of Fuel - Gasoline .............
104
Refueling - Diesel ........................................
104
Refueling - Gasoline ...................................
105
Fuel Consumption ......................................
106
Fuel Tank Selector Switch .......................
108
Engine Emission Control
Emission Law ................................................
109
Catalytic Converter ......................................
110
Selective Catalytic Reductant System - Diesel .............................................................
112
Diesel Particulate Filter ..............................
116
Transmission
Automatic Transmission ...........................
122
Power Take-Off ............................................
126
Rear Axle
General Information ...................................
128
Electronic Locking Differential ...............
128
2-Speed Rear Axle ......................................
129
Brakes
General Information ...................................
130
Hints on Driving With Anti-Lock Brakes ........................................................................\
..
131
Parking Brake ..................................................
131
Hill Start Assist .............................................
134
2
F650750 (TBC) , enUSA, Edition date: 202010, Second-Printing Table of Contents
Page 12 of 390

If these modified engine performance
characteristics persist for an extended
period and either the service engine soon
or powertrain malfunction, reduced power,
electronic throttle control light is
illuminated, have the system checked by
an authorized dealer.
Service engine soon
Powertrain malfunction, reduced
power, electronic throttle control
Diesel Lubrication System
It is important to change the engine oil at
the recommended service intervals or
when indicated by the information display
to maintain oil viscosity. Extending the oil
and filter change interval beyond the
recommended interval can negatively
affect engine performance, fuel economy
and engine life. See Engine Oil Check
(page 218).
Engine and secondary cooling system
The cooling system contains a primary
cooling loop to cool the engine and a
secondary cooling loop to cool the
transmission, charge air, and fuel. The
coolant serves three primary purposes: to
provide heat transfer, freeze point
protection, and corrosion protection using
additives.
Vehicles with diesel engines typically are
used to carry heavy loads and accumulate
mileage rapidly. These two factors may
cause the additives in the coolant to wear
out in a shorter time. You can find more
information about coolant additives and
coolant change intervals in the coolant
chapter. See
General Maintenance
Information (page 319). Operating the
engine with insufficient coolant or coolant
additive can cause severe engine damage. Selective catalytic reduction system
Your vehicle is equipped with a selective
catalytic reduction system designed to
reduce emission levels of nitrogen oxides
from the exhaust of your diesel engine. This
system relies on the use of Diesel Exhaust
Fluid (DEF) that you must replenish at
certain intervals. Failure to maintain proper
DEF levels or if the DEF becomes
contaminated will result in vehicle speed
limitations or result in your vehicle entering
an idle-only mode. See
Selective
Catalytic Reductant System (page 112).
Minor Troubleshooting Guide
If the engine won ’t crank WARNING:
Battery posts,
terminals and related accessories
contain lead and lead compounds. Wash
hands after handling.
Turn on the headlights. If the lights are dim,
do not go on at all or when the ignition is
turned to the start position, the lights
become dim or go out, the battery
connections may be loose or corroded, or
the battery may be discharged. If there is
a clicking or stuttering sound coming from
the engine compartment when you turn
the key to the start position, this may also
indicate a loose or corroded battery
connection.
Check the battery connections at the
battery posts, cable connection to the
engine grounding point and at the starter
connection.
If you suspect a discharged battery, have
it checked and corrected.
9
F650750 (TBC) , enUSA, Edition date: 202010, Second-Printing Introduction
Page 13 of 390

•
The gearshift lever must be in P (Park)
or N (Neutral) in order for the starter
to operate.
• Try operating the starter switch several
times. This operation may clean
potentially corroded contacts or make
the switch temporarily operable until
you can reach the dealer.
• If all electrical connections are tight
and you need assistance to start, See
Jump Starting the Vehicle (page 183).
If engine cranks but won ’t start
Prolonged starter cranking (in excess of 10
seconds) could cause damage to the
starter motor or the high-pressure fuel
pump.
• Check the fuel gauge. You may be out
of fuel. If the gauge shows that there
is fuel in the tank, the trouble may be
in the electrical system or the fuel
system. If equipped with an auxiliary
tank, be sure that the tank control
switch is set for the tank with fuel and
not on an empty tank.
• Leaving your ignition key turned to on
for over two minutes without starting
may make starting difficult because
the glow plugs will cease activation.
Reset the system by turning the ignition
key to off and then back to on again.
Note: If the system is out of fuel and the
engine will not start, do not continue
cranking the engine. Continued cranking can
damage the high-pressure fuel pump.
If the engine runs hot
The following could cause the engine to
overheat:
• Lack of coolant
• Dirty cooling system.
• Plugged radiator fins, A/C condenser
and/or oil cooler
• Malfunctioning fan drive •
Driving with frozen coolant
• Sticking thermostat
• Overloading or pulling heavy trailers
during hot weather
• Grill or radiator air blockage
• Slipping or missing drive belt
• Plugged or very dirty air filter
If fuses burn out WARNING: Replacement fuses and
circuit breakers must always be the
same rating as the original equipment
shown. Never replace a fuse or circuit
breaker with one of a higher rating.
Higher rated fuses or circuit breakers
could allow circuit overloading in the
event of a circuit malfunction, resulting
in severe vehicle damage or personal
injury due to fire.
Burned-out or blown fuses usually indicate
an electrical short-circuit, although a fuse
may occasionally burn out from vibration.
Insert a second fuse. If this fuse
immediately burns out and you cannot
locate the cause, return your vehicle to
your dealer for a circuit check. See
Changing a Fuse
(page 201).
Selective catalytic reduction system
speed limit and Idle-only modes
If the vehicle ’s speed is limited or in an
idle-only mode, the selective catalytic
reduction system may be limiting the
vehicle ’s functions due to low or
contaminated DEF. Check the DEF. See
Selective Catalytic Reductant System
(page
112).
SYMBOLS GLOSSARY
These are some of the symbols you may
see on your vehicle.
10
F650750 (TBC) , enUSA, Edition date: 202010, Second-Printing Introduction
Page 25 of 390
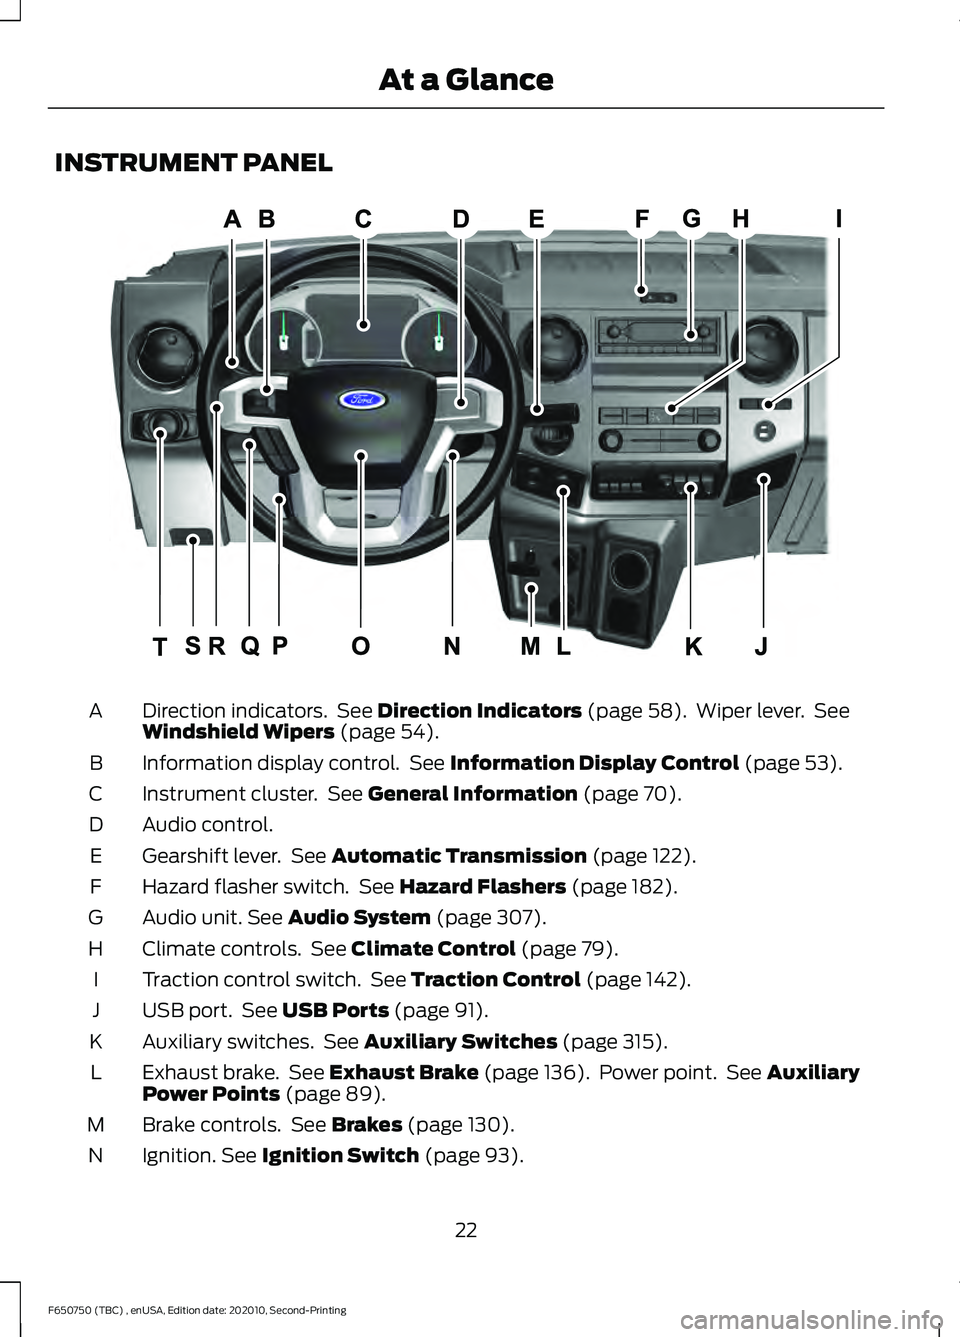
INSTRUMENT PANEL
Direction indicators. See Direction Indicators (page 58). Wiper lever. See
Windshield Wipers (page 54).
A
Information display control. See
Information Display Control (page 53).
B
Instrument cluster. See
General Information (page 70).
C
Audio control.
D
Gearshift lever. See
Automatic Transmission (page 122).
E
Hazard flasher switch. See
Hazard Flashers (page 182).
F
Audio unit.
See Audio System (page 307).
G
Climate controls. See
Climate Control (page 79).
H
Traction control switch. See
Traction Control (page 142).
I
USB port. See
USB Ports (page 91).
J
Auxiliary switches. See
Auxiliary Switches (page 315).
K
Exhaust brake. See
Exhaust Brake (page 136). Power point. See Auxiliary
Power Points (page 89).
L
Brake controls. See
Brakes (page 130).
M
Ignition.
See Ignition Switch (page 93).
N
22
F650750 (TBC) , enUSA, Edition date: 202010, Second-Printing At a GlanceE307565
Page 45 of 390
2. Release the button and pull down on
the height adjuster to make sure it is
locked in place. SEATBELT WARNING LAMP
AND INDICATOR CHIME This lamp illuminates and an
indicator chime will sound if the
driver seatbelt has not been
fastened when the vehicle's ignition is
turned on.
Conditions of operation Then
If
The seatbelt warning lamp illuminates andthe indicator chime sounds for a few seconds.
The driver seatbelt is not buckled before
the ignition switch is turned to the on posi- tion...
The seatbelt warning lamp and indicatorchime turn off.
The driver seatbelt is buckled while the
warning lamp is illuminated and the indic- ator chime is sounding...
The seatbelt warning lamp and indicatorchime remain off.
The driver seatbelt is buckled before the
ignition switch is turned to the on position...
SEATBELT REMINDER
Belt-Minder™
This feature supplements the safety belt
warning function by providing additional
reminders that intermittently sound a tone
and illuminate the safety belt warning light
when you are in the driver seat or you have
a front seat passenger and a safety belt is
unbuckled. The system uses information from the
front passenger sensing system to
determine if a front seat passenger is
present and therefore potentially in need
of a warning. To avoid activating the
Belt-Minder feature for objects you place
in the front passenger seat, only the front
seat passengers receive warnings as
determined by the front passenger sensing
system.
If the Belt-Minder warnings expire
(warnings for about five minutes) for one
passenger (driver or front passenger), the
other passenger can still cause the
Belt-Minder feature to turn on.
42
F650750 (TBC) , enUSA, Edition date: 202010, Second-Printing SeatbeltsE71880
Page 46 of 390
Then...
If...
The Belt-Minder feature will not activate.
You and the front seat passenger buckle
your safety belts before you switch the
ignition on or less than 1-2 minutes elapse after you switch the ignition on...
The Belt-Minder feature activates, the
safety belt warning light illuminates and a warning tone sounds for 6 seconds every
25 seconds, repeating for about 5 minutes or until you and the front seat passenger buckle your safety belts.
You or the front seat passenger do not
buckle your safety belts before your vehicle reaches at least 6 mph (9.7 km/h) and 1-2
minutes elapse after you switch the ignition on...
The Belt-Minder feature activates, the
safety belt warning light illuminates and a warning tone sounds for 6 seconds every
25 seconds, repeating for about 5 minutes or until you and the front seat passenger buckle your safety belts.
The safety belt for the driver or front
passenger is unbuckled for about 1 minute
while the vehicle is traveling at least 6 mph (9.7 km/h) and more than 1-2 minutes
elapse after you switch the ignition on...
Deactivating and Activating the
Belt-Minder Feature WARNING: While the system
allows you to deactivate it, this system
is designed to improve your chances of
being safely belted and surviving an
accident. We recommend you leave the
system activated for yourself and others
who may use the vehicle.
Note: The driver and front passenger
warnings switch on and off independently.
When you perform this procedure for one
seating position, do not buckle the other
position as this will terminate the process.
Read Steps 1 - 4 thoroughly before
proceeding with the programming
procedure. Before following the procedure, make sure
that:
•
The parking brake is set.
• The transmission is in park (P) or
neutral (N).
• The ignition is off.
• The driver and front passenger safety
belts are unbuckled.
1. Switch the ignition on. Do not start the
vehicle.
2. Wait until the safety belt warning light turns off (about one minute). After
Step 2, wait an additional 5 seconds
before proceeding with Step 3. Once
you start Step 3, you must complete
the procedure within 30 seconds.
3. For the seating position you are switching off, buckle then unbuckle the
safety belt three times at a moderate
speed, ending in the unbuckled state.
After Step 3, the safety belt warning
light turns on.
43
F650750 (TBC) , enUSA, Edition date: 202010, Second-Printing Seatbelts
Page 49 of 390
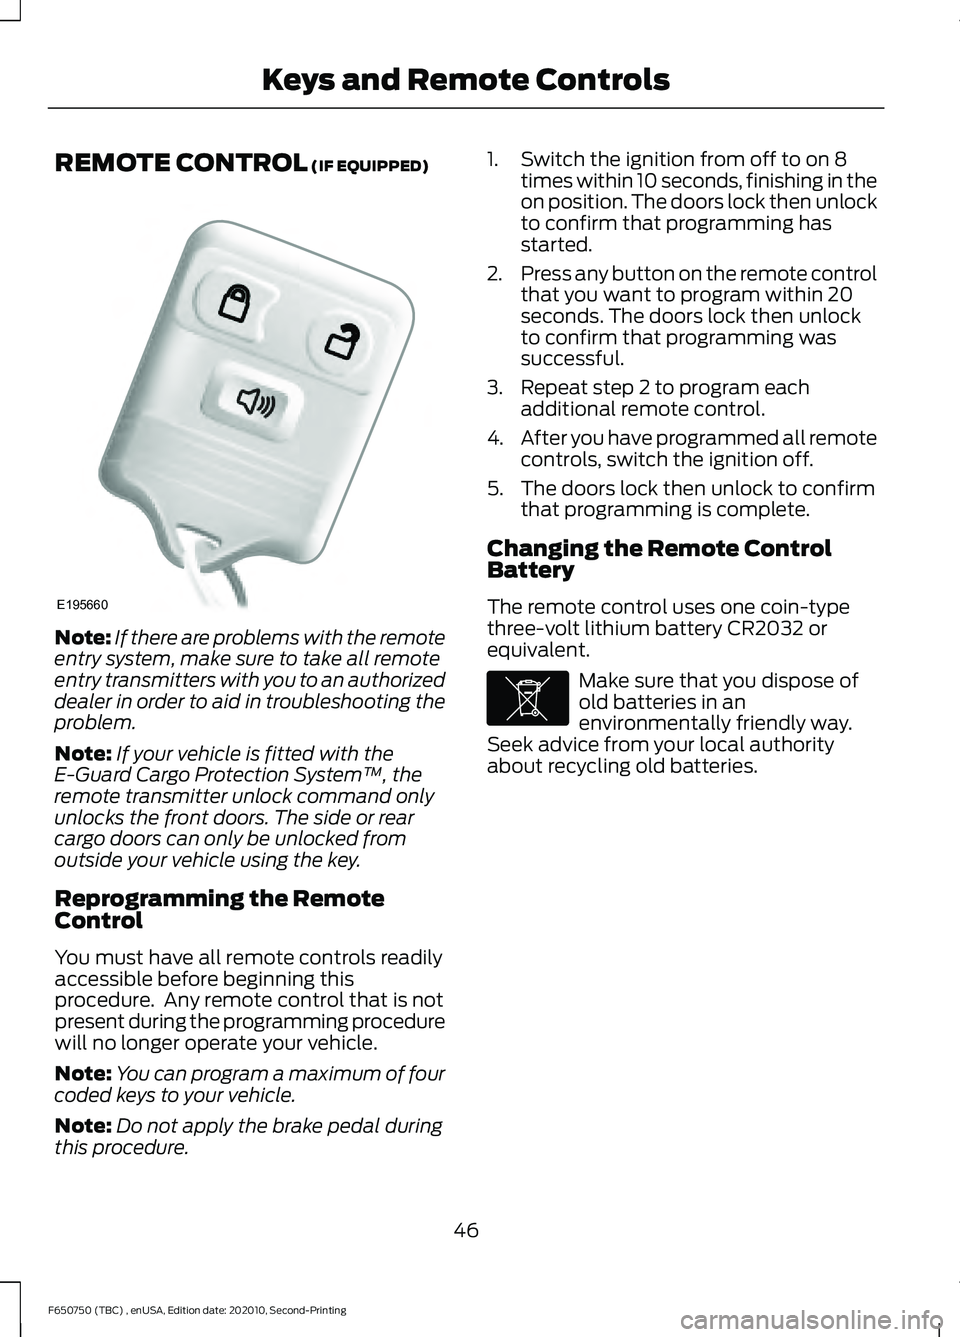
REMOTE CONTROL (IF EQUIPPED)
Note:
If there are problems with the remote
entry system, make sure to take all remote
entry transmitters with you to an authorized
dealer in order to aid in troubleshooting the
problem.
Note: If your vehicle is fitted with the
E-Guard Cargo Protection System ™, the
remote transmitter unlock command only
unlocks the front doors. The side or rear
cargo doors can only be unlocked from
outside your vehicle using the key.
Reprogramming the Remote
Control
You must have all remote controls readily
accessible before beginning this
procedure. Any remote control that is not
present during the programming procedure
will no longer operate your vehicle.
Note: You can program a maximum of four
coded keys to your vehicle.
Note: Do not apply the brake pedal during
this procedure. 1. Switch the ignition from off to on 8
times within 10 seconds, finishing in the
on position. The doors lock then unlock
to confirm that programming has
started.
2. Press any button on the remote control
that you want to program within 20
seconds. The doors lock then unlock
to confirm that programming was
successful.
3. Repeat step 2 to program each additional remote control.
4. After you have programmed all remote
controls, switch the ignition off.
5. The doors lock then unlock to confirm that programming is complete.
Changing the Remote Control
Battery
The remote control uses one coin-type
three-volt lithium battery CR2032 or
equivalent. Make sure that you dispose of
old batteries in an
environmentally friendly way.
Seek advice from your local authority
about recycling old batteries.
46
F650750 (TBC) , enUSA, Edition date: 202010, Second-Printing Keys and Remote ControlsE195660 E107998
Page 50 of 390
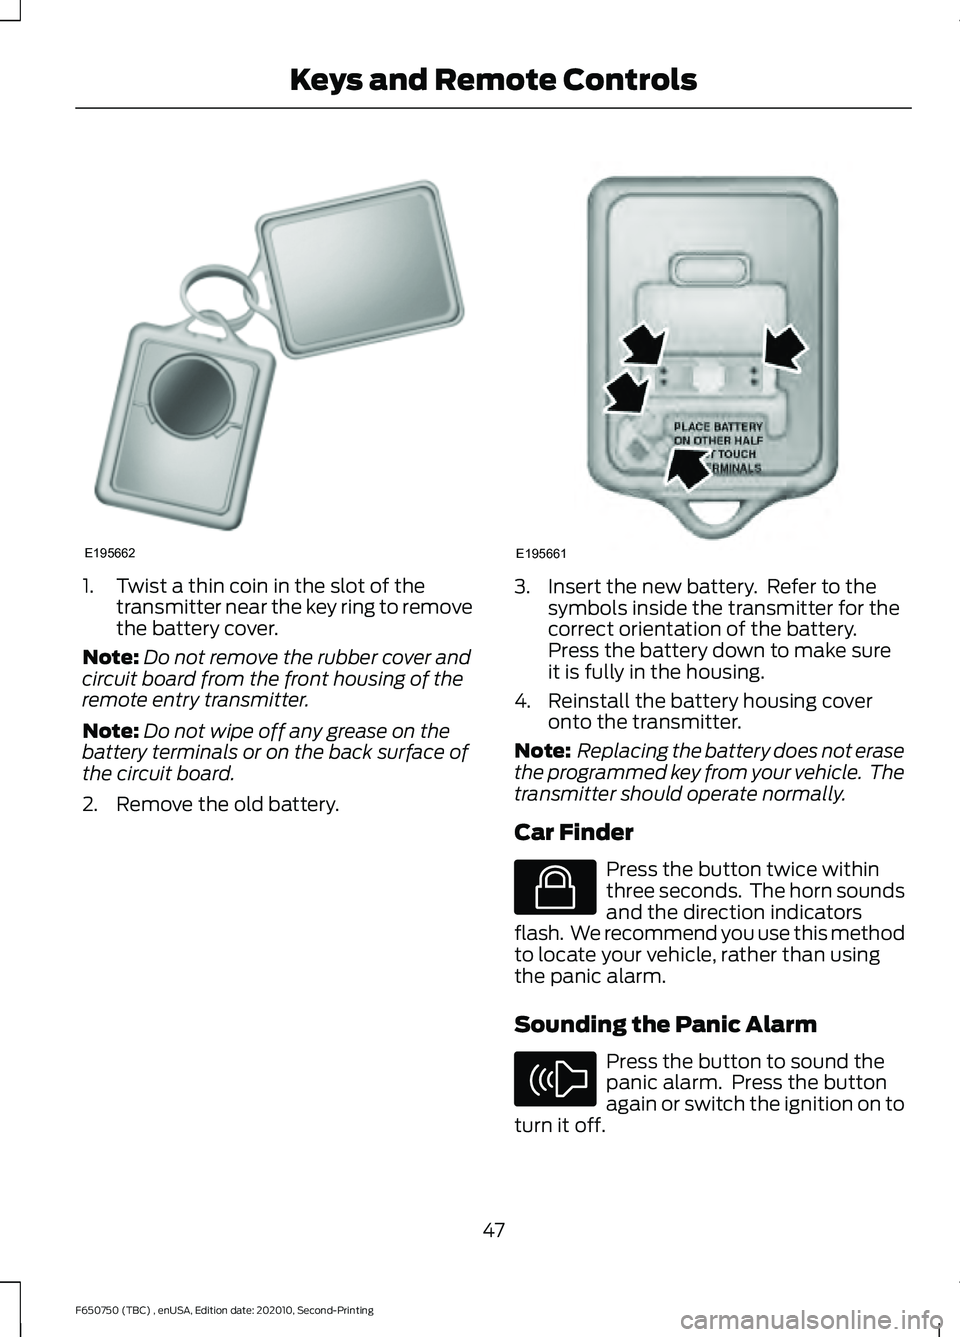
1. Twist a thin coin in the slot of the
transmitter near the key ring to remove
the battery cover.
Note: Do not remove the rubber cover and
circuit board from the front housing of the
remote entry transmitter.
Note: Do not wipe off any grease on the
battery terminals or on the back surface of
the circuit board.
2. Remove the old battery. 3. Insert the new battery. Refer to the
symbols inside the transmitter for the
correct orientation of the battery.
Press the battery down to make sure
it is fully in the housing.
4. Reinstall the battery housing cover onto the transmitter.
Note: Replacing the battery does not erase
the programmed key from your vehicle. The
transmitter should operate normally.
Car Finder Press the button twice within
three seconds. The horn sounds
and the direction indicators
flash. We recommend you use this method
to locate your vehicle, rather than using
the panic alarm.
Sounding the Panic Alarm Press the button to sound the
panic alarm. Press the button
again or switch the ignition on to
turn it off.
47
F650750 (TBC) , enUSA, Edition date: 202010, Second-Printing Keys and Remote ControlsE195662 E195661 E138623 E138624