2021 FORD F650/750 check transmission fluid
[x] Cancel search: check transmission fluidPage 219 of 390
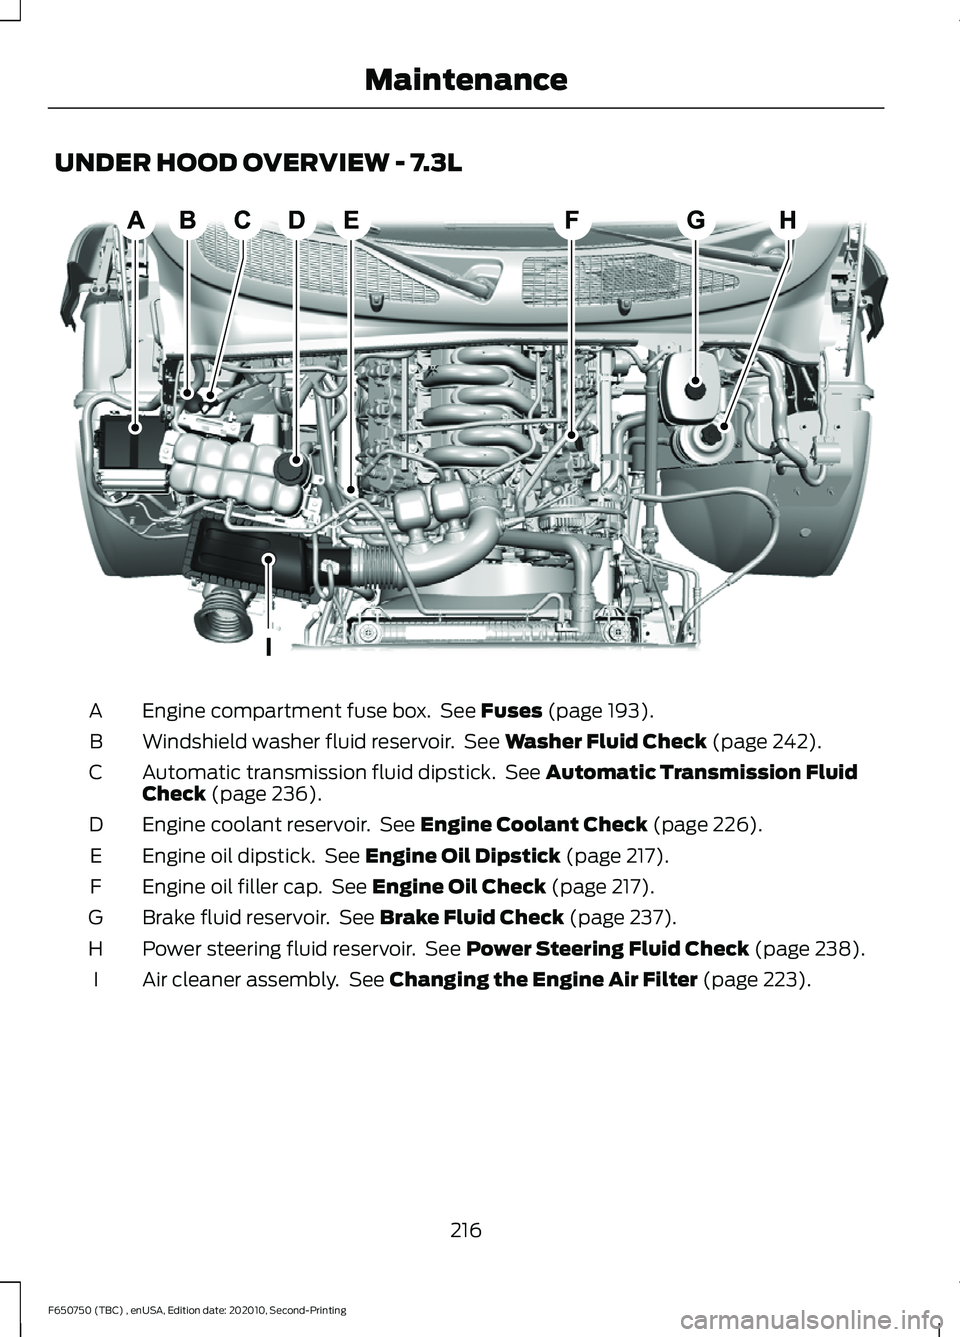
UNDER HOOD OVERVIEW - 7.3L
Engine compartment fuse box. See Fuses (page 193).
A
Windshield washer fluid reservoir. See
Washer Fluid Check (page 242).
B
Automatic transmission fluid dipstick. See
Automatic Transmission Fluid
Check (page 236).
C
Engine coolant reservoir. See
Engine Coolant Check (page 226).
D
Engine oil dipstick. See
Engine Oil Dipstick (page 217).
E
Engine oil filler cap. See
Engine Oil Check (page 217).
F
Brake fluid reservoir. See
Brake Fluid Check (page 237).
G
Power steering fluid reservoir. See
Power Steering Fluid Check (page 238).
H
Air cleaner assembly. See
Changing the Engine Air Filter (page 223).
I
216
F650750 (TBC) , enUSA, Edition date: 202010, Second-Printing MaintenanceE314523
Page 234 of 390
1. Pull off the road as soon as safely
possible and shift the transmission into
park (P).
2. Leave the engine running until the coolant temperature gauge needle
returns to the normal position. After
several minutes, if the temperature
does not drop, follow the remaining
steps.
3. Switch the engine off and wait for it to
cool. Check the coolant level.
4. If the coolant level is at or below the minimum mark, add prediluted coolant
immediately.
5. If the coolant level is normal, restart the engine and continue.
ENGINE COOLANT CHECK -
6.7L DIESEL WARNING: Do not remove the
coolant reservoir cap when the cooling
system is hot. Wait 10 minutes for the
cooling system to cool down. Cover the
coolant reservoir cap with a thick cloth
to prevent the possibility of scalding and
slowly remove the cap. Failure to follow
this instruction could result in personal
injury. WARNING:
Do not put coolant in
the windshield washer reservoir. If
sprayed on the windshield, coolant could
make it difficult to see through the
windshield. WARNING:
To reduce the risk of
personal injury, make sure the engine is
cool before unscrewing the coolant
pressure relief cap. The cooling system
is under pressure. Steam and hot liquid
can come out forcefully when you loosen
the cap slightly. WARNING:
Do not add coolant
further than the MAX mark.
When the engine is cold, check the
concentration and level of the coolant at
the intervals listed in the scheduled
maintenance information. See Scheduled
Maintenance
(page 319).
Note: Make sure that the coolant level is
between the
MIN and MAX marks on the
coolant reservoir.
Note: Coolant expands when it is hot. The
level may extend beyond the
MAX mark.
Maintain coolant concentration within
48% to 50%, which equates to a freeze
point between -30°F (-34°C) and -34°F
(-37°C). Coolant concentration should be
checked using a refractometer. We do not
recommend the use of hydrometers or
coolant test strips for measuring coolant
concentration.
Adding Coolant WARNING:
Do not add engine
coolant when the engine is hot. Failure
to follow this instruction could result in
personal injury. WARNING:
Do not remove the
coolant reservoir cap when the cooling
system is hot. Wait 10 minutes for the
cooling system to cool down. Cover the
coolant reservoir cap with a thick cloth
to prevent the possibility of scalding and
slowly remove the cap. Failure to follow
this instruction could result in personal
injury.
Note: Automotive fluids are not
interchangeable. Do not use coolant or
windshield washer fluid outside of its
specified function and vehicle location.
231
F650750 (TBC) , enUSA, Edition date: 202010, Second-Printing Maintenance
Page 239 of 390

AUTOMATIC TRANSMISSION
FLUID CHECK
The transmission does not consume fluid.
However, check the fluid level if the
transmission is not working properly, for
example if the transmission slips, shifts
slowly or if there are signs of fluid loss.
Replace the transmission fluid and filter
on your vehicle at the specified service
interval. See Scheduled Maintenance
(page 319).
Automatic transmission fluid expands
when warmed. To check the fluid level
consistently and accurately, do the
following:
1. Drive the vehicle until it reaches normal
operating temperature. This may take
up to
20 mi (30 km). Make sure that
the transmission fluid temperature
gauge on the instrument cluster is
within normal operating temperature
196– 215°F (91– 102°C)
before
checking.
2. Make sure that your vehicle is on level ground.
3. With the engine running, parking brake
engaged and your foot on the brake
pedal, move the gearshift lever through
all of the gear ranges. Allow sufficient
time for each gear to engage.
4. Make sure the parking brake is on. Make
sure the transmission is in park (P) or
neutral (N) and leave the engine
running.
5. Open the hood. See
Opening and
Closing the Hood (page 213).
6. Remove the dipstick and wipe it with a clean, lint-free cloth. See
Under
Hood Overview (page 215).
7. Replace the dipstick and remove it again to check the fluid level. 8. If the fluid level is correct, replace the
dipstick and make sure it is fully seated.
Note: If the fluid level is between the
maximum and minimum marks, the fluid
level is acceptable. Do not add fluid.
Transmission Fluid Level
Low Fluid Level If the fluid level is at or below the minimum
mark, add fluid immediately. See
Capacities and Specifications
(page
288).
Note: If there is no indication of fluid on the
dipstick, have your vehicle checked
immediately.
Correct Fluid Level Make sure that the fluid level is between
the maximum and minimum marks.
236
F650750 (TBC) , enUSA, Edition date: 202010, Second-Printing MaintenanceE163740 E163742
Page 240 of 390
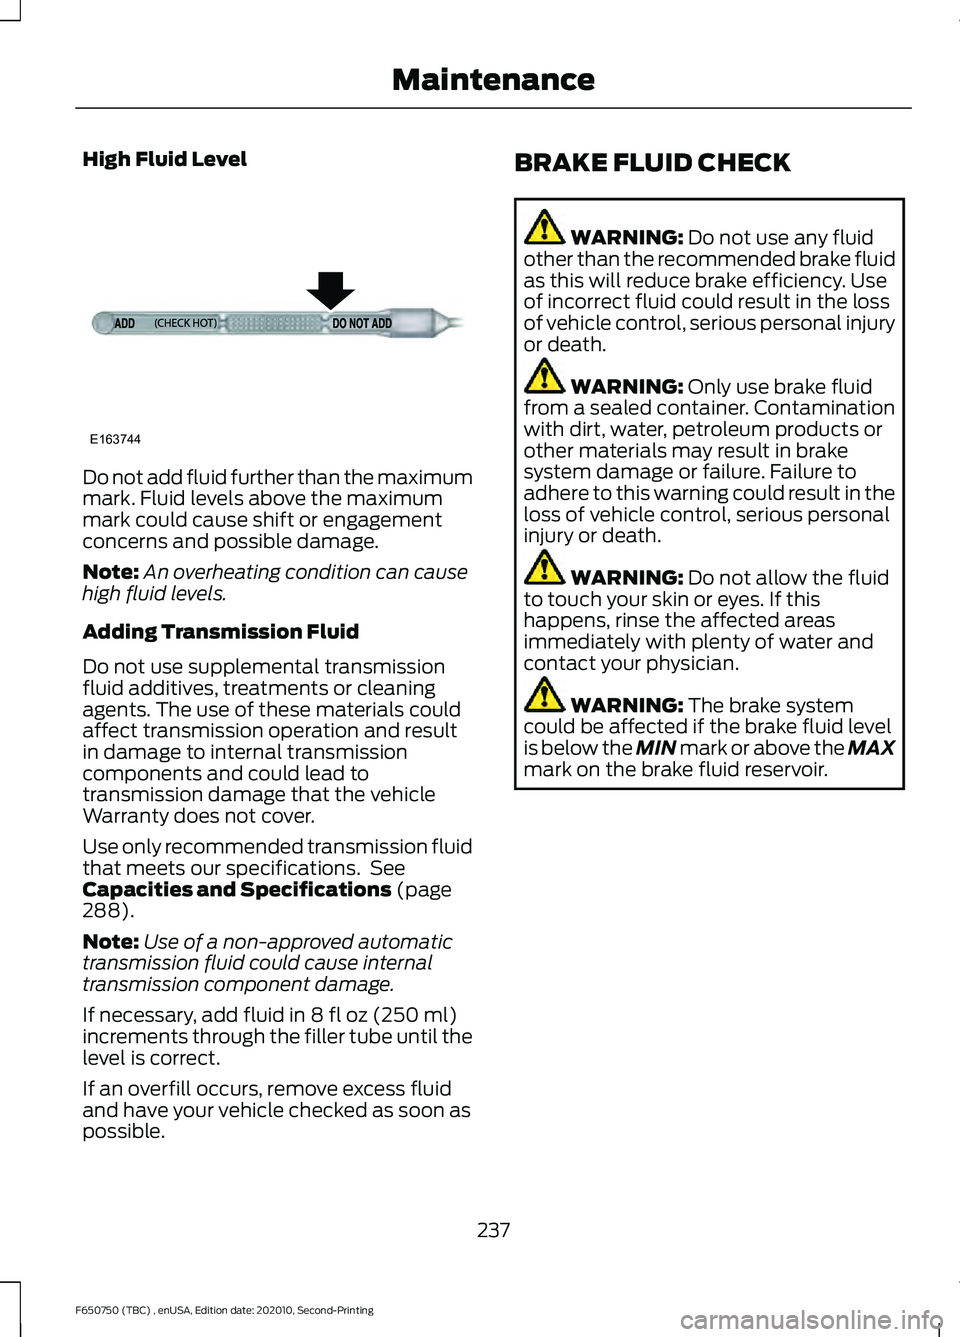
High Fluid Level
Do not add fluid further than the maximum
mark. Fluid levels above the maximum
mark could cause shift or engagement
concerns and possible damage.
Note:
An overheating condition can cause
high fluid levels.
Adding Transmission Fluid
Do not use supplemental transmission
fluid additives, treatments or cleaning
agents. The use of these materials could
affect transmission operation and result
in damage to internal transmission
components and could lead to
transmission damage that the vehicle
Warranty does not cover.
Use only recommended transmission fluid
that meets our specifications. See
Capacities and Specifications (page
288).
Note: Use of a non-approved automatic
transmission fluid could cause internal
transmission component damage.
If necessary, add fluid in
8 fl oz (250 ml)
increments through the filler tube until the
level is correct.
If an overfill occurs, remove excess fluid
and have your vehicle checked as soon as
possible. BRAKE FLUID CHECK WARNING:
Do not use any fluid
other than the recommended brake fluid
as this will reduce brake efficiency. Use
of incorrect fluid could result in the loss
of vehicle control, serious personal injury
or death. WARNING:
Only use brake fluid
from a sealed container. Contamination
with dirt, water, petroleum products or
other materials may result in brake
system damage or failure. Failure to
adhere to this warning could result in the
loss of vehicle control, serious personal
injury or death. WARNING:
Do not allow the fluid
to touch your skin or eyes. If this
happens, rinse the affected areas
immediately with plenty of water and
contact your physician. WARNING:
The brake system
could be affected if the brake fluid level
is below the MIN mark or above the MAX
mark on the brake fluid reservoir.
237
F650750 (TBC) , enUSA, Edition date: 202010, Second-Printing MaintenanceE163744
Page 326 of 390
Multi-point Inspection
In order to keep your vehicle running right,
it is important to have the systems on your
vehicle checked regularly. This can help
identify potential issues and prevent major
problems. We recommend having the
following multi-point inspection performed
at every scheduled maintenance interval
to help make sure your vehicle keeps
running great.Multi-point Inspection
Horn operation
Accessory drive belt(s)
Radiator, cooler, heater and A/C hoses
Battery performance
Suspension component for leaks ordamage
Engine air filter
Steering and linkage
Exhaust system
Tires (including spare) for wear and properpressure2
Exterior lamps operation
Windshield for cracks, chips or pits
Fluid levels 1
; fill if necessary
Washer spray and wiper operation
For oil and fluid leaks
Hazard warning system operation
Hood rest for lubrication
1 Brake, coolant recovery reservoir, automatic transmission, power steering and window
washer.
2 If your vehicle is equipped with a temporary mobility kit, check the tire sealant expiration
Use By date on the canister. Replace as needed.
Be sure to ask your dealership service
advisor or technician about the multi-point
vehicle inspection. It is a comprehensive
way to perform a thorough inspection of
your vehicle. Your checklist gives you
immediate feedback on the overall
condition of your vehicle. NORMAL SCHEDULED
MAINTENANCE
Intelligent Oil-Life Monitor™ -
Diesel Engine Only
Your diesel engine has an Intelligent
Oil-Life Monitor that determines when you
should change the engine oil based on how
you use your vehicle. By using several
important factors in its calculations, the
monitor helps reduce the cost of owning
your vehicle and reduces environmental
waste at the same time.
323
F650750 (TBC) , enUSA, Edition date: 202010, Second-Printing Scheduled Maintenance
Page 328 of 390
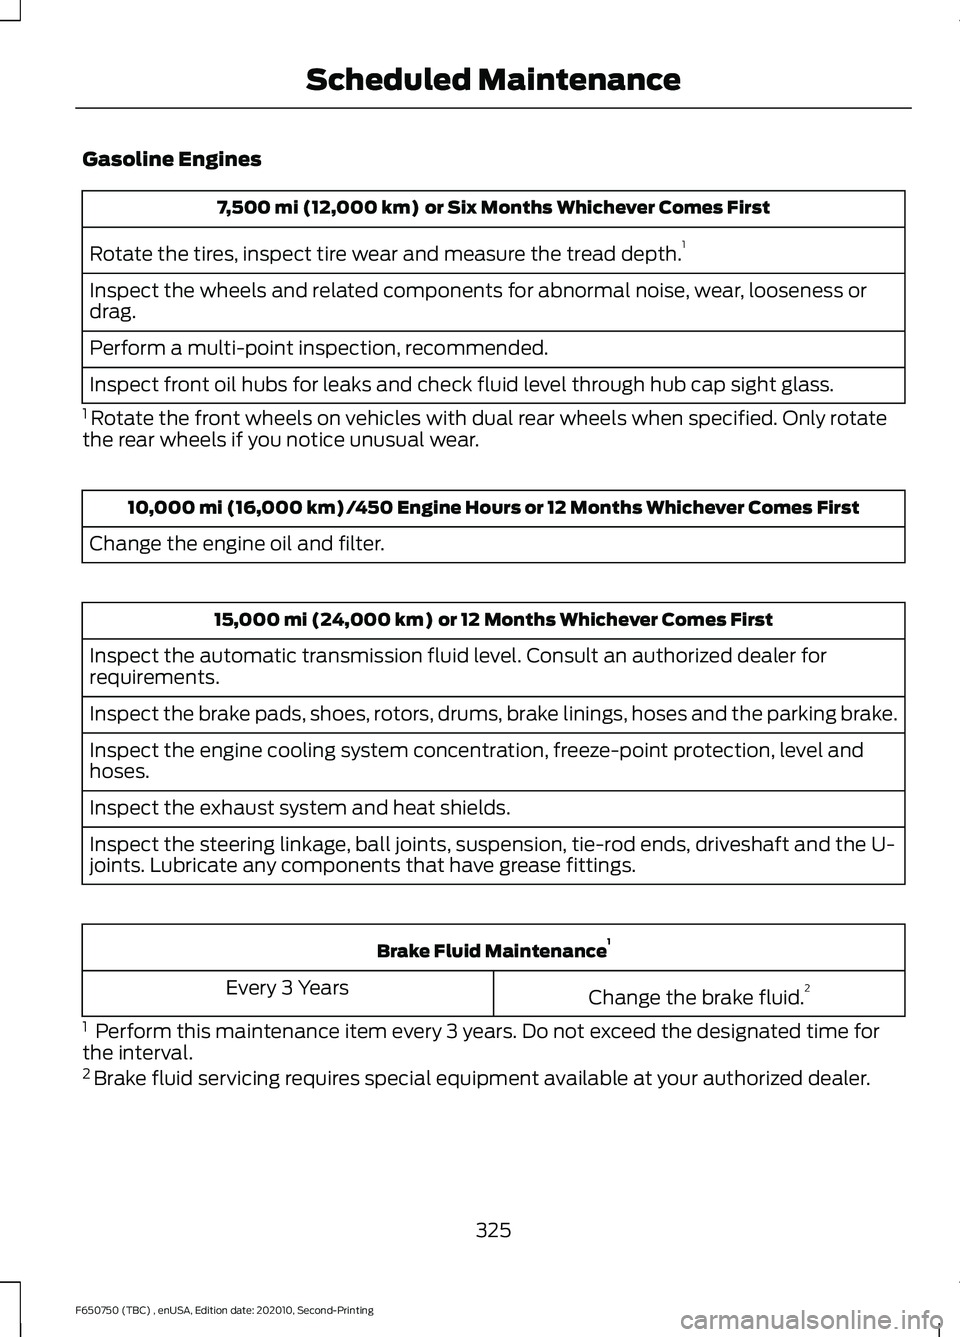
Gasoline Engines
7,500 mi (12,000 km) or Six Months Whichever Comes First
Rotate the tires, inspect tire wear and measure the tread depth. 1
Inspect the wheels and related components for abnormal noise, wear, looseness or
drag.
Perform a multi-point inspection, recommended.
Inspect front oil hubs for leaks and check fluid level through hub cap sight glass.
1 Rotate the front wheels on vehicles with dual rear wheels when specified. Only rotate
the rear wheels if you notice unusual wear. 10,000 mi (16,000 km) /450 Engine Hours or 12 Months Whichever Comes First
Change the engine oil and filter. 15,000 mi (24,000 km) or 12 Months Whichever Comes First
Inspect the automatic transmission fluid level. Consult an authorized dealer for
requirements.
Inspect the brake pads, shoes, rotors, drums, brake linings, hoses and the parking brake.
Inspect the engine cooling system concentration, freeze-point protection, level and
hoses.
Inspect the exhaust system and heat shields.
Inspect the steering linkage, ball joints, suspension, tie-rod ends, driveshaft and the U-
joints. Lubricate any components that have grease fittings. Brake Fluid Maintenance
1
Change the brake fluid. 2
Every 3 Years
1 Perform this maintenance item every 3 years. Do not exceed the designated time for
the interval.
2 Brake fluid servicing requires special equipment available at your authorized dealer.
325
F650750 (TBC) , enUSA, Edition date: 202010, Second-Printing Scheduled Maintenance
Page 330 of 390

At Every Oil Change Interval as Indicated by the Information Display
1
Inspect the air filter restriction gauge. Replace the filter if necessary.
Inspect the automatic transmission fluid level. Consult an authorized dealer for
requirements.
Inspect the brake pads, shoes, rotors, drums, brake linings, hoses and the parking brake.
Inspect the engine and secondary coolant concentration, freeze-point protection, level
and hoses.
Inspect the exhaust system and heat shields.
Inspect the steering linkage, ball joints, suspension, tie-rod ends, driveshaft and the U-
joints. Lubricate any components that have grease fittings.
Inspect front oil hubs for leaks and check fluid level through hub cap sight glass.
1 Do not exceed one year/10,000 mi (16,000 km) or 350 engine hours between service
intervals.
2 Reset the Intelligent Oil-Life Monitor after engine oil and filter changes. See Oil Change
Indicator Reset
(page 220).
3 Rotate the front wheels on vehicles with dual rear wheels when specified. Only rotate
the rear wheels if you notice unusual wear. Brake Fluid Maintenance
1
Change the brake fluid. 2
Every 3 Years
1 Perform this maintenance item every 3 years. Do not exceed the designated time for
the interval.
2 Brake fluid servicing requires special equipment available at your authorized dealer. Other Maintenance Items
1
Replace the engine-mounted and frame-mounted fuel
filters. 2
Every
22,000 mi
(36,000 km)
Inspect the engine and secondary cooling system coolant
concentration, freeze-point protection, additive, corrosion
inhibitor, strength, coolant level, and hoses. Add coolant
additive if necessary.3
Every
30,000 mi
(48,000 km)
327
F650750 (TBC) , enUSA, Edition date: 202010, Second-Printing Scheduled Maintenance
Page 380 of 390

2
2-Speed Rear Axle.......................................129
Axle Shifting......................................................... 129
A
A/C See: Climate Control........................................... 79
About This Manual
...........................................7
Diesel Engine Information................................... 8
Minor Troubleshooting Guide............................ 9
Warnings.................................................................... 8
ABS See: Brakes........................................................... 130
ABS driving hints See: Hints on Driving With Anti-Lock
Brakes.................................................................. 131
Accessories.....................................................315
Accessories See: Replacement Parts
Recommendation............................................. 17
ACC See: Using Adaptive Cruise Control............148
Adjusting the Headlamps........................240 Horizontal Aim Adjustment............................ 241
Vertical Aim Adjustment................................ 240
Adjusting the Steering Wheel
....................52
Air Brakes.........................................................135
Air Chamber Stroke Indication...................... 135
Cam Brakes - Automatic Slack Adjusters........................................................... 136
Emergency Air Brake......................................... 136
Air Conditioning See: Climate Control........................................... 79
Air Filter See: Changing the Engine Air Filter - 6.7L
Diesel.................................................................. 221
See: Changing the Engine Air Filter - 7.3L...................................................................... 223
Air Induction System Inspection............247 Chassis-mounted Charge Air Cooler..........247
Air Suspension
..............................................169
Air Suspension Dump Button........................ 169
Connecting and Disconnecting a Trailer with Air Suspension and Air Suspension
Dump Button.................................................. 169
Suspension Conversions................................. 169System Indicator Light.....................................
169
Appendices....................................................348
At a Glance
........................................................22
Audible Warnings and Indicators.............69 Headlamps On Warning Chime..................... 69
Key in Ignition Warning Chime........................ 69
Parking Brake On Warning Chime.................69
Audio System
................................................307
General Information......................................... 307
Audio Unit
.......................................................307
Accessing the Sound Settings..................... 308
Accessing the System Settings................... 308
Adjusting the Volume...................................... 308
Changing Radio Stations............................... 308
Pausing or Playing Media............................... 308
Returning to the Previous Screen...............308
Scrolling Through the Menu Options........308
Selecting a Menu Option............................... 309
Selecting Media................................................. 308
Selecting the Radio.......................................... 309
Setting a Memory Preset............................... 309
Switching the Audio Unit On and Off........309
Using a Cell Phone........................................... 309
Using Seek, Fast Forward and Reverse............................................................. 309
Autolamps........................................................56 Windshield Wiper Activated
Headlamps........................................................ 56
Automatic High Beam Control..................57 Automatic High Beam Indicator..................... 58
Switching the System On and Off.................57
Automatic Transmission............................122 Brake-Shift Interlock......................................... 125
If Your Vehicle Gets Stuck in Mud or Snow................................................................... 126
Progressive Range Selection - PRS.............125
Understanding the Shift Positions of a 6– Speed Automatic Transmission.........122
Understanding Your SelectShift™ Automatic Transmission............................. 123
Automatic Transmission Fluid Check............................................................236
Transmission Fluid Level................................. 236
Auxiliary Power Points
.................................89
110 Volt AC Power Point.................................... 89
12 Volt DC Power Point...................................... 89
Locations................................................................ 89
377
F650750 (TBC) , enUSA, Edition date: 202010, Second-Printing Index