Page 49 of 106

IDENTIFYING THE CLIMATE
CONTROL UNIT
Depending on your vehicle options, the
controls could look different than what you
see here.
SWITCHING CLIMATE
CONTROL ON AND OFF
Press the button.
SWITCHING MAXIMUM
DEFROST ON AND OFF Turn the temperature control
clockwise past the highest
setting to maximize defrosting.
Note: The temperature control springs back
to the highest setting.
Air flows through the windshield air vents,
and the blower motor adjusts to the
highest speed.
Note: To prevent window fogging, you
cannot select recirculated air when
maximum defrost is on.
Note: The heated rear window also turns
on when you select maximum defrost. SWITCHING THE HEATED
REAR WINDOW ON AND OFF Press the button to clear the rear
window of thin ice and fog. The
heated rear window turns off
after a short period of time.
Note: Do not use harsh chemicals, razor
blades or other sharp objects to clean or
remove decals from the inside of the heated
rear window as this could cause damage to
the heated rear window grid lines not
covered by the vehicle Warranty.
SETTING THE BLOWER MOTOR
SPEED Turn the blower motor control
counterclockwise for a lower blower
setting.
Turn the blower motor control clockwise
for a higher blower setting.
Note:
Lights on the control illuminate to
indicate the blower motor speed.
Note: When you switch the blower motor
off, air conditioning turns off and the
windows could fog up.
46
2021 Bronco (TG1) Canada/United States of America, enUSA, Edition date: 202101, First-Printing Climate Control - Vehicles With: Manual Temperature ControlE308141 E317606
Page 50 of 106

SETTING THE TEMPERATURE
Turn the temperature control
counterclockwise for cooler temperature
settings.
Turn the temperature control clockwise
for warmer temperature settings.
DIRECTING THE FLOW OF AIR
Directing Air to the Windshield Air
Vents
Press the button.
Directing Air to the Instrument
Panel Air Vents Press the button.
Directing Air to the Footwell Air
Vents Press the button. CLIMATE CONTROL HINTS
General Hints
•
Prolonged use of recirculated air may
cause the windows to fog up.
• You may feel a small amount of air
from the footwell air vents regardless
of the air distribution setting.
• To reduce humidity build-up inside your
vehicle, do not drive with the system
switched off or with recirculated air
always switched on.
• Do not place objects under the front
seats as this may interfere with the
airflow to the rear seats.
• Remove any snow, ice or leaves from
the air intake area at the base of the
windshield.
• To improve the time to reach a
comfortable temperature in hot
weather, drive with the windows open
until you feel cold air through the air
vents.
Quickly Heating the Interior
1. Adjust the blower motor speed to the highest speed setting.
2. Adjust the temperature control to the highest setting.
3. Direct air to the footwell air vents.
Recommended Settings for
Heating
1. Adjust the blower motor speed to the center setting.
2. Adjust the temperature control to the midway point of the hot settings.
3. Direct air to the footwell air vents.
Quickly Cooling the Interior
1. Press MAX A/C.
47
2021 Bronco (TG1) Canada/United States of America, enUSA, Edition date: 202101, First-Printing Climate Control - Vehicles With: Manual Temperature ControlE244106 E244097
Page 51 of 106
2.
Drive with the windows open for a short
period of time.
Recommended Settings for
Cooling
1. Adjust the blower motor speed to the center setting.
2. Adjust the temperature control to the midway point of the cold settings.
3. Direct air to the instrument panel air vents.
Defogging the Side Windows in
Cold Weather
1. Direct air to the instrument panel and windshield air vents.
2. Press and release A/C.
3. Adjust the temperature control to the setting you prefer.
4. Adjust the blower motor speed to the highest setting.
5. Direct air toward the side windows.
6. Close the instrument panel air vents.
48
2021 Bronco (TG1) Canada/United States of America, enUSA, Edition date: 202101, First-Printing Climate Control - Vehicles With: Manual Temperature Control
Page 52 of 106

SITTING IN THE CORRECT
POSITION
When you use them properly, the seat,
head restraint, seatbelt and airbags will
provide optimum protection in the event
of a crash.
We recommend that you follow these
guidelines:
•
Sit in an upright position with the base
of your spine as far back as possible.
• Do not recline the seat backrest so that
your torso is more than 30 degrees
from the upright position.
• Adjust the head restraint so that the
top of it is level with the top of your
head and as far forward as possible.
Make sure that you remain
comfortable.
• Keep sufficient distance between
yourself and the steering wheel. We
recommend a minimum of 10 in
(25 cm) between your breastbone and
the airbag cover.
• Hold the steering wheel with your arms
slightly bent. •
Bend your legs slightly so that you can
press the pedals fully.
• Position the shoulder strap of the
seatbelt over the center of your
shoulder and position the lap strap
tightly across your hips.
Make sure that your driving position is
comfortable and that you can maintain full
control of your vehicle.
MANUAL SEATS
HEAD RESTRAINT COMPONENTS The head restraints consist of:
An energy absorbing head
restraint.
A
Guide sleeve adjust and release
button.
B
Two steel stems.
C
Guide sleeve unlock and remove
button (If equipped).
D
49
2021 Bronco (TG1) Canada/United States of America, enUSA, Edition date: 202101, First-Printing Front SeatsE68595 E308298
Page 53 of 106

ADJUSTING THE HEAD
RESTRAINT
WARNING: Fully adjust the head
restraint before you sit in or operate your
vehicle. This will help minimize the risk
of neck injury in the event of a crash. Do
not adjust the head restraint when your
vehicle is moving. WARNING:
The head restraint is a
safety device. Whenever possible it
should be installed and properly
adjusted when the seat is occupied.
Failure to adjust the head restraint
properly could reduce its effectiveness
during certain impacts. WARNING:
Adjust the head
restraints for all passengers before you
drive your vehicle. This will help minimize
the risk of neck injury in the event of a
crash. Do not adjust the head restraints
when your vehicle is moving.
Note: Adjust the seat backrest to an upright
driving position before adjusting the head
restraint. Adjust the head restraint so that
the top of it is level with the top of your head
and as far forward as possible. Make sure
that you remain comfortable. If you are
extremely tall, adjust the head restraint to
its highest position.
Pull the head restraint up to raise it.
To lower the head restraint:
1. Press and hold the adjust and release button.
2. Push the head restraint down. For vehicles with tilting head restraints:
1. Adjust the seat backrest to an upright
driving or riding position.
2. Pivot the head restraint forward toward
your head to the preferred position.
After the head restraint reaches the
forward-most tilt position, pivot it forward
again to release it to the rearward, untilted
position.
Note: Do not attempt to force the head
restraint backward after it is tilted. Instead,
continue tilting it forward until the head
restraint releases to the upright position.
REMOVING THE HEAD RESTRAINT 50
2021 Bronco (TG1) Canada/United States of America, enUSA, Edition date: 202101, First-Printing Front SeatsE327919 E327503
Page 54 of 106

1. Pull up the head restraint until it
reaches the highest adjustment
position.
2. Press and hold the button.
3. Pull up the head restraint.
Note: You cannot remove head restraints
that have audio system speakers.
INSTALLING THE HEAD
RESTRAINT
Align the steel stems into the guide sleeves
and push the head restraint down until it
locks.
POWER SEATS
HEAD RESTRAINT COMPONENTS The head restraints consist of:
An energy absorbing head
restraint.
A
Two steel stems.
B
Guide sleeve adjust and release
button.
C
Guide sleeve unlock and remove
button (If equipped).
D ADJUSTING THE HEAD
RESTRAINT WARNING: Fully adjust the head
restraint before you sit in or operate your
vehicle. This will help minimize the risk
of neck injury in the event of a crash. Do
not adjust the head restraint when your
vehicle is moving. WARNING:
The head restraint is a
safety device. Whenever possible it
should be installed and properly
adjusted when the seat is occupied.
Failure to adjust the head restraint
properly could reduce its effectiveness
during certain impacts. WARNING:
Adjust the head
restraints for all passengers before you
drive your vehicle. This will help minimize
the risk of neck injury in the event of a
crash. Do not adjust the head restraints
when your vehicle is moving.
To raise the head restraint, pull the head
restraint up.
To lower the head restraint:
1. Press and hold the adjust and release button.
2. Push the head restraint down.
To tilt the head restraint: 51
2021 Bronco (TG1) Canada/United States of America, enUSA, Edition date: 202101, First-Printing Front SeatsE327921 E327919
Page 55 of 106

1. Adjust the seat backrest to an upright
driving or riding position.
2. Pivot the head restraint forward toward
your head to the preferred position.
After the head restraint reaches the
forward-most tilt position, pivot it forward
again to release it to the rearward, untilted
position.
Note: Do not attempt to force the head
restraint backward after it is tilted. Instead,
continue tilting it forward until the head
restraint releases to the upright position.
REMOVING THE HEAD RESTRAINT
1. Pull up the head restraint until it reaches its highest position.
2. Press and hold the adjust and release button.
3. Pull up the head restraint.
Note: You cannot remove head restraints
that have audio system speakers.
INSTALLING THE HEAD
RESTRAINT
Align the steel stems into the guide sleeves
and push the head restraint down until it
locks. HEATED SEATS (IF EQUIPPED)
HEATED SEAT PRECAUTIONS WARNING: Use caution when using
the heated seat if you are unable to feel
pain to your skin because of advanced
age, chronic illness, diabetes, spinal cord
injury, medication, alcohol use,
exhaustion or other physical conditions.
The heated seat could cause burns even
at low temperatures, especially if used
for long periods of time. Failure to follow
this instruction could result in personal
injury. WARNING:
Do not poke sharp
objects into the seat cushion or seat
backrest. This could damage the heated
seat element and cause it to overheat.
Failure to follow this instruction could
result in personal injury. WARNING:
Do not place anything
on the seat that blocks the heat, for
example a seat cover or a cushion. This
could cause the seat to overheat. Failure
to follow this instruction could result in
personal injury.
Do not:
• Place heavy objects on the seat.
• Operate the heated seat if water or any
other liquid spills on the seat. Allow the
seat to dry.
SWITCHING THE HEATED SEATS
ON AND OFF
The vehicle must be running to use this
feature.
52
2021 Bronco (TG1) Canada/United States of America, enUSA, Edition date: 202101, First-Printing Front Seats
Page 56 of 106
Press the heated seat symbol to cycle
through the various heat settings and off.
The more indicators that display, the
warmer the temperature of the seat.
Note:
The heated seats may remain on
after you remote start your vehicle, based
on your remote start settings. The heated
seats may also turn on when you start your
vehicle if they were on when you switched
your vehicle off.
53
2021 Bronco (TG1) Canada/United States of America, enUSA, Edition date: 202101, First-Printing Front SeatsE146322
 1
1 2
2 3
3 4
4 5
5 6
6 7
7 8
8 9
9 10
10 11
11 12
12 13
13 14
14 15
15 16
16 17
17 18
18 19
19 20
20 21
21 22
22 23
23 24
24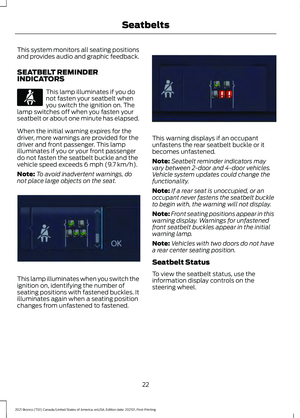 25
25 26
26 27
27 28
28 29
29 30
30 31
31 32
32 33
33 34
34 35
35 36
36 37
37 38
38 39
39 40
40 41
41 42
42 43
43 44
44 45
45 46
46 47
47 48
48 49
49 50
50 51
51 52
52 53
53 54
54 55
55 56
56 57
57 58
58 59
59 60
60 61
61 62
62 63
63 64
64 65
65 66
66 67
67 68
68 69
69 70
70 71
71 72
72 73
73 74
74 75
75 76
76 77
77 78
78 79
79 80
80 81
81 82
82 83
83 84
84 85
85 86
86 87
87 88
88 89
89 90
90 91
91 92
92 93
93 94
94 95
95 96
96 97
97 98
98 99
99 100
100 101
101 102
102 103
103 104
104 105
105
