2021 FORD BRONCO SPORT maintenance
[x] Cancel search: maintenancePage 286 of 471
The battery is in the engine compartment.
See Under Hood Overview (page 272).
Your vehicle has a maintenance-free
battery. It does not require additional
water during service.
If the vehicle battery has a cover, make
sure you correctly install it after cleaning
or replacing the battery.
For longer, trouble-free operation, keep the
top of the battery clean and dry and the
battery cables tightly fastened to the
battery terminals. If any corrosion is
present on the battery or terminals, remove
the cables from the terminals and clean
with a wire brush. You can neutralize the
acid with a solution of baking soda and
water.
We recommend that you disconnect the
negative battery cable terminal from the
battery if you plan to store your vehicle for
an extended period.
Note: If you only disconnect the negative
battery cable terminal, make sure it is
isolated or placed away from the battery
terminal to avoid unintended connection or
arcing.
To maintain correct operation of the
battery management system, if you add
any electrical devices to your vehicle, do
not connect the ground connection directly
to the negative battery terminal. A
connection at the negative battery terminal
can cause inaccurate measurements of
the battery condition and potential
incorrect system operation.
Note: If you add electrical accessories or
components to your vehicle this may
adversely affect battery performance,
durability and the performance of other
electrical systems on your vehicle.
If you replace the battery make sure it
matches the electrical requirements of
your vehicle. If you disconnect or replace the battery
and your vehicle has an automatic
transmission, it must relearn its adaptive
strategy. Because of this, the transmission
may shift firmly when first driven. This is
normal operation while the transmission
fully updates its operation to optimum
shift feel.
Remove and Reinstall the Battery
To disconnect or remove the battery, do
the following:
1.
Apply the parking brake and switch the
ignition off.
2. Switch all electrical equipment off, for
example lights and radio.
3. Wait a minimum of two minutes before
disconnecting the battery.
Note: The engine management system has
a power hold function and remains powered
for a period of time after you switch the
ignition off. This is to allow diagnostic and
adaptive tables to be stored. Disconnecting
the battery without waiting can cause
damage not covered by the vehicle
Warranty.
4. Disconnect the negative battery cable terminal.
5. Disconnect the positive battery cable terminal.
6. Remove the battery securing clamp.
7. Remove the battery.
8. To install, reverse the removal procedure.
Note: Before reconnecting the battery,
make sure the ignition remains switched off.
Note: Make sure the battery cable terminals
are fully tightened.
283
Bronco Sport (CHD) Canada/United States of America, enUSA, Edition date: 202007, Second-Printing Maintenance
Page 287 of 471
If you disconnect or replace the vehicle
battery, you must reset the following
features:
•
Window bounce-back.
• Clock Settings.
• Pre-set radio stations.
• Steering Angle Sensor.
Note: To calibrate the steering angle
sensor, drive the vehicle above 30 mph
(50 km/h) for a minimum of 1.2 mi (2 km).
Make sure to drive straight ahead for a
minimum of 30 seconds. Several vehicle
functions are disabled and a warning light
could appear until the sensor is calibrated.
Note: For flexible fuel vehicles, if you are
operating on E85, you could experience poor
starts or an inability to start the engine, and
driveability problems until the fuel trim and
ethanol content have been relearned. Drive
the vehicle at least
10 mi (16 km) to
completely relearn the idle trim and fuel
trim strategy.
Battery Disposal Make sure that you dispose of
old batteries in an
environmentally friendly way.
Seek advice from your local authority
about recycling old batteries.
ADJUSTING THE HEADLAMPS
Vertical Aim Adjustment
The headlamps on your vehicle are
properly aimed at the assembly plant. If
your vehicle has been in an accident, have
the alignment of your headlamps checked
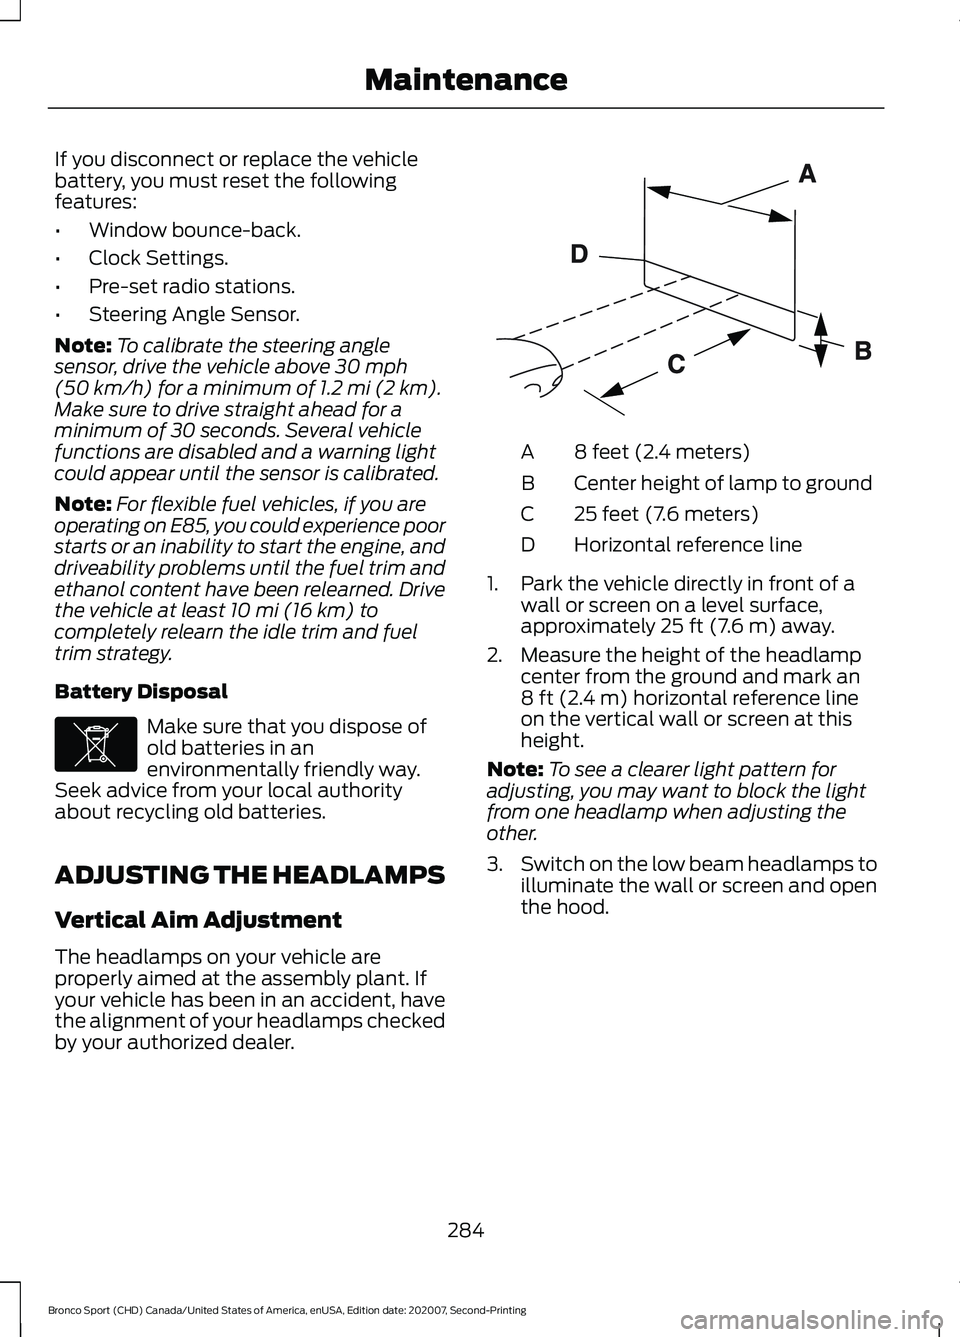
by your authorized dealer. 8 feet (2.4 meters)
A
Center height of lamp to ground
B
25 feet (7.6 meters)
C
Horizontal reference line
D
1. Park the vehicle directly in front of a wall or screen on a level surface,
approximately 25 ft (7.6 m) away.
2. Measure the height of the headlamp center from the ground and mark an
8 ft (2.4 m)
horizontal reference line
on the vertical wall or screen at this
height.
Note: To see a clearer light pattern for
adjusting, you may want to block the light
from one headlamp when adjusting the
other.
3. Switch on the low beam headlamps to
illuminate the wall or screen and open
the hood.
284
Bronco Sport (CHD) Canada/United States of America, enUSA, Edition date: 202007, Second-Printing MaintenanceE107998 E142592
Page 288 of 471

4. There is a distinct cut-off, or change
from light to dark, in the left portion of
the beam pattern. Position the top
edge of this cut-off at the horizontal
reference plane. 5. Locate the vertical adjuster on each
headlamp. Using a Phillips #2
screwdriver, turn the adjuster either
clockwise or counterclockwise to aim
the headlamp.
6. Close the hood and switch off the lamps.
Horizontal Aim Adjustment
Horizontal aim is not required for this
vehicle and is non-adjustable. WASHER FLUID CHECK WARNING: If you operate your
vehicle in temperatures below 41.0°F
(5°C), use washer fluid with antifreeze
protection. Failure to use washer fluid
with antifreeze protection in cold
weather could result in impaired
windshield vision and increase the risk
of injury or accident.
Note: The front and rear washer systems
are supplied from the same reservoir.
Add fluid to fill the reservoir if the level is
low. Only use a washer fluid that meets
our specifications. See
Capacities and
Specifications (page 334).
State or local regulations on volatile
organic compounds may restrict the use
of methanol, a common windshield washer
antifreeze additive. Washer fluids
containing non-methanol antifreeze
agents should be used only if they provide
cold weather protection without damaging
the vehicle ’s paint finish, wiper blades or
washer system.
FUEL FILTER
Your vehicle is equipped with a lifetime
fuel filter that is integrated with the fuel
tank. Regular maintenance or replacement
is not needed.
285
Bronco Sport (CHD) Canada/United States of America, enUSA, Edition date: 202007, Second-Printing MaintenanceE142466 E321760
Page 289 of 471
CHECKING THE WIPER
BLADES
Run the tip of your fingers over the edge of
the blade to check for roughness.
Clean the wiper blades with washer fluid
or water applied with a soft sponge or
cloth.
CHANGING THE FRONT WIPER
BLADES
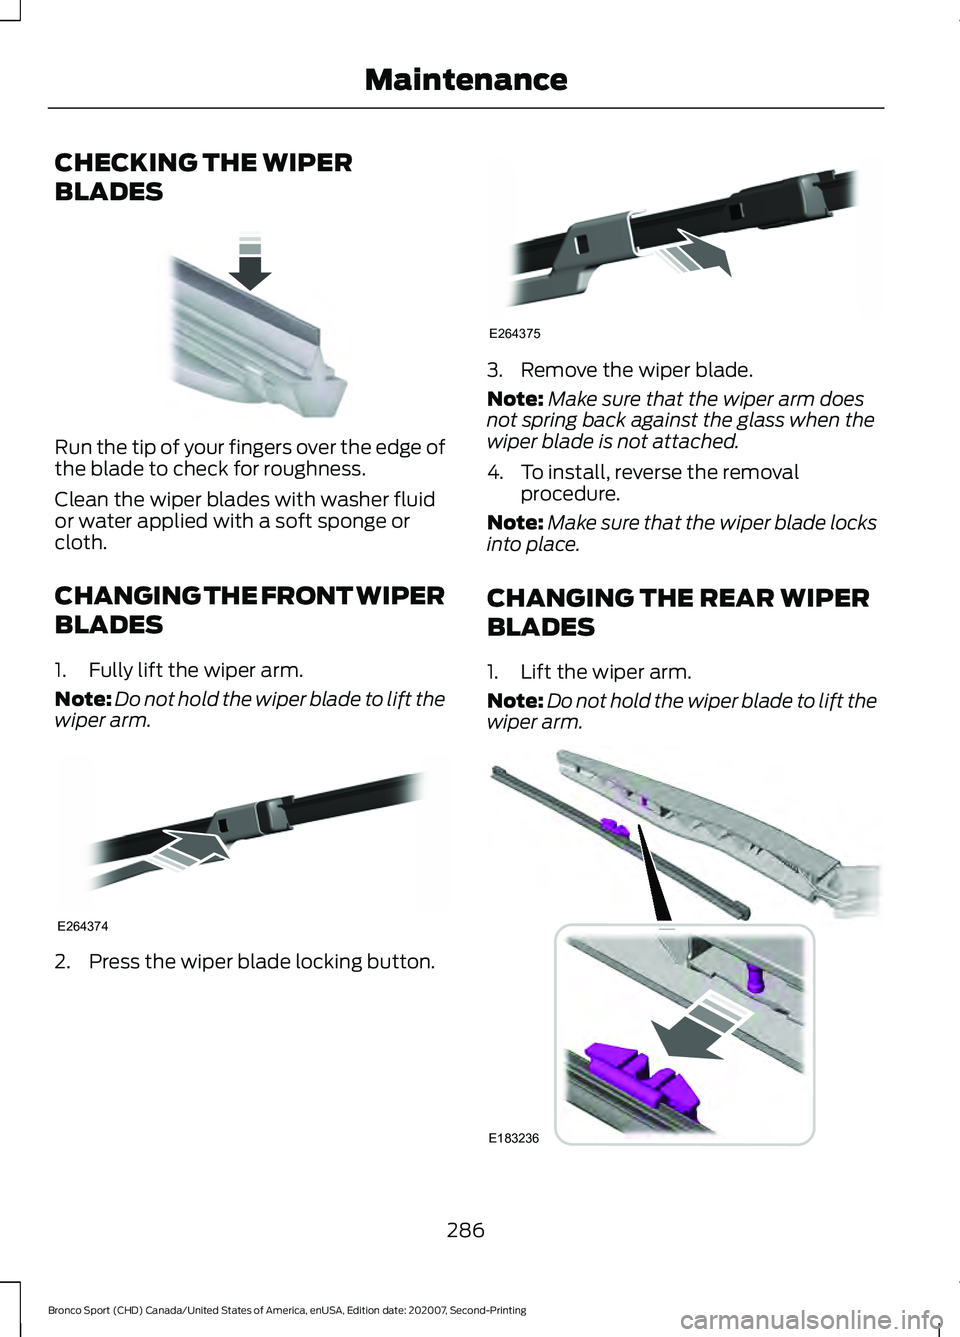
1. Fully lift the wiper arm.
Note:
Do not hold the wiper blade to lift the
wiper arm. 2. Press the wiper blade locking button. 3. Remove the wiper blade.
Note:
Make sure that the wiper arm does
not spring back against the glass when the
wiper blade is not attached.
4. To install, reverse the removal procedure.
Note: Make sure that the wiper blade locks
into place.
CHANGING THE REAR WIPER
BLADES
1. Lift the wiper arm.
Note: Do not hold the wiper blade to lift the
wiper arm. 286
Bronco Sport (CHD) Canada/United States of America, enUSA, Edition date: 202007, Second-Printing MaintenanceE142463 E264374 E264375 E183236
Page 290 of 471
2. Disengage the wiper blade from the
wiper arm.
Note: Make sure that the wiper arm does
not spring back against the glass when the
wiper blade is not attached.
3. To install, reverse the removal procedure.
Note: Make sure that the wiper blade locks
into place.
CHANGING A BULB
Replacing Headlamp Bulbs
Headlamp bulbs are LED and are not
serviceable. See an authorized dealer if
they fail.
Replacing Fog Lamp Bulbs
Fog lamp bulbs are LED and are not
serviceable. See an authorized dealer if
they fail.
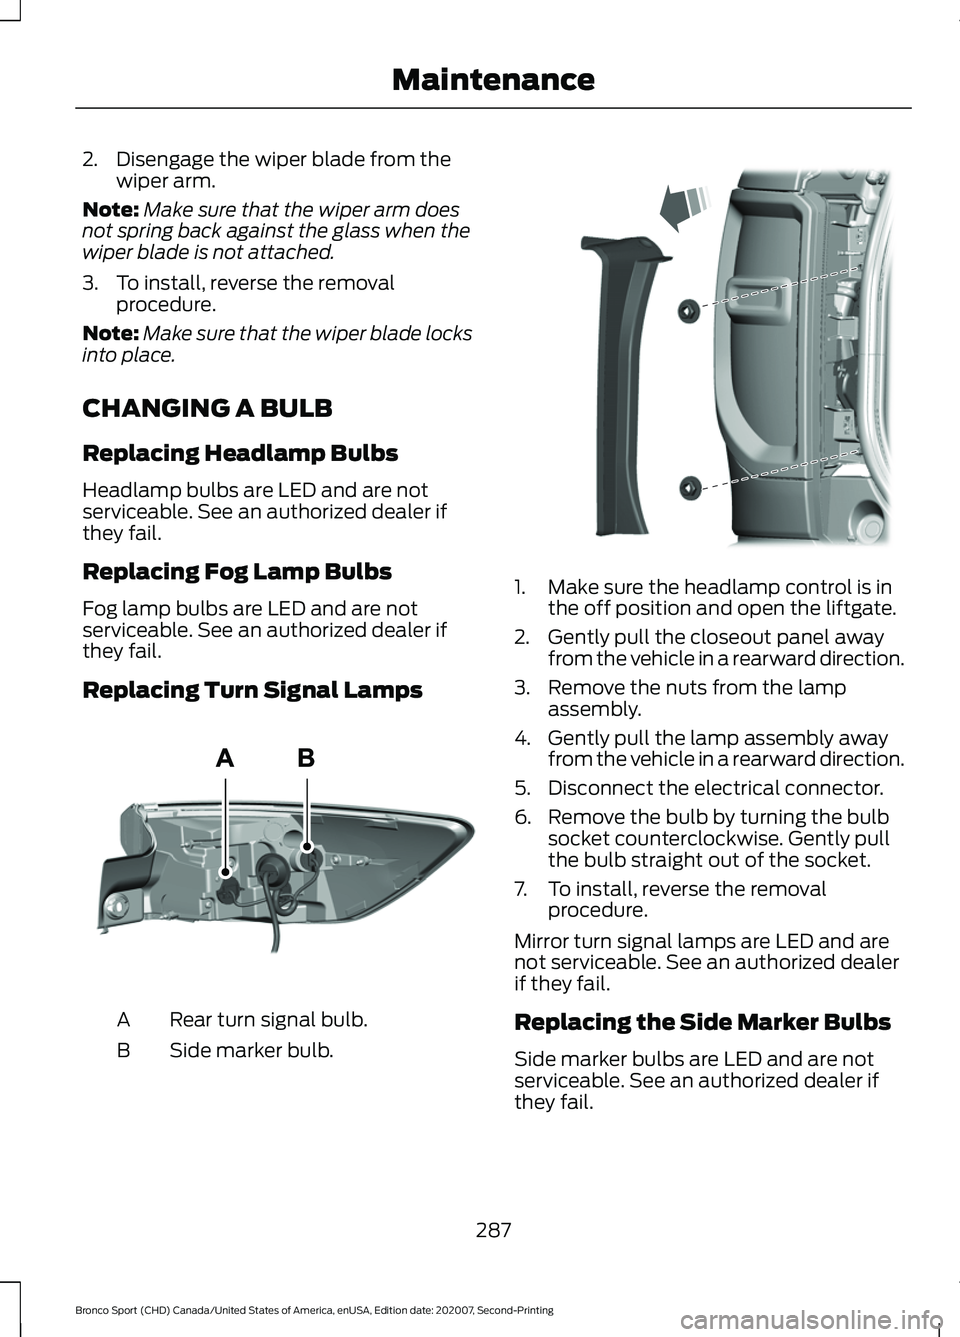
Replacing Turn Signal Lamps Rear turn signal bulb.
A
Side marker bulb.
B 1. Make sure the headlamp control is in
the off position and open the liftgate.
2. Gently pull the closeout panel away from the vehicle in a rearward direction.
3. Remove the nuts from the lamp assembly.
4. Gently pull the lamp assembly away from the vehicle in a rearward direction.
5. Disconnect the electrical connector.
6. Remove the bulb by turning the bulb socket counterclockwise. Gently pull
the bulb straight out of the socket.
7. To install, reverse the removal procedure.
Mirror turn signal lamps are LED and are
not serviceable. See an authorized dealer
if they fail.
Replacing the Side Marker Bulbs
Side marker bulbs are LED and are not
serviceable. See an authorized dealer if
they fail.
287
Bronco Sport (CHD) Canada/United States of America, enUSA, Edition date: 202007, Second-Printing MaintenanceE307885 E321838
Page 291 of 471
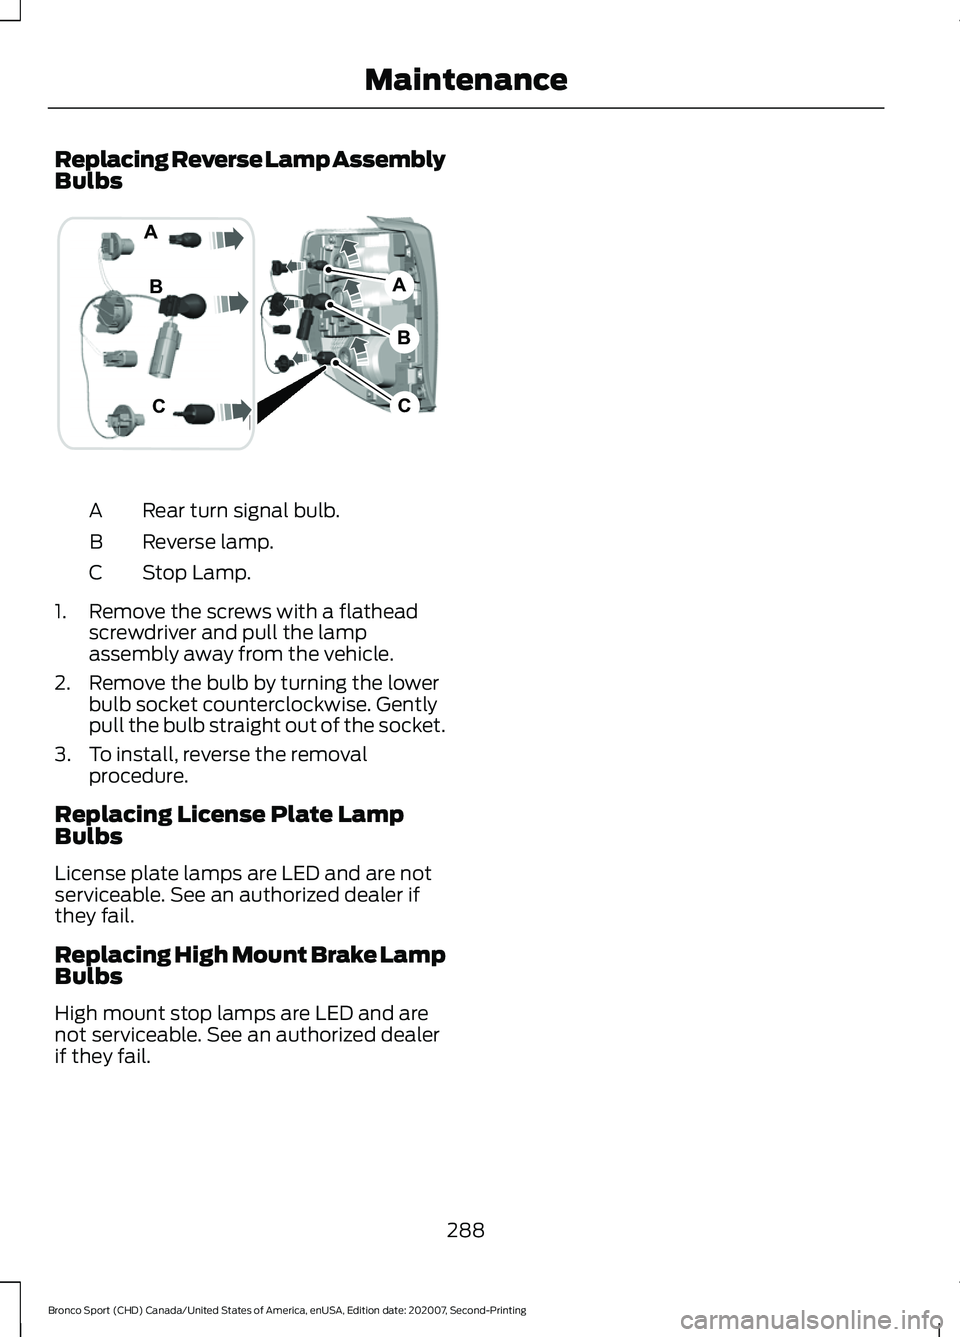
Replacing Reverse Lamp Assembly
Bulbs
Rear turn signal bulb.
A
Reverse lamp.
B
Stop Lamp.
C
1. Remove the screws with a flathead screwdriver and pull the lamp
assembly away from the vehicle.
2. Remove the bulb by turning the lower bulb socket counterclockwise. Gently
pull the bulb straight out of the socket.
3. To install, reverse the removal procedure.
Replacing License Plate Lamp
Bulbs
License plate lamps are LED and are not
serviceable. See an authorized dealer if
they fail.
Replacing High Mount Brake Lamp
Bulbs
High mount stop lamps are LED and are
not serviceable. See an authorized dealer
if they fail.
288
Bronco Sport (CHD) Canada/United States of America, enUSA, Edition date: 202007, Second-Printing MaintenanceB
A
C
C
B
A E321748
Page 297 of 471
REPAIRING MINOR PAINT
DAMAGE
Authorized dealers have touch-up paint to
match your vehicle
’s color. Your vehicle
color code is printed on a sticker on the
front, left-hand side door jamb. Take your
color code to your authorized dealer to
make sure you get the correct color.
Before repairing minor paint damage, use
a cleaner to remove particles such as bird
droppings, tree sap, insect deposits, tar
spots, road salt and industrial fallout.
Read the instructions before using cleaning
products.
CLEANING THE WHEELS
1. Regularly clean them with a wheel cleaner. We recommend that you use
Ford approved wheel cleaner if
available.
2. Remove dirt and brake dust with a sponge.
3. Remove tar and grease with a bug and
tar remover. We recommend that you
use Ford approved bug and tar remover
if available.
4. Thoroughly rinse the wheels with water
after cleaning.
If you intend on parking your vehicle for an
extended period after cleaning the wheels
with a wheel cleaner, drive your vehicle for
a few minutes before doing so. This
reduces the risk of corrosion of the brake
discs, brake pads and linings.
Do not clean the wheels when they are hot.
Note: Some car washes could damage
wheel rims and covers.
Note: Using non-recommended cleaners,
harsh cleaning products, chrome wheel
cleaners or abrasive materials could
damage wheel rims and covers. VEHICLE STORAGE
If you plan on storing your vehicle for 30
days or more, read the following
maintenance recommendations to make
sure your vehicle stays in good operating
condition.
We engineer and test all motor vehicles
and their components for reliable, regular
driving. Under various conditions,
long-term storage may lead to degraded
engine performance or failure unless you
use specific precautions to preserve engine
components.
General
•
Store all vehicles in a dry, ventilated
place.
• Protect from sunlight, if possible.
• If vehicles are stored outside, they
require regular maintenance to protect
against rust and damage.
Body
• Wash your vehicle thoroughly to
remove dirt, grease, oil, tar or mud from
exterior surfaces, rear-wheel housing
and the underside of front fenders.
• Periodically wash your vehicle if it is
stored in exposed locations.
• Touch-up exposed or primed metal to
prevent rust.
• Cover chrome and stainless steel parts
with a thick coat of auto wax to prevent
discoloration. Re-wax as necessary
when you wash your vehicle.
• Lubricate all hood, door and luggage
compartment hinges and latches with
a light grade oil.
• Cover interior trim to prevent fading.
• Keep all rubber parts free from oil and
solvents.
294
Bronco Sport (CHD) Canada/United States of America, enUSA, Edition date: 202007, Second-Printing Vehicle Care
Page 300 of 471
GENERAL INFORMATION
Use only approved wheel and tire sizes.
Using other sizes could damage your
vehicle. If you change the diameter of the
tires from what is fitted at the factory, the
speedometer may not display the correct
speed. If you intend to change the size of
the wheels from what was fitted by the
manufacturer, you can check the suitability
with your dealer.
Additional information related to the
functionality and maintenance of your tires
can be found later in this chapter. See Tire
Care (page 299).
You can find the recommended tire
inflation pressures on the Tire Label, which
is on the B-pillar or the edge of the driver
door. You can also find this information on
the Safety Compliance Certification Label,
affixed to either the door hinge pillar,
door-latch post, or the door edge that
meets the door latch post, next to the
driver seating position.
We strongly recommend maintaining these
tire pressures at all times. Failure to follow
the tire pressure recommendations can
cause uneven treadwear patterns, reduced
fuel economy, and adversely affect the
way your vehicle handles.
Note: Check and set the tire pressure at the
ambient temperature in which you are
intending to drive your vehicle and when the
tires are cold.
Note: Check your tire pressures at least
once per month.
If your vehicle has a spare tire, set the
pressure to the highest value given for your
vehicle and tire size combination. Notice to Utility Vehicle and Truck
Owners WARNING:
Utility vehicles have a
significantly higher rollover rate than
other types of vehicles. WARNING:
Vehicles with a higher
center of gravity (utility and four-wheel
drive vehicles) handle differently than
vehicles with a lower center of gravity
(passenger cars). Avoid sharp turns,
excessive speed and abrupt steering in
these vehicles. Failure to drive cautiously
increases the risk of losing control of your
vehicle, vehicle rollover, personal injury
and death. WARNING:
In a rollover crash, an
unbelted person is significantly more
likely to die than a person wearing a
seatbelt. WARNING:
Do not become
overconfident in the ability of four-wheel
drive vehicles. Although a four-wheel
drive vehicle may accelerate better than
a two-wheel drive vehicle in low traction
situations, it won't stop any faster than
two-wheel drive vehicles. Always drive
at a safe speed.
Utility vehicles and trucks handle
differently than passenger cars in the
various driving conditions that are
encountered on streets, highways and
off-road. Utility vehicles and trucks are not
designed for cornering at speeds as high
as passenger cars any more than low-slung
sports cars are designed to perform
satisfactorily under off-road conditions.
297
Bronco Sport (CHD) Canada/United States of America, enUSA, Edition date: 202007, Second-Printing Wheels and Tires