2021 FORD BRONCO SPORT fuel
[x] Cancel search: fuelPage 170 of 471
2. Rotate the outer ring of the
transmission selector clockwise from
park (P), until the desired gear
illuminates on the transmission
selector.
3. Release the brake pedal and the transmission remains in the selected
gear.
The instrument cluster also displays the
current gear.
Park (P)
In park (P), no power transmits to the
driven wheels and the transmission locks.
You can start the engine with the
transmission in this position.
Shift into park (P) only when your vehicle
is stationary.
Note: The electric parking brake could
automatically apply when you shift into park
(P). See Electric Parking Brake (page 177).
Reverse (R)
Shift into reverse (R) only when your
vehicle is stationary and the engine is at
idle speed.
Neutral (N) WARNING:
In neutral (N) your
vehicle has the ability to roll freely. If you
intend to leave your vehicle, make sure
you apply the parking brake.
In neutral (N), no power transmits to the
driven wheels but the transmission does
not lock. You can start the engine with the
transmission in this position.
Drive (D)
Drive (D) is the normal driving position for
the best fuel economy. Manual (M)
(If Equipped)
With your vehicle in drive (D), press the
manual (M) button to activate manual
mode.
In manual (M), you can upshift or
downshift using the paddle shifters.
Low(L)
(If Equipped)
With your vehicle in drive (D), press the low
(L) button to activate low mode.
• Provides maximum engine braking.
• You can shift the transmission into low
(L) at any vehicle speed.
• Is not for use under extended or normal
driving conditions and results in lower
fuel economy.
SelectShift
(If Equipped)
Use this feature to upshift or downshift
using the paddle shifters.
You can only use this feature in drive (D)
or manual (M).
The current gear flashes when you cannot
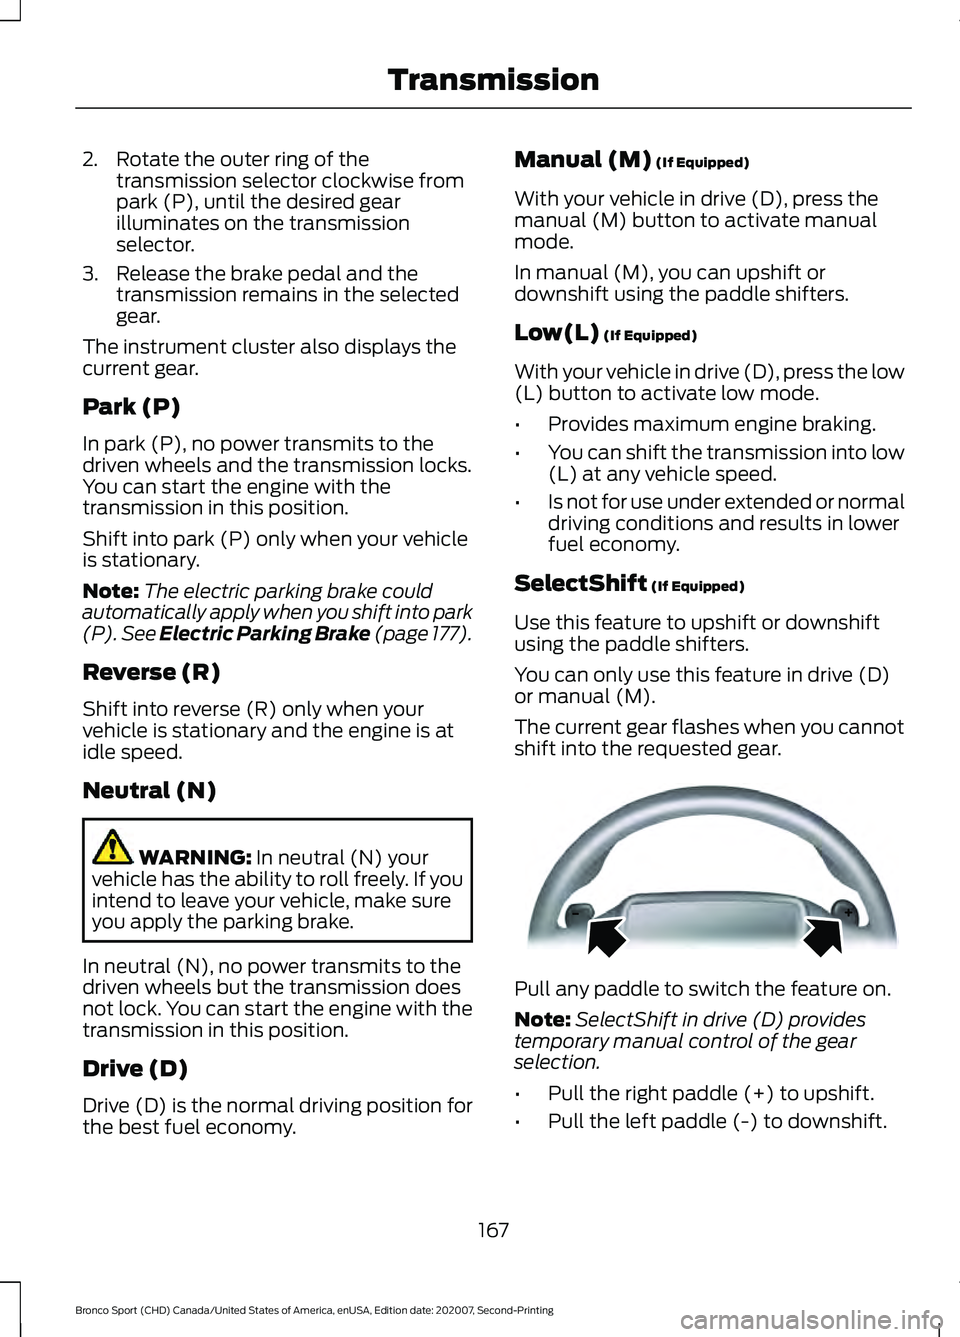
shift into the requested gear. Pull any paddle to switch the feature on.
Note:
SelectShift in drive (D) provides
temporary manual control of the gear
selection.
• Pull the right paddle (+) to upshift.
• Pull the left paddle (-) to downshift.
167
Bronco Sport (CHD) Canada/United States of America, enUSA, Edition date: 202007, Second-Printing TransmissionE144821
Page 227 of 471
SELECTING A DRIVE MODE -
2.0L ECOBOOST™
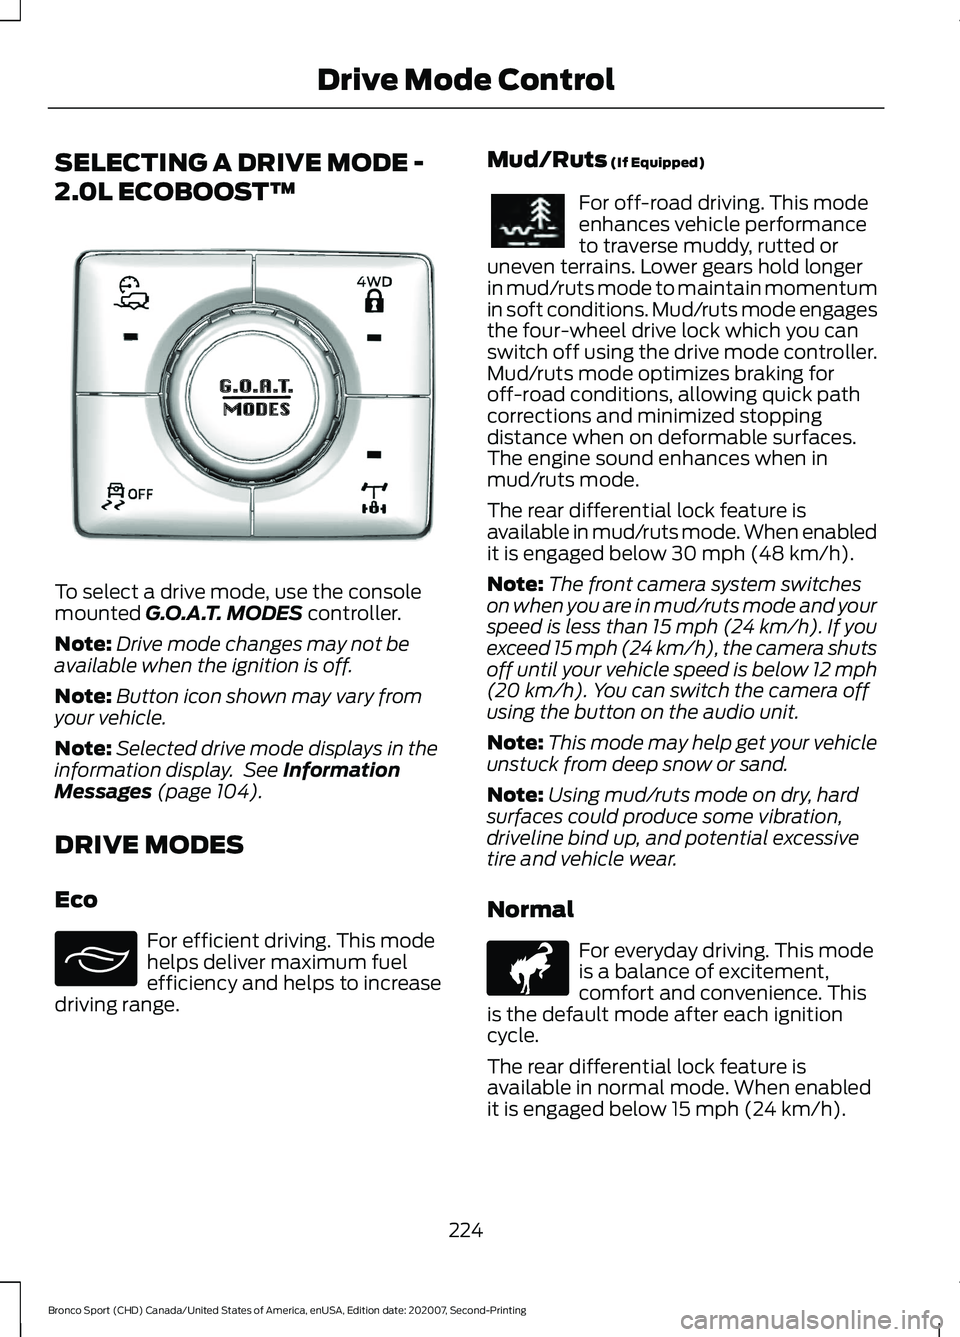
To select a drive mode, use the console
mounted G.O.A.T. MODES controller.
Note: Drive mode changes may not be
available when the ignition is off.
Note: Button icon shown may vary from
your vehicle.
Note: Selected drive mode displays in the
information display. See
Information
Messages (page 104).
DRIVE MODES
Eco For efficient driving. This mode
helps deliver maximum fuel
efficiency and helps to increase
driving range. Mud/Ruts
(If Equipped) For off-road driving. This mode
enhances vehicle performance
to traverse muddy, rutted or
uneven terrains. Lower gears hold longer
in mud/ruts mode to maintain momentum
in soft conditions. Mud/ruts mode engages
the four-wheel drive lock which you can
switch off using the drive mode controller.
Mud/ruts mode optimizes braking for
off-road conditions, allowing quick path
corrections and minimized stopping
distance when on deformable surfaces.
The engine sound enhances when in
mud/ruts mode.
The rear differential lock feature is
available in mud/ruts mode. When enabled
it is engaged below
30 mph (48 km/h).
Note: The front camera system switches
on when you are in mud/ruts mode and your
speed is less than 15 mph (24 km/h). If you
exceed 15 mph (24 km/h), the camera shuts
off until your vehicle speed is below 12 mph
(20 km/h)
. You can switch the camera off
using the button on the audio unit.
Note: This mode may help get your vehicle
unstuck from deep snow or sand.
Note: Using mud/ruts mode on dry, hard
surfaces could produce some vibration,
driveline bind up, and potential excessive
tire and vehicle wear.
Normal For everyday driving. This mode
is a balance of excitement,
comfort and convenience. This
is the default mode after each ignition
cycle.
The rear differential lock feature is
available in normal mode. When enabled
it is engaged below
15 mph (24 km/h).
224
Bronco Sport (CHD) Canada/United States of America, enUSA, Edition date: 202007, Second-Printing Drive Mode ControlE339229 E295413 E296606 E317283
Page 230 of 471
ROOF RACKS AND LOAD
CARRIERS
WARNING: When loading the roof
racks, we recommend you evenly
distribute the load, as well as maintain
a low center of gravity. Loaded vehicles,
with higher centers of gravity, may
handle differently than unloaded
vehicles. Take extra precautions, such
as slower speeds and increased stopping
distance, when driving a heavily loaded
vehicle. For correct roof rack system operation,
directly place loads on crossbars affixed
to the roof rack side rails. When using the
roof rack system, we recommend you use
our genuine accessory crossbars designed
specifically for your vehicle.
Make sure that you securely fasten the
load. Check the tightness of the load
before driving and at each fuel stop.
Note:
Do not place loads directly on the
roof panel. The roof panel is not designed
to directly carry a load.
Maximum Roof Load Amounts
Note: The maximum roof load is based on
the load being evenly distributed on the
crossbars. Maximum Roof Load
Weight on Crossbar (Total)
100 lb (45 kg)
Vehicles with Panoramic Roof
150 lb (68 kg)
Vehicles without Panoramic Roof
LOAD LIMIT
Vehicle Loading - with and
without a Trailer
This section guides you in the
proper loading of your vehicle,
trailer, or both. Keep your loaded
vehicle weight within its design
rating capability, with or without
a trailer. Properly loading your
vehicle provides maximum return
of vehicle design performance.
Before you load your vehicle,
become familiar with the following terms for determining
your vehicle
’s weight rating, with
or without a trailer, from the
vehicle ’s Tire and Loading
Information label or Safety
Compliance Certification label.
227
Bronco Sport (CHD) Canada/United States of America, enUSA, Edition date: 202007, Second-Printing Load Carrying
Page 242 of 471
Trailer Lamps
WARNING: Never connect any
trailer lamp wiring to the vehicle's tail
lamp wiring; this may damage the
electrical system resulting in fire. Contact
your authorized dealer as soon as
possible for assistance in proper trailer
tow wiring installation. Additional
electrical equipment may be required.
Trailer lamps are required on most towed
vehicles. Make sure all running lights, brake
lights, turn signals and hazard lights are
working.
Before Towing a Trailer
Practice turning, stopping and backing up
to get the feel of your vehicle-trailer
combination before starting on a trip.
When turning, make wider turns so the
trailer wheels clear curbs and other
obstacles.
When Towing a Trailer
• Do not drive faster than
70 mph
(113 km/h) during the first 500 mi
(800 km).
• Do not make full-throttle starts.
• Check your hitch, electrical connections
and trailer wheel lug nuts thoroughly
after you have traveled 50 mi (80 km).
• When stopped in congested or heavy
traffic during hot weather, place the
transmission in park (P) to aid engine
and transmission cooling and to help
A/C performance.
• Turn off the speed control with heavy
loads or in hilly terrain. The speed
control may turn off automatically
when you are towing on long, steep
grades. •
Shift to a lower gear when driving down
a long or steep hill. Do not apply the
brakes continuously, as they may
overheat and become less effective.
• If your transmission is equipped with a
Grade Assist or Tow/Haul feature, use
this feature when towing. This provides
engine braking and helps eliminate
excessive transmission shifting for
optimum fuel economy and
transmission cooling.
• Allow more distance for stopping with
a trailer attached. Anticipate stops and
brake gradually.
• Avoid parking on a grade. However, if
you must park on a grade:
1. Turn the steering wheel to point your vehicle tires away from traffic flow.
2. Set your vehicle parking brake.
3. Place the automatic transmission in park (P).
4. Place wheel chocks in front and back of the trailer wheels. Chocks are not
included with your vehicle.
Launching or Retrieving a Boat or
Personal Watercraft (PWC)
Note: Disconnect the wiring to the trailer
before
backing the trailer into the water.
Note: Reconnect the wiring to the trailer
after
removing the trailer from the water.
When backing down a ramp during boat
launching or retrieval:
• Do not allow the static water level to
rise above the bottom edge of the rear
bumper.
• Do not allow waves to break higher
than
6 in (15 cm) above the bottom
edge of the rear bumper.
239
Bronco Sport (CHD) Canada/United States of America, enUSA, Edition date: 202007, Second-Printing Towing
Page 250 of 471
Trail Control allows you to set a speed
between 1 mph (1.6 km/h) to 14 mph
(23 km/h) in a forward motion and 1 mph
(1.6 km/h) to 5 mph (8 km/h) in reverse.
The system controls acceleration and
braking in difficult off-road environments,
which allows you to focus on steering. See
What Is Trail Control
(page 184).
Trail Control Performance:
• Manages wheel slip to maximize
traction.
• Removes the need for you to use both
feet when driving in off-road situations.
• Provides braking to maximize traction
in descents.
• Gives you confidence in difficult
environments.
After Driving Your Vehicle Off-
Road WARNING:
After off-road use,
before returning to the road, check the
wheels and tires for damage. Off-road
use may cause damage to your wheels
and tires that can lead to tire failure, loss
of vehicle control, serious injury or death.
Driving off-road places more stress on your
vehicle than most on-road driving. After
driving off-road, check for damage to the
wheels, chassis and underbody.
Inspect the underbody of your vehicle by
checking tires, body structure, steering,
suspension, and exhaust system for
damage.
Inspect the tires for any cuts in the tread
or sidewall area. Also inspect the sidewall
for any bulge indicating damage to the tire.
Make sure that tires are inflated to proper
tire pressure as indicated on the tire
placard. Check the radiator for mud and debris and
clean as needed.
Check that the air filter is clean and dry.
Remove accumulations of plants or brush.
These things could be a fire hazard or hide
damage to the fuel lines, brake hoses, and
propeller shafts.
Make sure that the grille and radiator are
clear of any obstructions that may affect
cooling.
After extended operation in mud, sand,
water, or similar dirty conditions, inspect
the wipers and washers to make sure they
are working.
Note:
Mud caked windows are hard to see
through and can damage wiper blades or
motor.
Check wipers for debris or anything that
may scratch the windshield.
If you experience unusual vibration after
driving in mud, slush or similar conditions,
check the wheels for impacted material.
Impacted material can cause vibrations
when driving and wheel imbalance.
Remove the material to reduce the
vibration.
Note: If you have removed the impacted
material from the wheels and your vehicle
still has a vibration check your vehicle for
damage or see an authorized dealer.
Inspect the exhaust system for damage or
looseness.
Make sure that the brakes are in proper
working order and free of any mud, stones
and debris, which can become trapped
around the brake rotor, backing plate and
caliper.
Inspect the wheels for dents, cracks, or
other damage.
247
Bronco Sport (CHD) Canada/United States of America, enUSA, Edition date: 202007, Second-Printing Driving Hints
Page 251 of 471
Inspect undercarriage fasteners. If any are
loose or damaged, tighten or replace
ensuring that the proper torque
specification is used.
Inspect for torn or punctured boots on ball
joints, half shafts, steering gears.
Refit the front license plate if removed
previously.
BREAKING-IN
Tires
You need to break in new tires for
approximately 300 mi (480 km). During
this time, your vehicle may exhibit some
unusual driving characteristics.
Brakes and Clutch
Avoid heavy use of the brakes and clutch
if possible for the first
100 mi (160 km) in
town and for the first 1,000 mi (1,600 km)
on freeways.
DRIVING ECONOMICALLY
The following helps to improve fuel
consumption:
• Drive smoothly, accelerate gently and
anticipate the road ahead to avoid
heavy braking.
• Regularly check your tire pressures and
make sure that they are inflated to the
correct pressure.
• Follow the recommended maintenance
schedule and carry out the
recommended checks.
• Plan your journey and check the traffic
before you set off. It is more efficient
to combine errands into a single trip
whenever possible. •
Avoid idling the engine in cold weather
or for extended periods. Start the
engine only when you are ready to set
off.
• Do not carry unnecessary weight in your
vehicle as extra weight wastes fuel.
• Do not add unnecessary accessories
to the exterior of your vehicle, for
example running boards. If you use a
roof rack, remember to fold it down or
remove it when not in use.
• Do not shift into neutral when you are
braking or when your vehicle is slowing
down.
• Shut all windows when driving at high
speeds.
• Switch off all electric systems when
not in use, for example air conditioning.
Make sure that you unplug any
accessories from the auxiliary power
points when not in use.
FLOOR MATS WARNING:
Use a floor mat
designed to fit the footwell of your
vehicle that does not obstruct the pedal
area. Failure to follow this instruction
could result in the loss of control of your
vehicle, personal injury or death. WARNING:
Pedals that cannot
move freely can cause loss of vehicle
control and increase the risk of serious
personal injury. WARNING:
Secure the floor mat
to both retention devices so that it
cannot slip out of position and interfere
with the pedals. Failure to follow this
instruction could result in the loss of
control of your vehicle, personal injury or
death.
248
Bronco Sport (CHD) Canada/United States of America, enUSA, Edition date: 202007, Second-Printing Driving Hints
Page 253 of 471
ROADSIDE ASSISTANCE
Vehicles Sold in the United States:
Getting Roadside Assistance
To fully assist you should you have a
vehicle concern, Ford Motor Company
offers a complimentary roadside
assistance program. This program is
separate from the New Vehicle Limited
Warranty.
The service is available:
•
24 hours a day, seven days a week.
• For the coverage period supplied with
your vehicle.
Roadside Assistance covers:
• A flat tire change with a good spare
(except vehicles supplied with a tire
inflation kit).
• Battery jump start.
• Lock-out assistance (key replacement
cost is the customer's responsibility).
• Fuel delivery — independent service
contractors, if not prohibited by state,
local or municipal law, shall deliver up
to 2 gal (8 L) of gasoline or 5 gal (20 L)
of diesel fuel to a disabled vehicle.
Roadside Assistance limits fuel delivery
service to two no-charge occurrences
within a 12-month period.
• Winch out — available within 100 ft
(30 m) of a paved or county
maintained road, no recoveries. •
Towing — independent service
contractors, if not prohibited by state,
local or municipal law, shall tow Ford
eligible vehicles to an authorized dealer
within
35 mi (56 km) of the
disablement location or to the nearest
authorized dealer. If a member
requests a tow to an authorized dealer
that is more than
35 mi (56 km) from
the disablement location, the member
shall be responsible for any mileage
costs in excess of
35 mi (56 km).
• Roadside Assistance includes up to
$200 for a towed trailer if the disabled
eligible vehicle requires service at the
nearest authorized dealer. If the towing
vehicle is operational but the trailer is
not, then the trailer does not qualify for
any roadside services.
Vehicles Sold in the United States:
Using Roadside Assistance
Complete the roadside assistance
identification card and place it in your
wallet for quick reference. This card is in
the Owner's Manual kit.
United States vehicle customers who
require Roadside Assistance, call
1-800-241-3673.
If you need to arrange roadside assistance
for yourself, Ford Motor Company
reimburses a reasonable amount for
towing to the nearest dealership within
35 mi (56 km)
. To obtain reimbursement
information, United States vehicle
customers call 1-800-241-3673.
Customers need to submit their original
receipts.
250
Bronco Sport (CHD) Canada/United States of America, enUSA, Edition date: 202007, Second-Printing Roadside Emergencies
Page 254 of 471
Vehicles Sold in Canada: Getting
Roadside Assistance
To fully assist you should you have a
vehicle concern, Ford Motor Company of
Canada, Limited offers a complimentary
roadside assistance program. This program
is eligible within Canada or the continental
United States.
The service is available 24 hours a day,
seven days a week.
This program is separate from the New
Vehicle Limited Warranty, but the coverage
is concurrent with the powertrain coverage
period of your vehicle. Canadian roadside
coverage and benefits may differ from the
U.S. coverage.
If you require more information, please call
us in Canada at 1-800-665-2006, or visit
our website at www.ford.ca.
HAZARD FLASHERS
Note:
The hazard flashers operate when
the ignition is in any position, or if the key is
not in the ignition. If used when the vehicle
is not running, the battery loses charge. As
a result, there may be insufficient power to
restart your vehicle. The flasher control is on the
instrument panel. Use your
hazard flashers when your
vehicle is creating a safety hazard for other
motorists.
• Press the flasher control and all front
and rear direction indicators flash.
• Press the button again to switch them
off. FUEL SHUTOFF WARNING: If your vehicle has been
involved in a crash, have the fuel system
checked. Failure to follow this instruction
could result in fire, personal injury or
death.
Note: When you try to restart your vehicle
after a fuel shutoff, the vehicle makes sure
that various systems are safe to restart.
Once the vehicle determines the systems
are safe, then the vehicle allows you to
restart.
Note: In the event that your vehicle does
not restart after your third attempt, contact
a qualified technician.
The fuel pump shutoff stops the flow of
fuel to the engine in the event of a
moderate to severe crash. Not every
impact causes a shutoff.
Should your vehicle shut off after a crash,
you may restart your vehicle.
If your vehicle has a key system:
1. Switch off the ignition.
2. Switch to start position.
3. Switch off the ignition.
4. Switch on the ignition to re-enable the
fuel pump.
5. If the vehicle does not start, repeat steps 1 through 4.
If your vehicle has a push button start
system:
1. Press START/STOP to switch off your
vehicle.
2. Press the brake pedal and START/STOP
to switch on your
vehicle.
3. Remove your foot from the brake pedal
and press
START/STOP to switch off
your vehicle.
251
Bronco Sport (CHD) Canada/United States of America, enUSA, Edition date: 202007, Second-Printing Roadside Emergencies