2021 FORD BRONCO SPORT remote control
[x] Cancel search: remote controlPage 122 of 471
Press the button on the remote
control.
Within three seconds, press the
button on the remote control.
Within three seconds, press the
button again.
If the duration is set to 15 minutes, the
duration extends by another 15 minutes.
This provides a total of 30 minutes.
Note: Remote start can only be extended
once.
Note: A maximum of two remote starts, or
one remote start with an extension, are
allowed. To reset the restart procedure
switch the vehicle to on, then to off.
REMOTE START REMOTE
CONTROL INDICATORS
Remote Control Feedback
An LED on the remote control provides
status feedback of remote start or stop
commands. Status
LED
Remote startsuccessful.
Solid green.
Remote stopsuccessful.
Solid red.
Request failed or
status not received.
Blinking red.
Status incomplete.
Blinking green.
REMOTE START SETTINGS
Switching Climate Control Auto
Mode On and Off
1. Press Settings on the touchscreen. 2. Press
Remote Start Setup.
3. Press
Climate Control.
4. Select
Vehicle.
5. Switch
Auto on or off.
Note: If you switch the auto mode on, the
system attempts to heat or cool the interior
to
72°F (22°C).
Note: When you switch the ignition on, the
climate control system returns to the last
used settings.
Switching Climate Control Last
Settings On and Off
1. Press
Settings on the touchscreen.
2. Press
Vehicle.
3. Press
Remote Start Setup.
4. Switch
Last settings on.
Note: If you switch the last settings on, the
system remembers the last used settings.
Switching the Heated Seat
Settings On and Off
1. Press
Settings on the touchscreen.
2. Press
Vehicle.
3. Press
Remote Start Setup.
4. Press
Seats.
5. Switch
Auto on or off.
Note: If you switch the heated seat settings
on, the heated seats turn on during cold
weather.
Switching the Heated Steering
Wheel Settings On and Off
1. Press
Settings on the touchscreen.
2. Press
Vehicle.
3. Press
Remote Start Setup.
4. Press
Seats and Steering Wheel.
119
Bronco Sport (CHD) Canada/United States of America, enUSA, Edition date: 202007, Second-Printing Remote Start
(If Equipped)E138623 E138625
Page 147 of 471
WHAT IS THE WIRELESS
ACCESSORY CHARGER
The wireless accessory charger allows you
to charge one compatible Qi wireless
charging device on the charging area.
WIRELESS ACCESSORY
CHARGER PRECAUTIONS
WARNING: Wireless charging
devices can affect the operation of
implanted medical devices, including
cardiac pacemakers. If you have any
implanted medical devices, we
recommend that you consult with your
physician.
Tests on this equipment show that it
complies with part 18 of the FCC Rules.
• This equipment generates, uses and
can radiate radio frequency energy and
may cause harmful interference to
radio communications. There is no
guarantee that the interference will not
occur in a particular installation. If this
equipment does cause harmful
interference to radio or television
reception, please consult the dealer.
• This product is not end-user
serviceable. WARNING:
Changes or
modifications not expressively approved
by the party responsible for compliance
could void the user's authority to operate
the equipment. The term "IC:" before the
radio certification number only signifies
that Industry Canada technical
specifications were met. This device complies with Industry Canada
licence-exempt RSS standard(s).
Operation is subject to:
•
This device may not cause interference.
• This device must accept any
interference, including interference that
may cause undesired operation of the
device.
Keep the charging area clean and remove
foreign objects prior to charging a device.
Do not place items with a magnetic strip,
for example passports, parking tickets or
credit cards, near the charging area when
charging a device. Damage may occur to
the magnetic strip.
Do not place metal objects, for example
remote controls, coins and candy
wrappers, on or near the charging area
when charging a device. Metal objects may
heat up and degrade the charging
performance, in addition to causing error
messages and interruptions in charging.
Note: During charging, the device and the
charger could heat up, this is normal. If the
battery gets hotter than usual, the device
may stop charging.
LOCATING THE WIRELESS
ACCESSORY CHARGER The charging area is on the
center console or in the media
bin below the instrument panel.
CHARGING A WIRELESS
DEVICE
Place the device on the center of the
charging surface with the charging side
down. The charging stops after your device
reaches a full charge.
144
Bronco Sport (CHD) Canada/United States of America, enUSA, Edition date: 202007, Second-Printing Wireless Accessory Charger
(If Equipped)E297549
Page 169 of 471
AUTOMATIC TRANSMISSION
WARNING: Do not apply the brake
pedal and accelerator pedal
simultaneously. Applying both pedals
simultaneously for more than a few
seconds will limit engine performance,
which may result in difficulty maintaining
speed in traffic and could lead to serious
injury. WARNING:
When your vehicle is
stationary, keep the brake pedal fully
pressed when shifting gears. Failure to
follow this instruction could result in
personal injury, death or property
damage. WARNING:
Apply the parking
brake, shift into park (P), switch the
ignition off and remove the key before
you leave your vehicle. Failure to follow
this instruction could result in personal
injury or death.
Note: You may not be able to shift out of
park (P) unless the remote control is inside
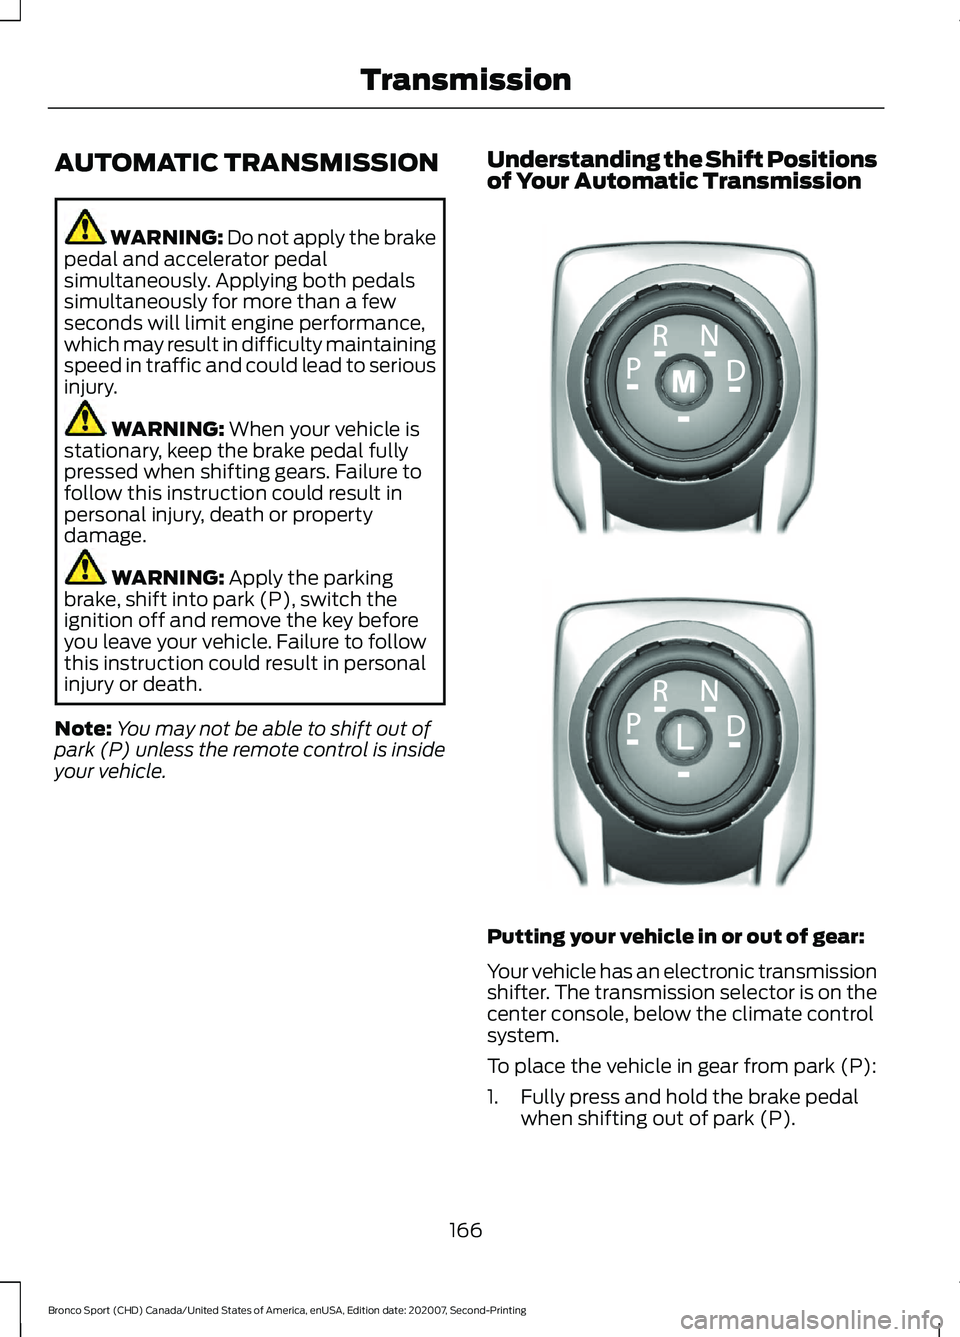
your vehicle. Understanding the Shift Positions
of Your Automatic Transmission
Putting your vehicle in or out of gear:
Your vehicle has an electronic transmission
shifter. The transmission selector is on the
center console, below the climate control
system.
To place the vehicle in gear from park (P):
1. Fully press and hold the brake pedal
when shifting out of park (P).
166
Bronco Sport (CHD) Canada/United States of America, enUSA, Edition date: 202007, Second-Printing TransmissionE322797 LE349178
Page 256 of 471
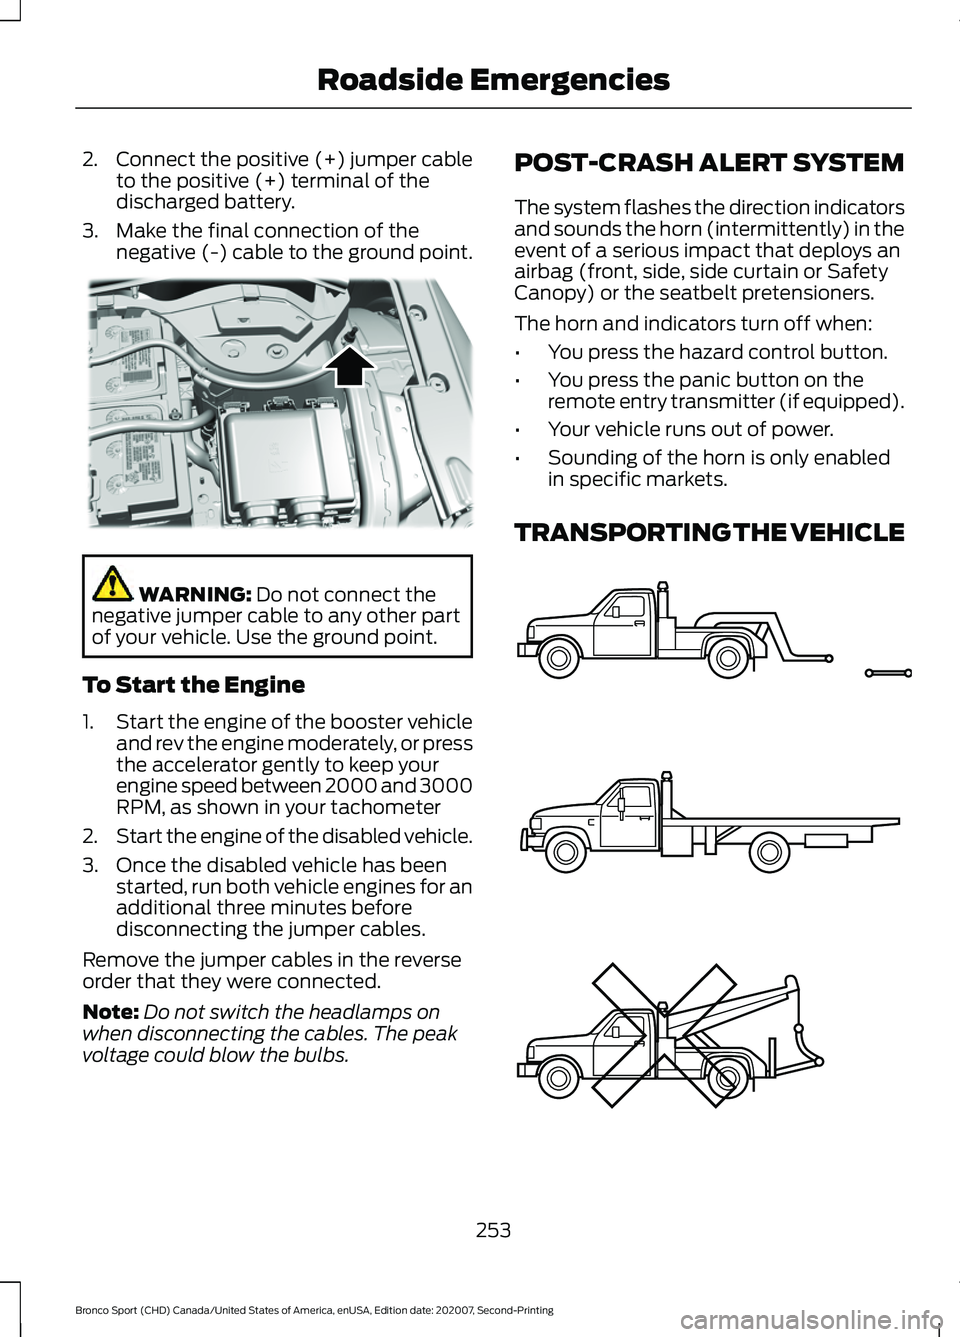
2.
Connect the positive (+) jumper cable
to the positive (+) terminal of the
discharged battery.
3. Make the final connection of the negative (-) cable to the ground point. WARNING: Do not connect the
negative jumper cable to any other part
of your vehicle. Use the ground point.
To Start the Engine
1. Start the engine of the booster vehicle
and rev the engine moderately, or press
the accelerator gently to keep your
engine speed between 2000 and 3000
RPM, as shown in your tachometer
2. Start the engine of the disabled vehicle.
3. Once the disabled vehicle has been started, run both vehicle engines for an
additional three minutes before
disconnecting the jumper cables.
Remove the jumper cables in the reverse
order that they were connected.
Note: Do not switch the headlamps on
when disconnecting the cables. The peak
voltage could blow the bulbs. POST-CRASH ALERT SYSTEM
The system flashes the direction indicators
and sounds the horn (intermittently) in the
event of a serious impact that deploys an
airbag (front, side, side curtain or Safety
Canopy) or the seatbelt pretensioners.
The horn and indicators turn off when:
•
You press the hazard control button.
• You press the panic button on the
remote entry transmitter (if equipped).
• Your vehicle runs out of power.
• Sounding of the horn is only enabled
in specific markets.
TRANSPORTING THE VEHICLE 253
Bronco Sport (CHD) Canada/United States of America, enUSA, Edition date: 202007, Second-Printing Roadside EmergenciesE318342 E143886
Page 312 of 471
WARNING: Only use
replacement tires and wheels
that are the same size, load
index, speed rating and type
(such as P-metric versus
LT-metric or all-season versus
all-terrain) as those originally
provided by Ford. The
recommended tire and wheel
size may be found on either the
Safety Compliance Certification
Label (affixed to either the door
hinge pillar, door-latch post, or
the door edge that meets the
door-latch post, next to the
driver's seating position), or the
Tire Label which is located on
the B-Pillar or edge of the
driver's door. If this information
is not found on these labels, then
you should contact your
authorized dealer as soon as
possible. Use of any tire or wheel
not recommended by Ford can
affect the safety and
performance of your vehicle,
which could result in an
increased risk of loss of vehicle
control, vehicle rollover, personal
injury and death. WARNING: To reduce the
risk of serious injury, when
mounting replacement tires and
wheels, you should not exceed
the maximum pressure indicated
on the sidewall of the tire to set
the beads without additional
precautions listed below. If the
beads do not seat at the
maximum pressure indicated,
re-lubricate and try again. WARNING: For a mounting
pressure more than
20 psi
(1.38 bar) greater than the
maximum pressure, a Ford
dealer or other tire service
professional should do the
mounting. WARNING:
Always inflate
steel carcass tires with a remote
air fill with the person inflating
standing at a minimum of
12 ft
(3.66 m) away from the wheel
and tire assembly. WARNING:
When inflating
the tire for mounting pressures
up to
20 psi (1.38 bar) greater
than the maximum pressure on
the tire sidewall, the following
precautions must be taken to
protect the person mounting the
tire:
• Make sure that you have the
correct tire and wheel size.
• Lubricate the tire bead and
wheel bead seat area again.
309
Bronco Sport (CHD) Canada/United States of America, enUSA, Edition date: 202007, Second-Printing Wheels and Tires
Page 340 of 471
WHAT IS A CONNECTED
VEHICLE
A connected vehicle has technology that
allows your vehicle to connect to a mobile
network and for you to access a range of
features. When used in conjunction with
the FordPass app, it could allow you to
monitor and control your vehicle further,
for example checking the tire pressures,
the fuel level and the vehicle location. For
additional information, refer to the local
Ford website.
CONNECTED VEHICLE
REQUIREMENTS
Connected service and related feature
functionality requires a compatible vehicle
network.
Some remote features require additional
service activation. Log in to your Ford
account for details. Some restrictions, third
party terms and message or data rates
may apply.
CONNECTED VEHICLE
LIMITATIONS
Evolving technology, cellular networks, or
regulations could affect functionality and
availability, or continued provision of some
features. These changes could even stop
some features from functioning.
CONNECTING THE VEHICLE TO
A MOBILE NETWORK -
VEHICLES WITH: MODEM
What Is the Modem The modem allows access to a
range of features built into your
vehicle.
Enabling and Disabling the Modem
1. Press Settings.
2. Press
FordPass Connect.
3. Press
Connectivity Settings.
4. Switch connectivity features on or off.
Connecting FordPass to the
Modem
1. Make sure that the modem is enabled using the vehicle settings menu.
2. Open the FordPass app on your device
and log in.
3. Add your vehicle or select your vehicle if already added.
4. Select the option for vehicle details.
5. Select the option to activate your vehicle.
6. Make sure that the name on the screen
matches the name shown in your
FordPass account.
7. Confirm that FordPass account is connected to the modem.
CONNECTING THE VEHICLE TO
A WI-FI NETWORK - VEHICLES
WITH: SYNC 3
1. Press
Settings.
337
Bronco Sport (CHD) Canada/United States of America, enUSA, Edition date: 202007, Second-Printing Connected Vehicle
Page 393 of 471
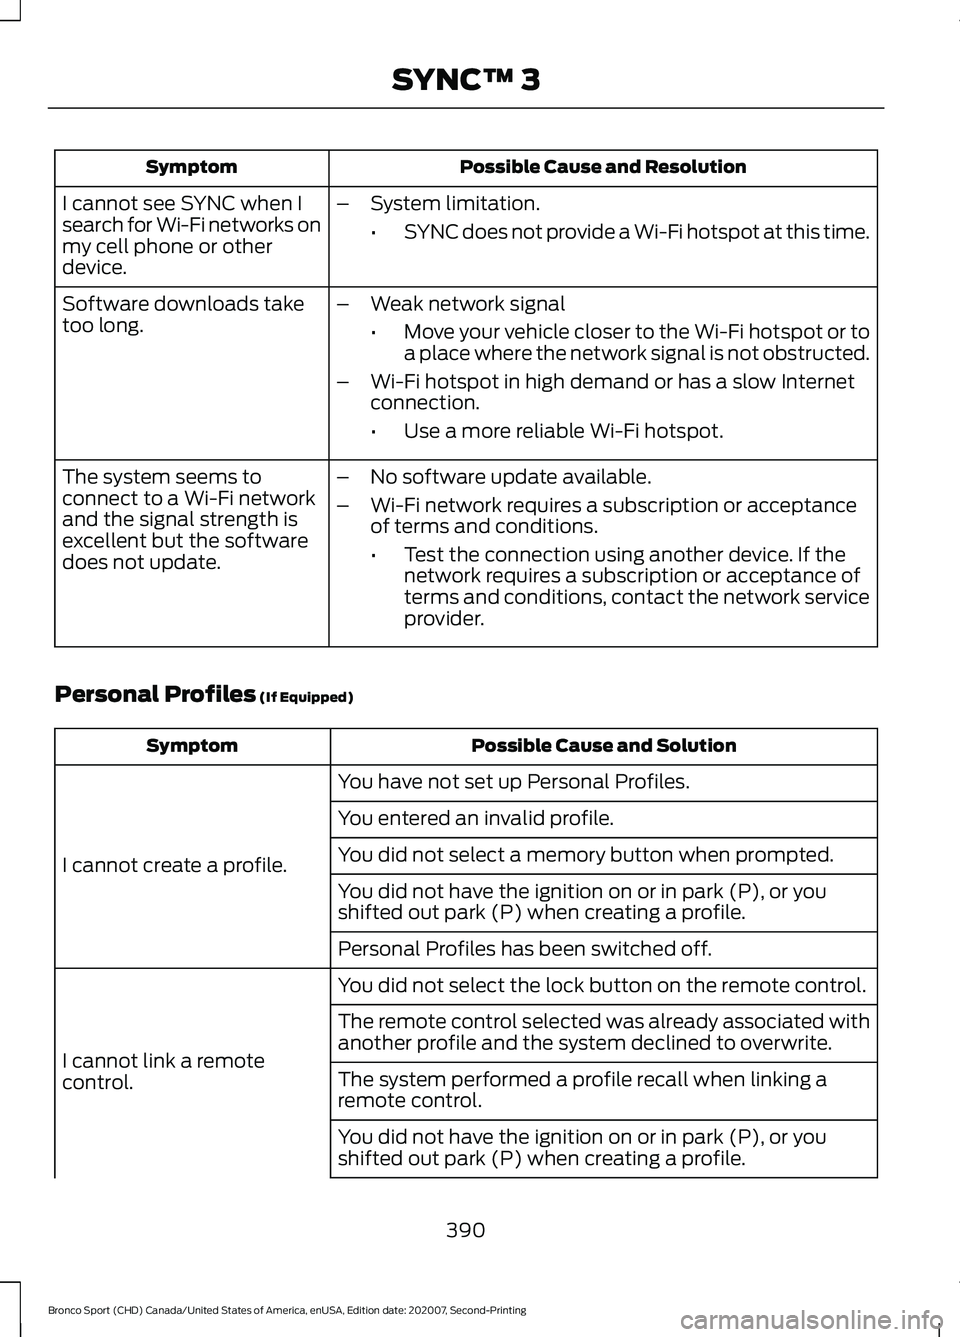
Possible Cause and Resolution
Symptom
I cannot see SYNC when I
search for Wi-Fi networks on
my cell phone or other
device. –
System limitation.
•SYNC does not provide a Wi-Fi hotspot at this time.
– Weak network signal
•Move your vehicle closer to the Wi-Fi hotspot or to
a place where the network signal is not obstructed.
– Wi-Fi hotspot in high demand or has a slow Internet
connection.
•Use a more reliable Wi-Fi hotspot.
Software downloads take
too long.
–No software update available.
– Wi-Fi network requires a subscription or acceptance
of terms and conditions.
•Test the connection using another device. If the
network requires a subscription or acceptance of
terms and conditions, contact the network service
provider.
The system seems to
connect to a Wi-Fi network
and the signal strength is
excellent but the software
does not update.
Personal Profiles (If Equipped) Possible Cause and Solution
Symptom
You have not set up Personal Profiles.
I cannot create a profile. You entered an invalid profile.
You did not select a memory button when prompted.
You did not have the ignition on or in park (P), or you
shifted out park (P) when creating a profile.
Personal Profiles has been switched off.
You did not select the lock button on the remote control.
I cannot link a remote
control. The remote control selected was already associated with
another profile and the system declined to overwrite.
The system performed a profile recall when linking a
remote control.
You did not have the ignition on or in park (P), or you
shifted out park (P) when creating a profile.
390
Bronco Sport (CHD) Canada/United States of America, enUSA, Edition date: 202007, Second-Printing SYNC™ 3
Page 394 of 471
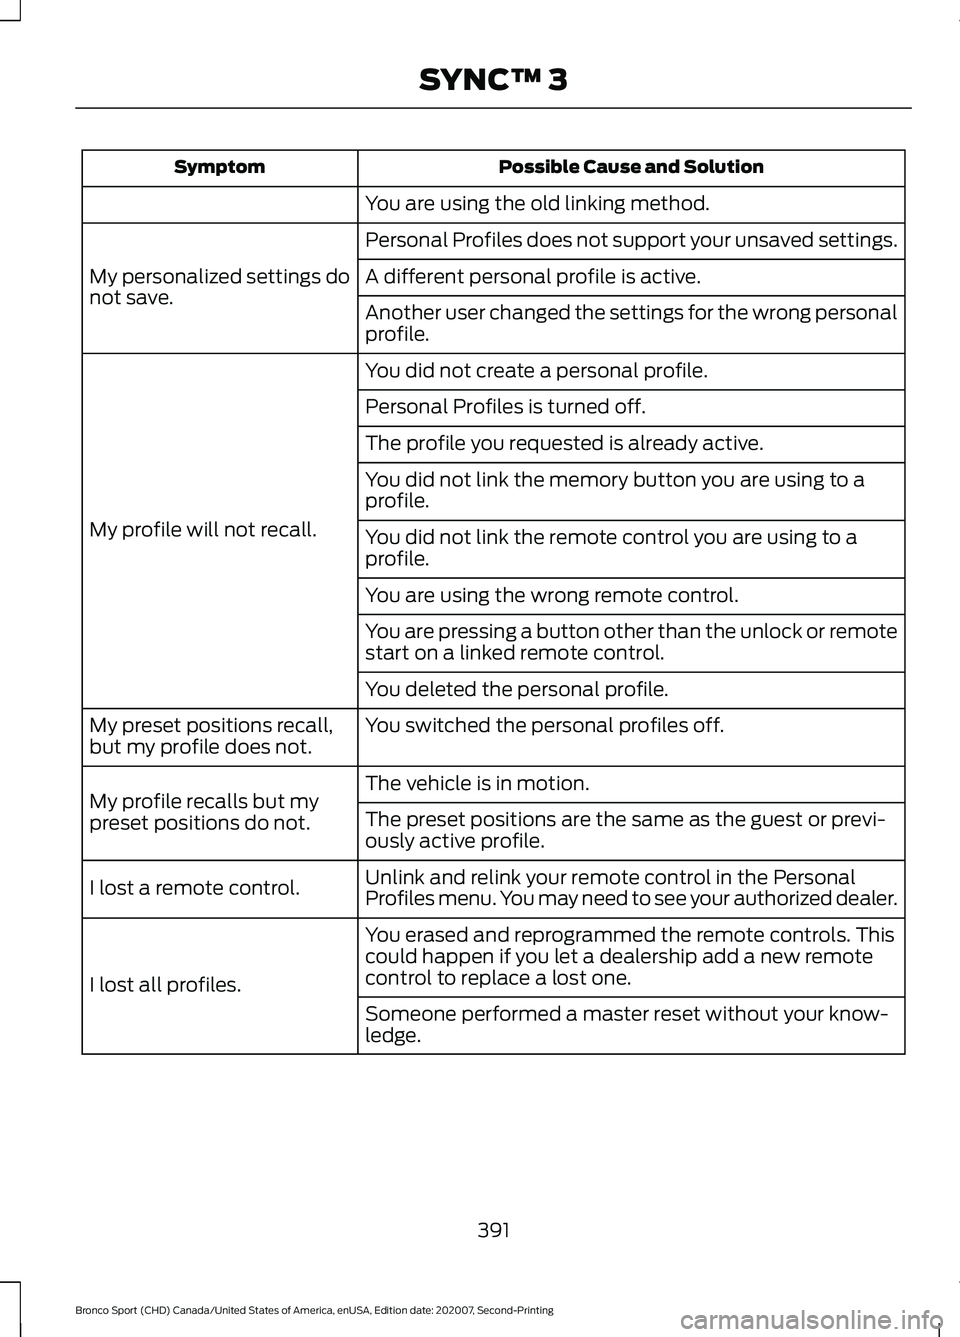
Possible Cause and Solution
Symptom
You are using the old linking method.
Personal Profiles does not support your unsaved settings.
My personalized settings do
not save. A different personal profile is active.
Another user changed the settings for the wrong personal
profile.
You did not create a personal profile.
My profile will not recall. Personal Profiles is turned off.
The profile you requested is already active.
You did not link the memory button you are using to a
profile.
You did not link the remote control you are using to a
profile.
You are using the wrong remote control.
You are pressing a button other than the unlock or remote
start on a linked remote control.
You deleted the personal profile.
You switched the personal profiles off.
My preset positions recall,
but my profile does not.
The vehicle is in motion.
My profile recalls but my
preset positions do not. The preset positions are the same as the guest or previ-
ously active profile.
Unlink and relink your remote control in the Personal
Profiles menu. You may need to see your authorized dealer.
I lost a remote control.
You erased and reprogrammed the remote controls. This
could happen if you let a dealership add a new remote
control to replace a lost one.
I lost all profiles.
Someone performed a master reset without your know-
ledge.
391
Bronco Sport (CHD) Canada/United States of America, enUSA, Edition date: 202007, Second-Printing SYNC™ 3