2021 FORD BRONCO SPORT Owners Manual
[x] Cancel search: 1Page 249 of 471
Crossing A Ravine, Gully, Ditch,
Washout Or Rut
Review the path ahead before attempting
to cross any obstacle. Review the obstacle
from outside the vehicle for an
understanding of the terrain condition in
front of and behind the obstacle. Approach
obstacles slowly and inch the vehicle over.
Ditches and washouts should be crossed
at a 45 degree angle when possible.
Driving Over Logs
Review the path ahead before attempting
to cross any obstacle. Review the obstacle
from outside the vehicle for an
understanding of the terrain condition in
front of and behind the obstacle.
Approach obstacles slowly and inch the
vehicle over, approaching at a 15 degree
angle.
Note:
It is best to have a front tire on top of
the log when the other begins to climb over.
If a large obstacle near the log such as a
rock cannot be avoided, choose a path that
places the rock directly under the tire
rather than the undercarriage of the
vehicle. This helps prevent damage to the
vehicle.
Driving Through Water Limitations Maximum Wading
Depth
Model
17.7 in (450 mm)
Base
23.6 in (600 mm)
Badlands
When you are driving though water do not
exceed 4 mph (7 km/h). Off-Road Driving Aids
Selecting an Off-Road Drive Mode
Using the appropriate drive mode increases
your vehicle's control.
See What Is Drive
Mode Control (page 223).
Using the Cameras Off-Road
Use the 180 degree camera to enhance
your off-road experience. See 180 Degree
Camera
(page 191).
Using Four-Wheel Drive Lock
Increases four wheel drive performance by
preventing the front and rear axles from
disconnecting. You can activate and
deactivate the four wheel drive lock on the
fly. See
Using Four-Wheel Drive (page
172).
Using Rear Differential Lock
The rear differential lock provides
additional traction to your vehicle when
stuck.
You can activate and deactivate the rear
differential lock on the fly within the
operating speed range.
The rear differential locker disengages
when the vehicle speed exceeds a set
value and it re-engages when the vehicle
speed goes below a set value. See
Using
Four-Wheel Drive (page 172).
Using Trail Control
The system works in a similar manner to
cruise control in off-road conditions. Trail
Control provides you the ability to
maneuver the vehicle without using the
throttle and brake pedals.
246
Bronco Sport (CHD) Canada/United States of America, enUSA, Edition date: 202007, Second-Printing Driving Hints
Page 250 of 471
Trail Control allows you to set a speed
between 1 mph (1.6 km/h) to 14 mph
(23 km/h) in a forward motion and 1 mph
(1.6 km/h) to 5 mph (8 km/h) in reverse.
The system controls acceleration and
braking in difficult off-road environments,
which allows you to focus on steering. See
What Is Trail Control
(page 184).
Trail Control Performance:
• Manages wheel slip to maximize
traction.
• Removes the need for you to use both
feet when driving in off-road situations.
• Provides braking to maximize traction
in descents.
• Gives you confidence in difficult
environments.
After Driving Your Vehicle Off-
Road WARNING:
After off-road use,
before returning to the road, check the
wheels and tires for damage. Off-road
use may cause damage to your wheels
and tires that can lead to tire failure, loss
of vehicle control, serious injury or death.
Driving off-road places more stress on your
vehicle than most on-road driving. After
driving off-road, check for damage to the
wheels, chassis and underbody.
Inspect the underbody of your vehicle by
checking tires, body structure, steering,
suspension, and exhaust system for
damage.
Inspect the tires for any cuts in the tread
or sidewall area. Also inspect the sidewall
for any bulge indicating damage to the tire.
Make sure that tires are inflated to proper
tire pressure as indicated on the tire
placard. Check the radiator for mud and debris and
clean as needed.
Check that the air filter is clean and dry.
Remove accumulations of plants or brush.
These things could be a fire hazard or hide
damage to the fuel lines, brake hoses, and
propeller shafts.
Make sure that the grille and radiator are
clear of any obstructions that may affect
cooling.
After extended operation in mud, sand,
water, or similar dirty conditions, inspect
the wipers and washers to make sure they
are working.
Note:
Mud caked windows are hard to see
through and can damage wiper blades or
motor.
Check wipers for debris or anything that
may scratch the windshield.
If you experience unusual vibration after
driving in mud, slush or similar conditions,
check the wheels for impacted material.
Impacted material can cause vibrations
when driving and wheel imbalance.
Remove the material to reduce the
vibration.
Note: If you have removed the impacted
material from the wheels and your vehicle
still has a vibration check your vehicle for
damage or see an authorized dealer.
Inspect the exhaust system for damage or
looseness.
Make sure that the brakes are in proper
working order and free of any mud, stones
and debris, which can become trapped
around the brake rotor, backing plate and
caliper.
Inspect the wheels for dents, cracks, or
other damage.
247
Bronco Sport (CHD) Canada/United States of America, enUSA, Edition date: 202007, Second-Printing Driving Hints
Page 251 of 471
Inspect undercarriage fasteners. If any are
loose or damaged, tighten or replace
ensuring that the proper torque
specification is used.
Inspect for torn or punctured boots on ball
joints, half shafts, steering gears.
Refit the front license plate if removed
previously.
BREAKING-IN
Tires
You need to break in new tires for
approximately 300 mi (480 km). During
this time, your vehicle may exhibit some
unusual driving characteristics.
Brakes and Clutch
Avoid heavy use of the brakes and clutch
if possible for the first
100 mi (160 km) in
town and for the first 1,000 mi (1,600 km)
on freeways.
DRIVING ECONOMICALLY
The following helps to improve fuel
consumption:
• Drive smoothly, accelerate gently and
anticipate the road ahead to avoid
heavy braking.
• Regularly check your tire pressures and
make sure that they are inflated to the
correct pressure.
• Follow the recommended maintenance
schedule and carry out the
recommended checks.
• Plan your journey and check the traffic
before you set off. It is more efficient
to combine errands into a single trip
whenever possible. •
Avoid idling the engine in cold weather
or for extended periods. Start the
engine only when you are ready to set
off.
• Do not carry unnecessary weight in your
vehicle as extra weight wastes fuel.
• Do not add unnecessary accessories
to the exterior of your vehicle, for
example running boards. If you use a
roof rack, remember to fold it down or
remove it when not in use.
• Do not shift into neutral when you are
braking or when your vehicle is slowing
down.
• Shut all windows when driving at high
speeds.
• Switch off all electric systems when
not in use, for example air conditioning.
Make sure that you unplug any
accessories from the auxiliary power
points when not in use.
FLOOR MATS WARNING:
Use a floor mat
designed to fit the footwell of your
vehicle that does not obstruct the pedal
area. Failure to follow this instruction
could result in the loss of control of your
vehicle, personal injury or death. WARNING:
Pedals that cannot
move freely can cause loss of vehicle
control and increase the risk of serious
personal injury. WARNING:
Secure the floor mat
to both retention devices so that it
cannot slip out of position and interfere
with the pedals. Failure to follow this
instruction could result in the loss of
control of your vehicle, personal injury or
death.
248
Bronco Sport (CHD) Canada/United States of America, enUSA, Edition date: 202007, Second-Printing Driving Hints
Page 252 of 471
WARNING: Do not place additional
floor mats or any other covering on top
of the original floor mats. This could
result in the floor mat interfering with the
operation of the pedals. Failure to follow
this instruction could result in the loss of
control of your vehicle, personal injury or
death. WARNING: Always make sure that
objects cannot fall into the driver foot
well while your vehicle is moving. Objects
that are loose can become trapped
under the pedals causing a loss of
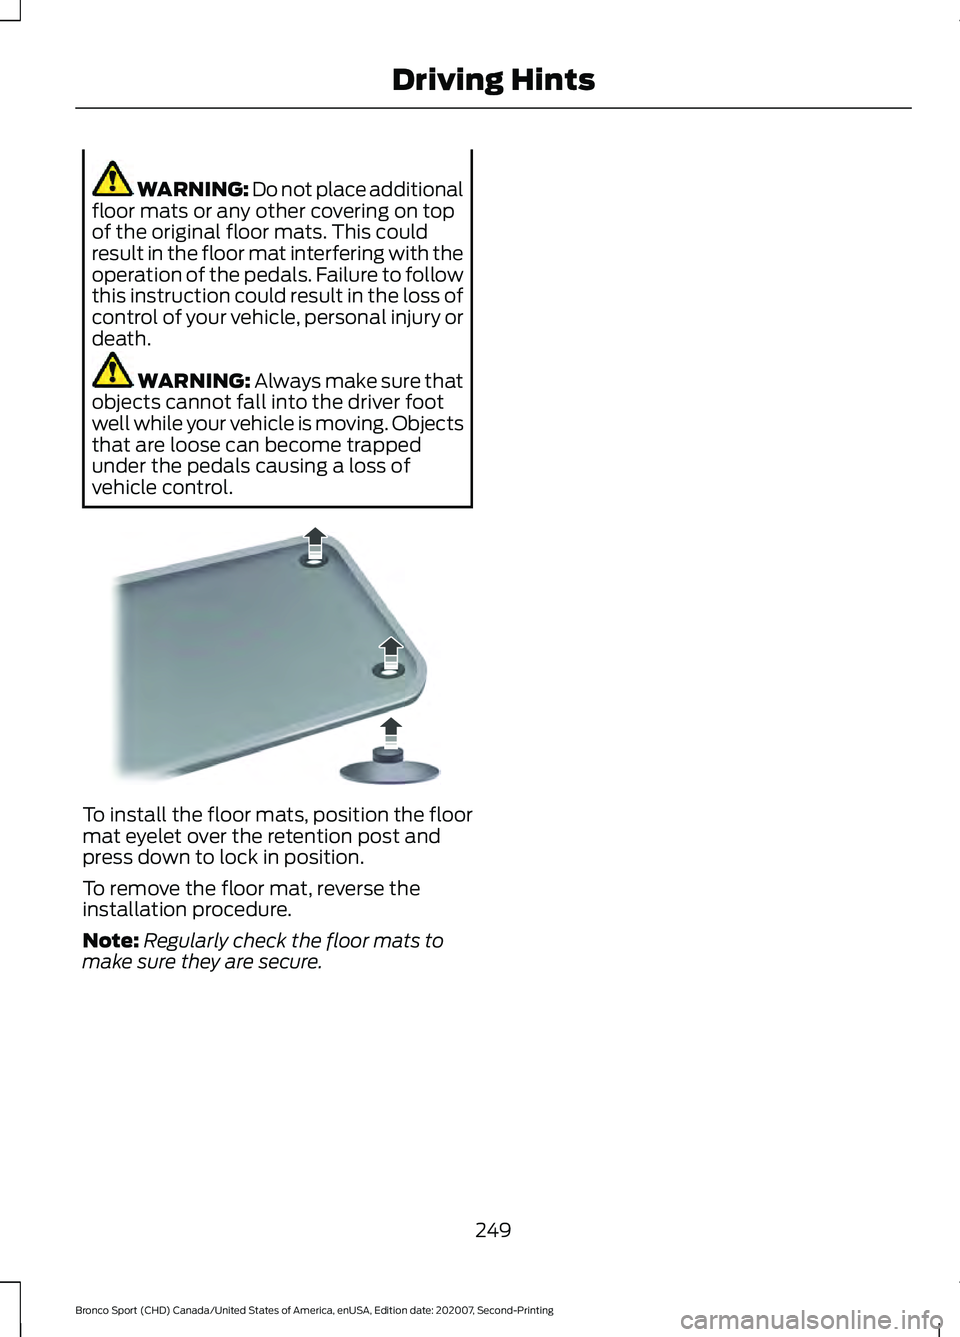
vehicle control. To install the floor mats, position the floor
mat eyelet over the retention post and
press down to lock in position.
To remove the floor mat, reverse the
installation procedure.
Note:
Regularly check the floor mats to
make sure they are secure.
249
Bronco Sport (CHD) Canada/United States of America, enUSA, Edition date: 202007, Second-Printing Driving HintsE142666
Page 253 of 471
ROADSIDE ASSISTANCE
Vehicles Sold in the United States:
Getting Roadside Assistance
To fully assist you should you have a
vehicle concern, Ford Motor Company
offers a complimentary roadside
assistance program. This program is
separate from the New Vehicle Limited
Warranty.
The service is available:
•
24 hours a day, seven days a week.
• For the coverage period supplied with
your vehicle.
Roadside Assistance covers:
• A flat tire change with a good spare
(except vehicles supplied with a tire
inflation kit).
• Battery jump start.
• Lock-out assistance (key replacement
cost is the customer's responsibility).
• Fuel delivery — independent service
contractors, if not prohibited by state,
local or municipal law, shall deliver up
to 2 gal (8 L) of gasoline or 5 gal (20 L)
of diesel fuel to a disabled vehicle.
Roadside Assistance limits fuel delivery
service to two no-charge occurrences
within a 12-month period.
• Winch out — available within 100 ft
(30 m) of a paved or county
maintained road, no recoveries. •
Towing — independent service
contractors, if not prohibited by state,
local or municipal law, shall tow Ford
eligible vehicles to an authorized dealer
within
35 mi (56 km) of the
disablement location or to the nearest
authorized dealer. If a member
requests a tow to an authorized dealer
that is more than
35 mi (56 km) from
the disablement location, the member
shall be responsible for any mileage
costs in excess of
35 mi (56 km).
• Roadside Assistance includes up to
$200 for a towed trailer if the disabled
eligible vehicle requires service at the
nearest authorized dealer. If the towing
vehicle is operational but the trailer is
not, then the trailer does not qualify for
any roadside services.
Vehicles Sold in the United States:
Using Roadside Assistance
Complete the roadside assistance
identification card and place it in your
wallet for quick reference. This card is in
the Owner's Manual kit.
United States vehicle customers who
require Roadside Assistance, call
1-800-241-3673.
If you need to arrange roadside assistance
for yourself, Ford Motor Company
reimburses a reasonable amount for
towing to the nearest dealership within
35 mi (56 km)
. To obtain reimbursement
information, United States vehicle
customers call 1-800-241-3673.
Customers need to submit their original
receipts.
250
Bronco Sport (CHD) Canada/United States of America, enUSA, Edition date: 202007, Second-Printing Roadside Emergencies
Page 254 of 471
Vehicles Sold in Canada: Getting
Roadside Assistance
To fully assist you should you have a
vehicle concern, Ford Motor Company of
Canada, Limited offers a complimentary
roadside assistance program. This program
is eligible within Canada or the continental
United States.
The service is available 24 hours a day,
seven days a week.
This program is separate from the New
Vehicle Limited Warranty, but the coverage
is concurrent with the powertrain coverage
period of your vehicle. Canadian roadside
coverage and benefits may differ from the
U.S. coverage.
If you require more information, please call
us in Canada at 1-800-665-2006, or visit
our website at www.ford.ca.
HAZARD FLASHERS
Note:
The hazard flashers operate when
the ignition is in any position, or if the key is
not in the ignition. If used when the vehicle
is not running, the battery loses charge. As
a result, there may be insufficient power to
restart your vehicle. The flasher control is on the
instrument panel. Use your
hazard flashers when your
vehicle is creating a safety hazard for other
motorists.
• Press the flasher control and all front
and rear direction indicators flash.
• Press the button again to switch them
off. FUEL SHUTOFF WARNING: If your vehicle has been
involved in a crash, have the fuel system
checked. Failure to follow this instruction
could result in fire, personal injury or
death.
Note: When you try to restart your vehicle
after a fuel shutoff, the vehicle makes sure
that various systems are safe to restart.
Once the vehicle determines the systems
are safe, then the vehicle allows you to
restart.
Note: In the event that your vehicle does
not restart after your third attempt, contact
a qualified technician.
The fuel pump shutoff stops the flow of
fuel to the engine in the event of a
moderate to severe crash. Not every
impact causes a shutoff.
Should your vehicle shut off after a crash,
you may restart your vehicle.
If your vehicle has a key system:
1. Switch off the ignition.
2. Switch to start position.
3. Switch off the ignition.
4. Switch on the ignition to re-enable the
fuel pump.
5. If the vehicle does not start, repeat steps 1 through 4.
If your vehicle has a push button start
system:
1. Press START/STOP to switch off your
vehicle.
2. Press the brake pedal and START/STOP
to switch on your
vehicle.
3. Remove your foot from the brake pedal
and press
START/STOP to switch off
your vehicle.
251
Bronco Sport (CHD) Canada/United States of America, enUSA, Edition date: 202007, Second-Printing Roadside Emergencies
Page 255 of 471
4. You can attempt to start the vehicle
by pressing the brake pedal and
START/STOP, or press START/STOP
without pressing the brake pedal.
5. If the vehicle does not start, repeat steps 1 through 4.
JUMP STARTING THE VEHICLE WARNING:
Keep batteries out of
reach of children. Batteries contain
sulfuric acid. Avoid contact with skin,
eyes or clothing. Shield your eyes when
working near the battery to protect
against possible splashing of acid
solution. In case of acid contact with skin
or eyes, flush immediately with water for
a minimum of 15 minutes and get prompt
medical attention. If acid is swallowed,
call a physician immediately. WARNING:
Batteries normally
produce explosive gases which can
cause personal injury. Therefore, do not
allow flames, sparks or lighted
substances to come near the battery.
When working near the battery, always
shield your face and protect your eyes.
Always provide correct ventilation. WARNING:
Use only adequately
sized cables with insulated clamps.
Note: Do not attempt to push-start an
automatic transmission vehicle. This could
cause transmission damage.
Note: Do not disconnect the battery of the
disabled vehicle as this could damage the
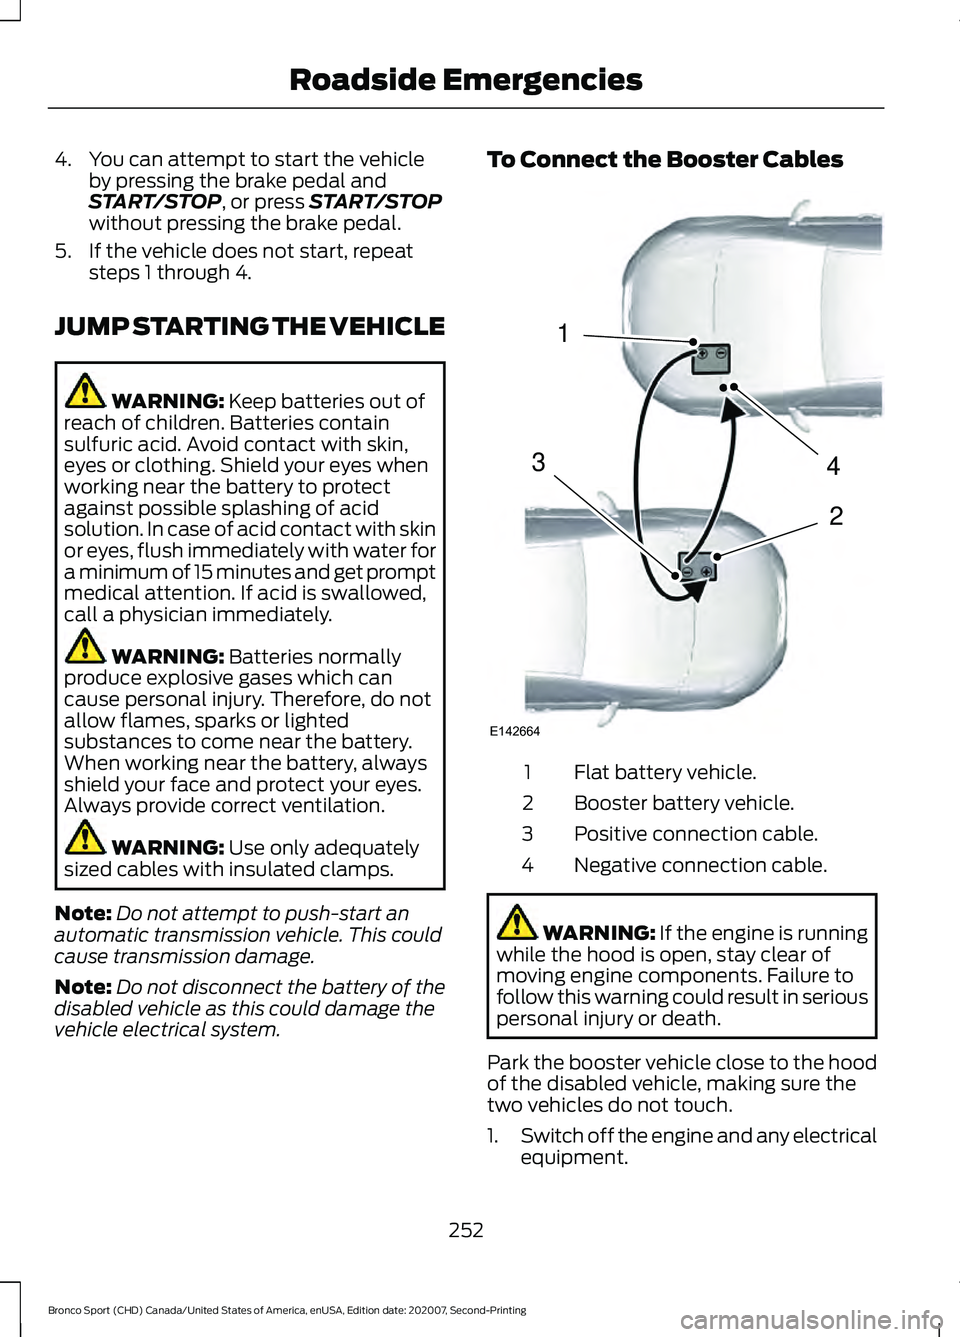
vehicle electrical system. To Connect the Booster Cables
Flat battery vehicle.
1
Booster battery vehicle.
2
Positive connection cable.
3
Negative connection cable.
4 WARNING: If the engine is running
while the hood is open, stay clear of
moving engine components. Failure to
follow this warning could result in serious
personal injury or death.
Park the booster vehicle close to the hood
of the disabled vehicle, making sure the
two vehicles do not touch.
1. Switch off the engine and any electrical
equipment.
252
Bronco Sport (CHD) Canada/United States of America, enUSA, Edition date: 202007, Second-Printing Roadside Emergencies4
2
1
3
E142664
Page 256 of 471
2.
Connect the positive (+) jumper cable
to the positive (+) terminal of the
discharged battery.
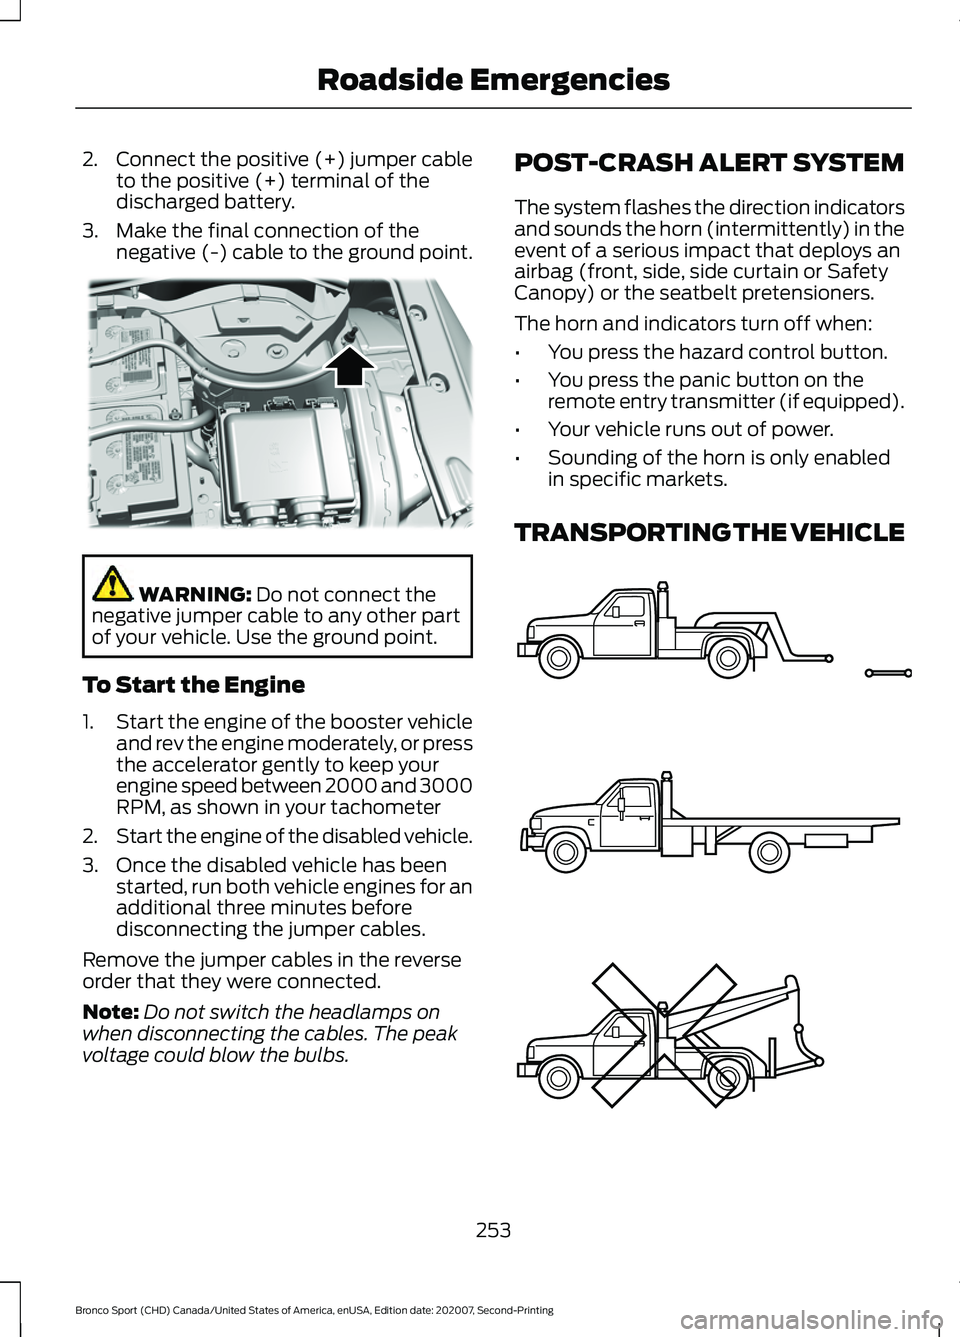
3. Make the final connection of the negative (-) cable to the ground point. WARNING: Do not connect the
negative jumper cable to any other part
of your vehicle. Use the ground point.
To Start the Engine
1. Start the engine of the booster vehicle
and rev the engine moderately, or press
the accelerator gently to keep your
engine speed between 2000 and 3000
RPM, as shown in your tachometer
2. Start the engine of the disabled vehicle.
3. Once the disabled vehicle has been started, run both vehicle engines for an
additional three minutes before
disconnecting the jumper cables.
Remove the jumper cables in the reverse
order that they were connected.
Note: Do not switch the headlamps on
when disconnecting the cables. The peak
voltage could blow the bulbs. POST-CRASH ALERT SYSTEM
The system flashes the direction indicators
and sounds the horn (intermittently) in the
event of a serious impact that deploys an
airbag (front, side, side curtain or Safety
Canopy) or the seatbelt pretensioners.
The horn and indicators turn off when:
•
You press the hazard control button.
• You press the panic button on the
remote entry transmitter (if equipped).
• Your vehicle runs out of power.
• Sounding of the horn is only enabled
in specific markets.
TRANSPORTING THE VEHICLE 253
Bronco Sport (CHD) Canada/United States of America, enUSA, Edition date: 202007, Second-Printing Roadside EmergenciesE318342 E143886