2021 DODGE CHALLENGER spare tire location
[x] Cancel search: spare tire locationPage 7 of 328

5
TRAILER TOWING ............................................... 111 Common Towing Definitions ......................... 111Trailer Hitch Classification ............................ 113
Trailer Towing Weights (Maximum Trailer
Weight Ratings) ............................................. 113
Trailer And Tongue Weight ........................... 114
Towing Requirements ................................... 114Towing Tips ................................................... 116
RECREATIONAL TOWING
(BEHIND MOTORHOME) ..................................... 117
DRIVING TIPS ....................................................... 117
Driving On Slippery Surfaces ........................ 117
Driving Through Water ................................. 118
MULTIMEDIA
UCONNECT SYSTEMS ......................................... 119
CYBERSECURITY ................................................. 119
UCONNECT SETTINGS ........................................ 120Customer Programmable Features .............. 120
UCONNECT INTRODUCTION................................ 135
System Overview .......................................... 135
Drag & Drop Menu Bar ................................. 138Safety And General Information ................... 138
UCONNECT MODES ............................................. 139
Steering Wheel Audio Controls ..................... 139
Radio Mode .................................................. 140
Media Mode .................................................. 148
Phone Mode ................................................. 150 ANDROID AUTO™ & APPLE CARPLAY® —
IF EQUIPPED ........................................................ 161
Android Auto™ .............................................. 161
Apple CarPlay® ............................................. 163Android Auto™ And Apple CarPlay®
Tips And Tricks .............................................. 165
PERFORMANCE PAGES...................................... 165
Home.............................................................. 166
Timers ............................................................ 168
Gauges ........................................................... 170
G-Force........................................................... 171
Engine ............................................................ 172
Dynamometer (Dyno) .................................... 172
DODGE DRIVE MODES — IF EQUIPPED ............ 173
Performance Control — If Equipped ............. 173
RADIO OPERATION AND MOBILE PHONES ..... 177
Regulatory And Safety Information .............. 177
SAFETY
SAFETY FEATURES .............................................. 178 Anti-Lock Brake System (ABS) ..................... 178
Electronic Brake Control (EBC) System ...... 179
AUXILIARY DRIVING SYSTEMS.......................... 184
Blind Spot Monitoring (BSM) —
If Equipped..................................................... 184Forward Collision Warning (FCW) Operation —
If Equipped..................................................... 187Tire Pressure Monitoring System (TPMS) .... 189 OCCUPANT RESTRAINT SYSTEMS ................... 192
Occupant Restraint Systems Features ....... 192
Important Safety Precautions ...................... 192
Seat Belt Systems ........................................ 193
Supplemental Restraint Systems (SRS) ...... 199Child Restraints ............................................ 208
SAFETY TIPS ........................................................ 223
Transporting Passengers.............................. 223
Transporting Pets ......................................... 223
Safety Checks You Should Make Inside
The Vehicle ................................................... 223
Periodic Safety Checks You Should Make
Outside The Vehicle ...................................... 225
Exhaust Gas................................................... 225
Carbon Monoxide Warnings ......................... 225
IN CASE OF EMERGENCY
HAZARD WARNING FLASHERS ......................... 226
ASSIST AND SOS MIRROR — IF EQUIPPED...... 226
JACKING AND TIRE CHANGING ......................... 229 Preparations For Jacking .............................. 230
Jack Location/Spare Tire Stowage ............. 230
Jacking And Changing A Tire ....................... 231
TIRE SERVICE KIT — IF EQUIPPED ..................... 234
Tire Service Kit Storage ................................ 234
Tire Service Kit Components And Operation ...234
Tire Service Kit Usage Precautions .............. 235
Sealing A Tire With Tire Service Kit .............. 236
21_LA_OM_EN_USC_t.book Page 5
Page 232 of 328

230IN CASE OF EMERGENCY
PREPARATIONS FOR JACKING
1. Park the vehicle on a firm, level surface as far
from the edge of the roadway as possible.
Avoid icy or slippery areas.
2. Turn on the Hazard Warning Flashers.
3. Apply the parking brake.
4. Place the gear selector into PARK (automatic transmission) or FIRST gear (manual
transmission).
5. Turn the ignition OFF.
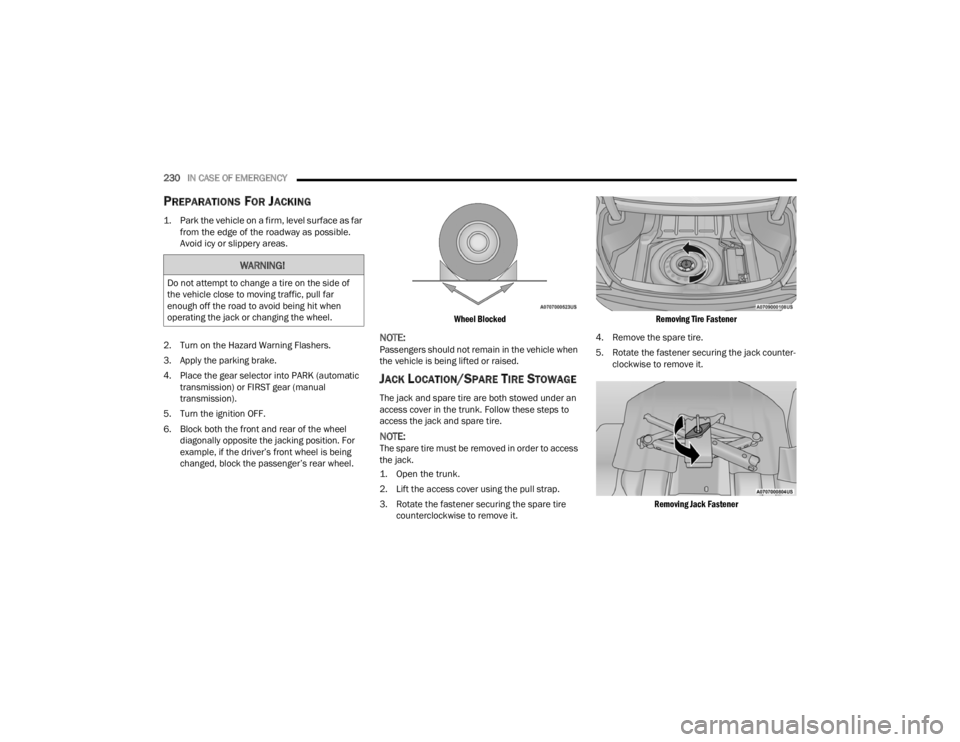
6. Block both the front and rear of the wheel diagonally opposite the jacking position. For
example, if the driver’s front wheel is being
changed, block the passenger’s rear wheel.
Wheel Blocked
NOTE:Passengers should not remain in the vehicle when
the vehicle is being lifted or raised.
JACK LOCATION/SPARE TIRE STOWAGE
The jack and spare tire are both stowed under an
access cover in the trunk. Follow these steps to
access the jack and spare tire.
NOTE:The spare tire must be removed in order to access
the jack.
1. Open the trunk.
2. Lift the access cover using the pull strap.
3. Rotate the fastener securing the spare tire
counterclockwise to remove it.
Removing Tire Fastener
4. Remove the spare tire.
5. Rotate the fastener securing the jack counter -
clockwise to remove it.
Removing Jack Fastener
WARNING!
Do not attempt to change a tire on the side of
the vehicle close to moving traffic, pull far
enough off the road to avoid being hit when
operating the jack or changing the wheel.
21_LA_OM_EN_USC_t.book Page 230
Page 233 of 328

IN CASE OF EMERGENCY231
(Continued)
6. Remove the jack and lug wrench assembly
from under the spare tire. Turn the jack screw
to the left to loosen the lug wrench, and
remove the wrench from the jack assembly.
JACKING AND CHANGING A TIRE
Jack Warning Label
Placement for the front and rear jacking locations
are critical. See the following images for proper
jacking locations.
Jack Engagement Locations
WARNING!
A loose tire or jack thrown forward in a collision or
hard stop could endanger the occupants of the
vehicle. Always stow the jack parts and the spare
tire in the places provided. Have the deflated (flat)
tire repaired or replaced immediately.
WARNING!
Carefully follow these tire changing warnings to
help prevent personal injury or damage to your
vehicle:
Always park on a firm, level surface as far from
the edge of the roadway as possible before
raising the vehicle.
Turn on the Hazard Warning Flashers.
Apply the parking brake firmly and place an
automatic transmission in PARK; a manual
transmission in REVERSE or FIRST gear.
Block the wheel diagonally opposite the wheel
to be raised.
Never start or run the engine with the vehicle
on a jack.
Do not let anyone sit in the vehicle when it is
on a jack.
Do not get under the vehicle when it is on a
jack. If you need to get under a raised vehicle,
take it to a service center where it can be
raised on a lift.
Only use the jack in the positions indicated
and for lifting this vehicle during a tire change.
If working on or near a roadway, be extremely
careful of motor traffic.
WARNING!
CAUTION!
Do not attempt to raise the vehicle by jacking on
locations other than those indicated in the
Jacking Instructions for this vehicle.7
21_LA_OM_EN_USC_t.book Page 231
Page 234 of 328

232IN CASE OF EMERGENCY
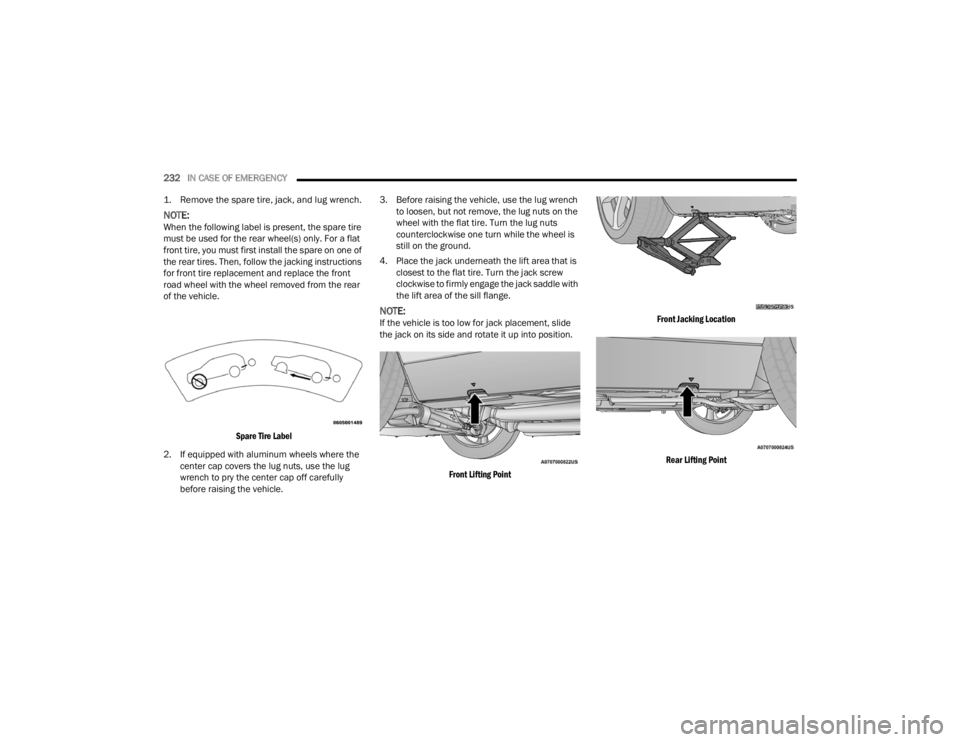
1. Remove the spare tire, jack, and lug wrench.
NOTE:When the following label is present, the spare tire
must be used for the rear wheel(s) only. For a flat
front tire, you must first install the spare on one of
the rear tires. Then, follow the jacking instructions
for front tire replacement and replace the front
road wheel with the wheel removed from the rear
of the vehicle.
Spare Tire Label
2. If equipped with aluminum wheels where the center cap covers the lug nuts, use the lug
wrench to pry the center cap off carefully
before raising the vehicle. 3. Before raising the vehicle, use the lug wrench
to loosen, but not remove, the lug nuts on the
wheel with the flat tire. Turn the lug nuts
counterclockwise one turn while the wheel is
still on the ground.
4. Place the jack underneath the lift area that is closest to the flat tire. Turn the jack screw
clockwise to firmly engage the jack saddle with
the lift area of the sill flange.
NOTE:If the vehicle is too low for jack placement, slide
the jack on its side and rotate it up into position.
Front Lifting Point Front Jacking Location
Rear Lifting Point
21_LA_OM_EN_USC_t.book Page 232
Page 235 of 328

IN CASE OF EMERGENCY233
Rear Jacking Location
5. Raise the vehicle just enough to remove the flat tire and install the spare tire.
6. Remove the lug nuts and tire.
7. Mount the spare tire.
Mounting Spare Tire
NOTE:For vehicles so equipped, do not attempt to install
a center cap or wheel cover on the compact spare
Ú
page 292.
8. Install the lug nuts with the cone shaped end of the lug nut toward the wheel. Lightly tighten
the lug nuts. 9. Lower the vehicle to the ground by turning the
jack handle counterclockwise.
10. Finish tightening the wheel bolts. Push down on the wrench while at the end of the handle
for increased leverage. Tighten the wheel bolts
in a star pattern until each wheel bolt has been
tightened twice Úpage 301. If in doubt about
the correct tightness, have them checked with
a torque wrench by an authorized dealer or at
a service station.
11. Stow the jack, tools and flat tire. Make sure the base of the jack faces the front of the vehicle
before tightening down the fastener.
WARNING!
Raising the vehicle higher than necessary can
make the vehicle less stable. It could slip off the
jack and hurt someone near it. Raise the vehicle
only enough to remove the tire.
CAUTION!
Be sure to mount the spare tire with the valve
stem facing outward. The vehicle could be
damaged if the spare tire is mounted incorrectly.
WARNING!
To avoid the risk of forcing the vehicle off the
jack, do not tighten the wheel nuts fully until the
vehicle has been lowered. Failure to follow this
warning may result in serious injury.
WARNING!
A loose tire or jack thrown forward in a collision
or hard stop could endanger the occupants of
the vehicle. Always stow the jack parts and the
spare tire in the places provided. Have the
deflated (flat) tire repaired or replaced
immediately.
7
21_LA_OM_EN_USC_t.book Page 233
Page 274 of 328

272SERVICING AND MAINTENANCE
Rear Interior Fuses
There is also a power distribution center located in
the trunk under the spare tire access panel. This
center contains fuses and relays. Fuse cavity
location and descriptions are printed on the inside
of the power distribution center cover.
Rear Power Distribution Center
CAUTION!
When installing the power distribution center
cover, it is important to ensure the cover is
properly positioned and fully latched. Failure
to do so may allow water to get into the power
distribution center and possibly result in an
electrical system failure.
When replacing a blown fuse, it is important to
use only a fuse having the correct amperage
rating. The use of a fuse with a rating other
than indicated may result in a dangerous elec-
trical system overload. If a properly rated fuse
continues to blow, it indicates a problem in the
circuit that must be corrected.
Cavity Cartridge Fuse Mini-FuseDescription
* If Equipped
F02 60 Amp Yellow –Front PDC Feed #1
F03 ––Spare
F04 60 Amp Yellow –Front PDC Feed #2
F05 30 Amp Pink
–Sunroof
20 Amp Blue – Police Dome Lamp – Police
F06 40 Amp Green –Exterior Lighting #1
F07 40 Amp Green –Exterior Lighting #2
F08 30 Amp Pink –Interior Lighting
21_LA_OM_EN_USC_t.book Page 272
Page 287 of 328

SERVICING AND MAINTENANCE285
Tire Loading And Tire Pressure
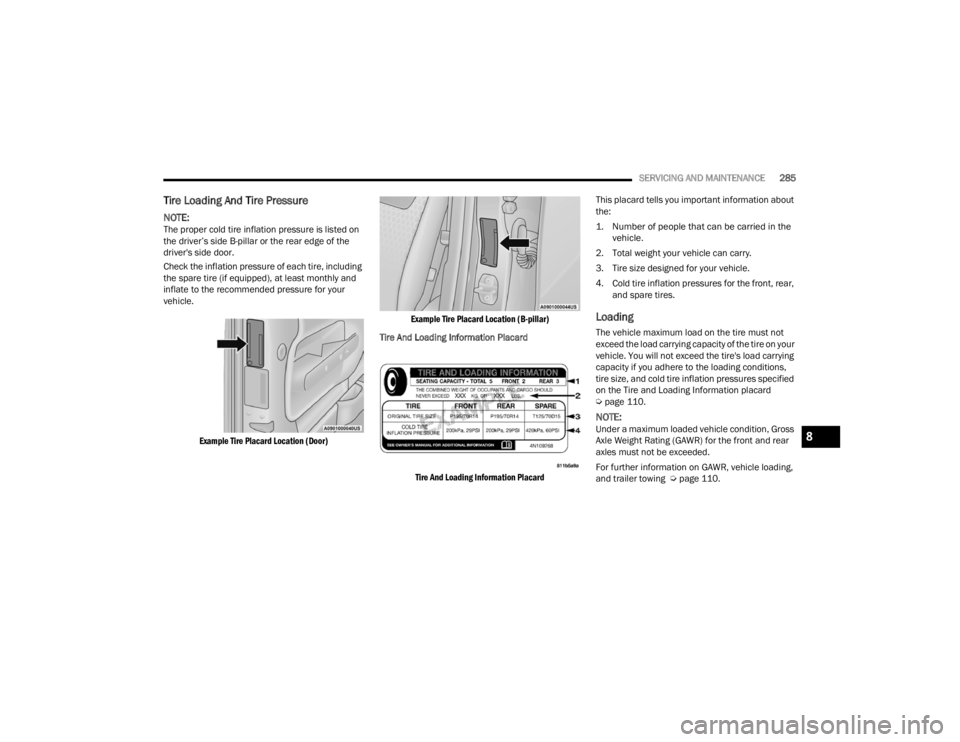
NOTE:The proper cold tire inflation pressure is listed on
the driver’s side B-pillar or the rear edge of the
driver's side door.
Check the inflation pressure of each tire, including
the spare tire (if equipped), at least monthly and
inflate to the recommended pressure for your
vehicle.
Example Tire Placard Location (Door) Example Tire Placard Location (B-pillar)
Tire And Loading Information Placard
Tire And Loading Information Placard
This placard tells you important information about
the:
1. Number of people that can be carried in the
vehicle.
2. Total weight your vehicle can carry.
3. Tire size designed for your vehicle.
4. Cold tire inflation pressures for the front, rear, and spare tires.
Loading
The vehicle maximum load on the tire must not
exceed the load carrying capacity of the tire on your
vehicle. You will not exceed the tire's load carrying
capacity if you adhere to the loading conditions,
tire size, and cold tire inflation pressures specified
on the Tire and Loading Information placard
Úpage 110.
NOTE:Under a maximum loaded vehicle condition, Gross
Axle Weight Rating (GAWR) for the front and rear
axles must not be exceeded.
For further information on GAWR, vehicle loading,
and trailer towing Ú page 110.8
21_LA_OM_EN_USC_t.book Page 285
Page 315 of 328

313
Autostick Operation
.................................................... 91Axle Fluid....................................................... 307Axle Lubrication............................................. 307
B
Back-Up......................................................... 108Battery.................................................... 70, 254Charging System Light................................. 70Keyless Key Fob Replacement.................... 14Location.................................................... 254Belts, Seat..................................................... 223Blind Spot Monitoring.................................... 184BluetoothConnecting To A Particular Mobile Phone Or Audio Device After Pairing
................154Body Mechanism Lubrication........................ 260B-Pillar Location............................................. 285Brake Assist System...................................... 179Brake Control System.................................... 179Brake Fluid.......................................... 265, 307Brake System...................................... 265, 301Fluid Check..................................... 265, 307Master Cylinder......................................... 265Parking........................................................ 82Warning Light..................................... 70, 301
Brake/Transmission Interlock......................... 87Break-In Recommendations, New Vehicle....... 82Brightness, Interior Lights................................ 45Bulb Replacement........................................ 276Bulbs, Light.......................................... 225, 276
C
Camera, Rear................................................ 108Capacities, Fluid........................................... 305Caps, FillerFuel.......................................................... 109Oil (Engine)............................................... 251Radiator (Coolant Pressure)..................... 264Car Washes................................................... 298Carbon Monoxide Warning............................ 225CargoVehicle Loading........................................ 110CD................................................................. 148Cellular Phone.............................................. 177Certification Label......................................... 110Chains, Tire................................................... 295Chart, Tire Sizing........................................... 281Check Engine Light
(Malfunction Indicator Light)............................ 77Checking Your Vehicle For Safety................. 223Checks, Safety.............................................. 223Child Restraint.............................................. 208
Child RestraintsBooster Seats........................................... 211Child Seat Installation............................... 221How To Stow An unused ALR Seat Belt..... 217Infant And Child Restraints....................... 210Lower Anchors And Tethers For Children.. 213Older Children And Child Restraints.......... 210Seating Positions...................................... 212Clean Air Gasoline......................................... 303CleaningWheels...................................................... 294Climate Control................................................48Cold Weather Operation...................................81Compact Spare Tire...................................... 292Contract, Service........................................... 309Controls........................................................ 140Cooling Pressure Cap (Radiator Cap)............ 264Cooling System............................................. 262Adding Coolant (Antifreeze)...................... 263Coolant Level................................... 262, 264Cooling Capacity....................................... 305Disposal Of Used Coolant......................... 264Drain, Flush, And Refill............................. 262Inspection................................................. 264Points To Remember................................ 264Pressure Cap............................................ 264Radiator Cap............................................. 264Selection Of Coolant (Antifreeze)......................... 263, 305, 306
11
21_LA_OM_EN_USC_t.book Page 313