2021 DODGE CHALLENGER change time
[x] Cancel search: change timePage 124 of 328

122MULTIMEDIA
Units
Display Brightness With Headlights OFF This setting will allow you to set the brightness when the headlights are off. To
access this setting, Display Mode must be set to Manual. The “+” setting will increase the brightness; the “-” will decrease the brightness.
Set Theme This setting will allow you to change the display theme.
Touchscreen Beep This setting will allow you to turn the touchscreen beep on or off.
Control Screen Timeout This setting will allow you to set the Control Screen to turn off automatically
after five seconds or stay open until manually closed.
Navigation Next Turn Pop-ups Displayed in Cluster This setting will display navigation prompts in the Instrument Cluster Display.
Setting Name Description
When the Units button is pressed on the touchscreen, the system displays the different measurement options. The selected unit of measurement will display
in the instrument cluster display and Navigation system (if equipped). The available settings are:
NOTE:Depending on the vehicle’s options, feature settings may vary.
Setting NameDescription
USThis setting will change the unit of measurement on the display to US.
Metric This setting will change the unit of measurement on the display to Metric.
Custom
This setting changes the “Speed” (MPH or km/h), “Distance” (mi or km), “Fuel
Consumption” (MPG [US], MPG [UK], L/100 km, or km/L), “Pressure” (psi, kPa, or bar), and “Temperature” (°C or °F) units of measurement independently.
21_LA_OM_EN_USC_t.book Page 122
Page 125 of 328

MULTIMEDIA123
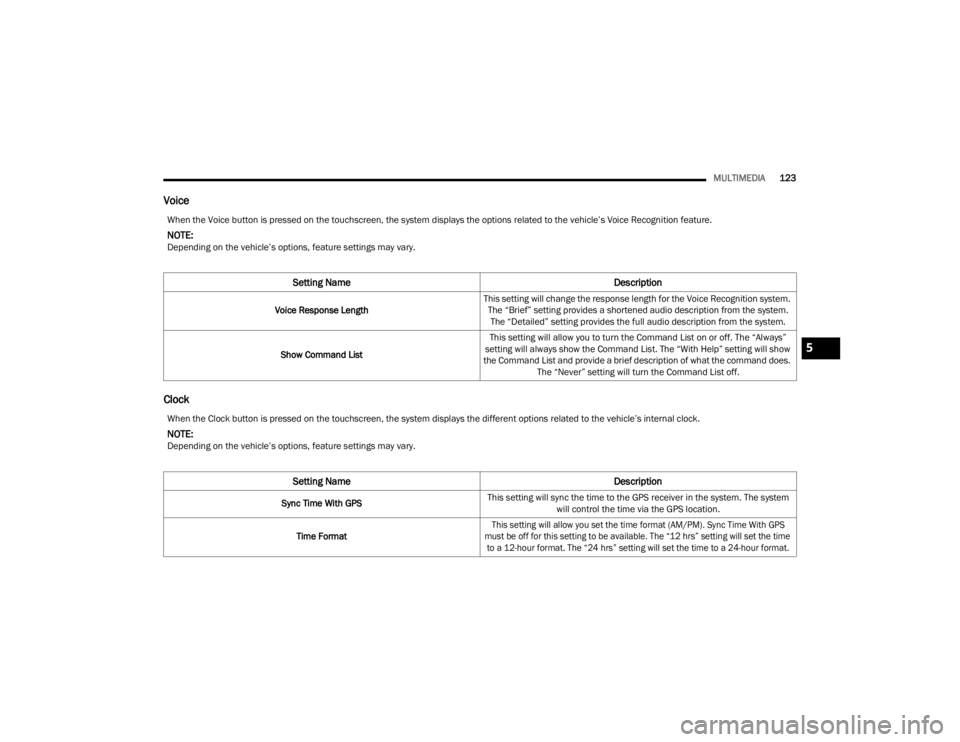
Voice
Clock
When the Voice button is pressed on the touchscreen, the system displays the options related to the vehicle’s Voice Recognition feature.
NOTE:Depending on the vehicle’s options, feature settings may vary.
Setting Name Description
Voice Response LengthThis setting will change the response length for the Voice Recognition system.
The “Brief” setting provides a shortened audio description from the system. The “Detailed” setting provides the full audio description from the system.
Show Command List This setting will allow you to turn the Command List on or off. The “Always”
setting will always show the Command List. The “With Help” setting will show
the Command List and provide a brief description of what the command does. The “Never” setting will turn the Command List off.
When the Clock button is pressed on the touchscreen, the system displays the different options related to the vehicle’s internal clock.
NOTE:Depending on the vehicle’s options, feature settings may vary.
Setting Name Description
Sync Time With GPSThis setting will sync the time to the GPS receiver in the system. The system
will control the time via the GPS location.
Time Format
This setting will allow you set the time format (AM/PM). Sync Time With GPS
must be off for this setting to be available. The “12 hrs” setting will set the time to a 12-hour format. The “24 hrs” setting will set the time to a 24-hour format.
5
21_LA_OM_EN_USC_t.book Page 123
Page 127 of 328

MULTIMEDIA125
Safety/Assistance
When the Safety/Assistance button is selected on the touchscreen, the system displays the options related to the vehicle’s safety settings. These options will
differ depending on the features equipped on the vehicle. The settings may display in list form or within subfolders on the screen. To access a subfolder, select
the desired folder; the available options related to that feature will then display on the screen.
NOTE:Depending on the vehicle’s options, feature settings may vary.
Setting Name Description
Forward Collision Warning SensitivityThis setting will change the distance at which the Forward Collision Warning
(FCW) alert sounds. The “Medium” setting will have the FCW system signal when an object is in view, and the possibility of a collision is detected. The
“Near” setting will have the FCW system signal when the object is closer to the
vehicle. The “Far” setting will have the FCW system signal when an object is at a far distance from the vehicle.
Forward Collision Warning
This setting will turn the Forward Collision Warning system on or off. The “Off” setting
will deactivate the FCW system. The “Warning Only” setting will provide only an
audible chime when a collision is detected. The “Warning + Active Braking” setting
will provide an audible chime and apply brake pressure when a collision is detected.
ParkSense This setting will change the type of ParkSense alert when a close object is
detected and provide both an audible chime and a visual display.
Rear ParkSense Volume This setting adjusts the volume of the Rear ParkSense system. The available
settings are “Low”, “Medium”, and “High”.
Blind Spot Alert This setting will change the type of alert provided when an object is detected
in a vehicle’s blind spot. The “Off” setting will turn off Blind Spot Alert. The
“Lights” setting will activate the Blind Spot Alert lights on the outside mirrors. The “Lights & Chime” setting will activate both the lights on the outside mirrors and an audible chime.5
21_LA_OM_EN_USC_t.book Page 125
Page 130 of 328

128MULTIMEDIA
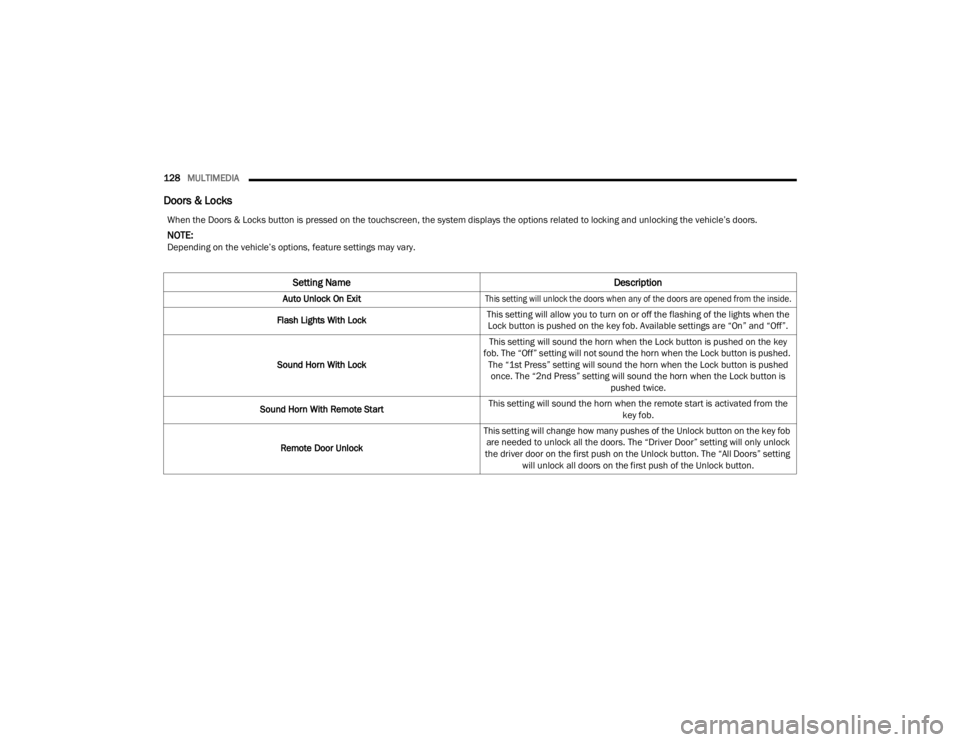
Doors & Locks
When the Doors & Locks button is pressed on the touchscreen, the system displays the options related to locking and unlocking the vehicle’s doors.
NOTE:Depending on the vehicle’s options, feature settings may vary.
Setting Name Description
Auto Unlock On Exit
This setting will unlock the doors when any of the doors are opened from the inside.
Flash Lights With Lock This setting will allow you to turn on or off the flashing of the lights when the
Lock button is pushed on the key fob. Available settings are “On” and “Off”.
Sound Horn With Lock This setting will sound the horn when the Lock button is pushed on the key
fob. The “Off” setting will not sound the horn when the Lock button is pushed. The “1st Press” setting will sound the horn when the Lock button is pushed once. The “2nd Press” setting will sound the horn when the Lock button is pushed twice.
Sound Horn With Remote Start This setting will sound the horn when the remote start is activated from the
key fob.
Remote Door Unlock This setting will change how many pushes of the Unlock button on the key fob
are needed to unlock all the doors. The “Driver Door” setting will only unlock
the driver door on the first push on the Unlock button. The “All Doors” setting will unlock all doors on the first push of the Unlock button.
21_LA_OM_EN_USC_t.book Page 128
Page 133 of 328

MULTIMEDIA131
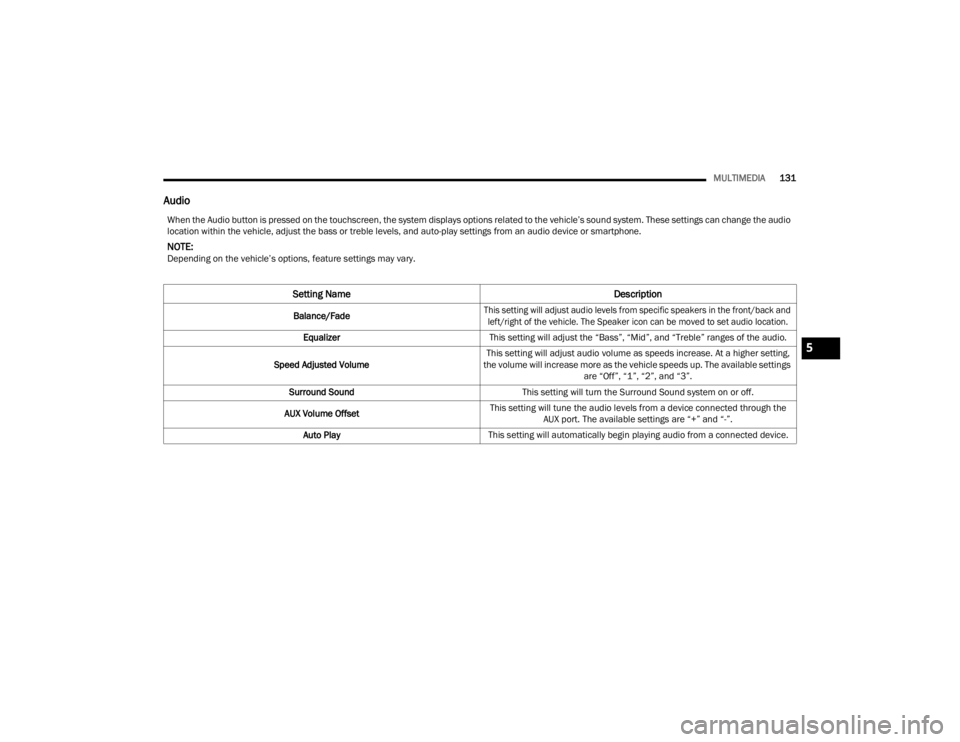
Audio
When the Audio button is pressed on the touchscreen, the system displays options related to the vehicle’s sound system. These settings can change the audio
location within the vehicle, adjust the bass or treble levels, and auto-play settings from an audio device or smartphone.
NOTE:Depending on the vehicle’s options, feature settings may vary.
Setting Name Description
Balance/Fade
This setting will adjust audio levels from specific speakers in the front/back and
left/right of the vehicle. The Speaker icon can be moved to set audio location.
Equalizer This setting will adjust the “Bass”, “Mid”, and “Treble” ranges of the audio.
Speed Adjusted Volume This setting will adjust audio volume as speeds increase. At a higher setting,
the volume will increase more as the vehicle speeds up. The available settings are “Off”, “1”, “2”, and “3”.
Surround Sound This setting will turn the Surround Sound system on or off.
AUX Volume Offset This setting will tune the audio levels from a device connected through the
AUX port. The available settings are “+” and “-”.
Auto Play This setting will automatically begin playing audio from a connected device.
5
21_LA_OM_EN_USC_t.book Page 131
Page 135 of 328

MULTIMEDIA133
Restore Settings
Channel Skip This setting allows you to set channels that you wish to skip. A channel list will
display of the skipped channels.
Subscription Information This menu provides SiriusXM® subscription information. SiriusXM® Travel
Link is a separate subscription.
Setting Name Description
When the Restore Settings button is pressed on the touchscreen, the system displays the options related to resetting the Uconnect system back to its default
settings. These settings can clear personal data and reset selected settings from other menus.
NOTE:Depending on the vehicle’s options, feature settings may vary.
Setting NameDescription
Restore SettingsThis setting will return all the previously changed settings to their factory
default.
Reset App Drawer This setting will reset the app drawer to its factory default layout.
Clear Personal Data This setting will display a pop-up that gives you the option to clear all personal
data from the system, including Bluetooth® devices and presets.
5
21_LA_OM_EN_USC_t.book Page 133
Page 143 of 328

MULTIMEDIA141
Direct Tune
Press the Tune button located at the bottom of the
radio screen to directly tune to a desired radio
station or channel.
Press the available number button on the
touchscreen to begin selecting a desired station.
Once a number has been entered, any numbers
that are no longer possible (stations that cannot be
reached) will become deactivated/grayed out.
Undo
You can backspace an entry by pressing the Back button on the touchscreen.
GO
Once the last digit of a station has been entered,
press “Ok”. The Direct Tune screen will close, and
the system will automatically tune to that station.
RADIO VOICE COMMANDS
Use your voice to quickly get to the AM, FM, or
SiriusXM® Satellite Radio stations you would like
to hear. (Subscription or included SiriusXM®
Satellite Radio trial required.)
Push the VR button on the steering wheel and
wait for the beep to say a command. See an
example below:
“ Tune to ninety-five-point-five FM”
“Tune to Satellite Channel Hits 1” Did You Know:
At any time, if you are not sure of
what to say or want to learn a Voice Command,
push the VR button and say “ Help”. The system
provides you with a list of commands.
SiriusXM® Satellite Radio Mode —
If Equipped
Uconnect 4 With 7-inch Display Changing To SiriusXM®
SiriusXM® Satellite Radio uses direct
satellite-to-receiver broadcasting technology to
provide clear, coast-to-coast radio content.
SiriusXM® is a subscription-based service.
Visit
siriusxm.com/getallaccess or review your
SiriusXM® Radio pamphlet in your Owner’s
Manual kit for more information. SiriusXM® services require subscriptions, sold
separately after the trial included with the new
vehicle purchase. If you decide to continue your
service at the end of your trial subscription, the
plan you choose will automatically renew and bill at
then-current rates until you call SiriusXM® at
866-635-2349 to cancel. See SiriusXM®
Customer Agreement for complete terms at
www.siriusxm.com (US) or www.siriusxm.ca
(Canada).
All fees and programming subject to change.
SiriusXM® satellite service is available only to
those at least 18 and older in the 48 contiguous
US and D.C. Our SiriusXM® satellite service is also
available in Canada and Puerto Rico (with
coverage limitations). SiriusXM® Internet radio
service is available throughout their satellite
service area and in AK. © 2021 SiriusXM® Radio
Inc. SiriusXM® and all related marks and logos are
trademarks of SiriusXM® Radio Inc.
This functionality is only available for radios
equipped with a Satellite receiver. In order to
receive satellite radio, the vehicle needs to be
outside with a clear view to the sky.
If the screen shows “Acquiring Signal”, you might
have to change the vehicle’s position in order to
receive a signal. In most cases, the satellite radio
does not receive a signal in underground parking
garages or tunnels.
5
21_LA_OM_EN_USC_t.book Page 141
Page 151 of 328

MULTIMEDIA149
AUX MODE
Overview
Auxiliary Mode (AUX) is entered by inserting an AUX
device using a cable with a 3.5 mm audio jack into
the AUX port or by pressing the AUX button on the
left side of the touchscreen, or under the Source
Select button (if equipped) when a device is
already connected.
To insert an Auxiliary device, gently insert the
Auxiliary device cable into the AUX port. If you
insert an Auxiliary device with the ignition and the
radio on, the unit will switch to AUX Mode and
begin to play.
Controlling The Auxiliary Device
The control of the Auxiliary device (e.g., selecting
playlists, play, fast forward, etc.) cannot be
provided by the radio; use the device controls
instead. Adjust the volume with the Volume button,
Volume/Mute rotary knob, or the On/Off rotary
knob, or with the volume of the attached device.
NOTE:The radio unit is acting as the amplifier for audio
output from the Auxiliary device. Therefore, if the
volume control on the Auxiliary device is set too
low, there will be insufficient audio signal for the
radio unit to play the music on the device. Seek Up
/Seek Down
In USB Mode, press the Seek Up button on the
touchscreen for the next selection on the USB
device. Press and release the Seek Down button
on the touchscreen to return to the beginning of
the current selection, or to return to the beginning
of the previous selection if the USB device is within
the first three seconds of the current selection.
In Bluetooth® Mode, press and release the Seek
Up button on the touchscreen for the next
selection on the Bluetooth® device. Press and
release the Seek Down button on the touchscreen
to return to the beginning of the current selection,
or return to the beginning of the previous selection
if the Bluetooth® device is within the first second
of the current selection.
Browse
In USB Mode, press the Browse button on the
touchscreen to display the browse window. In USB
Mode, the left side of the browse window displays
a list of ways you can browse through the contents
of the USB device. If supported by the device, you
can browse by Folder, Artist, Playlist, Album, Song,
etc. Press the desired button on the touchscreen
on the left side of the screen. The center of the
browse window shows items and its sub-functions,
which can be scrolled through by pressing the Up
and Down buttons to the right. The Tune/Scroll
knob can also be used to scroll. Media Mode
In USB Mode, press the Media button on the
touchscreen to select the desired audio source:
USB.
In Bluetooth® Mode, press the Media button on
the touchscreen to select the desired audio
source: Bluetooth®.
In AUX Mode, press the Media button on the
touchscreen to select the desired audio source:
AUX.
Repeat
In USB Mode, press the Repeat button on the
touchscreen to toggle the repeat functionality. The
Repeat button on the touchscreen is highlighted
when active. The Radio will continue to play the
current track, repeatedly, as long as the repeat is
active. Press the Repeat button again to enter
Repeat All. The radio will continue to play all the
current tracks, repeatedly, as long as the repeat
function is active. To cancel Repeat, press the
Repeat button a third time.
Shuffle
In USB Mode, press the Shuffle button on the
touchscreen to play the selections on the USB
device in random order to provide an interesting
change of pace. Press the Shuffle button on the
touchscreen a second time to turn this feature off.
5
21_LA_OM_EN_USC_t.book Page 149