Page 290 of 414
08
288Press the MODE button then "Bluetooth Audio" to
start Bluetooth mode.
Pairing a telephone
In the Bluetooth menu on your telephone, select the
system name in the list of devices detected.
Enter the code "1212
" in the telephone and confirm. Select the telephone to connect then press this
button.
Press "Select Device to Connect".
Wait until the telephone detected is displayed.
Press SETTINGS
. Press "Edit" to connect the telephone.
Press "System " then "Pairing". You can register or delete a device in the list.
BLUETOOTH® STREAMING - TELEPHONE
Page 291 of 414
289
TOUCH SCREEN AUDIO-CD
system
The system is protected in such a way that it will only
operate in your vehicle.
01 First steps - Control panel
For safety reasons, the driver must carry out operations
which require prolonged attention while the vehicle is
stationary.
When the engine is switched off and to prevent
discharging of the battery, the system switches off
following the activation of the energy economy mode.
Contents
03
General
operation
02
Steering mounted
controls
04
Radio
05
Music
06
Bluetooth
® telephone p.
p. p.
p.
p.
p. 290
291
293
300
303
308
Page 295 of 414
03
293
GENERAL OPERATION
Description of controls - Menus
Setting:
-
switch of
f the screen,
-
adjust the touch beep,
-
adjust the time or display it continuously
,
-
select the guidance voice,
-
select the picture quality for the screen and reversing
camera,
-
select RDS.
FM
/
MW / LW: select a radio
station from:
-
frequency modulation (FM),
-
medium wave (MW),
-
long wave (L
W).
BT Audio: connect a Bluetooth
(2.0) telephone then play the
music files by streaming. AUX: connect a portable player
to the Jack auxiliary socket then
play the music files.
Phone: make or receive
telephone calls.
Change from one screen
to the other. Voice: use the voice
commands.
USB / iPod®: connect a
portable player by US b or an
iPod
®, then play the music files.
CD: play the music files
through the CD player
(WAV, MP3, WMA, AAC).
Page 298 of 414
03
296
GENERAL OPERATION
Level 1 Level 2 Level 3
The telephone must first
be connected by the
"Phone"
menu.
Page 299 of 414

297
Level 1
Level 2 Level 3 Comments
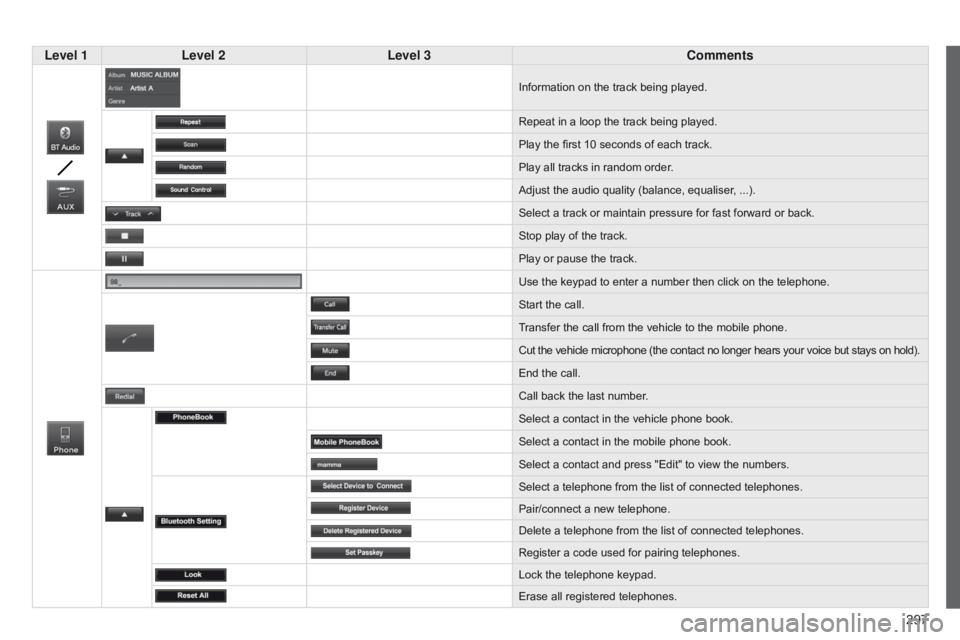
Information on the track being played.
Repeat in a loop the track being played.
Play the first 10
seconds of each track.
Play all tracks in random order.
Adjust the audio quality (balance, equaliser, ...).
Select a track or maintain pressure for fast forward or back.
Stop play of the track.
Play or pause the track.
Use the keypad to enter a number then click on the telephone.
Start the call.
Transfer the call from the vehicle to the mobile phone.
Cut the vehicle microphone (the contact no longer hears your voice but stays on hold).
End the call.
Call back the last number.
Select a contact in the vehicle phone book.
Select a contact in the mobile phone book.
Select a contact and press "Edit" to view the numbers.
Select a telephone from the list of connected telephones.
Pair/connect a new telephone.
Delete a telephone from the list of connected telephones.
Register a code used for pairing telephones.
Lock the telephone keypad.
Erase all registered telephones.
Page 301 of 414

299
Level 1
Level 2 Level 3 Comments
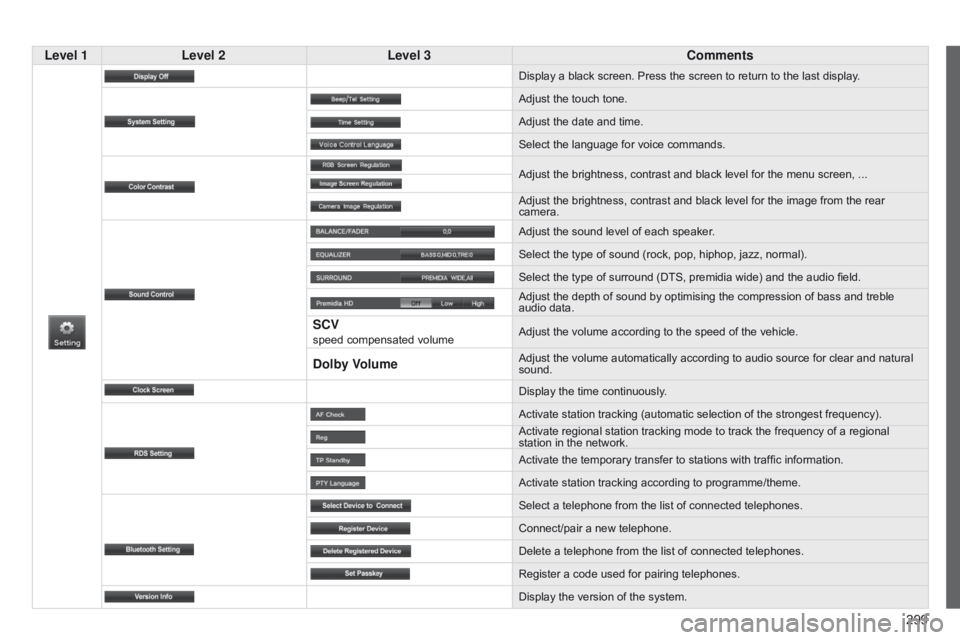
Display a black screen. Press the screen to return to the last display .
Adjust the touch tone.
Adjust the date and time.
Select the language for voice commands.
Adjust the brightness, contrast and black level for the menu screen, ...
Adjust the brightness, contrast and black level for the image from the rear
camera.
Adjust the sound level of each speaker.
Select the type of sound (rock, pop, hiphop, jazz, normal).
Select the type of surround (DTS, premidia wide) and the audio field.
Adjust the depth of sound by optimising the compression of bass and treble
audio data.
SCV speed compensated volume Adjust the volume according to the speed of the vehicle.
Dolby VolumeAdjust the volume automatically according to audio source for clear and natural
sound.
Display the time continuously.
Activate station tracking (automatic selection of the strongest frequency).
Activate regional station tracking mode to track the frequency of a regional
station in the network.
Activate the temporary transfer to stations with traffic information.
Activate station tracking according to programme/theme.
Select a telephone from the list of connected telephones.
Connect/pair a new telephone.
Delete a telephone from the list of connected telephones.
Register a code used for pairing telephones.
Display the version of the system.
Page 303 of 414

04
301
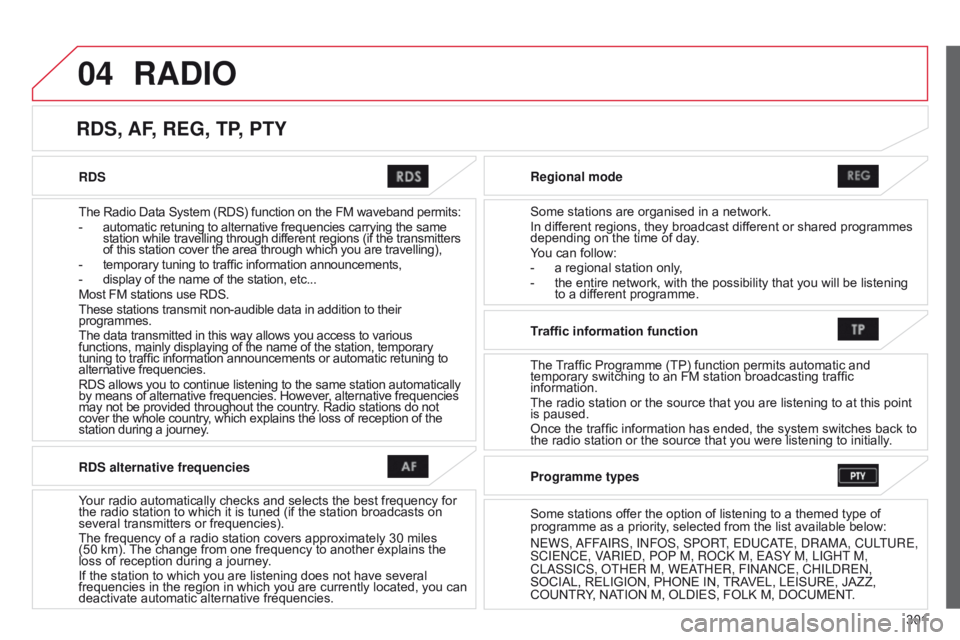
RDS
The Radio Data System (RDS) function on the FM waveband permits:
-
automatic retuning to alternative frequencies carrying the same
station while travelling through different regions (if the transmitters
of this station cover the area through which you are travelling),
-
temporary tuning to traffic information announcements,
-
display of the name of the station, etc...
Most FM stations use RDS.
These stations transmit non-audible data in addition to their
programmes.
The data transmitted in this way allows you access to various
functions, mainly displaying of the name of the station, temporary
tuning to traffic information announcements or automatic retuning to
alternative frequencies.
RDS allows you to continue listening to the same station automatically
by means of alternative frequencies. However, alternative frequencies
may not be provided throughout the country. Radio stations do not
cover the whole country, which explains the loss of reception of the
station during a journey. Regional mode
Some stations are organised in a network.
In different regions, they broadcast different or shared programmes
depending on the time of day.
You can follow:
-
a regional station only
,
-
the entire network, with the possibility that you will be listening
to a dif
ferent programme.
RDS, AF, REG, TP, PTY
RADIO
RDS alternative frequencies
Your radio automatically checks and selects the best frequency for
the radio station to which it is tuned (if the station broadcasts on
several transmitters or frequencies).
The frequency of a radio station covers approximately 30
miles
(50
km). The change from one frequency to another explains the
loss of reception during a journey.
If the station to which you are listening does not have several
frequencies in the region in which you are currently located, you can
deactivate automatic alternative frequencies. Traffic information function
The Traf
fi c Programme (TP) function permits automatic and
temporary switching to an FM station broadcasting traffic
information.
The radio station or the source that you are listening to at this point
is paused.
Once the traffic information has ended, the system switches back to
the radio station or the source that you were listening to initially .
Programme types
Some stations offer the option of listening to a themed type of
programme as a priority, selected from the list available below:
n
EWS,
a
FF
a
IRS, I n F o S, SP o RT, E d UC a
TE,
d R a M a , CULTURE,
SCIE
n CE, V
a
RIE d , P o P M, R o C k M, E a SY M, LIGHT M,
CL
a SSICS, o THER M, WE a
THER, FI
nan CE, CHIL d RE n ,
SOCIAL, RELIGION, PHONE IN, TRAVEL, LEISURE, JAZZ,
COUNTRY, NATION M, OLDIES, FOLK M, DOCUMENT.
Page 306 of 414
05
304
MUSIC
Using the USB port
With the vehicle stationary, ignition
switch in the LOCK position, connect
a suitable cable to the portable player.
The USB port is used to connect
a portable device (MP3 player, a
pple® player, ...). The files are sent
from the player to your audio system
and heard through the vehicle's
speakers.
Then connect the cable to the
vehicle's USB port.
Models supported:
-
iPod® 5th generation (video).
-
iPod classic® (2009).
-
iPod nano® 6th generation.
-
iPod nano® 3rd generation (video).
-
iPod touch® 4th generation.
-
iPhone 4S®.
-
USB memory sticks formatted F
AT32 (File Allocation Table)
only.
File formats: MP3, WMA, AAC, WAV.
-
Maximum number of levels (including root): 8.
-
Number of folders: 100.
-
Number of files: 255. T
o disconnect the cable, the ignition switch must be in the LOCK
position.
Take care not to trap the cable when closing the armrest.