2021 CHRYSLER VOYAGER remove seats
[x] Cancel search: remove seatsPage 47 of 348

GETTING TO KNOW YOUR VEHICLE45
Head Restraints — Second Row Quad
Seats
The second row outboard head restraints, as well
as the removable 8th passenger seat (if equipped),
may have adjustable head restraints.
NOTE:If equipped with Stow ‘n Go seating, the head
restraints are non-adjustable and non-removable.
Do not pull on non-adjustable head restraints
when folding the seat. To raise the head restraint, pull upward on the
head restraint. To lower the head restraint, push
the adjustment button, located at the base of the
head restraint, and push downward.
To remove the head restraint, raise it as far as it
can go. Then, push the release button and the
adjustment button at the base of each post while
pulling the head restraint up. Seatback angle may
need to be adjusted to fully remove the head
restraint. To reinstall the head restraint, put the
head restraint posts into the holes and push
downward. Then, adjust the head restraint to the
appropriate height.
Head Restraints — Second Row Bench
The second row bench seat is equipped with
adjustable head restraints.
To raise the head restraint, pull upward on the
head restraint. To lower the head restraint, push
the adjustment button, located at the base of the
head restraint, and push downward.
Bench Seat Head Restraint
To remove the head restraint, raise it as far as it
can go. Then, push the release button and the
adjustment button at the base of each post while
pulling the head restraint up. Seatback angle may
need to be adjusted to fully remove the head
restraint. To reinstall the head restraint, put the
head restraint posts into the holes and push
downward. Then, adjust the head restraint to the
appropriate height.
WARNING!
A loose head restraint thrown forward in a
collision or hard stop could cause serious
injury or death to occupants of the vehicle.
Always securely stow removed head restraints
in a location outside the occupant compart -
ment.
ALL the head restraints MUST be reinstalled in
the vehicle to properly protect the occupants.
Follow the reinstallation instructions above
prior to operating the vehicle or occupying a
seat.
1 — Release Button
2 — Adjustment Button
2
21_RUV_OM_EN_USC_t.book Page 45
Page 48 of 348

46GETTING TO KNOW YOUR VEHICLE
NOTE:For information on child restraint tethering, see Úpage 202.
Head Restraints — Third Row
The outboard head restraints can be manually
folded forward for improved rearward visibility. Pull
the release strap to fold them forward.
Release Straps
NOTE:
The head restraints must be raised manually
when occupying the third row.
Do not fold if there are passengers seated in the
third row seats.
The head restraint in the center position can be
raised and lowered for tether routing or height
adjustment
Úpage 202.
NOTE:To remove the center head restraint, raise it as far
as it can go. Then, push the release button and the
adjustment button at the base of each post while
pulling the head restraint up. To reinstall the head
restraint, put the head restraint posts into the
holes and push downward. Then, using the
adjustment button, adjust the head restraint to the
appropriate height.
Adjustment Button
WARNING!
A loose head restraint thrown forward in a
collision or hard stop could cause serious
injury or death to occupants of the vehicle.
Always securely stow removed head restraints
in a location outside the occupant compart -
ment.
ALL the head restraints MUST be reinstalled in
the vehicle to properly protect the occupants.
Follow the reinstallation instructions above
prior to operating the vehicle or occupying a
seat.
WARNING!
ALL the head restraints MUST be reinstalled in
the vehicle to properly protect the occupants.
Follow the reinstallation instructions above prior
to operating the vehicle or occupying a seat.
21_RUV_OM_EN_USC_t.book Page 46
Page 84 of 348

82GETTING TO KNOW YOUR VEHICLE
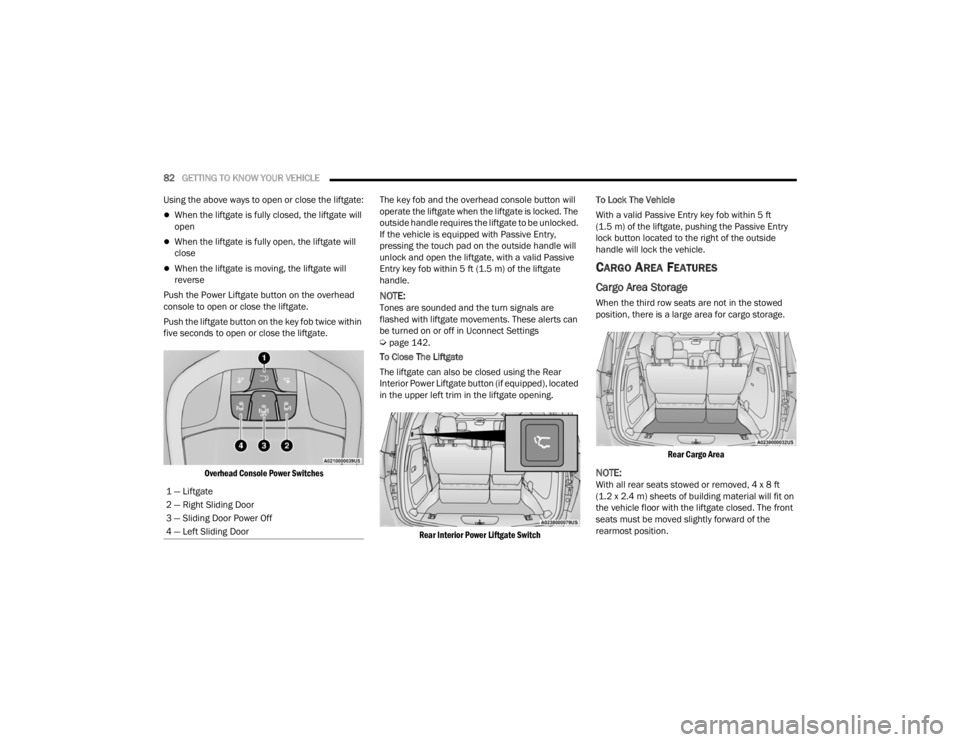
Using the above ways to open or close the liftgate:
When the liftgate is fully closed, the liftgate will
open
When the liftgate is fully open, the liftgate will
close
When the liftgate is moving, the liftgate will
reverse
Push the Power Liftgate button on the overhead
console to open or close the liftgate.
Push the liftgate button on the key fob twice within
five seconds to open or close the liftgate.
Overhead Console Power Switches
The key fob and the overhead console button will
operate the liftgate when the liftgate is locked. The
outside handle requires the liftgate to be unlocked.
If the vehicle is equipped with Passive Entry,
pressing the touch pad on the outside handle will
unlock and open the liftgate, with a valid Passive
Entry key fob within 5 ft (1.5 m) of the liftgate
handle.
NOTE:Tones are sounded and the turn signals are
flashed with liftgate movements. These alerts can
be turned on or off in Uconnect Settings
Úpage 142.
To Close The Liftgate
The liftgate can also be closed using the Rear
Interior Power Liftgate button (if equipped), located
in the upper left trim in the liftgate opening.
Rear Interior Power Liftgate Switch
To Lock The Vehicle
With a valid Passive Entry key fob within 5 ft
(1.5 m) of the liftgate, pushing the Passive Entry
lock button located to the right of the outside
handle will lock the vehicle.
CARGO AREA FEATURES
Cargo Area Storage
When the third row seats are not in the stowed
position, there is a large area for cargo storage.
Rear Cargo Area
NOTE:With all rear seats stowed or removed, 4 x 8 ft
(1.2 x 2.4 m) sheets of building material will fit on
the vehicle floor with the liftgate closed. The front
seats must be moved slightly forward of the
rearmost position.
1 — Liftgate
2 — Right Sliding Door
3 — Sliding Door Power Off
4 — Left Sliding Door
21_RUV_OM_EN_USC_t.book Page 82
Page 209 of 348

SAFETY207
Adjustable Upper Shoulder Belt Anchorage
In the front and second row outboard seats the
shoulder belt can be adjusted upward or
downward to position the seat belt away from your
neck. Push or squeeze the anchorage button to
release the anchorage, and move it up or down to
the position that serves you best.
Adjustable Anchorage
As a guide, if you are shorter than average, you will
prefer the shoulder belt anchorage in a lower
position, and if you are taller than average, you will
prefer the shoulder belt anchorage in a higher
position. After you release the anchorage button,
try to move it up or down to make sure that it is
locked in position.
NOTE:The adjustable upper shoulder belt anchorage is
equipped with an Easy Up feature. This feature
allows the shoulder belt anchorage to be adjusted
in the upward position without pushing or
squeezing the release button. To verify the
shoulder belt anchorage is latched, pull downward
on the shoulder belt anchorage until it is locked
into position.Second Row Center (If Equipped) And Third
Row Center Seat Belt Operating
Instructions
The second row center (if equipped) and third row
center seat belts feature a seat belt with a
mini-latch plate and buckle, which allows the seat
belt to detach from the lower anchor when the seat
is folded. The mini-latch plate and regular latch
plate can then be stored out of the way in the
headliner for added convenience to open up
utilization of the storage areas behind the front
seats when the seat is not occupied.
1. Remove the mini-latch plate and regular latch plate from its stowed position in the headliner
slightly behind the second or third row seat.
Mini-Latch Stowage
WARNING!
Wearing your seat belt incorrectly could make
your injuries in a collision much worse. You
might suffer internal injuries, or you could
even slide out of the seat belt. Follow these
instructions to wear your seat belt safely and
to keep your passengers safe, too.
Position the shoulder belt across the shoulder
and chest with minimal, if any slack so that it
is comfortable and not resting on your neck.
The retractor will withdraw any slack in the
shoulder belt.
Misadjustment of the seat belt could reduce
the effectiveness of the safety belt in a crash.
Always make all seat belt height adjustments
when the vehicle is stationary.
6
21_RUV_OM_EN_USC_t.book Page 207
Page 213 of 348

SAFETY211
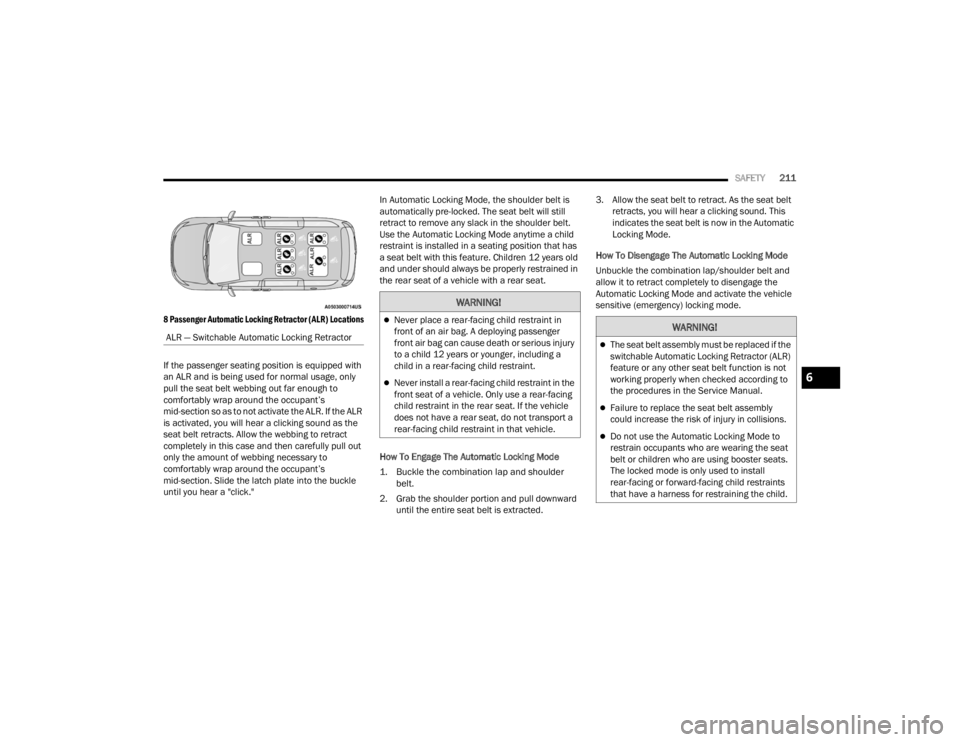
8 Passenger Automatic Locking Retractor (ALR) Locations
If the passenger seating position is equipped with
an ALR and is being used for normal usage, only
pull the seat belt webbing out far enough to
comfortably wrap around the occupant’s
mid-section so as to not activate the ALR. If the ALR
is activated, you will hear a clicking sound as the
seat belt retracts. Allow the webbing to retract
completely in this case and then carefully pull out
only the amount of webbing necessary to
comfortably wrap around the occupant’s
mid-section. Slide the latch plate into the buckle
until you hear a "click." In Automatic Locking Mode, the shoulder belt is
automatically pre-locked. The seat belt will still
retract to remove any slack in the shoulder belt.
Use the Automatic Locking Mode anytime a child
restraint is installed in a seating position that has
a seat belt with this feature. Children 12 years old
and under should always be properly restrained in
the rear seat of a vehicle with a rear seat.
How To Engage The Automatic Locking Mode
1. Buckle the combination lap and shoulder
belt.
2. Grab the shoulder portion and pull downward until the entire seat belt is extracted. 3. Allow the seat belt to retract. As the seat belt
retracts, you will hear a clicking sound. This
indicates the seat belt is now in the Automatic
Locking Mode.
How To Disengage The Automatic Locking Mode
Unbuckle the combination lap/shoulder belt and
allow it to retract completely to disengage the
Automatic Locking Mode and activate the vehicle
sensitive (emergency) locking mode.
ALR — Switchable Automatic Locking Retractor
WARNING!
Never place a rear-facing child restraint in
front of an air bag. A deploying passenger
front air bag can cause death or serious injury
to a child 12 years or younger, including a
child in a rear-facing child restraint.
Never install a rear-facing child restraint in the
front seat of a vehicle. Only use a rear-facing
child restraint in the rear seat. If the vehicle
does not have a rear seat, do not transport a
rear-facing child restraint in that vehicle.
WARNING!
The seat belt assembly must be replaced if the
switchable Automatic Locking Retractor (ALR)
feature or any other seat belt function is not
working properly when checked according to
the procedures in the Service Manual.
Failure to replace the seat belt assembly
could increase the risk of injury in collisions.
Do not use the Automatic Locking Mode to
restrain occupants who are wearing the seat
belt or children who are using booster seats.
The locked mode is only used to install
rear-facing or forward-facing child restraints
that have a harness for restraining the child.
6
21_RUV_OM_EN_USC_t.book Page 211
Page 229 of 348

SAFETY227
Older Children And Child Restraints
Children who are two years old or who have
outgrown their rear-facing convertible child seat
can ride forward-facing in the vehicle.
Forward-facing child seats and convertible child
seats used in the forward-facing direction are for
children who are over two years old or who have
outgrown the rear-facing weight or height limit of
their rear-facing convertible child seat. Children
should remain in a forward-facing child seat with a
harness for as long as possible, up to the highest
weight or height allowed by the child seat.
All children whose weight or height is above the
forward-facing limit for the child seat should use a
belt-positioning booster seat until the vehicle’s
seat belts fit properly. If the child cannot sit with
knees bent over the vehicle’s seat cushion while
the child’s back is against the seatback, they
should use a belt-positioning booster seat. The
child and belt-positioning booster seat are held in
the vehicle by the seat belt.WARNING!
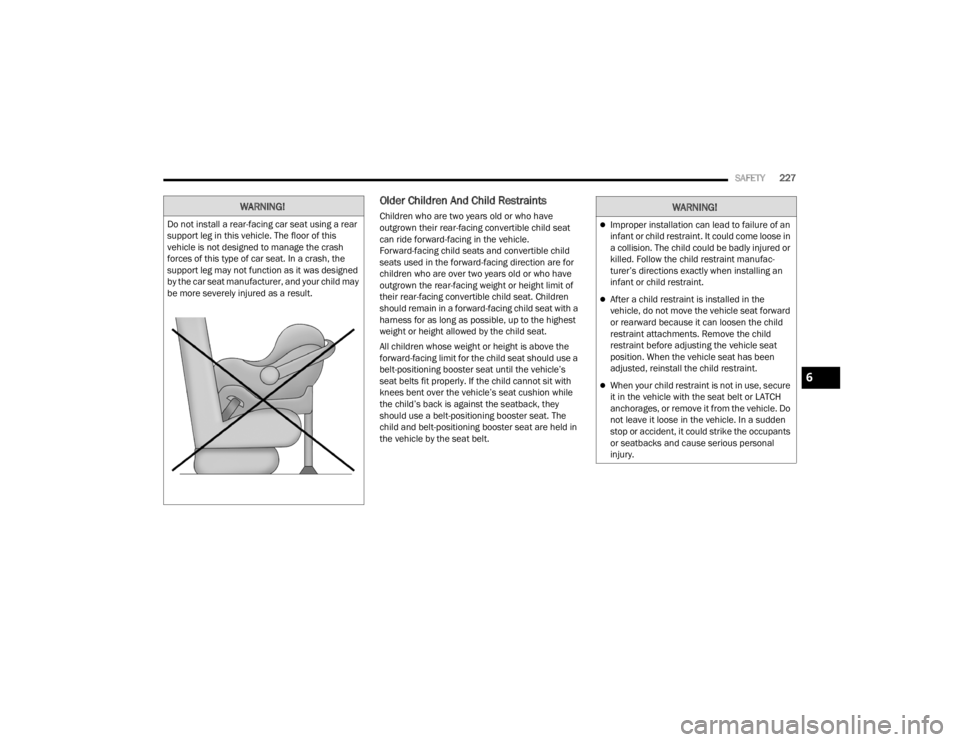
Do not install a rear-facing car seat using a rear
support leg in this vehicle. The floor of this
vehicle is not designed to manage the crash
forces of this type of car seat. In a crash, the
support leg may not function as it was designed
by the car seat manufacturer, and your child may
be more severely injured as a result.
WARNING!
Improper installation can lead to failure of an
infant or child restraint. It could come loose in
a collision. The child could be badly injured or
killed. Follow the child restraint manufac -
turer’s directions exactly when installing an
infant or child restraint.
After a child restraint is installed in the
vehicle, do not move the vehicle seat forward
or rearward because it can loosen the child
restraint attachments. Remove the child
restraint before adjusting the vehicle seat
position. When the vehicle seat has been
adjusted, reinstall the child restraint.
When your child restraint is not in use, secure
it in the vehicle with the seat belt or LATCH
anchorages, or remove it from the vehicle. Do
not leave it loose in the vehicle. In a sudden
stop or accident, it could strike the occupants
or seatbacks and cause serious personal
injury.6
21_RUV_OM_EN_USC_t.book Page 227
Page 233 of 348

SAFETY231
NOTE:If the folding, non-adjustable head restraint interferes with the installation of the child restraint, the head restraint may be folded and the child seat installed in
front of it.
Frequently Asked Questions About Installing Child Restraints With LATCH
What is the weight limit (child’s weight + weight of
the child restraint) for using the LATCH anchorage
system to attach the child restraint? 65 lbs (29.5 kg)Use the LATCH anchorage system until the combined weight of the child
and the child restraint is 65 lbs (29.5 kg). Use the seat belt and tether
anchor instead of the LATCH system once the combined weight is more
than 65 lbs (29.5 kg).
Can the LATCH anchorages and the seat belt be
used together to attach a rear-facing or
forward-facing child restraint? NoDo not use the seat belt when you use the LATCH anchorage system to
attach a rear-facing or forward-facing child restraint.
Booster seats may be attached to the LATCH anchorages if allowed by the
booster seat manufacturer. See your booster seat owner’s manual for
more information.
Can two child restraints be attached using a
common lower LATCH anchorage? NoNever “share” a LATCH anchorage with two or more child restraints. If the
center position does not have dedicated LATCH lower anchorages, use
the seat belt to install a child seat in the center position next to a child
seat using the LATCH anchorages in an outboard position.
Can the rear-facing child restraint touch the back of
the front passenger seat? YesThe child seat may touch the back of the front passenger seat if the child
restraint manufacturer also allows contact. See your child restraint
owner’s manual for more information.
Can the rear head restraints be removed? YesThe 2nd row head restraints on bench and the center head restraint in
the 8 passenger vehicle can be removed if they interfere with the
installation of the child restraint. 2nd row Stow 'n Go head restraints are
not removable. The 3rd row center head restraint is removable in all
vehicles, but the 3rd row outboard head restraints are not removable
Úpage 43.
6
21_RUV_OM_EN_USC_t.book Page 231
Page 243 of 348

SAFETY241
Third Row Tether Attachment
The tether anchorage found on the back of the
60% seat in the third row may be used by either the
left outboard or the center seating position. Only
tether one child restraint to the tether anchorage
at a time.
To connect the tether strap hook to the tether
anchorage for either seating position on the 60%
third row seat:
1. Route the tether strap to provide the most
direct path for the strap between the anchor
and the child seat.
2. If the car seat is in the center, raise the center head restraint and route the tether strap
around the inboard (left) side of the head
restraint support posts, as shown in the
diagram. 3. Attach the tether strap hook of the child
restraint to the top tether anchorage as shown
in the diagram.
4. Remove slack in the tether strap according to the child restraint manufacturer’s instructions.
Center Tether Attachment – 3rd Row
Outboard Tether Attachments – 3rd Row
SAFETY TIPS
TRANSPORTING PASSENGERS
NEVER TRANSPORT PASSENGERS IN THE CARGO
AREA.
WARNING!
An incorrectly anchored tether strap could
lead to increased head motion and possible
injury to the child. Use only the anchorage
position directly behind the child seat to
secure a child restraint top tether strap.
If your vehicle is equipped with a split rear
seat, make sure the tether strap does not slip
into the opening between the seatbacks as
you remove slack in the strap.
WARNING!
Do not connect the tether strap for more than
one child restraint to the tether anchorage on
the 60% seat in the third row. This anchorage is
intended for one child restraint at a time.
WARNING!
Do not leave children or animals inside parked
vehicles in hot weather. Interior heat build-up
may cause serious injury or death.
It is extremely dangerous to ride in a cargo
area, inside or outside of a vehicle. In a colli -
sion, people riding in these areas are more
likely to be seriously injured or killed.
Do not allow people to ride in any area of your
vehicle that is not equipped with seats and
seat belts.
Be sure everyone in your vehicle is in a seat
and using a seat belt properly.
6
21_RUV_OM_EN_USC_t.book Page 241