2021 CHRYSLER 300 battery
[x] Cancel search: batteryPage 190 of 268
188 IN CASE OF EMERGENCY
JUMP STARTING PROCEDURE
NOTE:
Make sure at all times that unused ends of jumper
c a
bles are not contacting each other or either
vehicle while making connections.
Connecting The Jumper Cables
1. C onnect the positive
(
+) end of the jumper
cable to the remote positive (+)
post of the
discharged vehicle.
2. C onnect the opposite end of the positive (
+)
jumper cable to the positive (+) post of the
booster battery.
3. C onnect the negative (
-) end of the jumper
cable to the negative (-) post of the booster
battery. 4. C
onnect the opposite end of the negative (
-)
jumper cable to the remote negative (-) post
(exposed metallic/unpainted post of the
discharge vehicle) located directly behind the
under-hood fuse box.
5. S tart the engine in the vehicle that has the
b
ooster battery, let the engine idle a few
minutes, and then start the engine in the
vehicle with the discharged battery.
6. O nce the engine is started, follow the discon-
n
ection procedure below. Disconnecting The Jumper Cables
1. D
isconnect the negative
(
-) end of the jumper
cable from the remote negative (-)
post of the
discharged vehicle.
2. D isconnect the opposite end of the negative (
-)
jumper cable from the negative (-) post of the
booster battery.
3. D isconnect the positive (
+) end of the jumper
cable from the positive (+) post of the booster
battery.
4. D isconnect the opposite end of the positive (
+)
jumper cable from the remote positive (+) post
of the discharged vehicle.
5. R einstall the protective cover over the remote
p
ositive (+) post of the discharged vehicle.
If frequent jump starting is required to start your
ve
hicle you should have the battery and charging
system tested at an authorized dealer.
WARNING!
Failure to follow this jump starting procedure
could result in personal injury or property
damage due to battery explosion.
CAUTION!
Failure to follow these procedures could result in
damage to the charging system of the booster
vehicle or the discharged vehicle.
WARNING!
Do not connect the jumper cable to the negative
(-) post of the discharged battery. The resulting
electrical spark could cause the battery to
explode and could result in personal injury.
CAUTION!
Do not run the booster vehicle engine above
2,000 rpm since it provides no charging benefit,
w a
stes fuel, and can damage booster vehicle
engine.
CAUTION!
Accessories plugged into the vehicle power
outlets draw power from the vehicle’s battery,
even when not in use (i.e., cellular devices, etc.).
Eventually, if plugged in long enough without
engine operation, the vehicle’s battery will
discharge sufficiently to degrade battery life
and/or prevent the engine from starting.
Page 192 of 268
190 IN CASE OF EMERGENCY
IF YOUR ENGINE OVERHEATS
If the vehicle is overheating, it will need to be
serviced by an authorized dealer.
In any of the following situations, you can reduce
th
e potential for overheating by taking the
appropriate action.
On the highways — slow down.
In city traffic — while stopped, place the trans -
mission in NEUTRAL, but do not increase the
e n
gine idle speed while preventing vehicle
motion with the brakes.
NOTE:
There are steps that you can take to slow down an
i m
pending overheat condition:
If your Air Conditioner (A/C) is on, turn it off. The
A/C system adds heat to the engine cooling
system and turning the A/C off can help remove
this heat.
You can also turn the temperature control to
maximum heat, the mode control to floor and
the blower control to high. This allows the heater
core to act as a supplement to the radiator and
aids in removing heat from the engine cooling
system.
MANUAL PARK RELEASE
To move the vehicle in cases where the
transmission will not shift out of PARK (such as a
depleted battery), a Manual Park Release is
available.
WARNING!
You or others can be badly burned by hot engine
coolant (antifreeze) or steam from your radiator. If
you see or hear steam coming from under the
hood, do not open the hood until the radiator has
had time to cool. Never try to open a cooling
system pressure cap when the radiator or coolant
bottle is hot.
CAUTION!
Driving with a hot cooling system could damage
your vehicle. If the temperature gauge reads HOT
(H), pull over and stop the vehicle. Idle the vehicle
with the air conditioner turned off until the pointer
drops back into the normal range. If the pointer
remains on HOT (H), and you hear continuous
chimes, turn the engine off immediately and call
for service.
WARNING!
Always secure your vehicle by fully applying the
parking brake before activating the Manual Park
Release. In addition, you should be seated in the
driver's seat with your foot firmly on the brake
pedal when activating the Manual Park Release.
Activating the Manual Park Release will allow
your vehicle to roll away if it is not secured by the
parking brake, or by proper connection to a tow
vehicle. Activating the Manual Park Release on
an unsecured vehicle could lead to serious
injury or death for those in or around the vehicle.
Page 195 of 268
IN CASE OF EMERGENCY 193
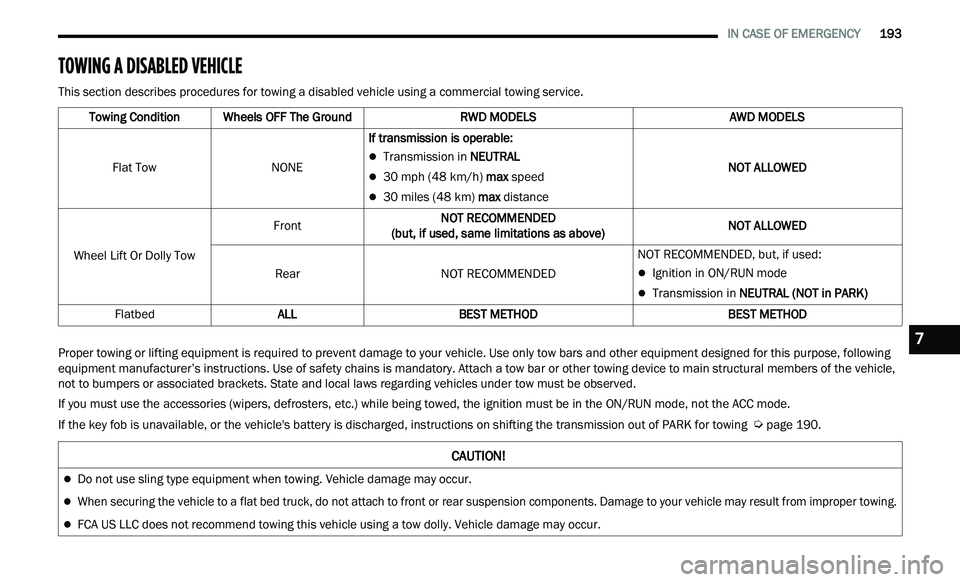
TOWING A DISABLED VEHICLE
This section describes procedures for towing a disabled vehicle using a commercial towing service.
Proper towing or lifting equipment is required to prevent damage to your vehicle. Use only tow bars and other equipment designed for this purpose, following
eq
uipment manufacturer’s instructions. Use of safety chains is mandatory. Attach a tow bar or other towing device to main structural members of the vehicle,
not to bumpers or associated brackets. State and local laws regarding vehicles under tow must be observed.
If you must use the accessories (wipers, defrosters, etc.) while being towed, the ignition must be in the ON/RUN mode, not the ACC mode.
If the key fob is unavailable, or the vehicle's battery is discharged, instructions on shifting the transmission out of PARK for towing
Ú page 190.
Towing Condition
Wheels OFF The Ground RWD MODELS AWD MODELS
Flat Tow NONEIf transmission is operable:
Transmission in NEUTRAL
30 mph (48 km/h) max speed
30 miles (48 km) max distance NOT ALLOWED
Wheel Lift Or Dolly Tow Front
NOT RECOMMENDED
(b
ut, if used, same limitations as above) NOT ALLOWED
Rear NOT RECOMMENDED NOT RECOMMENDED, but, if used:
Ignition in ON/RUN mode
Transmission in
NEUTRAL (NOT in PARK)
Flatbed ALL BEST METHOD BEST METHOD
CAUTION!
Do not use sling type equipment when towing. Vehicle damage may occur.
When securing the vehicle to a flat bed truck, do not attach to front or rear suspension components. Damage to your vehicle may result from improper towing.
FCA US LLC does not recommend towing this vehicle using a tow dolly. Vehicle damage may occur.
7
Page 198 of 268
196 SERVICING AND MAINTENANCE
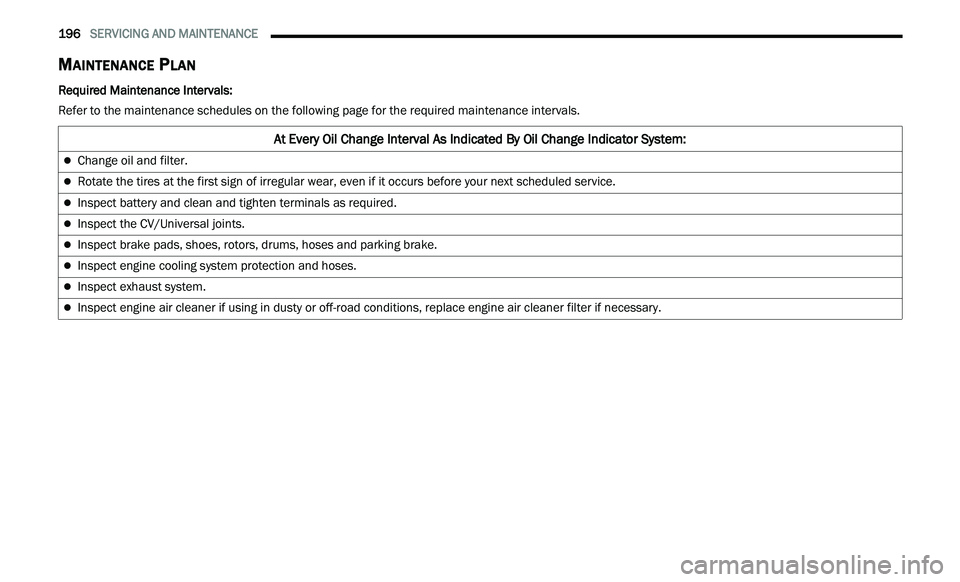
MAINTENANCE PLAN
Required Maintenance Intervals:
Refer to the maintenance schedules on the following page for the required maintenance intervals.
At Every Oil Change Interval As Indicated By Oil Change Indicator System:
Change oil and filter.
Rotate the tires at the first sign of irregular wear, even if it occurs before your next scheduled service.
Inspect battery and clean and tighten terminals as required.
Inspect the CV/Universal joints.
Inspect brake pads, shoes, rotors, drums, hoses and parking brake.
Inspect engine cooling system protection and hoses.
Inspect exhaust system.
Inspect engine air cleaner if using in dusty or off-road conditions, replace engine air cleaner filter if necessary.
Page 203 of 268
SERVICING AND MAINTENANCE 201
(Continued)
CHECKING OIL LEVEL
To ensure proper engine lubrication, the engine oil
must be maintained at the correct level. Check the
oil level at regular intervals, such as every month.
The best time to check the engine oil level is about
five minutes after a fully warmed up engine is shut
off.
Checking the oil while the vehicle is on level ground
w i
ll improve the accuracy of the oil level readings.
There are four possible dipstick types:
Crosshatched zone.
Crosshatched zone marked SAFE.
Crosshatched zone marked with MIN at the low
end of the range and MAX at the high end of the
range.
Crosshatched zone marked with dimples at the
MIN and the MAX ends of the range.
NOTE:
Always maintain the oil level within the crosshatch
m a
rkings on the dipstick.
Adding 1 quart (1.0 liters) of oil when the reading
is
at the low end of the dipstick range will raise the
oil level to the high end of the range marking.
ADDING WASHER FLUID
The windshield washer fluid reservoir is located in
the front of the engine compartment. Be sure to
check the fluid level at regular intervals. Fill the
reservoir with windshield washer solvent (not
radiator antifreeze) and operate the system for a
few seconds to flush out the residual water.
When refilling the washer fluid reservoir, apply
s om
e washer fluid to a cloth or towel and wipe the
wiper blades clean. This will help blade
performance.
To prevent freeze-up of your windshield washer
sy
stem in cold weather, select a solution or mixture
that meets or exceeds the temperature range of
your climate. This rating information can be found
on most washer fluid containers.
The fluid reservoir will hold nearly 1 gallon (4 liters)
of
washer fluid when the message “Low Washer
Fluid” appears in the instrument cluster.
MAINTENANCE-FREE BATTERY
Your vehicle is equipped with a maintenance-free
battery. You will never have to add water, nor is
periodic maintenance required.
NOTE:
The battery is stored under an access cover in the
t r
unk. Remote battery terminals are located in the
engine compartment for jump starting
Ú page 186.
CAUTION!
Overfilling or underfilling the crankcase will
cause aeration or loss of oil pressure. This could
damage your engine.
WARNING!
Commercially available windshield washer
solvents are flammable. They could ignite and
burn you. Care must be exercised when filling or
working around the washer solution.
WARNING!
Battery fluid is a corrosive acid solution and
can burn or even blind you. Do not allow
battery fluid to contact your eyes, skin, or
clothing. Do not lean over a battery when
attaching clamps. If acid splashes in eyes or
on skin, flush the area immediately with large
amounts of water
Ú page 186.
8
Page 204 of 268
202 SERVICING AND MAINTENANCE
(Continued)
PRESSURE WASHING
Cleaning the engine compartment with a high
pressure washer is not recommended.
VEHICLE MAINTENANCE
An authorized dealer has the qualified service
personnel, special tools, and equipment to
perform all service operations in an expert
manner. Service Manuals are available which
include detailed service information for your
vehicle. Refer to these Service Manuals before
attempting any procedure yourself.
NOTE:
Intentional tampering with emissions control
s y
stems may void your warranty and could result in
civil penalties being assessed against you.
ENGINE OIL
Engine Oil Selection — 3.6L And 5.7L
Engine
For best performance and maximum protection
under all types of operating conditions, the
manufacturer only recommends engine oils that
are API Certified and meet the requirements of FCA
Material Standard MS-6395.
NOTE:
Hemi engines at times can tick right after startup
a n
d then quiet down after approximately 30
seconds. This is normal and will not harm the
engine. This characteristic can be caused by short
drive cycles. For example, if the vehicle is started
then shut off after driving a short distance. Upon
restarting, you may experience a ticking sound.
Battery gas is flammable and explosive. Keep
flame or sparks away from the battery. Do not
use a booster battery or any other booster
source with an output greater than 12 Volts.
Do not allow cable clamps to touch each
other.
Battery posts, terminals, and related accesso -
ries contain lead and lead compounds. Wash
h a
nds after handling.
The battery in this vehicle has a vent hose that
should not be disconnected and should only
be replaced with a battery of the same type
(vented).
CAUTION!
It is essential when replacing the cables on
the battery that the positive cable is attached
to the positive post and the negative cable is
attached to the negative post. Battery posts
are marked positive (+) and negative (-) and
are identified on the battery case. Cable
clamps should be tight on the terminal posts
and free of corrosion.
WARNING!
If a “fast charger” is used while the battery is
in the vehicle, disconnect both vehicle battery
cables before connecting the charger to the
battery. Do not use a “fast charger” to provide
starting voltage.
CAUTION!
Precautions have been taken to safeguard all
parts and connections however, the pressures
generated by these machines is such that
complete protection against water ingress
cannot be guaranteed.
CAUTION!
WARNING!
You can be badly injured working on or around a
motor vehicle. Only do service work for which
you have the knowledge and the proper
equipment. If you have any doubt about your
ability to perform a service job, take your vehicle
to a competent mechanic.
Page 216 of 268
214 SERVICING AND MAINTENANCE
FUSES
General Information
The fuses protect electrical systems against
excessive current.
When a device does not work, you must check the
fu
se element inside the blade fuse for a break/
melt.
Also, please be aware that when using power
ou t
lets for extended periods of time with the
engine off may result in vehicle battery discharge.
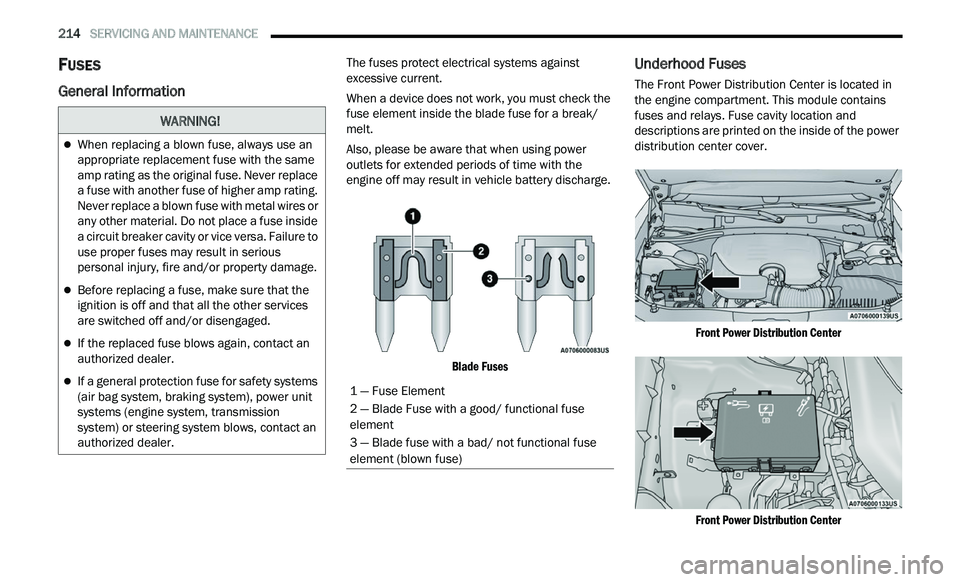
Blade Fuses
Underhood Fuses
The Front Power Distribution Center is located in
the engine compartment. This module contains
fuses and relays. Fuse cavity location and
descriptions are printed on the inside of the power
distribution center cover.
Front Power Distribution Center
Front Power Distribution Center
WARNING!
When replacing a blown fuse, always use an
appropriate replacement fuse with the same
amp rating as the original fuse. Never replace
a fuse with another fuse of higher amp rating.
Never replace a blown fuse with metal wires or
any other material. Do not place a fuse inside
a circuit breaker cavity or vice versa. Failure to
use proper fuses may result in serious
personal injury, fire and/or property damage.
Before replacing a fuse, make sure that the
ignition is off and that all the other services
are switched off and/or disengaged.
If the replaced fuse blows again, contact an
authorized dealer.
If a general protection fuse for safety systems
(air bag system, braking system), power unit
systems (engine system, transmission
system) or steering system blows, contact an
authorized dealer.1 — Fuse Element
2 — Blade Fuse with a good/ functional fuse
element
3 — Blade fuse with a bad/ not functional fuse
el
ement (blown fuse)
Page 221 of 268

SERVICING AND MAINTENANCE 219
F23 –10 Amp RedFuel Door * / Diagnostic Port
F24 –10 Amp RedIntegrated Center Stack
F25 –10 Amp RedTire Pressure Monitor System
F26 –15 Amp BlueTrans Mod (Charger Non- Police/300)
F27 –25 Amp ClearAmplifier *
F31 –25 Amp BreakerPower Seats *
F32 –15 Amp BlueHVAC Module/Cluster
F33 –15 Amp BlueIGN SW/Wireless Mod/Steer Clmn Lock Mod/Remote
S
t
art *
F34 –10 Amp RedSteering Column Module/Clock (300)
F35 –5 Amp TanBattery Sensor
F36 –15 Amp BlueActive Exhaust Valve *
F37 –20 Amp YellowRadio
F38 –20 Amp YellowMedia Hub / Console APO
F42 30 Amp Pink –Rear Defrost
F43 –20 Amp YellowRear Heated Seats * / Heated Steering Wheel *
F44 –10 Amp RedPark Assist / Blind Spot / Rear View Camera
F45 –15 Amp BlueCluster / Rearview Mirror / Lane Departure
F46 ––Spare
F47 –10 Amp RedAdaptive Front Lighting / Day Time Running Lamps *
Cavity Cartridge Fuse Mini-Fuse Description
* If Equipped
8