2021 CHRYSLER 300 ECU
[x] Cancel search: ECUPage 39 of 268

GETTING TO KNOW YOUR VEHICLE 37
UNIVERSAL GARAGE DOOR OPENER
(HOMELINK®)
HomeLink® Buttons And Indicator Light
HomeLink® replaces up to three hand-held
transmitters that operate devices such as
garage door openers, motorized gates, lighting,
or home security systems. The HomeLink® unit
is powered by your vehicle’s 12 Volt battery.
The HomeLink® buttons that are located in the
overhead console or sunvisor designate the
three different HomeLink® channels.
To operate HomeLink®, push and release any
of the programmed HomeLink® buttons. These
buttons will activate the devices they are
programmed to with each press of the corre
-
sponding HomeLink® button.
The HomeLink® indicator light is located above
the center button.
BEFORE YOU BEGIN PROGRAMMING
H
OMELINK®
For efficient programming and accurate
transmission of the radio-frequency signal, it is
recommended that a new battery be placed in the
hand-held transmitter of the device that is being
programmed to the HomeLink® system. Make
sure your hand-held transmitter is programmed to
activate the device you are trying to program your
HomeLink® button to.
Ensure that your vehicle is parked outside of the
g a
rage before you begin programming.
It is recommended that you erase all the channels
of
your HomeLink® before you use it for the first
time.
ERASING ALL THE HOMELINK®
C
HANNELS
To erase the channels, follow this procedure:
1. P lace the ignition switch into the ON/RUN
p
osition.
2. Push and hold the two outside HomeLink® b
uttons (I and III) for up to 20 seconds, or until
the HomeLink® indicator light flashes.
NOTE:
Erasing all channels should only be performed
w h
en programming HomeLink® for the first time.
Do not erase channels when programming addi -
tional buttons.
IDENTIFYING WHETHER YOU HAVE A
R
OLLING CODE OR NON-ROLLING CODE
D
EVICE
Before programming a device to one of your
HomeLink® buttons, you must determine whether
the device has a rolling code or non-rolling code.
Rolling Code Devices
To determine if your device has a rolling code, a
g ood
indicator is its manufacturing date. Typically,
devices manufactured after 1995 have rolling
codes. A device with a rolling code will also have a
“LEARN” or “TRAIN” button located where the
antenna is attached to the device. The button may
not be immediately visible when looking at the
device. The name and color of the button may vary
slightly by manufacturer.
NOTE:
The “LEARN” or “TRAIN” button is not the button
y ou
normally use to operate the device.
Non-rolling Code Devices
Most devices manufactured before 1995 will not
h a
ve a rolling code. These devices will also not
have a “LEARN” or “TRAIN” button.
2
Page 60 of 268
58 GETTING TO KNOW YOUR VEHICLE
PANORAMIC SUNROOF — IF EQUIPPED
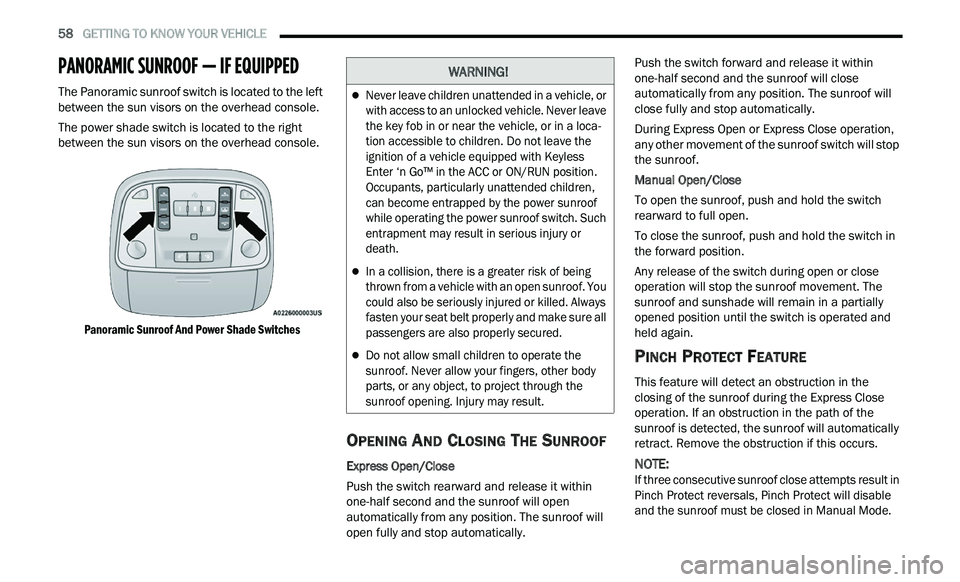
The Panoramic sunroof switch is located to the left
between the sun visors on the overhead console.
The power shade switch is located to the right
be
tween the sun visors on the overhead console.
Panoramic Sunroof And Power Shade Switches
OPENING AND CLOSING THE SUNROOF
Express Open/Close
Push the switch rearward and release it within
on e
-half second and the sunroof will open
automatically from any position. The sunroof will
open fully and stop automatically. Push the switch forward and release it within
on
e
-half second and the sunroof will close
automatically from any position. The sunroof will
close fully and stop automatically.
During Express Open or Express Close operation,
an
y other movement of the sunroof switch will stop
the sunroof.
Manual Open/Close
To open the sunroof, push and hold the switch
r e
arward to full open.
To close the sunroof, push and hold the switch in
th
e forward position.
Any release of the switch during open or close
ope
ration will stop the sunroof movement. The
sunroof and sunshade will remain in a partially
opened position until the switch is operated and
held again.
PINCH PROTECT FEATURE
This feature will detect an obstruction in the
closing of the sunroof during the Express Close
operation. If an obstruction in the path of the
sunroof is detected, the sunroof will automatically
retract. Remove the obstruction if this occurs.
NOTE:
If three consecutive sunroof close attempts result in
P i
nch Protect reversals, Pinch Protect will disable
and the sunroof must be closed in Manual Mode.
WARNING!
Never leave children unattended in a vehicle, or
with access to an unlocked vehicle. Never leave
the key fob in or near the vehicle, or in a loca -
tion accessible to children. Do not leave the
i g
nition of a vehicle equipped with Keyless
Enter ‘n Go™ in the ACC or ON/RUN position.
Occupants, particularly unattended children,
can become entrapped by the power sunroof
while operating the power sunroof switch. Such
entrapment may result in serious injury or
death.
In a collision, there is a greater risk of being
thrown from a vehicle with an open sunroof. You
could also be seriously injured or killed. Always
fasten your seat belt properly and make sure all
passengers are also properly secured.
Do not allow small children to operate the
sunroof. Never allow your fingers, other body
parts, or any object, to project through the
sunroof opening. Injury may result.
Page 63 of 268
GETTING TO KNOW YOUR VEHICLE 61
(Continued)
NOTE:
Before closing the trunk lid make sure your key fob
i s
n’t inside the trunk area. The trunk will latch then
automatically unlock if the key fob is detected, not
allowing the key fob to be locked in the trunk area.
TRUNK SAFETY
Trunk Emergency Release
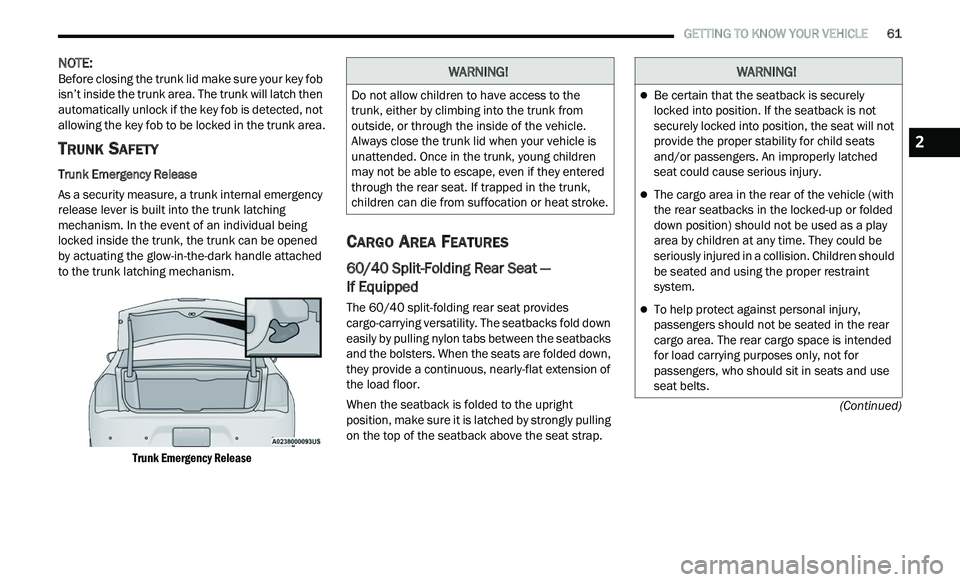
As a security measure, a trunk internal emergency
r e
lease lever is built into the trunk latching
mechanism. In the event of an individual being
locked inside the trunk, the trunk can be opened
by actuating the glow-in-the-dark handle attached
to the trunk latching mechanism.
Trunk Emergency Release
CARGO AREA FEATURES
60/40 Split-Folding Rear Seat —
If Equipped
The 60/40 split-folding rear seat provides
cargo-carrying versatility. The seatbacks fold down
easily by pulling nylon tabs between the seatbacks
and the bolsters. When the seats are folded down,
they provide a continuous, nearly-flat extension of
the load floor.
When the seatback is folded to the upright
pos
ition, make sure it is latched by strongly pulling
on the top of the seatback above the seat strap.
WARNING!
Do not allow children to have access to the
trunk, either by climbing into the trunk from
outside, or through the inside of the vehicle.
Always close the trunk lid when your vehicle is
unattended. Once in the trunk, young children
may not be able to escape, even if they entered
through the rear seat. If trapped in the trunk,
children can die from suffocation or heat stroke.
WARNING!
Be certain that the seatback is securely
locked into position. If the seatback is not
securely locked into position, the seat will not
provide the proper stability for child seats
and/or passengers. An improperly latched
seat could cause serious injury.
The cargo area in the rear of the vehicle (with
the rear seatbacks in the locked-up or folded
down position) should not be used as a play
area by children at any time. They could be
seriously injured in a collision. Children should
be seated and using the proper restraint
system.
To help protect against personal injury,
passengers should not be seated in the rear
cargo area. The rear cargo space is intended
for load carrying purposes only, not for
passengers, who should sit in seats and use
seat belts.
2
Page 64 of 268
62 GETTING TO KNOW YOUR VEHICLE
Trunk Mat — If Equipped
A trunk mat covers the bottom of the cargo area.
The trunk mat is used to protect the interior of the
trunk from mud, snow, and debris.
Grocery Bag Hooks
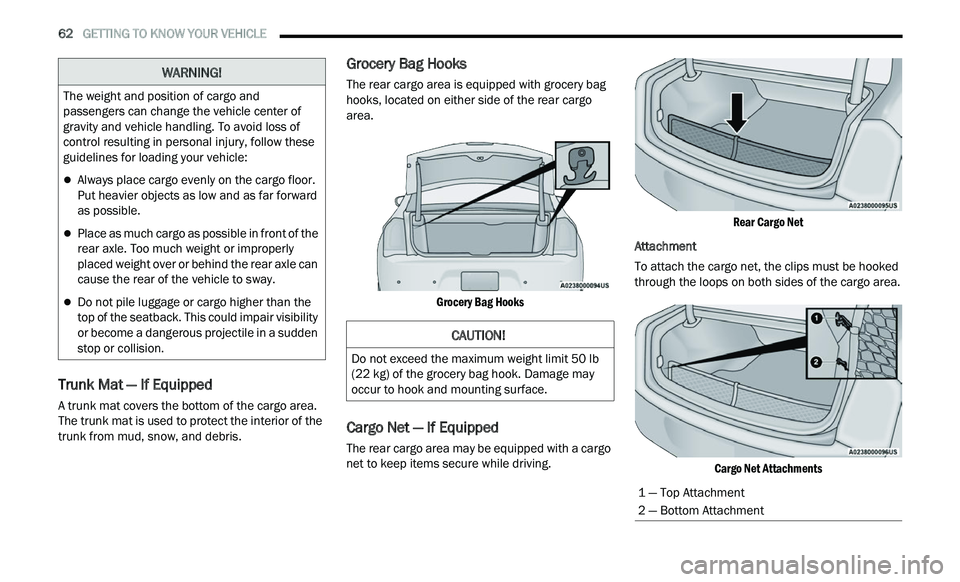
The rear cargo area is equipped with grocery bag
hooks, located on either side of the rear cargo
area.
Grocery Bag Hooks
Cargo Net — If Equipped
The rear cargo area may be equipped with a cargo
net to keep items secure while driving.
Rear Cargo Net
Attachment
To attach the cargo net, the clips must be hooked
t h
rough the loops on both sides of the cargo area.
Cargo Net Attachments
The weight and position of cargo and
pa
ssengers can change the vehicle center of
gravity and vehicle handling. To avoid loss of
control resulting in personal injury, follow these
guidelines for loading your vehicle:
Always place cargo evenly on the cargo floor.
Put heavier objects as low and as far forward
as possible.
Place as much cargo as possible in front of the
rear axle. Too much weight or improperly
placed weight over or behind the rear axle can
cause the rear of the vehicle to sway.
Do not pile luggage or cargo higher than the
top of the seatback. This could impair visibility
or become a dangerous projectile in a sudden
stop or collision.
WARNING!
CAUTION!
Do not exceed the maximum weight limit 50 lb
(22 kg) of the grocery bag hook. Damage may
occur to hook and mounting surface.
1 — Top Attachment
2 — Bottom Attachment
Page 73 of 268
GETTING TO KNOW YOUR INSTRUMENT PANEL 71
NOTE:
The charging system is independent from load
reduction. The charging system performs a diag
-
nostic on the charging system continuously.
If the Battery Charge Warning Light is on it may
indicate a problem with the charging system
Ú page 73.
The electrical loads that may be switched off (if
e q
uipped), and vehicle functions which can be
affected by load reduction:
Heated Seat/Vented Seats/Heated Wheel —
If Equipped
Heated/Cooled Cup Holders — If Equipped
Rear Defroster And Heated Mirrors
HVAC System
115 Volts AC Power Inverter System
Audio and Telematics System
Loss of the battery charge may indicate one or
m or
e of the following conditions:
The charging system cannot deliver enough
electrical power to the vehicle system because
the electrical loads are larger than the capability
of the charging system. The charging system is
still functioning properly.
Turning on all possible vehicle electrical loads
(e.g. HVAC to max settings, exterior and interior
lights, overloaded power outlets +12 Volts, 115 Volts AC, USB ports) during certain driving
c
on
ditions (city driving, towing, frequent stop -
ping).
Installing options like additional lights, upfitter
electrical accessories, audio systems, alarms
and similar devices.
Unusual driving cycles (short trips separated by
long parking periods).
The vehicle was parked for an extended period
of time (weeks, months).
The battery was recently replaced and was not
charged completely.
The battery was discharged by an electrical load
left on when the vehicle was parked.
The battery was used for an extended period
with the engine not running to supply radio,
lights, chargers, +12 Volt portable appliances
like vacuum cleaners, game consoles and
similar devices.
What to do when an electrical load reduction
a c
tion message is present (“Battery Saver On” or
“Battery Saver Mode”)
During a trip:
Reduce power to unnecessary loads if possible:
Turn off redundant lights (interior or exte -
rior)
Check what may be plugged in to power
outlets +12 Volts, 115 Volts AC, USB ports
Check HVAC settings (blower, temperature)
Check the audio settings (volume)
After a trip:
Check if any aftermarket equipment was
installed (additional lights, upfitter electrical
accessories, audio systems, alarms) and review
specifications if any (load and Ignition Off Draw
currents).
Evaluate the latest driving cycles (distance,
driving time and parking time).
The vehicle should have service performed if
the message is still present during consecutive
trips and the evaluation of the vehicle and
driving pattern did not help to identify the cause.
PROGRAMMABLE FEATURES
The instrument cluster display can be used to view
or change the following settings. Push the up
or
down arrow button to scroll through the main
menus, then push the ri
ght arrow button to
scroll through the submenus of each menu item.
P u
sh the left arrow button to scroll back to a
previous menu or submenu.
WARNING LIGHTS AND MESSAGES
The warning/indicator lights will illuminate in the
instrument panel together with a dedicated
message and/or acoustic signal when applicable.
These indications are indicative and precautionary
3
Page 76 of 268
74 GETTING TO KNOW YOUR INSTRUMENT PANEL
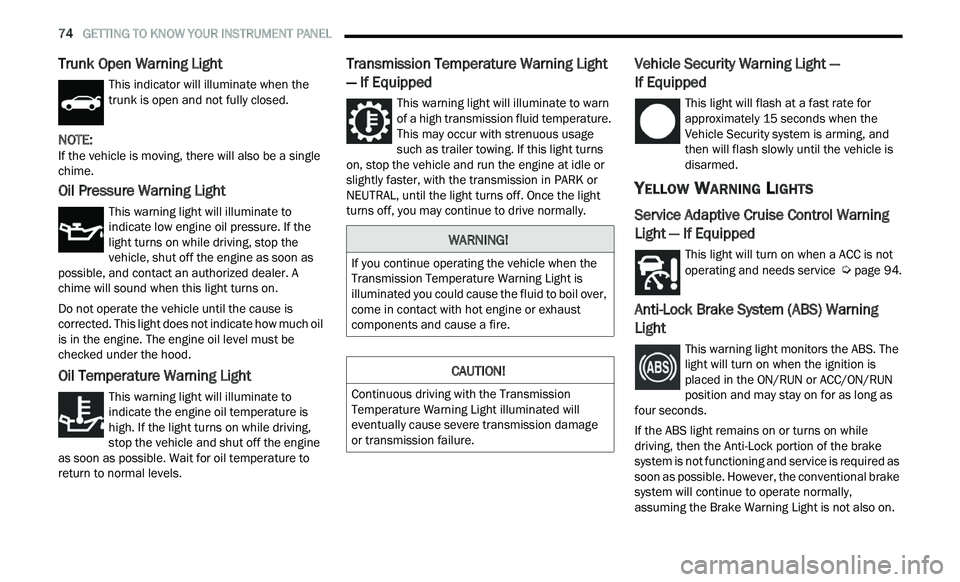
Trunk Open Warning Light
This indicator will illuminate when the
trunk is open and not fully closed.
NOTE:
If the vehicle is moving, there will also be a single
c h
ime.
Oil Pressure Warning Light
This warning light will illuminate to
indicate low engine oil pressure. If the
li
ght turns on while driving, stop the
vehicle, shut off the engine as soon as
possible, and contact an authorized dealer. A
chime will sound when this light turns on.
Do not operate the vehicle until the cause is
c or
rected. This light does not indicate how much oil
is in the engine. The engine oil level must be
checked under the hood.
Oil Temperature Warning Light
This warning light will illuminate to
indicate the engine oil temperature is
h i
gh. If the light turns on while driving,
stop the vehicle and shut off the engine
as soon as possible. Wait for oil temperature to
return to normal levels.
Transmission Temperature Warning Light
— If Equipped
This warning light will illuminate to warn
of a high transmission fluid temperature.
T h
is may occur with strenuous usage
such as trailer towing. If this light turns
on, stop the vehicle and run the engine at idle or
slightly faster, with the transmission in PARK or
NEUTRAL, until the light turns off. Once the light
turns off, you may continue to drive normally.
Vehicle Security Warning Light —
If Equipped
This light will flash at a fast rate for
approximately 15 seconds when the
V e
hicle Security system is arming, and
then will flash slowly until the vehicle is
disarmed.
YELLOW WARNING LIGHTS
Service Adaptive Cruise Control Warning
Light — If Equipped
This light will turn on when a ACC is not
operating and needs service Ú page 94.
Anti-Lock Brake System (ABS) Warning
Light
This warning light monitors the ABS. The
light will turn on when the ignition is
p
l
aced in the ON/RUN or ACC/ON/RUN
position and may stay on for as long as
four seconds.
If the ABS light remains on or turns on while
dr
iving, then the Anti-Lock portion of the brake
system is not functioning and service is required as
soon as possible. However, the conventional brake
system will continue to operate normally,
assuming the Brake Warning Light is not also on.
WARNING!
If you continue operating the vehicle when the
Transmission Temperature Warning Light is
illuminated you could cause the fluid to boil over,
come in contact with hot engine or exhaust
components and cause a fire.
CAUTION!
Continuous driving with the Transmission
Temperature Warning Light illuminated will
eventually cause severe transmission damage
or transmission failure.
Page 81 of 268
GETTING TO KNOW YOUR INSTRUMENT PANEL 79
ONBOARD DIAGNOSTIC SYSTEM — OBD II
Your vehicle is equipped with a sophisticated
Onboard Diagnostic system called OBD II. This
system monitors the performance of the
emissions, engine, and transmission control
systems. When these systems are operating
properly, your vehicle will provide excellent
performance and fuel economy, as well as engine
emissions well within current government
regulations.
If any of these systems require service, the OBD II
sy
stem will turn on the Malfunction Indicator Light
(MIL). It will also store diagnostic codes and other
information to assist your service technician in
making repairs. Although your vehicle will usually
be drivable and not need towing, see an authorized
dealer for service as soon as possible.
ONBOARD DIAGNOSTIC SYSTEM
(OBD II) C
YBERSECURITY
Your vehicle is required to have an OBD II and a
connection port to allow access to information
related to the performance of your emissions
controls. Authorized service technicians may need
to access this information to assist with the
diagnosis and service of your vehicle and
emissions system
Ú page 121.
EMISSIONS INSPECTION AND
MAINTENANCE PROGRAMS
In some localities, it may be a legal requirement to
pass an inspection of your vehicle's emissions
control system. Failure to pass could prevent
vehicle registration.
For states that require an Inspection and
Maintenance (I/M), this check verifies
th
e Malfunction Indicator Light (MIL) is
functioning and is not on when the
engine is running, and that the OBD II system is
ready for testing.
Normally, the OBD II system will be ready. The
OBD II system may n
ot
be ready if your vehicle was
recently serviced, recently had a dead battery or a
battery replacement. If the OBD II system should
be determined not ready for the I/M test, your
vehicle may fail the test.
Your vehicle has a simple ignition actuated test,
w h
ich you can use prior to going to the test station.
To check if your vehicle's OBD II system is ready,
you must do the following:
1. Cycle the ignition switch to the ON position, b
ut do not crank or start the engine.
NOTE:
If you crank or start the engine, you will have to
s t
art this test over.
CAUTION!
Prolonged driving with the MIL on could cause
further damage to the emission control
system. It could also affect fuel economy and
driveability. The vehicle must be serviced
before any emissions tests can be performed.
If the MIL is flashing while the vehicle is
running, severe catalytic converter damage
and power loss will soon occur. Immediate
service is required.
WARNING!
ONLY an authorized service technician should
connect equipment to the OBD II connection
port in order to read the VIN, diagnose, or
service your vehicle.
If unauthorized equipment is connected to the
OBD II connection port, such as a
driver-behavior tracking device, it may:
Be possible that vehicle systems,
including safety related systems, could be
impaired or a loss of vehicle control could
occur that may result in an accident
involving serious injury or death.
Access, or allow others to access, infor -
mation stored in your vehicle systems,
i n
cluding personal information.
3
Page 88 of 268
86 STARTING AND OPERATING
(Continued)
IGNITION PARK INTERLOCK
This vehicle is equipped with an Ignition Park
Interlock which requires the transmission to be in
PARK before the ignition can be turned to the OFF
mode. This helps the driver avoid inadvertently
leaving the vehicle without placing the
transmission in PARK. This system also locks the
transmission in PARK whenever the ignition is in
the OFF mode.
NOTE:
The transmission is NOT locked in PARK when the
i g
nition is in the ACC mode (even though the
engine will be off). Ensure that the transmission is
in PARK, and the ignition is OFF (not in ACC mode)
before exiting the vehicle.
Your vehicle could move and injure you and
others if it is not in PARK. Check by trying to
move the transmission gear selector out of
PARK with the brake pedal released. Make
sure the transmission is in PARK before
exiting the vehicle.
The transmission may not engage PARK if the
vehicle is moving. Always bring the vehicle to a
complete stop before shifting to PARK, and
verify that the transmission gear position indi -
cator solidly indicates PARK (P) without
b l
inking. Ensure that the vehicle is completely
stopped, and the PARK position is properly
indicated, before exiting the vehicle.
It is dangerous to shift out of PARK or
NEUTRAL if the engine speed is higher than
idle speed. If your foot is not firmly pressing
the brake pedal, the vehicle could accelerate
quickly forward or in reverse. You could lose
control of the vehicle and hit someone or
something. Only shift into gear when the
engine is idling normally and your foot is firmly
pressing the brake pedal.
WARNING!
Unintended movement of a vehicle could
injure those in or near the vehicle. As with all
vehicles, you should never exit a vehicle while
the engine is running. Before exiting a vehicle,
always come to a complete stop, then apply
the parking brake, shift the transmission into
PARK, and turn the ignition OFF. When the
ignition is in the OFF mode, the transmission
is locked in PARK, securing the vehicle against
unwanted movement.
When exiting the vehicle, always make sure
the ignition is in the OFF mode, remove the
key fob from the vehicle, and lock the vehicle.
Never leave children alone in a vehicle, or with
access to an unlocked vehicle. Allowing chil -
dren to be in a vehicle unattended is
da
ngerous for a number of reasons. A child or
others could be seriously or fatally injured.
Children should be warned not to touch the
parking brake, brake pedal or the transmis -
sion gear selector.
Do not leave the key fob in or near the vehicle
(or in a location accessible to children), and do
not leave the ignition in the ACC or ON/RUN
mode. A child could operate power windows,
other controls, or move the vehicle.
WARNING!CAUTION!
Shift into or out of PARK or REVERSE only after
the vehicle has come to a complete stop.
Do not shift between PARK, REVERSE,
NEUTRAL, or DRIVE when the engine is above
idle speed.
Before shifting into any gear, make sure your
foot is firmly pressing the brake pedal.