2021 CHRYSLER 300 engine oil
[x] Cancel search: engine oilPage 86 of 268
84 STARTING AND OPERATING
AFTER STARTING
The idle speed is controlled automatically, and it
will decrease as the engine warms up.
ENGINE BLOCK HEATER — IF EQUIPPED
The engine block heater warms the engine, and
permits quicker starts in cold weather. Connect the
cord to a standard 110-115 Volt AC electrical
outlet with a grounded, three-wire extension cord.
The engine block heater must be plugged in at
le
ast one hour to have an adequate warming effect
on the engine.
The engine block heater cord is routed under the
h ood
on the driver side of the vehicle. It has a
removable cap that is located near the air box.
ENGINE BREAK-IN RECOMMENDATIONS
A long break-in period is not required for the
drivetrain (engine, transmission, and rear axle) in
your new vehicle.
Drive moderately during the first 300 miles
( 5
00 km). After the initial 60 miles (100 km),
s p
eeds up to 50 or 55 mph (80 or 90 km/h) are
d e
sirable.
While cruising, brief full-throttle acceleration within
th
e limits of local traffic laws contributes to a good
break-in. However, wide-open throttle acceleration
in low gear can be detrimental and should be
avoided.
The engine oil, transmission fluid, and axle
l u
bricant installed at the factory are high-quality
and energy-conserving. Oil, fluid, and lubricant
changes should be consistent with anticipated
climate and conditions under which vehicle
operations will occur. For the recommended
viscosity and quality grades
Ú page 249.
NOTE:
A new engine may consume some oil during its first
f e
w thousand miles (kilometers) of operation. This should be considered a normal part of the break-in
and not interpreted as an indication of difficulty.
Please check your oil level with the engine oil indi
-
cator often during the break in period. Add oil as
r e
quired.
PARKING BRAKE
Before leaving the vehicle, make sure that the
parking brake is fully applied and place the gear
selector in the PARK position.
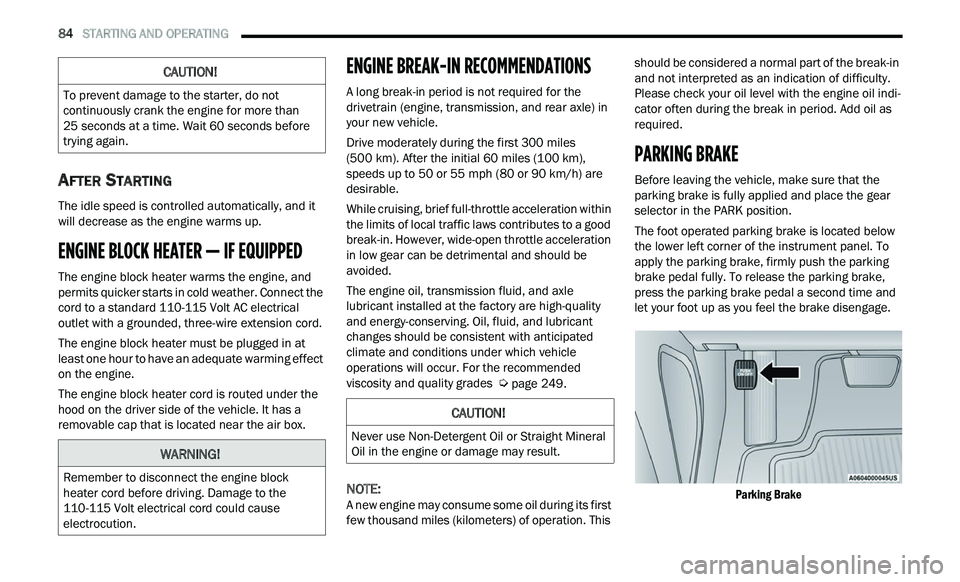
The foot operated parking brake is located below
th
e lower left corner of the instrument panel. To
apply the parking brake, firmly push the parking
brake pedal fully. To release the parking brake,
press the parking brake pedal a second time and
let your foot up as you feel the brake disengage.
Parking Brake
CAUTION!
To prevent damage to the starter, do not
continuously crank the engine for more than
25 seconds at a time. Wait 60 seconds before
t r
ying again.
WARNING!
Remember to disconnect the engine block
heater cord before driving. Damage to the
110-115 Volt electrical cord could cause
electrocution.
CAUTION!
Never use Non-Detergent Oil or Straight Mineral
Oil in the engine or damage may result.
Page 122 of 268
120 STARTING AND OPERATING
(Continued)
Replace tires when tread wear indicators first
become visible.
Keep tires properly inflated.
Maintain sufficient distance between your
vehicle and the vehicle in front of you to avoid a
collision in a sudden stop.
Your vehicle may be equipped with a Limited Slip
D i
fferential (LSD) that reduces, but does not
eliminate, the amount of wheel slip across a given
axle for improved handling.
DRIVING THROUGH WATER
Driving through water more than a few inches/
centimeters deep will require extra caution to
ensure safety and prevent damage to your vehicle.
Flowing/Rising Water Shallow Standing Water
Although your vehicle is capable of driving through
shallow standing water, consider the following
Warnings and Cautions before doing so.
WARNING!
Do not drive on or across a road or path where
water is flowing and/or rising (as in storm
run-off). Flowing water can wear away the road
or path's surface and cause your vehicle to sink
into deeper water. Furthermore, flowing and/or
rising water can carry your vehicle away swiftly.
Failure to follow this warning may result in
injuries that are serious or fatal to you, your
passengers, and others around you.
WARNING!
Driving through standing water limits your
vehicle’s traction capabilities. Do not exceed
5
mph (8 km/h) when driving through
st
anding water.
Driving through standing water limits your
vehicle’s braking capabilities, which increases
stopping distances. Therefore, after driving
through standing water, drive slowly and
lightly press on the brake pedal several times
to dry the brakes.
Failure to follow these warnings may result in
injuries that are serious or fatal to you, your
passengers, and others around you.
CAUTION!
Always check the depth of the standing water
before driving through it. Never drive through
standing water that is deeper than the bottom
of the tire rims mounted on the vehicle.
Determine the condition of the road or the
path that is under water and if there are any
obstacles in the way before driving through
the standing water.
Do not exceed 5 mph (8 km/h) when driving
th
rough standing water. This will minimize
wave effects.
Driving through standing water may cause
damage to your vehicle’s drivetrain compo -
nents. Always inspect your vehicle’s fluids
( i
.e., engine oil, transmission, axle, etc.) for
signs of contamination (i.e., fluid that is milky
or foamy in appearance) after driving through
standing water. Do not continue to operate
the vehicle if any fluid appears contaminated,
as this may result in further damage. Such
damage is not covered by the New Vehicle
Limited Warranty.
Getting water inside your vehicle’s engine can
cause it to lock up and stall out, and cause
serious internal damage to the engine. Such
damage is not covered by the New Vehicle
Limited Warranty.
CAUTION!
Page 180 of 268
178 SAFETY
(Continued)
lug nuts/bolt torque for tightness. Check the tires
(including spare) for proper cold inflation pressure.
Lights
Have someone observe the operation of brake
lights and exterior lights while you work the
controls. Check turn signal and high beam
indicator lights on the instrument panel.
Door Latches
Check for proper closing, latching, and locking.
Fluid Leaks
Check area under the vehicle after overnight
parking for fuel, coolant, oil, or other fluid leaks.
Also, if gasoline fumes are detected or if fuel or
brake fluid leaks are suspected, the cause should
be located and corrected immediately.
EXHAUST GAS
The best protection against carbon monoxide entry
into the vehicle body is a properly maintained
engine exhaust system.
Whenever a change is noticed in the sound of the
ex
haust system, when exhaust fumes can be
detected inside the vehicle, or when the underside
or rear of the vehicle is damaged, have an
authorized dealer inspect the complete exhaust
system and adjacent body areas for broken,
damaged, deteriorated, or mispositioned parts.
Open seams or loose connections could permit
exhaust fumes to seep into the passenger
compartment. In addition, inspect the exhaust
system each time the vehicle is raised for
lubrication or oil change. Replace as required.
CARBON MONOXIDE WARNINGS
WARNING!
Exhaust gases can injure or kill. They contain
carbon monoxide (CO), which is colorless and
odorless. Breathing it can make you
unconscious and can eventually poison you. To
avoid breathing (CO), follow these safety tips:
Do not run the engine in a closed garage or in
confined areas any longer than needed to
move your vehicle in or out of the area.
If you are required to drive with the trunk/lift -
gate/rear doors open, make sure that all
w i
ndows are closed and the climate control
BLOWER switch is set at high speed. DO NOT
use the recirculation mode.
If it is necessary to sit in a parked vehicle with
the engine running, adjust your heating or
cooling controls to force outside air into the
vehicle. Set the blower at high speed.
WARNING!
WARNING!
Carbon monoxide (CO) in exhaust gases is
deadly. Follow the precautions below to prevent
carbon monoxide poisoning:
Do not inhale exhaust gases. They contain
carbon monoxide, a colorless and odorless
gas, which can kill. Never run the engine in a
closed area, such as a garage, and never sit in
a parked vehicle with the engine running for
an extended period. If the vehicle is stopped in
an open area with the engine running for more
than a short period, adjust the ventilation
system to force fresh, outside air into the
vehicle.
Guard against carbon monoxide with proper
maintenance. Have the exhaust system
inspected every time the vehicle is raised.
Have any abnormal conditions repaired
promptly. Until repaired, drive with all side
windows fully open.
Page 197 of 268
195
SERVICING AND MAINTENANCE
SCHEDULED SERVICING
This vehicle is equipped with an automatic oil
change indicator system. The oil change indicator
system will remind you that it is time to take your
vehicle in for scheduled maintenance.
Based on engine operation conditions, the oil
ch
ange indicator message will illuminate. This
means that service is required for the vehicle.
Operating conditions such as frequent short-trips,
trailer tow, and extremely hot or cold ambient
temperatures will influence when the “Change Oil”
or “Oil Change Required” message is displayed.
Have your vehicle serviced as soon as possible,
within the next 500 miles (805 km). The “Oil Change Required” message will be
di
splayed in the instrument cluster and a single
chime will sound, indicating that an oil change is
necessary.
An authorized dealer will reset the oil change
in
dicator message after completing the scheduled
oil change.
NOTE:
Under no circumstances should oil change
i n
tervals exceed 10,000 miles (16,000 km),
1 2
months or 350 hours of engine run time,
w h
ichever comes first. The 350 hours of engine
run or idle time is generally only a concern for fleet
customers. Once A Month Or Before A Long Trip:
Check engine oil level.
Check windshield washer fluid level.
Check tire pressure and look for unusual wear
or damage. Rotate tires at the first sign of irreg
-
ular wear, even if it occurs before your next
s c
heduled service.
Check the fluid levels of the coolant reservoir,
brake master cylinder, and power steering (if
equipped) and fill as needed.
Check function of all interior and exterior lights.
8
Page 198 of 268
196 SERVICING AND MAINTENANCE
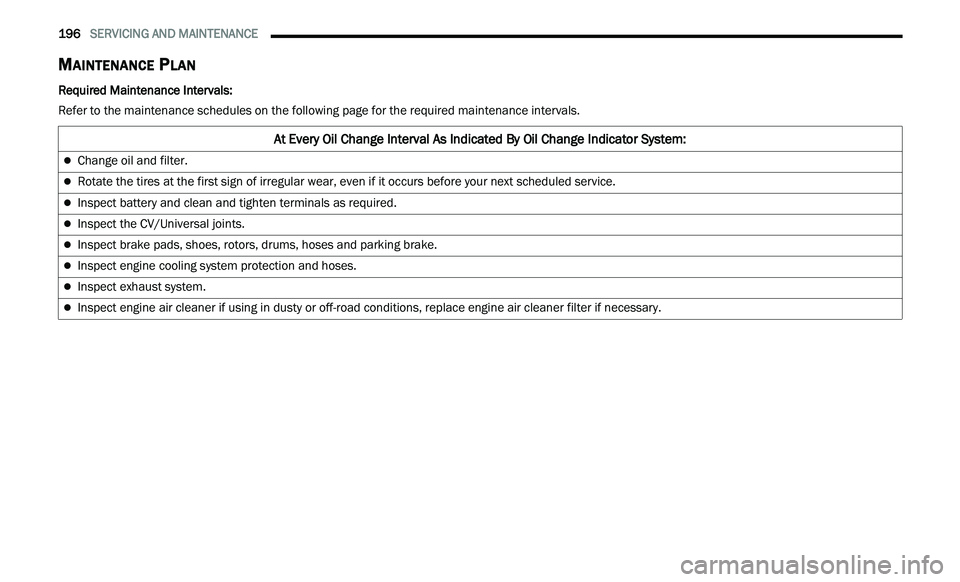
MAINTENANCE PLAN
Required Maintenance Intervals:
Refer to the maintenance schedules on the following page for the required maintenance intervals.
At Every Oil Change Interval As Indicated By Oil Change Indicator System:
Change oil and filter.
Rotate the tires at the first sign of irregular wear, even if it occurs before your next scheduled service.
Inspect battery and clean and tighten terminals as required.
Inspect the CV/Universal joints.
Inspect brake pads, shoes, rotors, drums, hoses and parking brake.
Inspect engine cooling system protection and hoses.
Inspect exhaust system.
Inspect engine air cleaner if using in dusty or off-road conditions, replace engine air cleaner filter if necessary.
Page 201 of 268
SERVICING AND MAINTENANCE 199
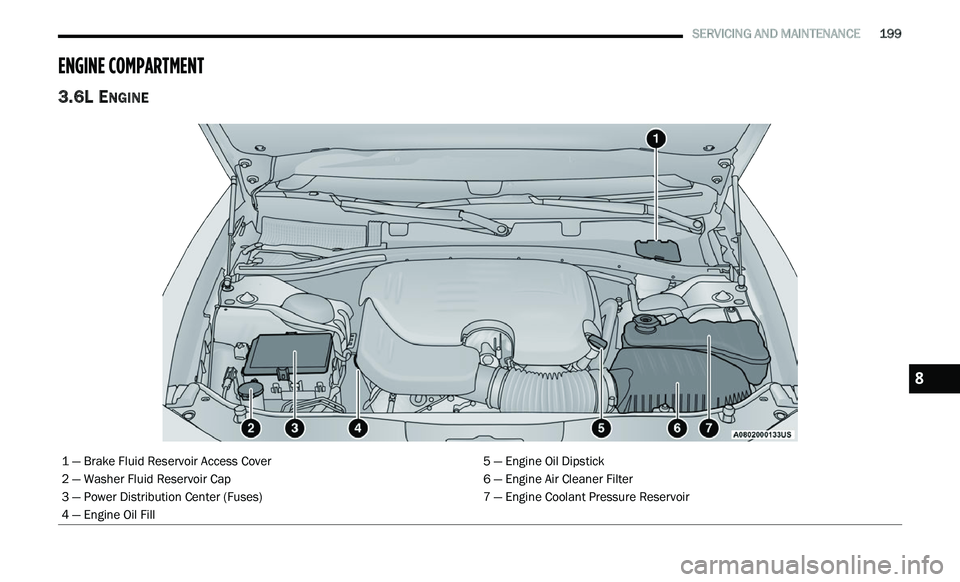
ENGINE COMPARTMENT
3.6L ENGINE
1 — Brake Fluid Reservoir Access Cover 5 — Engine Oil Dipstick
2 — Washer Fluid Reservoir Cap 6 — Engine Air Cleaner Filter
3 — Power Distribution Center (Fuses) 7 — Engine Coolant Pressure Reservoir
4 — Engine Oil Fill
8
Page 202 of 268
200 SERVICING AND MAINTENANCE
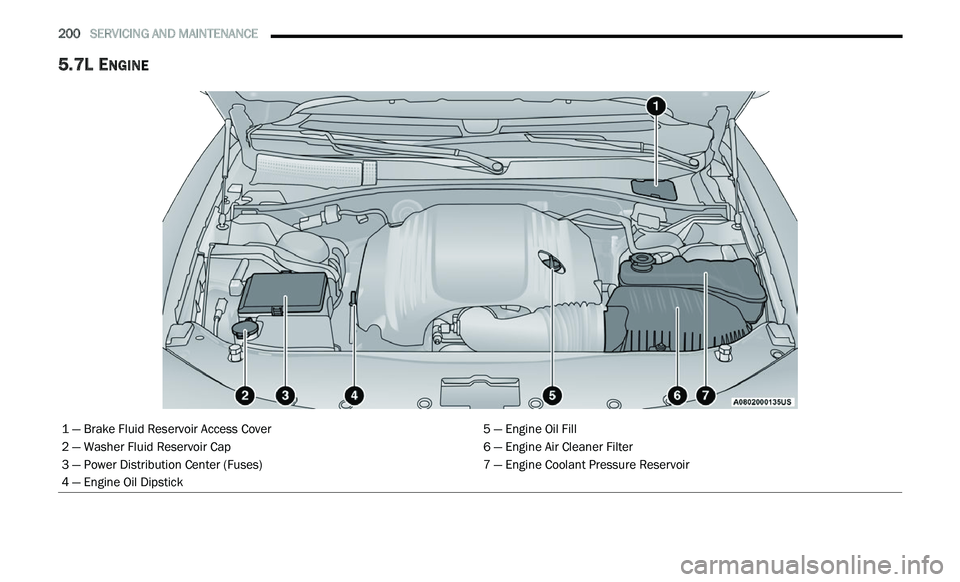
5.7L ENGINE
1 — Brake Fluid Reservoir Access Cover 5 — Engine Oil Fill
2 — Washer Fluid Reservoir Cap 6 — Engine Air Cleaner Filter
3 — Power Distribution Center (Fuses) 7 — Engine Coolant Pressure Reservoir
4 — Engine Oil Dipstick
Page 203 of 268
SERVICING AND MAINTENANCE 201
(Continued)
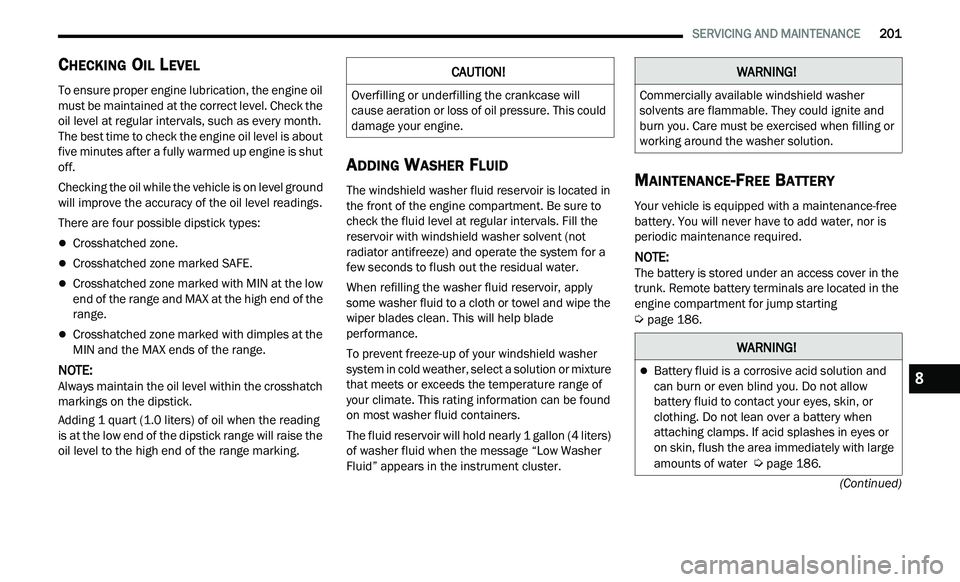
CHECKING OIL LEVEL
To ensure proper engine lubrication, the engine oil
must be maintained at the correct level. Check the
oil level at regular intervals, such as every month.
The best time to check the engine oil level is about
five minutes after a fully warmed up engine is shut
off.
Checking the oil while the vehicle is on level ground
w i
ll improve the accuracy of the oil level readings.
There are four possible dipstick types:
Crosshatched zone.
Crosshatched zone marked SAFE.
Crosshatched zone marked with MIN at the low
end of the range and MAX at the high end of the
range.
Crosshatched zone marked with dimples at the
MIN and the MAX ends of the range.
NOTE:
Always maintain the oil level within the crosshatch
m a
rkings on the dipstick.
Adding 1 quart (1.0 liters) of oil when the reading
is
at the low end of the dipstick range will raise the
oil level to the high end of the range marking.
ADDING WASHER FLUID
The windshield washer fluid reservoir is located in
the front of the engine compartment. Be sure to
check the fluid level at regular intervals. Fill the
reservoir with windshield washer solvent (not
radiator antifreeze) and operate the system for a
few seconds to flush out the residual water.
When refilling the washer fluid reservoir, apply
s om
e washer fluid to a cloth or towel and wipe the
wiper blades clean. This will help blade
performance.
To prevent freeze-up of your windshield washer
sy
stem in cold weather, select a solution or mixture
that meets or exceeds the temperature range of
your climate. This rating information can be found
on most washer fluid containers.
The fluid reservoir will hold nearly 1 gallon (4 liters)
of
washer fluid when the message “Low Washer
Fluid” appears in the instrument cluster.
MAINTENANCE-FREE BATTERY
Your vehicle is equipped with a maintenance-free
battery. You will never have to add water, nor is
periodic maintenance required.
NOTE:
The battery is stored under an access cover in the
t r
unk. Remote battery terminals are located in the
engine compartment for jump starting
Ú page 186.
CAUTION!
Overfilling or underfilling the crankcase will
cause aeration or loss of oil pressure. This could
damage your engine.
WARNING!
Commercially available windshield washer
solvents are flammable. They could ignite and
burn you. Care must be exercised when filling or
working around the washer solution.
WARNING!
Battery fluid is a corrosive acid solution and
can burn or even blind you. Do not allow
battery fluid to contact your eyes, skin, or
clothing. Do not lean over a battery when
attaching clamps. If acid splashes in eyes or
on skin, flush the area immediately with large
amounts of water
Ú page 186.
8