2021 CHRYSLER 300 check oil
[x] Cancel search: check oilPage 197 of 268
195
SERVICING AND MAINTENANCE
SCHEDULED SERVICING
This vehicle is equipped with an automatic oil
change indicator system. The oil change indicator
system will remind you that it is time to take your
vehicle in for scheduled maintenance.
Based on engine operation conditions, the oil
ch
ange indicator message will illuminate. This
means that service is required for the vehicle.
Operating conditions such as frequent short-trips,
trailer tow, and extremely hot or cold ambient
temperatures will influence when the “Change Oil”
or “Oil Change Required” message is displayed.
Have your vehicle serviced as soon as possible,
within the next 500 miles (805 km). The “Oil Change Required” message will be
di
splayed in the instrument cluster and a single
chime will sound, indicating that an oil change is
necessary.
An authorized dealer will reset the oil change
in
dicator message after completing the scheduled
oil change.
NOTE:
Under no circumstances should oil change
i n
tervals exceed 10,000 miles (16,000 km),
1 2
months or 350 hours of engine run time,
w h
ichever comes first. The 350 hours of engine
run or idle time is generally only a concern for fleet
customers. Once A Month Or Before A Long Trip:
Check engine oil level.
Check windshield washer fluid level.
Check tire pressure and look for unusual wear
or damage. Rotate tires at the first sign of irreg
-
ular wear, even if it occurs before your next
s c
heduled service.
Check the fluid levels of the coolant reservoir,
brake master cylinder, and power steering (if
equipped) and fill as needed.
Check function of all interior and exterior lights.
8
Page 203 of 268
SERVICING AND MAINTENANCE 201
(Continued)
CHECKING OIL LEVEL
To ensure proper engine lubrication, the engine oil
must be maintained at the correct level. Check the
oil level at regular intervals, such as every month.
The best time to check the engine oil level is about
five minutes after a fully warmed up engine is shut
off.
Checking the oil while the vehicle is on level ground
w i
ll improve the accuracy of the oil level readings.
There are four possible dipstick types:
Crosshatched zone.
Crosshatched zone marked SAFE.
Crosshatched zone marked with MIN at the low
end of the range and MAX at the high end of the
range.
Crosshatched zone marked with dimples at the
MIN and the MAX ends of the range.
NOTE:
Always maintain the oil level within the crosshatch
m a
rkings on the dipstick.
Adding 1 quart (1.0 liters) of oil when the reading
is
at the low end of the dipstick range will raise the
oil level to the high end of the range marking.
ADDING WASHER FLUID
The windshield washer fluid reservoir is located in
the front of the engine compartment. Be sure to
check the fluid level at regular intervals. Fill the
reservoir with windshield washer solvent (not
radiator antifreeze) and operate the system for a
few seconds to flush out the residual water.
When refilling the washer fluid reservoir, apply
s om
e washer fluid to a cloth or towel and wipe the
wiper blades clean. This will help blade
performance.
To prevent freeze-up of your windshield washer
sy
stem in cold weather, select a solution or mixture
that meets or exceeds the temperature range of
your climate. This rating information can be found
on most washer fluid containers.
The fluid reservoir will hold nearly 1 gallon (4 liters)
of
washer fluid when the message “Low Washer
Fluid” appears in the instrument cluster.
MAINTENANCE-FREE BATTERY
Your vehicle is equipped with a maintenance-free
battery. You will never have to add water, nor is
periodic maintenance required.
NOTE:
The battery is stored under an access cover in the
t r
unk. Remote battery terminals are located in the
engine compartment for jump starting
Ú page 186.
CAUTION!
Overfilling or underfilling the crankcase will
cause aeration or loss of oil pressure. This could
damage your engine.
WARNING!
Commercially available windshield washer
solvents are flammable. They could ignite and
burn you. Care must be exercised when filling or
working around the washer solution.
WARNING!
Battery fluid is a corrosive acid solution and
can burn or even blind you. Do not allow
battery fluid to contact your eyes, skin, or
clothing. Do not lean over a battery when
attaching clamps. If acid splashes in eyes or
on skin, flush the area immediately with large
amounts of water
Ú page 186.
8
Page 206 of 268
204 SERVICING AND MAINTENANCE
AIR CONDITIONER MAINTENANCE
For best possible performance, your air conditioner
should be checked and serviced by an authorized
dealer at the start of each warm season. This
service should include cleaning of the condenser
fins and a performance test. Drive belt tension
should also be checked at this time.
Refrigerant Recovery And Recycling
R-134a — If Equipped
R-134a Air Conditioning Refrigerant is a hydrofluo -
rocarbon (HFC) that is an ozone-friendly
s u
bstance. The manufacturer recommends that
air conditioning service be performed by an
authorized dealer or other service facilities using
recovery and recycling equipment.
NOTE:
Use only manufacturer approved A/C system PAG
c om
pressor oil and refrigerants.
Refrigerant Recovery And Recycling
R-1234yf — If Equipped
R-1234yf Air Conditioning Refrigerant is a hydroflu -
oroolefin (HFO) that is endorsed by the
E n
vironmental Protection Agency and is an
ozone-friendly substance with a low global-
warming potential. The manufacturer recommends that air conditioning service be
performed by an authorized dealer using recovery
and recycling equipment.
NOTE:
Use only manufacturer approved A/C system PAG
c om
pressor oil, and refrigerants.
Cabin Air Filter
The cabin air filter is located in the fresh air inlet
under the hood, behind a removable panel in the
cowl on the passenger side of the vehicle, next to
the windshield wipers. When installing a new cabin
air filter, ensure its proper orientation.
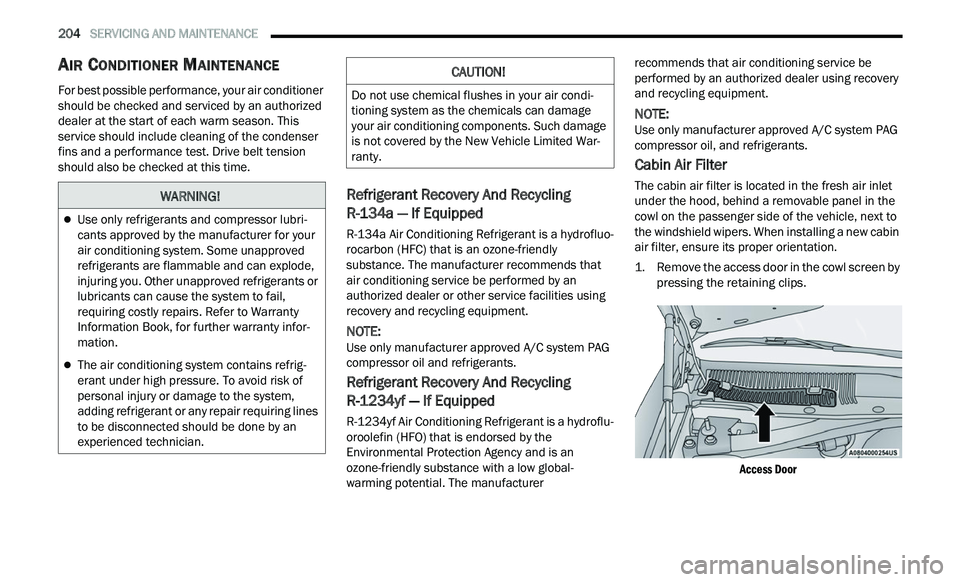
1. R emove the access door in the cowl screen by
p
ressing the retaining clips.
Access Door
WARNING!
Use only refrigerants and compressor lubri -
cants approved by the manufacturer for your
a i
r conditioning system. Some unapproved
refrigerants are flammable and can explode,
injuring you. Other unapproved refrigerants or
lubricants can cause the system to fail,
requiring costly repairs. Refer to Warranty
Information Book, for further warranty infor -
mation.
The air conditioning system contains refrig -
erant under high pressure. To avoid risk of
p e
rsonal injury or damage to the system,
adding refrigerant or any repair requiring lines
to be disconnected should be done by an
experienced technician.
CAUTION!
Do not use chemical flushes in your air condi -
tioning system as the chemicals can damage
y ou
r air conditioning components. Such damage
is not covered by the New Vehicle Limited War -
ranty.
Page 214 of 268
212 SERVICING AND MAINTENANCE
(Continued)
BRAKE SYSTEM
In order to ensure brake system performance, all
brake system components should be inspected
periodically
Ú page 195.
Fluid Level Check — Brake Master Cylinder
Check the fluid level in the master cylinder
immediately if the brake system warning light
indicates system failure.
Check the fluid level in the master cylinder when
pe
rforming underhood services.
Clean the top of the master cylinder area before
re
moving the cap. Add fluid to bring the level up to
the top of the “FULL” mark on the side of the
master cylinder reservoir.
Overfilling of fluid is not recommended because it
ma
y cause leaking in the system.
Add enough fluid to bring the level up to the
re
quirements described on the brake fluid reservoir. With disc brakes, fluid level can be
expected to fall as the brake pads wear. However,
low fluid level may be caused by a leak and a
checkup may be needed.
Use only brake fluid that has been recommended
b
y
the manufacturer, and has been kept in a tightly
closed container to avoid contamination from
foreign matter or moisture
Ú page 250.
AUTOMATIC TRANSMISSION
Special Additives
The manufacturer strongly recommends against
using any special additives in the transmission.
Automatic Transmission Fluid (ATF) is an
engineered product and its performance may be
impaired by supplemental additives. Therefore, do
not add any fluid additives to the transmission.
Avoid using transmission sealers as they may
adversely affect seals.
WARNING!
Riding the brakes can lead to brake failure and
possibly a collision. Driving with your foot resting
or riding on the brake pedal can result in
abnormally high brake temperatures, excessive
lining wear, and possible brake damage. You
would not have your full braking capacity in an
emergency.
WARNING!
Use only manufacturer's recommended brake
fluid Ú page 250. Using the wrong type of
brake fluid can severely damage your brake
s y
stem and/or impair its performance. The
proper type of brake fluid for your vehicle is
also identified on the original factory installed
hydraulic master cylinder reservoir.
To avoid contamination from foreign matter or
moisture, use only new brake fluid or fluid that
has been in a tightly closed container. Keep
the master cylinder reservoir cap secured at
all times. Brake fluid in a open container
absorbs moisture from the air resulting in a
lower boiling point. This may cause it to boil
unexpectedly during hard or prolonged
braking, resulting in sudden brake failure. This
could result in a collision.
Overfilling the brake fluid reservoir can result
in spilling brake fluid on hot engine parts,
causing the brake fluid to catch fire. Brake
fluid can also damage painted and vinyl
surfaces, care should be taken to avoid its
contact with these surfaces.
Do not allow petroleum based fluid to contam -
inate the brake fluid. Brake seal components
c ou
ld be damaged, causing partial or
complete brake failure. This could result in a
collision.
WARNING!
Page 215 of 268
SERVICING AND MAINTENANCE 213
Fluid Level Check
The fluid level is preset at the factory and does not
require adjustment under normal operating
conditions. Routine fluid level checks are not
required; therefore the transmission has no
dipstick. An authorized dealer can check your
transmission fluid level using special service tools.
If you notice fluid leakage or transmission
malfunction, visit an authorized dealer
immediately to have the transmission fluid level
checked. Operating the vehicle with an improper
fluid level can cause severe transmission damage.
Fluid And Filter Changes
Under normal operating conditions, the fluid
installed at the factory will provide satisfactory
lubrication for the life of the vehicle.
Routine fluid and filter changes are not required.
How e
ver, change the fluid and filter if the fluid
becomes contaminated (with water, etc.), or if the
transmission is disassembled for any reason.
Selection Of Lubricant
It is important to use the proper transmission fluid
to ensure optimum transmission performance and
life. Use only the manufacturer's specified
transmission fluid
Ú page 250. It is important to
maintain the transmission fluid at the correct level
u s
ing the recommended fluid.
NOTE:
No chemical flushes should be used in any trans -
mission; only the approved lubricant should be
u s
ed.
ALL WHEEL DRIVE (AWD) —
I
F EQUIPPED
The All Wheel Drive system consists of a transfer
case and front differential. The exterior surface of
these components should be inspected for
evidence of fluid leaks. Confirmed leaks should be
repaired as soon as possible.
The transfer case fluid fill/inspection plug is
l oc
ated in the middle of the rear housing. To
inspect the transfer case fluid level, remove the
fill/inspection plug. The fluid level should be even
with the bottom of the hole. Use this plug to add
fluid as required.
The front differential fill plug is located on the outer
cov
er near the half shaft attachment. To inspect
the differential fluid level, remove the fill plug. The
fluid level should be even with or slightly below the
bottom of the hole.
Fluid Changes
For the proper maintenance intervals Ú page 195.
REAR AXLE
For normal service, periodic fluid level checks are
not required. When the vehicle is serviced for other
reasons the exterior surfaces of the axle assembly
should be inspected. If gear oil leakage is
suspected inspect the fluid level
Ú page 250.
CAUTION!
Do not use chemical flushes in your
transmission as the chemicals can damage your
transmission components. Such damage is not
covered by the New Vehicle Limited Warranty.
CAUTION!
If a transmission fluid leak occurs, visit an
authorized dealer immediately. Severe
transmission damage may occur. An authorized
dealer has the proper tools to adjust the fluid
level accurately.CAUTION!
Using a transmission fluid other than the
manufacturer’s recommended fluid may cause
deterioration in transmission shift quality and/or
torque converter shudder
Ú page 250.
8
Page 247 of 268
245
TECHNICAL SPECIFICATIONS
VEHICLE IDENTIFICATION NUMBER (VIN)
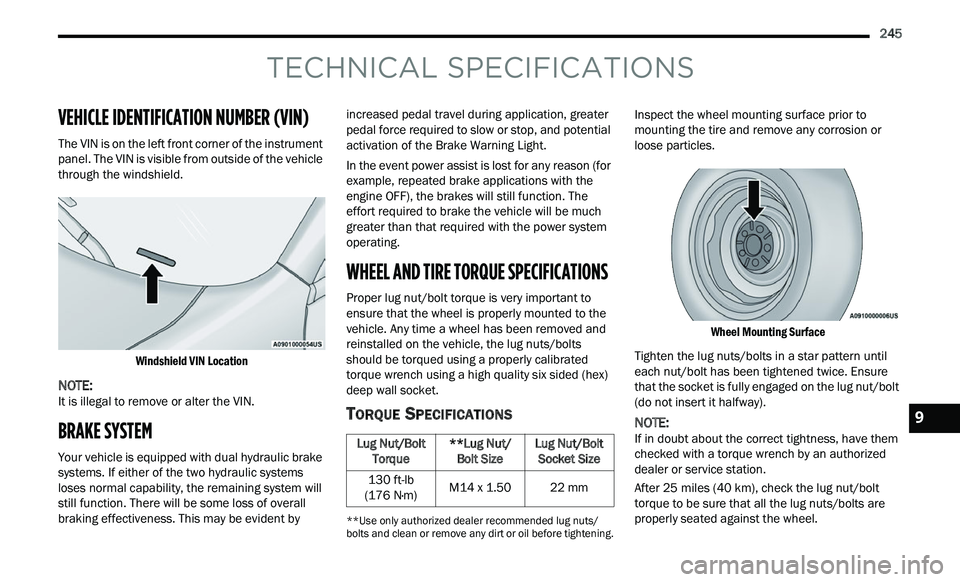
The VIN is on the left front corner of the instrument
panel. The VIN is visible from outside of the vehicle
through the windshield.
Windshield VIN Location
NOTE:
It is illegal to remove or alter the VIN.
BRAKE SYSTEM
Your vehicle is equipped with dual hydraulic brake
systems. If either of the two hydraulic systems
loses normal capability, the remaining system will
still function. There will be some loss of overall
braking effectiveness. This may be evident by increased pedal travel during application, greater
pedal force required to slow or stop, and potential
activation of the Brake Warning Light.
In the event power assist is lost for any reason (for
ex
ample, repeated brake applications with the
engine OFF), the brakes will still function. The
effort required to brake the vehicle will be much
greater than that required with the power system
operating.
WHEEL AND TIRE TORQUE SPECIFICATIONS
Proper lug nut/bolt torque is very important to
ensure that the wheel is properly mounted to the
vehicle. Any time a wheel has been removed and
reinstalled on the vehicle, the lug nuts/bolts
should be torqued using a properly calibrated
torque wrench using a high quality six sided (hex)
deep wall socket.
TORQUE SPECIFICATIONS
**Use only authorized dealer recommended lug nuts/
bolts and clean or remove any dirt or oil before tightening.
Inspect the wheel mounting surface prior to
mounting the tire and remove any corrosion or
loose particles.
Wheel Mounting Surface
Tighten the lug nuts/bolts in a star pattern until
ea
ch nut/bolt has been tightened twice. Ensure
that the socket is fully engaged on the lug nut/bolt
(do not insert it halfway).
NOTE:
If in doubt about the correct tightness, have them
c h
ecked with a torque wrench by an authorized
dealer or service station.
After 25 miles (40 km), check the lug nut/bolt
t or
que to be sure that all the lug nuts/bolts are
properly seated against the wheel.
Lug Nut/Bolt Torque**Lug Nut/Bolt Size Lug Nut/Bolt
Soc ket Size
130 ft-lb
( 1
76 N·m) M14 x 1.50
22 mm
9
Page 258 of 268
256
B
Back-Up.........................................................110Battery....................................................73, 201Charging System Light.................................73Keyless Key Fob Replacement....................13Location....................................................201Belts, Seat.....................................................176Beverage Holder Cooled (Cupholder)..............53Beverage Holder Heated (Cupholder)..............53Body Mechanism Lubrication........................206B-Pillar Location.............................................229Brake Assist System......................................138Brake Control System....................................138Brake Fluid..........................................212, 250Brake System......................................212, 245Fluid Check.....................................212, 250Master Cylinder.........................................212Parking........................................................84Warning Light.....................................72, 245Brake/Transmission Interlock.........................87Break-In Recommendations, New Vehicle.......84Brightness, Interior Lights................................44Bulb Replacement.........................................221Bulbs, Light..........................................178, 221
C
Camera, Rear................................................110Capacities, Fluid............................................248
Caps, Filler
Oil (Engine)...............................................199Radiator (Coolant Pressure).....................210Car Washes...................................................242Carbon Monoxide Warning............................178CargoVehicle Loading........................................113Cargo Area Cover.............................................61Cargo Compartment........................................61Cellular Phone..............................................136Certification Label.........................................113Chains, Tire...................................................239Chart, Tire Sizing...........................................226Check Engine Light (Malfunction Indicator
Light)................................................................79Checking Your Vehicle For Safety.................176Checks, Safety..............................................176Child Restraint..............................................166Child Restraints Booster Seats...........................................168Child Seat Installation..............................174How To Stow An unused ALR Seat Belt....172Infant And Child Restraints.......................167Lower Anchors And Tethers For Children..169Older Children And Child Restraints.........167Seating Positions......................................169Child Safety Locks...........................................23Clean Air Gasoline.........................................246
CleaningWheels......................................................238Climate Control................................................47Automatic....................................................47Coin Holder......................................................52Cold Weather Operation...................................83Compact Spare Tire......................................236ConsoleFloor............................................................52Contract, Service...........................................252Cooling Pressure Cap (Radiator Cap)............210Cooling System.............................................209Adding Coolant (Antifreeze)......................210Coolant Capacity.......................................248Coolant Level...................................209, 211Disposal Of Used Coolant.........................211Drain, Flush, And Refill.............................209Inspection.................................................211Points To Remember................................211Pressure Cap............................................210Radiator Cap.............................................210Selection Of Coolant
(Antifreeze).........................210, 248, 249Corrosion Protection.....................................242Cruise Control (Speed Control)..................92, 94Cruise Light...............................................77, 78Customer Assistance....................................251Cybersecurity................................................121
Page 259 of 268

257
D
Daytime Running Lights...................................41Dealer Service...............................................202Deck Lid
Power Release............................................60Defroster, Windshield....................................177Diagnostic System, Onboard...........................79Dimmer SwitchHeadlight.....................................................41DipsticksOil (Engine)................................................201Disable Vehicle Towing..................................193DisposalAntifreeze (Engine Coolant).......................211Door Ajar..........................................................73Door Ajar Light.................................................73Door LocksAutomatic....................................................22Child-Protection Door Lock — Rear Doors....23Doors...............................................................19Driver’s Seat Back Tilt.....................................27DrivingThrough Flowing, Rising, Or Shallow
Standing Water
.....................................120
E
Electric Brake Control System.......................138Anti-Lock Brake System.............................137Electronic Roll Mitigation.................138, 142
Electric Remote Mirrors...................................35
Electronic Power Distribution Center (Fuses)...214
Electronic Speed Control (Cruise Control)........93Electronic Stability Control (ESC)..................139Electronic Throttle Control Warning Light.........73Emergency Gas Can Refueling......................189Emergency, In Case Of Freeing Vehicle When Stuck.....................192Hazard Warning Flasher...........................179Jacking.....................................................182Jump Starting..................................186, 187Towing......................................................193Emission Control System Maintenance...........79Engine..................................................199, 200Air Cleaner................................................203Block Heater................................................84Break-In Recommendations........................84Checking Oil Level....................................201Compartment..................................199, 200Compartment Identification......................199Coolant (Antifreeze).........................209, 249Cooling.....................................................209Exhaust Gas Caution................................178Fails To Start...............................................83Flooded, Starting.........................................83Fuel Requirements...................................246Jump Starting..................................186, 187Oil...........................................202, 248, 249Oil Filler Cap.............................................199Oil Filter....................................................203
Oil Selection....................................202, 248
Oil Synthetic..............................................203Overheating..............................................190Starting........................................................81Enhanced Accident Response
Feature................................................164, 194Ethanol..........................................................247Exhaust Gas Cautions...................................178Exhaust System...................................178, 208Exterior Lighting...............................................40Exterior Lights........................................40, 178
F
Filters Air Cleaner
................................................203Air Conditioning.................................50, 204Engine Oil........................................203, 249Engine Oil Disposal...................................203Flashers........................................................179Hazard Warning........................................179Turn Signals................................43, 78, 178Flash-To-Pass...................................................41Flooded Engine Starting...................................83Floor Console...................................................52Fluid Capacities............................................248Fluid Leaks....................................................178Fluid Level ChecksBrake........................................................212Cooling System.........................................209Engine Oil.................................................201
Transfer Case...........................................213
11