2021 CHRYSLER 300 change time
[x] Cancel search: change timePage 69 of 268

GETTING TO KNOW YOUR INSTRUMENT PANEL 67
Instrument Cluster Display Controls
Up And Down Arrow Buttons:
Using the up
or down arrow buttons allows
you to cycle through the Main Menu Items.
Changes the Main Screen area and Menu Title
a r
ea.
Left And Right Arrow Buttons:
Using the left
or right arrow button allows
you to cycle through the submenu items of the
M a
in menu item.
NOTE:
Holding the up / down or left / right
a
rrow button will loop the user through the
c u
rrently selected menu or options presented
on the screen.
Upon returning to a main menu, the last
submenu screen viewed within that main menu
will be displayed.
OK Button:
For Digital Speedometer:
Pushing the OK button changes units (mph or
km/h).
For Screen Setup:
OK button allows user to enter menu and
submenus.
Within each submenu layer, the up and
down arrow buttons will allow the user to
select the item of interest.
Pushing the OK button makes the selection. A
confirmation screen will appear, returning the
user to the first page of the submenu.
Pushing the left arrow button will exit each
submenu layer and return to the main menu.
For the Trip and Fuel Economy menus:
Information is reset by pushing and holding the
OK button.
ENGINE OIL LIFE RESET
Oil Change Required
Your vehicle is equipped with an engine oil change
in
dicator system. The “Oil Change Required”
message will display in the instrument cluster
display for five seconds after a single chime has
sounded, to indicate the next scheduled oil change
interval. The engine oil change indicator system is
duty cycle based, which means the engine oil
change interval may fluctuate, dependent upon
your personal driving style.
Unless reset, this message will continue to display
e a
ch time you place the ignition in the ON/RUN
position. To turn off the message temporarily, push
and release the OK or arrow buttons. To reset the
oil change indicator system (after performing the
scheduled maintenance), refer to the following
procedure.
Vehicles Equipped With Keyless Enter ‘N Go™ —
I g
nition
Use the steering wheel instrument cluster display
con
trols for the following procedure(s):
1. Without pressing the brake pedal, push the E
NGINE START/STOP button and place the
ignition in the ON/RUN position (do not start
the engine).
1 — Left Arrow Button
2 — Up Arrow Button
3 — Right Arrow Button
4 — Down Arrow Button
5 — OK Button
3
Page 71 of 268
GETTING TO KNOW YOUR INSTRUMENT PANEL 69
The ACC screen may display once again if any ACC
activity occurs, which may include any of the
following:
Distance Setting Change
System Cancel
Driver Override
System Off
ACC Proximity Warning
ACC Unavailable Warning
LaneSense — If Equipped
The instrument cluster display displays the current
La n
eSense system settings Ú page 108. The
information displayed depends on LaneSense
s y
stem status. Push the LaneSense button
(located on the center stack below the Uconnect
display) until one of the following displays in the
instrument cluster display:
LaneSense Off
When LaneSense is deactivated, the display will
r e
ad “LaneSense Off.”
LaneSense On
When LaneSense is activated, the display will
re
ad “LaneSense On.”
Fuel Economy
The Fuel Economy Menu has two submenu pages;
one with Current Value (instantaneous calculation
of the fuel economy) displayed and one without the
Current Value displayed (toggle the left
or
right arrow button to select one):
Current Fuel Economy (MPG, L/100 km, or
km/L).
Range To Empty (miles or km).
Average Fuel Economy (MPG, L/100 km, or
km/L).
Lower end of gauge will be displayed in an
amber color and turn green as Fuel Economy
improves.
Hold the OK button to reset average fuel
economy information.
Trip Info
Push and release the up or down arrow
button until the Trip Menu item is displayed in the
i n
strument cluster display. Toggle the left
or
right arrow button to select Trip A or Trip B. The
Trip information will display the following:
Distance – Shows the total distance (mi or km)
traveled for Trip A or Trip B since the last reset.
Average Fuel Economy – Shows the average
fuel economy (MPG, L/100km or km/L) of Trip A
or Trip B since the last reset.
Elapsed Time – Shows the total elapsed time of
travel since the last reset.
Hold the OK
button to reset feature information.
Audio
This menu displays the Audio information of the
currently playing audio source (e.g. FM radio).
Messages
This feature shows the number of stored warning
messages, if any. Pushing the left
or right
a
rrow button will allow you to scroll through the
s t
ored messages.
Screen Setup
Push and release the up or down arrow
button until the Screen Setup Menu displays in the
i n
strument cluster display. Push and release the
OK button to enter the submenus. The Screen
Setup feature allows you to change what
information is displayed in the instrument cluster
as well as the location that information is
displayed.
NOTE:
Screen Setup is available only when the vehicle is
n ot
in motion.
1. Upper Left
Compass
Outside Temp
Time
3
Page 73 of 268
GETTING TO KNOW YOUR INSTRUMENT PANEL 71
NOTE:
The charging system is independent from load
reduction. The charging system performs a diag
-
nostic on the charging system continuously.
If the Battery Charge Warning Light is on it may
indicate a problem with the charging system
Ú page 73.
The electrical loads that may be switched off (if
e q
uipped), and vehicle functions which can be
affected by load reduction:
Heated Seat/Vented Seats/Heated Wheel —
If Equipped
Heated/Cooled Cup Holders — If Equipped
Rear Defroster And Heated Mirrors
HVAC System
115 Volts AC Power Inverter System
Audio and Telematics System
Loss of the battery charge may indicate one or
m or
e of the following conditions:
The charging system cannot deliver enough
electrical power to the vehicle system because
the electrical loads are larger than the capability
of the charging system. The charging system is
still functioning properly.
Turning on all possible vehicle electrical loads
(e.g. HVAC to max settings, exterior and interior
lights, overloaded power outlets +12 Volts, 115 Volts AC, USB ports) during certain driving
c
on
ditions (city driving, towing, frequent stop -
ping).
Installing options like additional lights, upfitter
electrical accessories, audio systems, alarms
and similar devices.
Unusual driving cycles (short trips separated by
long parking periods).
The vehicle was parked for an extended period
of time (weeks, months).
The battery was recently replaced and was not
charged completely.
The battery was discharged by an electrical load
left on when the vehicle was parked.
The battery was used for an extended period
with the engine not running to supply radio,
lights, chargers, +12 Volt portable appliances
like vacuum cleaners, game consoles and
similar devices.
What to do when an electrical load reduction
a c
tion message is present (“Battery Saver On” or
“Battery Saver Mode”)
During a trip:
Reduce power to unnecessary loads if possible:
Turn off redundant lights (interior or exte -
rior)
Check what may be plugged in to power
outlets +12 Volts, 115 Volts AC, USB ports
Check HVAC settings (blower, temperature)
Check the audio settings (volume)
After a trip:
Check if any aftermarket equipment was
installed (additional lights, upfitter electrical
accessories, audio systems, alarms) and review
specifications if any (load and Ignition Off Draw
currents).
Evaluate the latest driving cycles (distance,
driving time and parking time).
The vehicle should have service performed if
the message is still present during consecutive
trips and the evaluation of the vehicle and
driving pattern did not help to identify the cause.
PROGRAMMABLE FEATURES
The instrument cluster display can be used to view
or change the following settings. Push the up
or
down arrow button to scroll through the main
menus, then push the ri
ght arrow button to
scroll through the submenus of each menu item.
P u
sh the left arrow button to scroll back to a
previous menu or submenu.
WARNING LIGHTS AND MESSAGES
The warning/indicator lights will illuminate in the
instrument panel together with a dedicated
message and/or acoustic signal when applicable.
These indications are indicative and precautionary
3
Page 77 of 268
GETTING TO KNOW YOUR INSTRUMENT PANEL 75
If the ABS light does not turn on when the ignition
is placed in the ON/RUN or ACC/ON/RUN position,
have the brake system inspected by an authorized
dealer.
Electronic Stability Control (ESC) Active
Warning Light — If Equipped
This warning light will indicate when the
Electronic Stability Control system is
Ac
tive. The ESC Indicator Light in the
instrument cluster will come on when the
ignition is placed in the ON/RUN or ACC/ON/RUN
position, and when ESC is activated. It should go
out with the engine running. If the ESC Indicator
Light comes on continuously with the engine
running, a malfunction has been detected in the
ESC system. If this warning light remains on after
several ignition cycles, and the vehicle has been
driven several miles (kilometers) at speeds greater
than 30 mph (48 km/h), see an authorized dealer
a s
soon as possible to have the problem
diagnosed and corrected.
The ESC OFF Indicator Light and the ESC Indi -
cator Light come on momentarily each time the
ig nition is placed in the ON/RUN or ACC/ON/
RUN position.
The ESC system will make buzzing or clicking
sounds when it is active. This is normal; the
sounds will stop when ESC becomes inactive.
This light will come on when the vehicle is in an
ESC event.
Electronic Stability Control (ESC) OFF
Warning Light — If Equipped
This warning light indicates the ESC is off.
Each time the ignition is turned to ON/
R U
N or ACC/ON/RUN, the ESC system
will be on, even if it was turned off previously.
Service LaneSense Warning Light —
If Equipped
This warning light will illuminate when the
LaneSense system is not operating and
r e
quires service. Please see an
authorized dealer.
LaneSense Warning Light — If Equipped
The LaneSense system provides the
driver with visual and steering torque
w a
rnings when the vehicle starts to drift
out of its lane unintentionally without the
use of a turn signal.
When the LaneSense system senses a lane drift
situation, the LaneSense indicator changes
from solid green to solid yellow.
When the LaneSense system senses the lane
has been approached and is in a lane departure
situation, the LaneSense indicator changes
from solid white/green to flashing yellow
Ú page 108.
Low Fuel Warning Light
When the fuel level reaches
approximately 1.9 gal (7.13 L), this light
wi
ll turn on and a single chime will sound.
Low Washer Fluid Warning Light —
If Equipped
This warning light will illuminate when the
windshield washer fluid is low
Ú page 201.
Engine Check/Malfunction Indicator
Warning Light (MIL)
The Engine Check/Malfunction Indicator
Light (MIL) is a part of an Onboard
Di
agnostic System called OBD II that
monitors engine and automatic
transmission control systems. This warning light
will illuminate when the ignition is in the ON/RUN
position before engine start. If the bulb does not
come on when turning the ignition switch from OFF
to ON/RUN, have the condition checked promptly.
Certain conditions, such as a loose or missing gas
c a
p, poor quality fuel, etc., may illuminate the light
after engine start. The vehicle should be serviced if
the light stays on through several typical driving
styles. In most situations, the vehicle will drive
normally and will not require towing.
3
Page 84 of 268
82 STARTING AND OPERATING
To Turn Off The Engine Using ENGINE START/STOP
Button
1. Place the gear selector in PARK, then push
a
nd release the ENGINE START/STOP button.
2. The ignition will return to the OFF mode.
3
. I f the gear selector is not in PARK, the ENGINE
S
TART/STOP button must be held for two
seconds or three short pushes in a row with
the vehicle speed above 5 mph (8 km/h)
b e
fore the engine will shut off. The ignition will
remain in the ACC mode until the gear selector
is in PARK and the button is pushed twice to
the OFF mode.
4. I f the gear selector is not in PARK and the
E
NGINE START/STOP button is pushed once
with the vehicle speed above 5 mph (8 km/h),
th
e instrument cluster will display a “ Vehicle
Not In Park ” message and the engine will
remain running. Never leave a vehicle out of
the PARK position, or it could roll.
NOTE:
If the gear selector is not in PARK, and the ENGINE
S T
ART/STOP button is pushed once with the
vehicle speed below 5 mph (8 km/h), the engine
wi
ll shut off and the ignition will remain in the ACC
position. If vehicle speed drops below 1.2 mph
(1
.9 km/h), the vehicle will AutoPark Ú page 82. ENGINE START/STOP Button Functions — With
Dr
iver’s Foot OFF The Brake Pedal (In PARK Or
NEUTRAL Position)
The ENGINE START/STOP button operates similar
t o
an ignition switch. It has three modes: OFF, ACC,
and RUN. To change the ignition modes without
starting the vehicle and use the accessories, follow
these directions:
1. S tart with the ignition in the OFF mode.
2
. P ush the ENGINE START/STOP button once to
p
lace the ignition to the ACC mode.
3. Push the ENGINE START/STOP button a s
econd time to place the ignition to the RUN
mode.
4. P ush the ENGINE START/STOP button a third
t
ime to return the ignition to the OFF mode.
AUTOPARK
AutoPark is a supplemental feature to assist in
placing the vehicle in PARK should the situations
on the following pages occur. It is a back up system
and should not be relied upon as the primary
method by which the driver shifts the vehicle into
PARK.
The conditions under which AutoPark will engage
ar
e outlined on the following pages. If the vehicle is not in PARK and the driver turns off
t
h
e engine, the vehicle may AutoPark.
AutoPark will engage when all of these conditions
ar
e met:
Vehicle is equipped with a rotary selector and an
eight speed transmission
Vehicle is not in PARK
Vehicle speed is 1.2 mph (1.9 km/h) or less
Ignition switched from RUN to ACC
WARNING!
Driver inattention could lead to failure to place
the vehicle in PARK. ALWAYS DO A VISUAL
CHECK that your vehicle is in PARK by verifying
that a solid (not blinking) “P” is indicated in
the instrument cluster display and near the
gear selector. If the “P” indicator is blinking,
your vehicle is not in PARK. As an added
precaution, always apply the parking brake
when exiting the vehicle.
AutoPark is a supplemental feature. It is not
designed to replace the need to shift your
vehicle into PARK. It is a back up system and
should not be relied upon as the primary
method by which the driver shifts the vehicle
into PARK.
Page 86 of 268
84 STARTING AND OPERATING
AFTER STARTING
The idle speed is controlled automatically, and it
will decrease as the engine warms up.
ENGINE BLOCK HEATER — IF EQUIPPED
The engine block heater warms the engine, and
permits quicker starts in cold weather. Connect the
cord to a standard 110-115 Volt AC electrical
outlet with a grounded, three-wire extension cord.
The engine block heater must be plugged in at
le
ast one hour to have an adequate warming effect
on the engine.
The engine block heater cord is routed under the
h ood
on the driver side of the vehicle. It has a
removable cap that is located near the air box.
ENGINE BREAK-IN RECOMMENDATIONS
A long break-in period is not required for the
drivetrain (engine, transmission, and rear axle) in
your new vehicle.
Drive moderately during the first 300 miles
( 5
00 km). After the initial 60 miles (100 km),
s p
eeds up to 50 or 55 mph (80 or 90 km/h) are
d e
sirable.
While cruising, brief full-throttle acceleration within
th
e limits of local traffic laws contributes to a good
break-in. However, wide-open throttle acceleration
in low gear can be detrimental and should be
avoided.
The engine oil, transmission fluid, and axle
l u
bricant installed at the factory are high-quality
and energy-conserving. Oil, fluid, and lubricant
changes should be consistent with anticipated
climate and conditions under which vehicle
operations will occur. For the recommended
viscosity and quality grades
Ú page 249.
NOTE:
A new engine may consume some oil during its first
f e
w thousand miles (kilometers) of operation. This should be considered a normal part of the break-in
and not interpreted as an indication of difficulty.
Please check your oil level with the engine oil indi
-
cator often during the break in period. Add oil as
r e
quired.
PARKING BRAKE
Before leaving the vehicle, make sure that the
parking brake is fully applied and place the gear
selector in the PARK position.
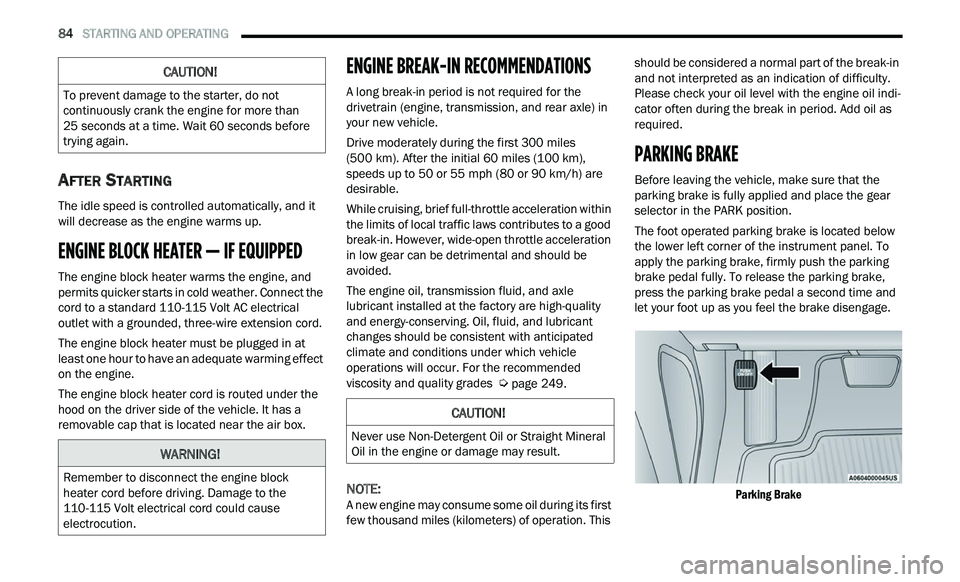
The foot operated parking brake is located below
th
e lower left corner of the instrument panel. To
apply the parking brake, firmly push the parking
brake pedal fully. To release the parking brake,
press the parking brake pedal a second time and
let your foot up as you feel the brake disengage.
Parking Brake
CAUTION!
To prevent damage to the starter, do not
continuously crank the engine for more than
25 seconds at a time. Wait 60 seconds before
t r
ying again.
WARNING!
Remember to disconnect the engine block
heater cord before driving. Damage to the
110-115 Volt electrical cord could cause
electrocution.
CAUTION!
Never use Non-Detergent Oil or Straight Mineral
Oil in the engine or damage may result.
Page 95 of 268
STARTING AND OPERATING 93
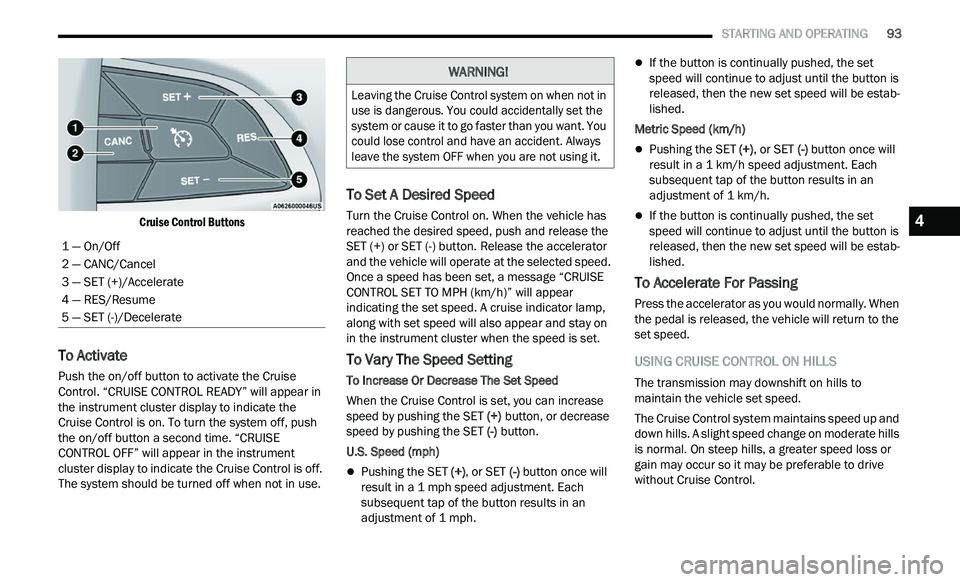
Cruise Control Buttons
To Activate
Push the on/off button to activate the Cruise
Control. “CRUISE CONTROL READY” will appear in
the instrument cluster display to indicate the
Cruise Control is on. To turn the system off, push
the on/off button a second time. “CRUISE
CONTROL OFF” will appear in the instrument
cluster display to indicate the Cruise Control is off.
The system should be turned off when not in use.
To Set A Desired Speed
Turn the Cruise Control on. When the vehicle has
reached the desired speed, push and release the
SET (+) or SET (-) button. Release the accelerator
and the vehicle will operate at the selected speed.
Once a speed has been set, a message “CRUISE
CONTROL SET TO MPH (km/h)” will appear
indicating the set speed. A cruise indicator lamp,
along with set speed will also appear and stay on
in the instrument cluster when the speed is set.
To Vary The Speed Setting
To Increase Or Decrease The Set Speed
When the Cruise Control is set, you can increase
sp
eed by pushing the SET (+) button, or decrease
speed by pushing the SET (-) button.
U.S. Speed (mph)
Pushing the SET (+) , or SET (-) button once will
result in a 1 mph speed adjustment. Each
s u
bsequent tap of the button results in an
adjustment of 1 mph.
If the button is continually pushed, the set
speed will continue to adjust until the button is
released, then the new set speed will be estab -
lished.
Metric Speed (km/h)
Pushing the SET (+), or SET (-) button once will
result in a 1 km/h speed adjustment. Each
s u
bsequent tap of the button results in an
adjustment of 1 km/h.
If the button is continually pushed, the set
speed will continue to adjust until the button is
released, then the new set speed will be estab -
lished.
To Accelerate For Passing
Press the accelerator as you would normally. When
the pedal is released, the vehicle will return to the
set speed.
USING CRUISE CONTROL ON HILLS
The transmission may downshift on hills to
maintain the vehicle set speed.
The Cruise Control system maintains speed up and
dow
n hills. A slight speed change on moderate hills
is normal. On steep hills, a greater speed loss or
gain may occur so it may be preferable to drive
without Cruise Control.
1 — On/Off
2 — CANC/Cancel
3 — SET (+)/Accelerate
4 — RES/Resume
5 — SET (-)/Decelerate
WARNING!
Leaving the Cruise Control system on when not in
use is dangerous. You could accidentally set the
system or cause it to go faster than you want. You
could lose control and have an accident. Always
leave the system OFF when you are not using it.
4
Page 98 of 268
96 STARTING AND OPERATING
Activating Adaptive Cruise Control (ACC)
The minimum set speed for the ACC system is
20 mph (32 km/h).
When the system is turned on and in the ready
s t
ate, the instrument cluster displays “ACC Ready.”
When the system is off, the instrument cluster
di
splay will read “Adaptive Cruise Control (ACC)
Off.”
NOTE:
You cannot engage ACC under the following condi -
tions:
When the brakes are applied
When the parking brake is applied
When the gear selector is in PARK, REVERSE or
NEUTRAL
When the vehicle speed is below the minimum
speed range
When the brakes are overheated
When the driver’s door is open at low speeds
When the driver’s seat belt is unbuckled at low
speeds
When there is a stationary vehicle in front of
your vehicle in close proximity
To Activate/Deactivate
Push and release the Adaptive Cruise Control
(ACC) on/off button. The ACC menu in the
instrument cluster displays “ACC Ready.”
To turn the system off, push and release the
A d
aptive Cruise Control (ACC) on/off button again.
At this time, the system will turn off and the
instrument cluster displays “Adaptive Cruise
Control (ACC) Off.”
To Set A Desired ACC Speed
When the vehicle reaches the speed desired, push
the SET (+) button or the SET (-) button and
release. The instrument cluster display will show
the set speed.
NOTE:
Fixed Speed Cruise Control can be used without
A C
C enabled. To change between the different
modes, push the ACC on/off button which turns
the ACC and the Fixed Speed Cruise Control off.
Pushing the Fixed Speed Cruise Control on/off button will result in turning on (changing to) Fixed
Speed Cruise Control mode.
If ACC is set when the vehicle speed is
be
low
20 mph (32 km/h), the set speed will default to
2 0
mph (32 km/h).
NOTE:
Fixed Speed Cruise Control cannot be set below
2 0
mph (32 km/h).
If either system is set when the vehicle speed is
a b
ove 20 mph (32 km/h), the set speed shall be
t h
e current speed of the vehicle.
NOTE:
Keeping your foot on the accelerator pedal can
cause the vehicle to continue to accelerate
beyond the set speed. If this occurs, the
message “DRIVER OVERRIDE” will display in the
instrument cluster display.
WARNING!
Leaving the Adaptive Cruise Control (ACC)
system on when not in use is dangerous. You
could accidentally set the system or cause it to
go faster than you want. You could lose control
and have a collision. Always leave the system off
when you are not using it.
WARNING!
In Fixed Speed Cruise Control mode, the system
will not react to vehicles ahead. In addition, the
proximity warning does not activate and no
alarm will sound even if you are too close to the
vehicle ahead since neither the presence of the
vehicle ahead nor the vehicle-to-vehicle distance
is detected. Be sure to maintain a safe distance
between your vehicle and the vehicle ahead.
Always be aware which mode is selected.