2021 CHRYSLER 300 warning lights
[x] Cancel search: warning lightsPage 5 of 268

3
EXTERIOR LIGHTS ................................................. 40
Headlight Switch.. .............................................40
Multifunction Lever . . ........................................40
Daytime Running Lights (DRLs). . .....................41
High/Low Beam Switch. . ..................................41
Automatic High Beam — If Equipped . . ...........41
Flash-To-Pass. . ..................................................41
Automatic Headlights . . ....................................41
Parking Lights . . ................................................41
Headlights On With Wipers . . ............................42
Adaptive Bi-Xenon High Intensity Discharge
Headlights — If Equipped . .
...............................42
Headlight Time Delay . . .....................................42
Lights-On Reminder . . .......................................42
Fog Lights — If Equipped . . ................................42
Turn Signals . . ....................................................43
Lane Change Assist — If Equipped . . ................43
INTERIOR LIGHTS . . ............................................... 43
Interior Courtesy Lights .. ..................................43
WINDSHIELD WIPERS AND WASHERS . . ............ 45
Windshield Wiper Operation .. ..........................45
Rain Sensing Wipers — If Equipped . . .............46
CLIMATE CONTROLS . . .......................................... 47
Automatic Climate Control Descriptions And
Functions . .........................................................47
A
utomatic Temperature Control (ATC) . . .........49
Climate Voice Commands. . ..............................50
Operating Tips . . ...............................................50 INTERIOR STORAGE AND EQUIPMENT .
.
............. 51
Storage..............................................................51
U SB/AUX Control . . ...........................................53
Lighted Cupholders — If Equipped . . ................53
Heated And Cooled Cupholders —
If Equipped . .
.....................................................53
Power Sunshade — If Equipped . . ....................54
Power Outlets . . .................................................54
WINDOWS . . ............................................................56
Power Window Controls .. .................................56
Automatic Window Features . . ........................56
Reset Auto-Up . . ................................................57
Window Lockout Switch . . .................................57
Wind Buffeting . . ...............................................57
PANORAMIC SUNROOF — IF EQUIPPED . . ...........58
Opening And Closing The Sunroof.. .................58
Pinch Protect Feature . . ....................................58
Venting Sunroof. . ..............................................59
Opening And Closing The Power Shade. . ........59
Sunroof Maintenance . . ....................................59
Ignition Off Operation. . .....................................59
HOOD . .....................................................................59
O pening The Hood.. ..........................................59
Closing The Hood . . ...........................................60
TRUNK . ...................................................................60
O pening The Trunk .. .........................................60
Closing The Trunk. . ...........................................60
Trunk Safety . . ...................................................61
Cargo Area Features . . .....................................61
LOAD LEVELING SYSTEM — IF EQUIPPED . . .......63
GETTING TO KNOW YOUR
INSTRUMENT PANEL
INSTRUMENT CLUSTER ........................................ 64
Instrument Cluster Descriptions .. .................. 66
INSTRUMENT CLUSTER DISPLAY . . ...................... 66
Location And Controls.. .................................... 66
Engine Oil Life Reset . . ..................................... 67
Instrument Cluster Display Selectable
Menu Items . .
.................................................... 68
Battery Saver On/Battery Saver Mode
Message — Electrical Load Reduction
Actions — If Equipped . .
.................................... 70
Programmable Features . . ................................ 71
WARNING LIGHTS AND MESSAGES . . ................. 71
Red Warning Lights .. ........................................72
Yellow Warning Lights . . .................................... 74
Yellow Indicator Lights . . ................................... 77
Green Indicator Lights . . ................................... 77
White Indicator Lights . . .................................... 78
Blue Indicator Lights . . ...................................... 78
ONBOARD DIAGNOSTIC SYSTEM — OBD II . . ...... 79
Onboard Diagnostic System
(OBD II) Cybersecurity . .
.................................... 79
EMISSIONS INSPECTION AND MAINTENANCE
PROGRAMS . .
.......................................................... 79
Page 10 of 268
8
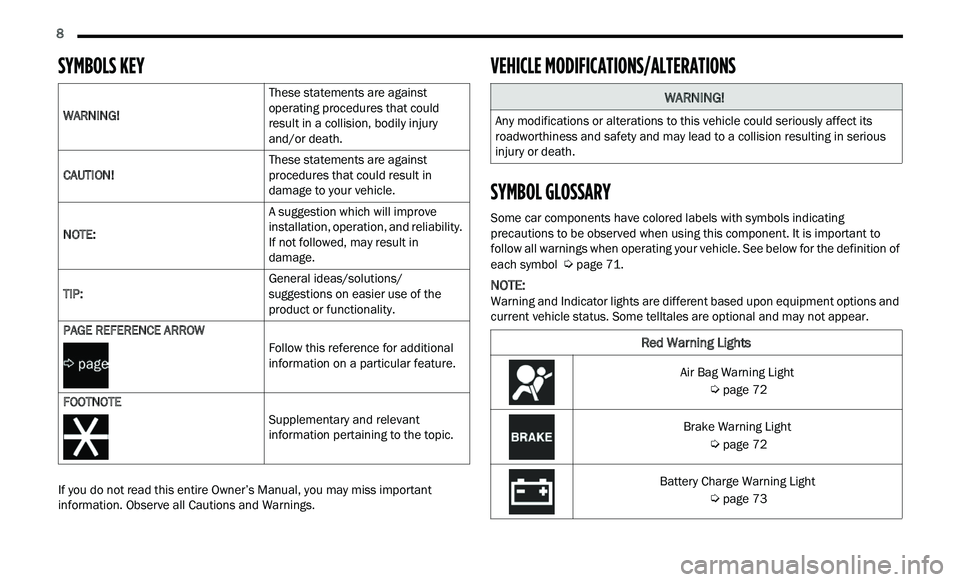
SYMBOLS KEY
If you do not read this entire Owner’s Manual, you may miss important
information. Observe all Cautions and Warnings.
VEHICLE MODIFICATIONS/ALTERATIONS
SYMBOL GLOSSARY
Some car components have colored labels with symbols indicating
precautions to be observed when using this component. It is important to
follow all warnings when operating your vehicle. See below for the definition of
each symbol
Ú page 71.
NOTE:
Warning and Indicator lights are different based upon equipment options and
c u
rrent vehicle status. Some telltales are optional and may not appear.
WARNING!
These statements are against
o
p
erating procedures that could
result in a collision, bodily injury
and/or death.
CAUTION! These statements are against
p
r
ocedures that could result in
damage to your vehicle.
NOTE: A suggestion which will improve
in
stallation, operation, and reliability.
If not followed, may result in
damage.
TIP: General ideas/solutions/
s
u
ggestions on easier use of the
product or functionality.
PAGE REFERENCE ARROW
Follow this reference for additional
in
formation on a particular feature.
FOOTNOTE Supplementary and relevant
in
formation pertaining to the topic.
WARNING!
Any modifications or alterations to this vehicle could seriously affect its
roadworthiness and safety and may lead to a collision resulting in serious
injury or death.
Red Warning Lights
Air Bag Warning Light
Ú page 72
Brake Warning Light
Ú page 72
Battery Charge Warning Light
Ú page 73
Page 11 of 268

9
Door Open Warning Light
Ú page 73
Electric Power Steering Fault Warning Light
Ú page 73
Electronic Throttle Control (ETC) Warning Light
Ú page 73
Engine Coolant Temperature Warning Light
Ú page 73
Oil Pressure Warning Light
Ú page 74
Oil Temperature Warning Light
Ú page 74
Seat Belt Reminder Warning Light
Ú page 73
Transmission Temperature Warning Light
Ú page 74
Red Warning Lights
Trunk Open Warning Light
Ú page 74
Vehicle Security Warning Light
Ú page 74
Yellow Warning Lights
Engine Check/Malfunction Indicator Warning Light (MIL)
Ú page 75
Electronic Stability Control (ESC) Active Warning Light
Ú page 75
Electronic Stability Control (ESC) OFF Warning Light
Ú page 75
Low Washer Fluid Warning Light
Ú page 75
Tire Pressure Monitoring System (TPMS) Warning Light
Ú page 76
Red Warning Lights
1
Page 12 of 268
10
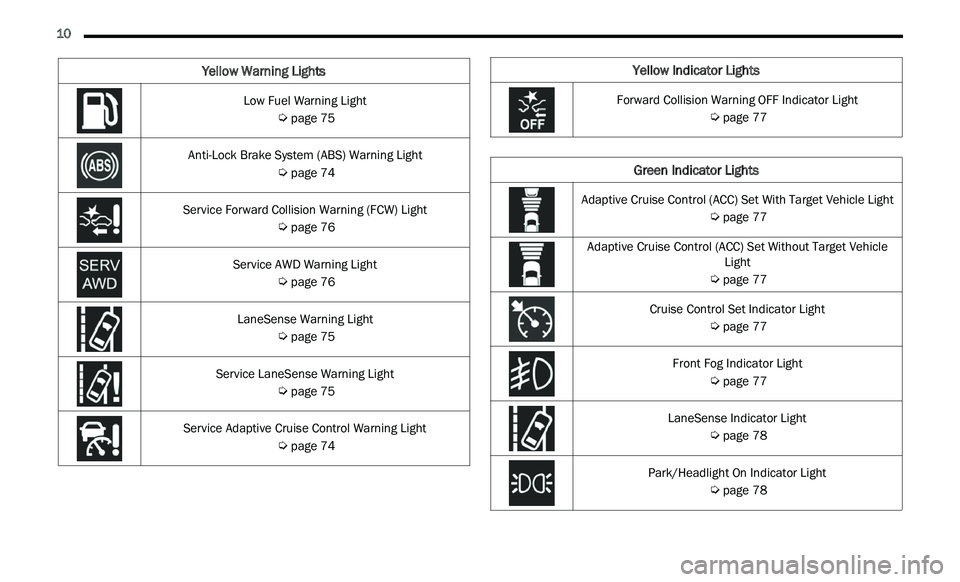
Low Fuel Warning Light
Ú page 75
Anti-Lock Brake System (ABS) Warning Light
Ú page 74
Service Forward Collision Warning (FCW) Light
Ú page 76
Service AWD Warning Light
Ú page 76
LaneSense Warning Light
Ú page 75
Service LaneSense Warning Light
Ú page 75
Service Adaptive Cruise Control Warning Light
Ú page 74
Yellow Warning LightsYellow Indicator Lights
Forward Collision Warning OFF Indicator Light
Ú page 77
Green Indicator Lights
Adaptive Cruise Control (ACC) Set With Target Vehicle Light
Ú page 77
Adaptive Cruise Control (ACC) Set Without Target Vehicle Lig
ht
Ú page 77
Cruise Control Set Indicator Light
Ú page 77
Front Fog Indicator Light
Ú page 77
LaneSense Indicator Light
Ú page 78
Park/Headlight On Indicator Light
Ú page 78
Page 18 of 268
16 GETTING TO KNOW YOUR VEHICLE
(Continued)
NOTE:
When opening the driver's door with the ignition in
ON/RUN (engine not running), a chime will sound
to remind you to place the ignition in the OFF posi-
tion. In addition to the chime, the message will
d i
splay “Ignition Or Accessory On” in the cluster.
For more information on proper engine starting
procedures, see Ú page 81.
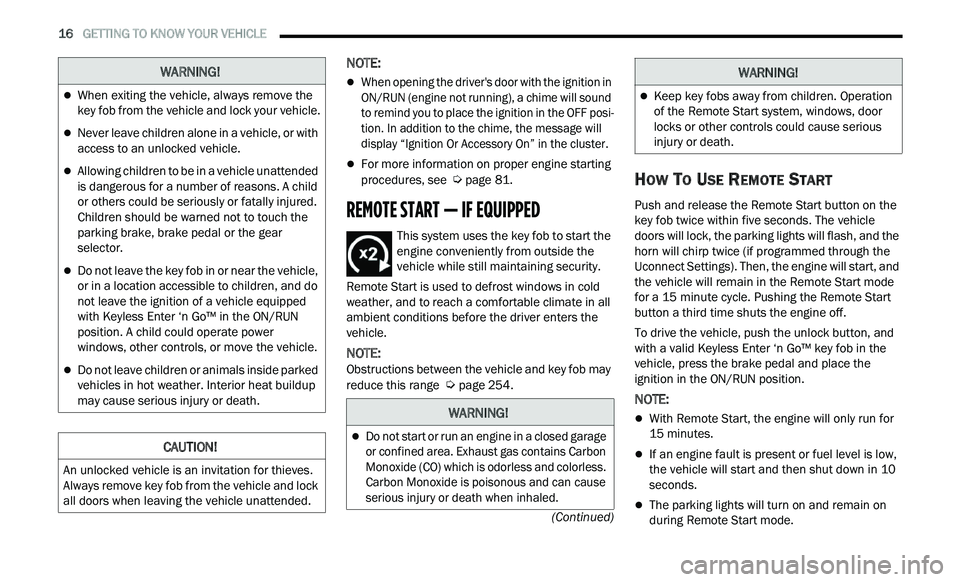
REMOTE START — IF EQUIPPED
This system uses the key fob to start the
engine conveniently from outside the
v
e
hicle while still maintaining security.
Remote Start is used to defrost windows in cold
we
ather, and to reach a comfortable climate in all
ambient conditions before the driver enters the
vehicle.
NOTE:
Obstructions between the vehicle and key fob may
r e
duce this range Ú page 254.
HOW TO USE REMOTE START
Push and release the Remote Start button on the
key fob twice within five seconds. The vehicle
doors will lock, the parking lights will flash, and the
horn will chirp twice (if programmed through the
Uconnect Settings). Then, the engine will start, and
the vehicle will remain in the Remote Start mode
for a 15
minute cycle. Pushing the Remote Start
bu
tton a third time shuts the engine off.
To drive the vehicle, push the unlock button, and
wi
th a valid Keyless Enter ‘n Go™ key fob in the
vehicle, press the brake pedal and place the
ignition in the ON/RUN position.
NOTE:
With Remote Start, the engine will only run for
15 minutes.
If an engine fault is present or fuel level is low,
the vehicle will start and then shut down in 10
seconds.
The parking lights will turn on and remain on
during Remote Start mode.
WARNING!
When exiting the vehicle, always remove the
key fob from the vehicle and lock your vehicle.
Never leave children alone in a vehicle, or with
access to an unlocked vehicle.
Allowing children to be in a vehicle unattended
is dangerous for a number of reasons. A child
or others could be seriously or fatally injured.
Children should be warned not to touch the
parking brake, brake pedal or the gear
selector.
Do not leave the key fob in or near the vehicle,
or in a location accessible to children, and do
not leave the ignition of a vehicle equipped
with Keyless Enter ‘n Go™ in the ON/RUN
position. A child could operate power
windows, other controls, or move the vehicle.
Do not leave children or animals inside parked
vehicles in hot weather. Interior heat buildup
may cause serious injury or death.
CAUTION!
An unlocked vehicle is an invitation for thieves.
Always remove key fob from the vehicle and lock
all doors when leaving the vehicle unattended.
WARNING!
Do not start or run an engine in a closed garage
or confined area. Exhaust gas contains Carbon
Monoxide (CO) which is odorless and colorless.
Carbon Monoxide is poisonous and can cause
serious injury or death when inhaled.
Keep key fobs away from children. Operation
of the Remote Start system, windows, door
locks or other controls could cause serious
injury or death.
WARNING!
Page 33 of 268
GETTING TO KNOW YOUR VEHICLE 31
Rear Heated Seats — If Equipped
On some models, the two rear outboard seats may
be equipped with heated seats. There are two
heated seat switches that allow the rear
passengers to operate the seats independently.
The heated seat switches for each heater are
located on the rear of the center console. You can choose from HI, LO, or OFF heat settings.
A
m
ber indicator lights in each switch indicate the
level of heat in use. Two indicator lights will
illuminate for HI, one for LO and none for OFF.
Push the heated seat button once to turn the
HI setting on.
Push the heated seat button a second time
to turn the LO setting on.
Push the heated seat button a third time to
turn the heating elements off.
When the HI-level setting is selected, the heater
w i
ll provide a boosted heat level during the first
four minutes of operation. Then, the heat output
will drop to the normal HI-level. If the HI-level
setting is selected, the system will automatically
switch to LO-level after approximately 60 minutes
of
continuous operation. At that time, the number
of indicator lights changes from two to one,
indicating the change. The LO-level setting will turn
off automatically after approximately 45 minutes.
NOTE:
Once a heat setting is selected, heat will be felt
within two to five minutes.
The engine must be running for the heated
seats to operate.
FRONT VENTILATED SEATS —
I
F EQUIPPED
The ventilated seats are equipped with fans that
can be controlled through the climate and control
screen in the Uconnect system. The fans operate
at two speeds, HI and LO.
Press the ventilated seat button once to
choose HI.
Press the ventilated seat button a second
time to choose LO.
Press the ventilated seat button a third time
to turn the ventilated seat off.
WARNING!
Persons who are unable to feel pain to the
skin because of advanced age, chronic illness,
diabetes, spinal cord injury, medication,
alcohol use, exhaustion or other physical
condition must exercise care when using the
seat heater. It may cause burns even at low
temperatures, especially if used for long
periods of time.
Do not place anything on the seat or seatback
that insulates against heat, such as a blanket
or cushion. This may cause the seat heater to
overheat. Sitting in a seat that has been over -
heated could cause serious burns due to the
i n
creased surface temperature of the seat.
WARNING!
Persons who are unable to feel pain to the skin
because of advanced age, chronic illness,
diabetes, spinal cord injury, medication, alcohol
use, exhaustion or other physical condition
must exercise care when using the seat heater.
It may cause burns even at low temperatures,
especially if used for long periods of time.
Do not place anything on the seat or seatback
that insulates against heat, such as a blanket or
cushion. This may cause the seat heater to
overheat. Sitting in a seat that has been over -
heated could cause serious burns due to the
i n
creased surface temperature of the seat.
2
Page 37 of 268

GETTING TO KNOW YOUR VEHICLE 35
OUTSIDE MIRRORS
The outside mirror(s) can be adjusted to the center
of the adjacent lane of traffic to achieve the
optimal view.
DRIVER'S OUTSIDE AUTOMATIC
D
IMMING MIRROR — IF EQUIPPED
The driver’s outside mirror will automatically adjust
for glare from vehicles behind you. This feature is
controlled by the inside automatic dimming mirror
and will automatically adjust for headlight glare
when the inside mirror adjusts.
OUTSIDE MIRRORS WITH TURN SIGNAL
A
ND APPROACH LIGHTING —
I
F EQUIPPED
Driver and passenger outside mirrors with turn
signal and approach lighting contain four LEDs,
which are located in the upper outer corner of each
mirror.
Three of the LEDs are turn signal indicators, which
fl
ash with the corresponding turn signal lights in
the front and rear of the vehicle. Turning on the
Hazard Warning flashers will also activate these
LEDs.
The fourth LED supplies illuminated entry lighting,
w h
ich turns on in both mirrors when you use the
key fob or open any door. This LED shines outward
to illuminate the front and rear door handles. It
also shines downward to illuminate the area in
front of the doors.
The illuminated entry lighting fades to off after
ab
out 30 seconds or it will fade to off immediately
once the ignition is placed into the ON/RUN
position.
NOTE:
The approach lighting will not function when the
g e
ar selector is moved out of the PARK position.
POWER MIRRORS
The power mirror controls are located on the
driver's door trim panel.
The power mirror controls consist of mirror select
bu
ttons and a four-way mirror control switch. To
adjust a mirror, push the mirror select button for
the mirror that you want to adjust. Using the mirror
control switch, push on any of the four arrows for
the direction that you want the mirror to move.
Power Mirror Controls
Power mirror positions can be saved with a Driver
M e
mory Settings profile Ú page 26.
WARNING!
Vehicles and other objects seen in an outside
convex mirror will look smaller and farther away
than they really are. Relying too much on side
convex mirrors could cause you to collide with
another vehicle or other object. Use your inside
mirror when judging the size or distance of a
vehicle seen in a side convex mirror.
1 — Left Mirror Selection
2 — Mirror Direction Control
3 — Right Mirror Selection
2
Page 43 of 268
GETTING TO KNOW YOUR VEHICLE 41
DAYTIME RUNNING LIGHTS (DRLS)
The Daytime Running Lights will turn on when the
engine is started and will remain on unless the
headlights are turned to the on position, the
parking brake is applied, or the ignition is placed in
the OFF position.
NOTE:
For vehicles sold in Canada, the Daytime
Running Lights will automatically deactivate
when the front fog lights are turned on.
If allowed by law in the country in which the
vehicle was purchased, the Daytime Running
Lights can be turned on and off using the
Uconnect system
Ú page 122.
On some vehicles, the Daytime Running Lights
may deactivate or reduce intensity on one side
of the vehicle (when a turn signal is activated on
that side), or on both sides of the vehicle (when
the hazard warning lights are activated).
HIGH/LOW BEAM SWITCH
Push the multifunction lever toward the instrument
panel to switch the headlights to high beams.
Pulling the multifunction lever back will turn the
low beams on.
AUTOMATIC HIGH BEAM — IF EQUIPPED
The Automatic High Beam Headlamp Control
system provides increased forward lighting at night
by automating high beam control through the use
of a digital camera mounted on the inside rearview
mirror. This camera detects vehicle specific light
and automatically switches from high beams to low
beams until the approaching vehicle is out of view.
NOTE:
The Automatic High Beam Headlamp Control
can be turned on or off by selecting or dese
-
lecting “Auto High Beam” within Uconnect
Se
ttings Ú page 122, as well as turning the
headlight switch to the AUTO position.
Broken, muddy, or obstructed headlights and
taillights of vehicles in the field of view will
cause headlights to remain on longer (closer to
the vehicle). Also, dirt, film, and other obstruc -
tions on the windshield or camera lens will
c a
use the system to function improperly.
If the windshield or Automatic High Beam Head -
lamp Control mirror is replaced, the mirror must
b e
re-aimed to ensure proper performance. See
a local authorized dealer.
FLASH-TO-PASS
You can signal another vehicle with your headlights
by lightly pulling the multifunction lever toward you. This will cause the high beam headlights to turn on,
and remain on, until the lever is released.
AUTOMATIC HEADLIGHTS
This system automatically turns the headlights on
or off according to ambient light levels. To turn the
system on, rotate the headlight switch
counterclockwise to the AUTO position. When the
system is on, the headlight time delay feature is
also on. This means the headlights will stay on for
up to 90 seconds after placing the ignition in the
OFF position. The headlight time delay can be
programmed 0/30/60/90 seconds within
Uconnect Settings
Ú page 122.
To turn the automatic system off, move the
h e
adlight switch out of the AUTO position.
NOTE:
The engine must be running before the headlights
w i
ll come on in the automatic mode.
PARKING LIGHTS
To turn on the parking lights and instrument panel
lights, rotate the headlight switch clockwise. To
turn off the parking lights, rotate the headlight
switch back to the O (off) position.
NOTE:
For vehicles sold in Canada, rotate the headlight
s w
itch to the AUTO position to turn off the parking
lights.
2