2021 CHEVROLET SILVERADO 2500HD power steering
[x] Cancel search: power steeringPage 241 of 433
Chevrolet Silverado 2500 HD/3500 HD Owner Manual (GMNA-Localizing-U.
S./Canada/Mexico-14632154) - 2021 - CRC - 11/20/20
240 Driving and Operating
The actual 4x4 shift request is only made
after the button is released. The 4x4 graphic
will remain flashing until the shift request
has completed.
A DIC message displays. Once the 4x4 shift
has completed, the DIC message disappears,
the 4x4 graphic stops flashing, and the
current setting is indicated.
Brakes
Antilock Brake System (ABS)
The Antilock Brake System (ABS) helps
prevent a braking skid and maintain steering
while braking hard.
ABS performs a system check when the
vehicle is first driven. A momentary motor
or clicking noise may be heard while this
test is going on, and the brake pedal may
move slightly. This is normal.
If there is a problem with ABS, this warning
light stays on. SeeAntilock Brake System
(ABS) Warning Light 0114.
ABS does not change the time needed to
get a foot on the brake pedal and does not
always decrease stopping distance. If you
get too close to the vehicle ahead, there will
not be enough time to apply the brakes if
that vehicle suddenly slows or stops. Always
leave enough room ahead to stop, even
with ABS.
Using ABS
Do not pump the brakes. Just hold the brake
pedal down firmly. Hearing or feeling ABS
operate is normal.
Braking in Emergencies
ABS allows steering and braking at the same
time. In many emergencies, steering can
help even more than braking.
Electric Parking Brake
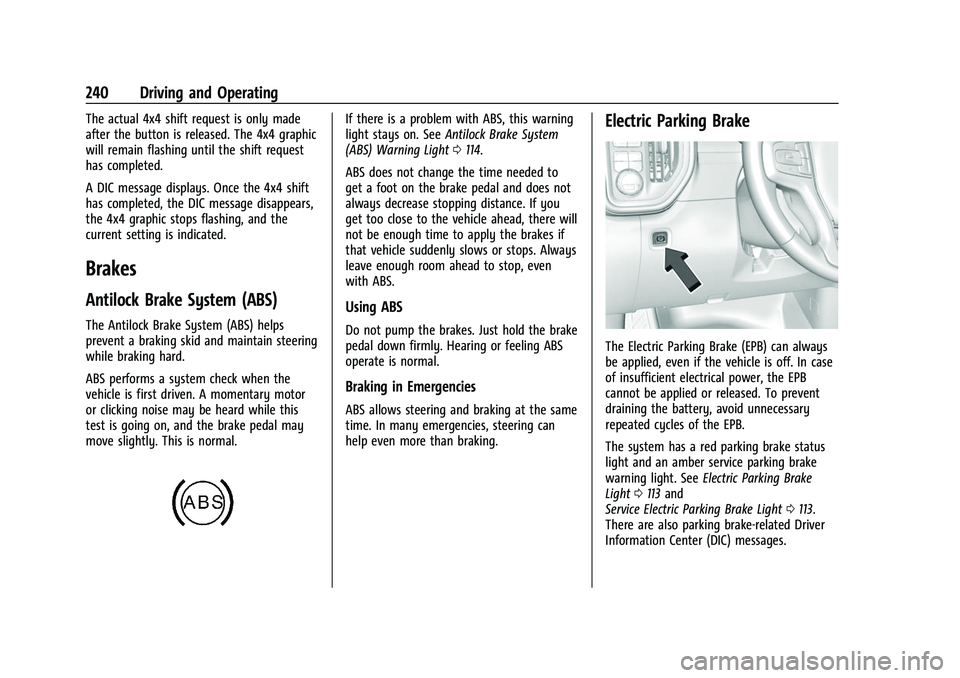
The Electric Parking Brake (EPB) can always
be applied, even if the vehicle is off. In case
of insufficient electrical power, the EPB
cannot be applied or released. To prevent
draining the battery, avoid unnecessary
repeated cycles of the EPB.
The system has a red parking brake status
light and an amber service parking brake
warning light. See Electric Parking Brake
Light 0113 and
Service Electric Parking Brake Light 0113.
There are also parking brake-related Driver
Information Center (DIC) messages.
Page 283 of 433
Chevrolet Silverado 2500 HD/3500 HD Owner Manual (GMNA-Localizing-U.
S./Canada/Mexico-14632154) - 2021 - CRC - 11/20/20
282 Driving and Operating
Tow/Haul Mode is most useful when towing
a heavy trailer or carrying a large or
heavy load:
.Through rolling terrain.
.In stop-and-go traffic.
.In busy parking lots.
Operating the vehicle in Tow/Haul Mode
when lightly loaded or not towing will not
cause damage; however, it is not
recommended and may result in unpleasant
engine and transmission driving
characteristics, heavy or light steering
efforts, and reduced fuel economy.
Integrated Trailer Brake Control System
The vehicle may have an Integrated Trailer
Brake Control (ITBC) system for use with
electric trailer brakes or most electric over
hydraulic trailer brake systems. These
instructions apply to both types of electric
trailer brakes.
This symbol is on the Trailer Brake Control
Panel on vehicles with an ITBC system. The
power output to the trailer brakes is
proportional to the amount of vehicle
braking. This available power output to the
trailer brakes can be adjusted to a wide
range of trailering situations.
The ITBC system is integrated with the
vehicle’s brake, antilock brake, and
StabiliTrak/Electronic Stability Control (ESC)
systems. In trailering conditions that cause
the vehicle’s antilock brake or StabiliTrak/
ESC systems to activate, power sent to the
trailer's brakes will be automatically
adjusted to minimize trailer wheel lock-up.
This does not imply that the trailer has
StabiliTrak/ESC.
If the vehicle’s brake, antilock brake,
or StabiliTrak/ESC systems are not
functioning properly, the ITBC system may
not function fully or at all. Make sure all of
these systems are fully operational to allow
the ITBC system to function properly.
The ITBC system is powered through the
vehicle's electrical system. Turning the
ignition off will also turn off the ITBC
system. The ITBC system is fully functional
only when the ignition is in on.{Warning
Connecting a trailer that has an air brake
system may result in reduced or
complete loss of trailer braking, including
increased stopping distance or trailer
instability which could result in serious
injury, death, or property damage. Only
use the ITBC system with electric or
electric over hydraulic trailer brake
systems.
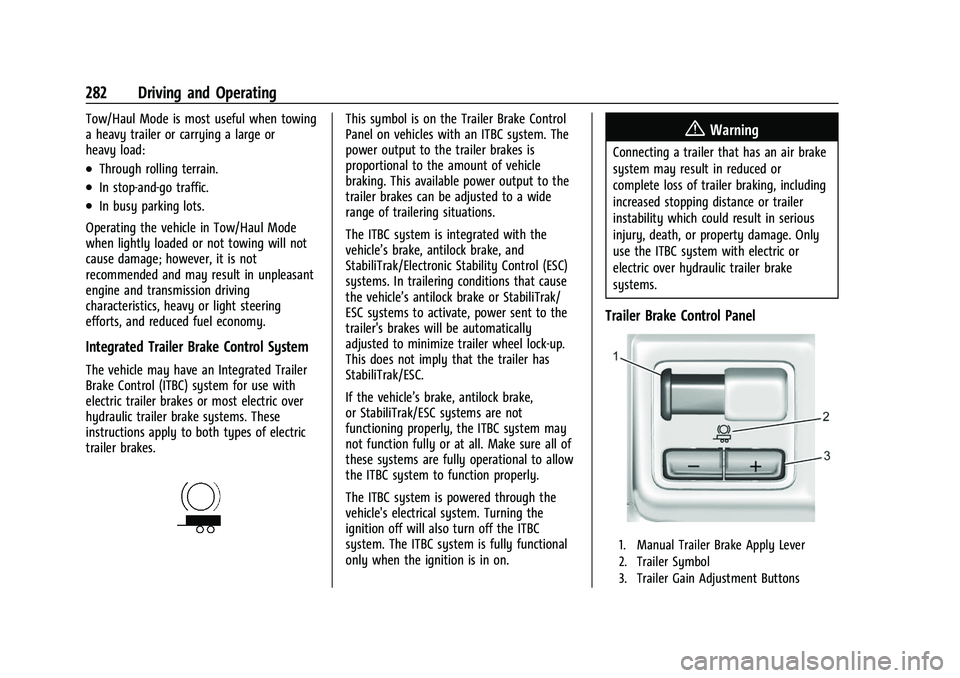
Trailer Brake Control Panel
1. Manual Trailer Brake Apply Lever
2. Trailer Symbol
3. Trailer Gain Adjustment Buttons
Page 301 of 433

Chevrolet Silverado 2500 HD/3500 HD Owner Manual (GMNA-Localizing-U.
S./Canada/Mexico-14632154) - 2021 - CRC - 11/20/20
300 Vehicle Care
Vehicle Care
General Information
General Information . . . . . . . . . . . . . . . . . . . 301
California Proposition 65 Warning . . . . . 301
California Perchlorate MaterialsRequirements . . . . . . . . . . . . . . . . . . . . . . . . 301
Accessories and Modifications . . . . . . . . . 302
Vehicle Checks
Doing Your Own Service Work . . . . . . . . 302
Hood . . . . . . . . . . . . . . . . . . . . . . . . . . . . . . . . . . 302
Engine Compartment Overview . . . . . . . 304
Engine Oil . . . . . . . . . . . . . . . . . . . . . . . . . . . . . 305
Engine Oil Life System . . . . . . . . . . . . . . . . 307
Automatic Transmission Fluid . . . . . . . . . 308
Engine Air Filter Life System . . . . . . . . . . 308
Engine Air Cleaner/Filter . . . . . . . . . . . . . . 309
Cooling System . . . . . . . . . . . . . . . . . . . . . . . . 310
Engine Overheating . . . . . . . . . . . . . . . . . . . . 312
Overheated Engine Protection Operating Mode . . . . . . . . . . . . . . . . . . . . . 314
Engine Fan . . . . . . . . . . . . . . . . . . . . . . . . . . . . 314
Power Steering Fluid . . . . . . . . . . . . . . . . . . . 314
Washer Fluid . . . . . . . . . . . . . . . . . . . . . . . . . . 315
Brakes . . . . . . . . . . . . . . . . . . . . . . . . . . . . . . . . . 316
Brake Pad Life System . . . . . . . . . . . . . . . . . 316
Brake Fluid . . . . . . . . . . . . . . . . . . . . . . . . . . . . . 317
Battery - North America . . . . . . . . . . . . . . . 318
Four-Wheel Drive . . . . . . . . . . . . . . . . . . . . . . 320 Front Axle . . . . . . . . . . . . . . . . . . . . . . . . . . . . . 320
Rear Axle . . . . . . . . . . . . . . . . . . . . . . . . . . . . . . 320
Noise Control System . . . . . . . . . . . . . . . . . 320
Starter Switch Check . . . . . . . . . . . . . . . . . . . 321
Automatic Transmission Shift Lock
Control Function Check . . . . . . . . . . . . . . 322
Ignition Transmission Lock Check . . . . . . 322
Park Brake and P (Park) Mechanism Check . . . . . . . . . . . . . . . . . . . . . . . . . . . . . . . . 322
Wiper Blade Replacement . . . . . . . . . . . . . 322
Glass Replacement . . . . . . . . . . . . . . . . . . . . . 323
Windshield Replacement . . . . . . . . . . . . . . . 323
Gas Strut(s) . . . . . . . . . . . . . . . . . . . . . . . . . . . . 323
Headlamp Aiming
Front Headlamp Aiming . . . . . . . . . . . . . . . 324
Bulb Replacement
Bulb Replacement . . . . . . . . . . . . . . . . . . . . . 324
Halogen Bulbs . . . . . . . . . . . . . . . . . . . . . . . . . 325
LED Lighting . . . . . . . . . . . . . . . . . . . . . . . . . . . 325
Headlamps, Front Turn Signal, Sidemarker, and Parking Lamps . . . . . . 325
Taillamps, Turn Signal, Stoplamps, and Back-Up Lamps . . . . . . . . . . . . . . . . . . . . . . 326
Center High-Mounted Stoplamp (CHMSL) and Cargo Lamp . . . . . . . . . . . . 327
License Plate Lamp . . . . . . . . . . . . . . . . . . . . 328
Electrical System
Electrical System Overload . . . . . . . . . . . . 328 Fuses and Circuit Breakers . . . . . . . . . . . . . 329
Engine Compartment Fuse Block . . . . . . 329
Instrument Panel Fuse Block (Left) . . . . . 332
Instrument Panel Fuse Block (Right) . . . 334
Wheels and Tires
Tires . . . . . . . . . . . . . . . . . . . . . . . . . . . . . . . . . . 336
All-Season Tires . . . . . . . . . . . . . . . . . . . . . . . . 337
Winter Tires . . . . . . . . . . . . . . . . . . . . . . . . . . . 337
All-Terrain Tires . . . . . . . . . . . . . . . . . . . . . . . . 337
Tire Sidewall Labeling . . . . . . . . . . . . . . . . . 338
Tire Designations . . . . . . . . . . . . . . . . . . . . . . 339
Tire Terminology and Definitions . . . . . . 339
Tire Pressure . . . . . . . . . . . . . . . . . . . . . . . . . . . 341
Tire Pressure Monitor System . . . . . . . . . 342
Tire Pressure Monitor Operation . . . . . . 343
Tire Inspection . . . . . . . . . . . . . . . . . . . . . . . . 348
Tire Rotation . . . . . . . . . . . . . . . . . . . . . . . . . . 348
When It Is Time for New Tires . . . . . . . . 350
Buying New Tires . . . . . . . . . . . . . . . . . . . . . . 351
Different Size Tires and Wheels . . . . . . . . 352
Uniform Tire Quality Grading . . . . . . . . . . 352
Wheel Alignment and Tire Balance . . . . 354
Wheel Replacement . . . . . . . . . . . . . . . . . . . 354
Tire Chains . . . . . . . . . . . . . . . . . . . . . . . . . . . . 354
If a Tire Goes Flat . . . . . . . . . . . . . . . . . . . . . 355
Tire Changing . . . . . . . . . . . . . . . . . . . . . . . . . 356
Full-Size Spare Tire . . . . . . . . . . . . . . . . . . . . 366
Jump Starting
Jump Starting - North America . . . . . . . . 367
Page 306 of 433
Chevrolet Silverado 2500 HD/3500 HD Owner Manual (GMNA-Localizing-U.
S./Canada/Mexico-14632154) - 2021 - CRC - 11/20/20
Vehicle Care 305
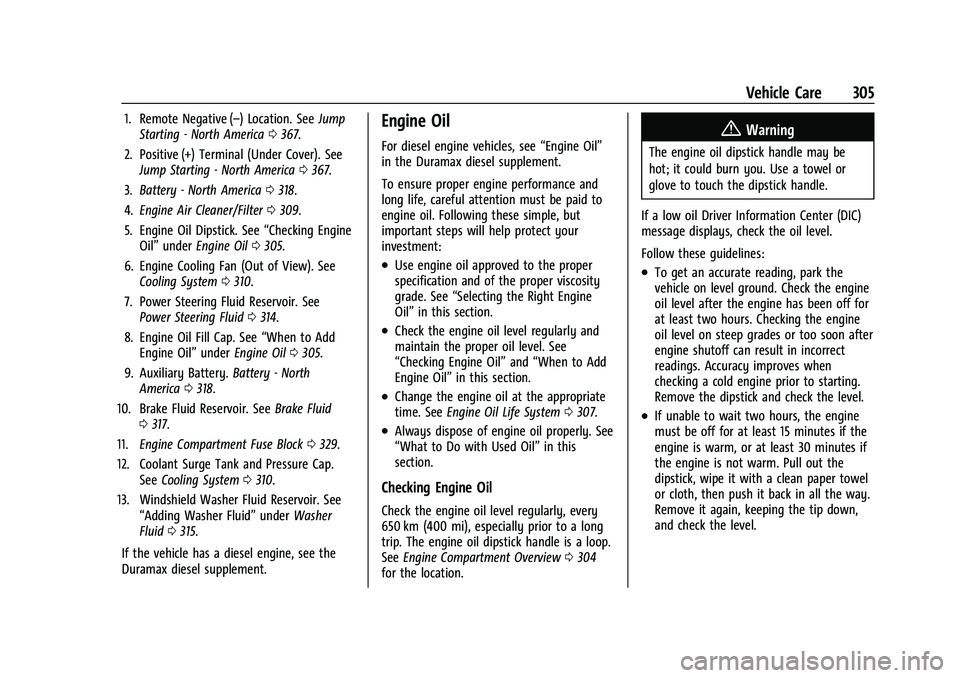
1. Remote Negative (–) Location. SeeJump
Starting - North America 0367.
2. Positive (+) Terminal (Under Cover). See Jump Starting - North America 0367.
3. Battery - North America 0318.
4. Engine Air Cleaner/Filter 0309.
5. Engine Oil Dipstick. See “Checking Engine
Oil” under Engine Oil 0305.
6. Engine Cooling Fan (Out of View). See Cooling System 0310.
7. Power Steering Fluid Reservoir. See Power Steering Fluid 0314.
8. Engine Oil Fill Cap. See “When to Add
Engine Oil” underEngine Oil 0305.
9. Auxiliary Battery. Battery - North
America 0318.
10. Brake Fluid Reservoir. See Brake Fluid
0 317.
11. Engine Compartment Fuse Block 0329.
12. Coolant Surge Tank and Pressure Cap. SeeCooling System 0310.
13. Windshield Washer Fluid Reservoir. See “Adding Washer Fluid” underWasher
Fluid 0315.
If the vehicle has a diesel engine, see the
Duramax diesel supplement.Engine Oil
For diesel engine vehicles, see “Engine Oil”
in the Duramax diesel supplement.
To ensure proper engine performance and
long life, careful attention must be paid to
engine oil. Following these simple, but
important steps will help protect your
investment:
.Use engine oil approved to the proper
specification and of the proper viscosity
grade. See “Selecting the Right Engine
Oil” in this section.
.Check the engine oil level regularly and
maintain the proper oil level. See
“Checking Engine Oil” and“When to Add
Engine Oil” in this section.
.Change the engine oil at the appropriate
time. SeeEngine Oil Life System 0307.
.Always dispose of engine oil properly. See
“What to Do with Used Oil” in this
section.
Checking Engine Oil
Check the engine oil level regularly, every
650 km (400 mi), especially prior to a long
trip. The engine oil dipstick handle is a loop.
See Engine Compartment Overview 0304
for the location.
{Warning
The engine oil dipstick handle may be
hot; it could burn you. Use a towel or
glove to touch the dipstick handle.
If a low oil Driver Information Center (DIC)
message displays, check the oil level.
Follow these guidelines:
.To get an accurate reading, park the
vehicle on level ground. Check the engine
oil level after the engine has been off for
at least two hours. Checking the engine
oil level on steep grades or too soon after
engine shutoff can result in incorrect
readings. Accuracy improves when
checking a cold engine prior to starting.
Remove the dipstick and check the level.
.If unable to wait two hours, the engine
must be off for at least 15 minutes if the
engine is warm, or at least 30 minutes if
the engine is not warm. Pull out the
dipstick, wipe it with a clean paper towel
or cloth, then push it back in all the way.
Remove it again, keeping the tip down,
and check the level.
Page 315 of 433

Chevrolet Silverado 2500 HD/3500 HD Owner Manual (GMNA-Localizing-U.
S./Canada/Mexico-14632154) - 2021 - CRC - 11/20/20
314 Vehicle Care
normal idle speed for at least five minutes
while the vehicle is parked. If the warning is
still there, turn off the engine and get
everyone out of the vehicle until it
cools down.
If there is no sign of steam, idle the engine
for five minutes while parked. If the warning
is still displayed, turn off the engine until it
cools down.
Overheated Engine Protection
Operating Mode
If an overheated engine condition exists and
the ENGINE POWER IS REDUCED message
displays, an overheat protection mode which
alternates firing groups of cylinders helps to
prevent engine damage. In this mode, a loss
in power and engine performance will be
noticed. This operating mode allows the
vehicle to be driven to a safe place in an
emergency. Driving extended distances and/
or towing a trailer in the overheat
protection mode should be avoided.
If the engine or transmission detects an
impending hot fluid condition, then the
transmission may force upshifts to limit
temperatures. Downshifts may also be
prevented in this instance. Normal operationmay continue unless the display indicates
there is a hot condition and engine should
be idled.
Caution
After driving in the overheated engine
protection operating mode, the engine oil
will be severely degraded. Any repairs
performed before the engine is cool may
cause engine damage. Allow the engine
to cool before attempting any repair.
Repair the cause of coolant loss, change
the oil, and reset the oil life system. See
Engine Oil
0305.
Engine Fan
If the vehicle has the Duramax diesel
engine, see the Duramax diesel supplement.
The vehicle has a clutched engine cooling
fan. When the clutch is engaged, the fan
spins faster to provide more air to cool the
engine. In most everyday driving conditions,
the fan is spinning slower and the clutch is
not fully engaged. This improves fuel
economy and reduces fan noise. Under
heavy vehicle loading, trailer towing, and/or
high outside temperatures, the fan speed
increases as the clutch more fully engages, so an increase in fan noise may be heard.
This is normal and should not be mistaken
as the transmission slipping or making extra
shifts. It is merely the cooling system
functioning properly. The fan will slow down
when additional cooling is not required and
the clutch partially disengages.
This fan noise may be heard when starting
the engine. It will go away as the fan clutch
partially disengages.
Power Steering Fluid
The power steering fluid reservoir is in the
engine compartment on the driver side of
the vehicle. See
Engine Compartment
Overview 0304 for reservoir location.
When to Check Power Steering Fluid
It is not necessary to regularly check power
steering fluid unless there is a leak
suspected in the system or an unusual noise
Page 316 of 433
Chevrolet Silverado 2500 HD/3500 HD Owner Manual (GMNA-Localizing-U.
S./Canada/Mexico-14632154) - 2021 - CRC - 11/20/20
Vehicle Care 315
is heard. A fluid loss in this system could
indicate a problem. Have the system
inspected and repaired.
Wait for the power steering system to cool,
with the engine off, before checking the
fluid.
How to Check Power Steering Fluid
To check the power steering fluid:1. Set the ignition off and let the engine compartment cool down.
2. Wipe the cap and the top of the reservoir clean.
3. Unscrew the cap and wipe the dipstick with a clean rag.
4. Replace the cap and completely tighten it.
5. Remove the cap again and look at the fluid level on the dipstick.
The level should be between the ADD and
FULL marks. If necessary, add only enough
fluid to bring the level up to the hashed
area between the ADD and FULL marks, do
not overfill. To prevent contamination of brake fluid,
never check or fill the power steering
reservoir with the brake master cylinder
cover off.
What to Use
Caution
Use of the incorrect fluid may damage
the vehicle and the damages may not be
covered by the vehicle warranty. Always
use the correct fluid listed in
Recommended Fluids and Lubricants
0393.
To determine what kind of fluid to use, see
Recommended Fluids and Lubricants 0393.
Always use the proper fluid. Failure to use
the proper fluid can cause leaks and damage
hoses and seals.
Washer Fluid
What to Use
When windshield washer fluid needs to be
added, be sure to read the manufacturer's
instructions before use. Use a fluid that has
sufficient protection against freezing in an
area where the temperature may fall below
freezing.
Adding Washer Fluid
The vehicle has a low washer fluid message
on the DIC that comes on when the washer
fluid is low. The message is displayed for
15 seconds at the start of each ignition cycle.
When the WASHER FLUID LOW ADD FLUID
message displays, washer fluid will need to
be added to the windshield washer fluid
reservoir.
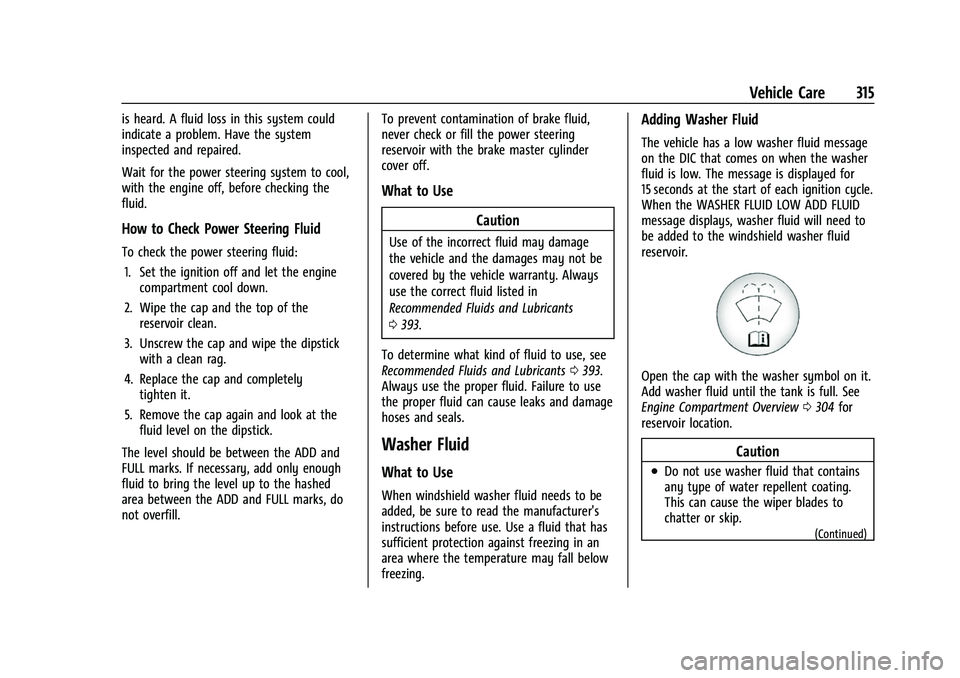
Open the cap with the washer symbol on it.
Add washer fluid until the tank is full. See
Engine Compartment Overview 0304 for
reservoir location.
Caution
.Do not use washer fluid that contains
any type of water repellent coating.
This can cause the wiper blades to
chatter or skip.
(Continued)
Page 336 of 433
Chevrolet Silverado 2500 HD/3500 HD Owner Manual (GMNA-Localizing-U.
S./Canada/Mexico-14632154) - 2021 - CRC - 11/20/20
Vehicle Care 335
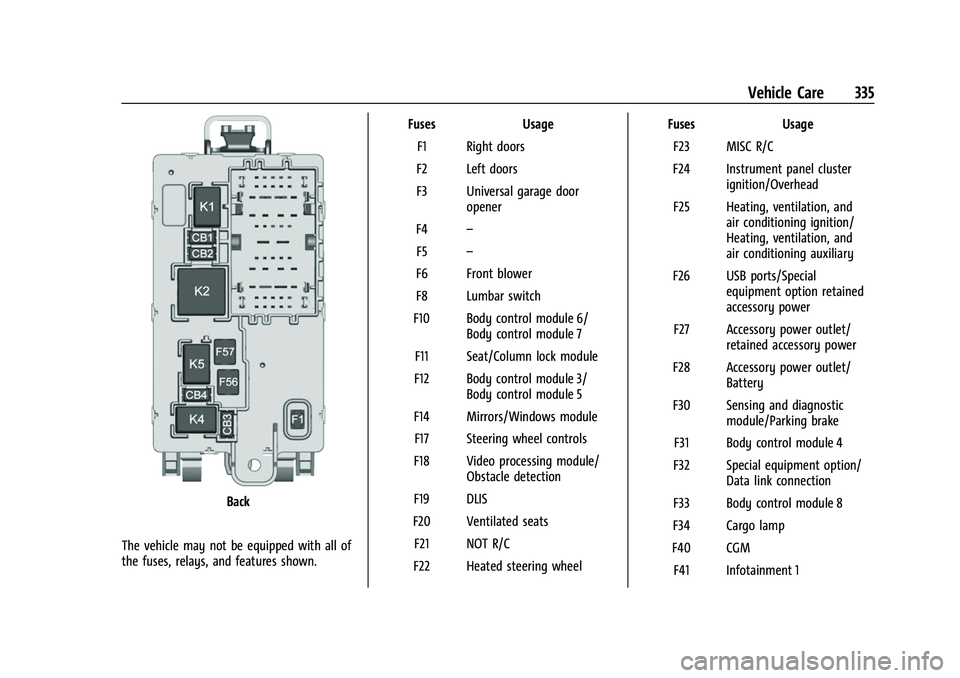
Back
The vehicle may not be equipped with all of
the fuses, relays, and features shown. Fuses Usage
F1 Right doors
F2 Left doors
F3 Universal garage door opener
F4 –
F5 –
F6 Front blower
F8 Lumbar switch
F10 Body control module 6/ Body control module 7
F11 Seat/Column lock module
F12 Body control module 3/ Body control module 5
F14 Mirrors/Windows module F17 Steering wheel controls
F18 Video processing module/ Obstacle detection
F19 DLIS
F20 Ventilated seats F21 NOT R/C
F22 Heated steering wheel Fuses Usage
F23 MISC R/C
F24 Instrument panel cluster ignition/Overhead
F25 Heating, ventilation, and air conditioning ignition/
Heating, ventilation, and
air conditioning auxiliary
F26 USB ports/Special equipment option retained
accessory power
F27 Accessory power outlet/ retained accessory power
F28 Accessory power outlet/ Battery
F30 Sensing and diagnostic module/Parking brake
F31 Body control module 4
F32 Special equipment option/ Data link connection
F33 Body control module 8
F34 Cargo lamp
F40 CGM F41 Infotainment 1
Page 378 of 433
Chevrolet Silverado 2500 HD/3500 HD Owner Manual (GMNA-Localizing-U.
S./Canada/Mexico-14632154) - 2021 - CRC - 11/20/20
Vehicle Care 377
blades. Bugs, road grime, sap, and a buildup
of vehicle wash/wax treatments may cause
wiper streaking.
Replace the wiper blades if they are worn or
damaged. Damage can be caused by
extreme dusty conditions, sand, salt, heat,
sun, snow, and ice.
Weatherstrips
Apply weatherstrip lubricant on
weatherstrips to make them last longer, seal
better, and not stick or squeak. Lubricate
weatherstrips once a year. Hot, dry climates
may require more frequent application. Black
marks from rubber material on painted
surfaces can be removed by rubbing with a
clean cloth. SeeRecommended Fluids and
Lubricants 0393.
Tires
Use a stiff brush with tire cleaner to clean
the tires.
Caution
Using petroleum-based tire dressing
products on the vehicle may damage the
paint finish and/or tires. When applying a
(Continued)
Caution (Continued)
tire dressing, always wipe off any
overspray from all painted surfaces on
the vehicle.
Wheels and Wheel Trim
Use a soft, clean cloth with mild soap and
water to clean the wheels. After rinsing
thoroughly with clean water, dry with a
soft, clean towel. A wax may then be
applied.
Caution
Chrome wheels and chrome wheel trim
may be damaged if the vehicle is not
washed after driving on roads that have
been sprayed with magnesium chloride or
calcium chloride. These are used on roads
for conditions such as dust and ice.
Always wash the chrome with soap and
water after exposure.
Caution
To avoid surface damage on wheels and
wheel trim, do not use strong soaps,
chemicals, abrasive polishes, cleaners,
(Continued)
Caution (Continued)
or brushes. Use only GM approved
cleaners. Do not drive the vehicle through
an automatic car wash that uses silicon
carbide tire/wheel cleaning brushes.
Damage could occur and the repairs
would not be covered by the vehicle
warranty.
Brake System
Visually inspect brake lines and hoses for
proper hook-up, binding, leaks, cracks,
chafing, etc. Inspect disc brake pads for wear
and rotors for surface condition. Inspect
drum brake linings/shoes for wear or cracks.
Inspect all other brake parts.
Steering, Suspension, and Chassis
Components
Visually inspect steering, suspension, and
chassis components for damaged, loose,
or missing parts or signs of wear at least
once a year.
Inspect power steering for proper
attachment, connections, binding, cracks,
chafing, etc.