2021 CHEVROLET SILVERADO 2500HD automatic transmission
[x] Cancel search: automatic transmissionPage 283 of 433
Chevrolet Silverado 2500 HD/3500 HD Owner Manual (GMNA-Localizing-U.
S./Canada/Mexico-14632154) - 2021 - CRC - 11/20/20
282 Driving and Operating
Tow/Haul Mode is most useful when towing
a heavy trailer or carrying a large or
heavy load:
.Through rolling terrain.
.In stop-and-go traffic.
.In busy parking lots.
Operating the vehicle in Tow/Haul Mode
when lightly loaded or not towing will not
cause damage; however, it is not
recommended and may result in unpleasant
engine and transmission driving
characteristics, heavy or light steering
efforts, and reduced fuel economy.
Integrated Trailer Brake Control System
The vehicle may have an Integrated Trailer
Brake Control (ITBC) system for use with
electric trailer brakes or most electric over
hydraulic trailer brake systems. These
instructions apply to both types of electric
trailer brakes.
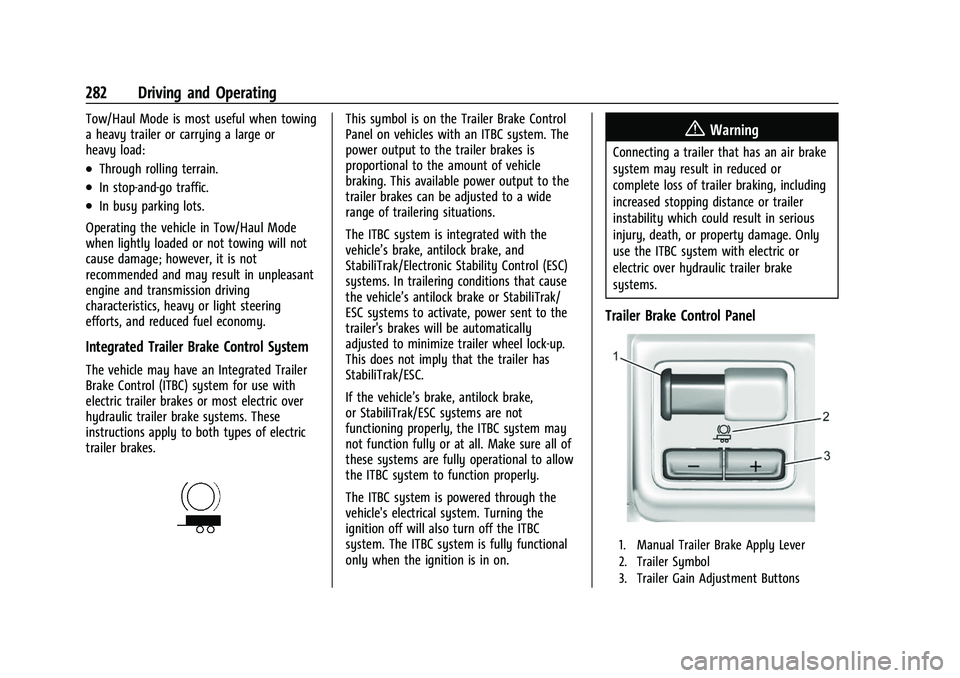
This symbol is on the Trailer Brake Control
Panel on vehicles with an ITBC system. The
power output to the trailer brakes is
proportional to the amount of vehicle
braking. This available power output to the
trailer brakes can be adjusted to a wide
range of trailering situations.
The ITBC system is integrated with the
vehicle’s brake, antilock brake, and
StabiliTrak/Electronic Stability Control (ESC)
systems. In trailering conditions that cause
the vehicle’s antilock brake or StabiliTrak/
ESC systems to activate, power sent to the
trailer's brakes will be automatically
adjusted to minimize trailer wheel lock-up.
This does not imply that the trailer has
StabiliTrak/ESC.
If the vehicle’s brake, antilock brake,
or StabiliTrak/ESC systems are not
functioning properly, the ITBC system may
not function fully or at all. Make sure all of
these systems are fully operational to allow
the ITBC system to function properly.
The ITBC system is powered through the
vehicle's electrical system. Turning the
ignition off will also turn off the ITBC
system. The ITBC system is fully functional
only when the ignition is in on.{Warning
Connecting a trailer that has an air brake
system may result in reduced or
complete loss of trailer braking, including
increased stopping distance or trailer
instability which could result in serious
injury, death, or property damage. Only
use the ITBC system with electric or
electric over hydraulic trailer brake
systems.
Trailer Brake Control Panel
1. Manual Trailer Brake Apply Lever
2. Trailer Symbol
3. Trailer Gain Adjustment Buttons
Page 288 of 433
Chevrolet Silverado 2500 HD/3500 HD Owner Manual (GMNA-Localizing-U.
S./Canada/Mexico-14632154) - 2021 - CRC - 11/20/20
Driving and Operating 287
2. The brake lights turn on for abouttwo seconds.
3. The left turn signal light flashes three times.
4. The right turn signal light flashes three times.
5. The reverse lights turn on for about two seconds.
6. Steps 2–5 repeat for approximately one minute and 45 seconds, or until the
test deactivates.
Touch Stop to stop the test. The test will
automatically end after one minute and
45 seconds.
The sequence also deactivates when any of
the following occur:
.The ignition is turned off.
.The transmission is shifted out of P (Park).
.The brake pedal is pressed.
.The turn signal is activated.
.The hazard warning lights are activated.
Trailering App
If equipped, the Trailering App is on the
Home Page of the infotainment display. If equipped this feature allows profiles for
connected trailers to be created to view
status, to store and track trailer usage
information, and to set up towing assistance
features.
The Trailering App Preview will appear when
the Trailering App is opened for the first
time from the Home Page. Touch GET
STARTED in the Trailering App to go into
the app.
When a trailer is electrically connected and
a trailer profile has not been created, there
will be an option to create a profile, use a
guest profile, or select Accessory/No trailer.
After the pop-up is displayed three times,
Don’t Remind Me will display and touching
that will turn off the trailer detection
pop-up. To turn the Trailer Detection Alert
on, select ON in the Settings tab.
When a trailer is electrically connected and
after a Trailer Profile has been created, the
trailer detection pop-up will appear with a
list of all of the custom Trailer Profiles made
on the vehicle. To load an existing Trailer
Profile, select one of the Trailer Profiles
listed, or load the Guest Trailer Profile by
selecting GUEST TRAILER. Touching
Accessory/No trailer will select Accessory/No
trailer as the active Trailer Profile and willdismiss the pop- up. Shifting the vehicle
from P (Park) will select Guest Trailer as the
active Trailer Profile and will dismiss the
pop-up.
Create a Trailer Profile
1. Touch Create Profile on the trailer detection pop-up or touch + Add Trailer
Profile in the Trailering App.
2. Create a name for the trailer.
3. Select the trailer type.
4. Select Save Profile.
A pop-up will indicate the setup is complete.
Touch DONE to complete the process or
touch TRAILER FEATURE SETUP to set up the
Tow/Haul Mode reminder, Trailer Tire
Pressure Monitoring System, if equipped,
maintenance reminders, or towing
assistance, if equipped.
Import a Trailer Profile
A trailer profile saved to an OnStar account
can be imported to the vehicle. 1. Touch + Add Trailer Profile in the Trailering App
2. Touch Import Profile on the pop-up.
3. Select a trailer profile from the list.
4. Touch IMPORT.
Page 292 of 433
Chevrolet Silverado 2500 HD/3500 HD Owner Manual (GMNA-Localizing-U.
S./Canada/Mexico-14632154) - 2021 - CRC - 11/20/20
Driving and Operating 291
trailer is connected. When a trailer is
connected and the ignition is off, the
Trailering App System will periodically pulse
the lighting circuits of the trailer to verify it
is still connected. The trailer lights may
periodically flash as a result of this trailer
connection detection. These flashes may be
more visible in dark ambient light
environments. The flashing or flickering
lights are a normal condition and the
Trailering App System has built-in
protections to prevent the battery from
draining. When Theft Alert is also enabled
the frequency and pattern of this flashing
will change.
Connection Problem
If any of the trailer connections are lost, a
message about the connection issue will
appear on the Driver Information Center
(DIC). The infotainment display will also
show the connection issue in the Connection
Status view.
If a trailer connection is not detected, the
Trailering App will not display the
Connection Status screen.Connection Trailer Lighting Faults Detected
The Trailering App System monitors for
electrical faults on the trailer lights.
A message about the lighting issue will
appear on the DIC. The infotainment display
will also show the lighting issue in the
Connection Status view. Repair your trailer
lights if needed. A trailer lighting issue is
not covered by your GM warranty.
Diagnose View
Touch Diagnose to see more information
about the connection problem.
This view will display the names of the
trailer connector pins, a graphic of the trailer
connector, and a graphic of the back of the
trailer.
Any connector pin that failed will be amber
color, and the location of the corresponding
connection will be highlighted on the
graphic of the back of the trailer.
The Running Lights connection may not
detect partial outages. Activate the light test
to check all trailer lamps. See
“Light Test”
following. Light Test
Touch Start Light Test to cycle the trailer
lights on and off to determine if they are
working. The test follows this sequence:
1. The running lights turn on first and remain on throughout the sequence.
2. The brake lights turn on for about two seconds.
3. The left turn signal light flashes three times.
4. The right turn signal light flashes three times.
5. The reverse lights turn on for about two seconds.
6. Steps 2–5 repeat for approximately one minute and 45 seconds, or until the
test deactivates.
Touch Stop to stop the test. The test will
automatically end after one minute and
45 seconds.
The sequence also deactivates when any of
the following occur:
.The ignition is turned off.
.The transmission is shifted out of P (Park).
.The brake pedal is pressed.
.The turn signal is activated.
Page 301 of 433

Chevrolet Silverado 2500 HD/3500 HD Owner Manual (GMNA-Localizing-U.
S./Canada/Mexico-14632154) - 2021 - CRC - 11/20/20
300 Vehicle Care
Vehicle Care
General Information
General Information . . . . . . . . . . . . . . . . . . . 301
California Proposition 65 Warning . . . . . 301
California Perchlorate MaterialsRequirements . . . . . . . . . . . . . . . . . . . . . . . . 301
Accessories and Modifications . . . . . . . . . 302
Vehicle Checks
Doing Your Own Service Work . . . . . . . . 302
Hood . . . . . . . . . . . . . . . . . . . . . . . . . . . . . . . . . . 302
Engine Compartment Overview . . . . . . . 304
Engine Oil . . . . . . . . . . . . . . . . . . . . . . . . . . . . . 305
Engine Oil Life System . . . . . . . . . . . . . . . . 307
Automatic Transmission Fluid . . . . . . . . . 308
Engine Air Filter Life System . . . . . . . . . . 308
Engine Air Cleaner/Filter . . . . . . . . . . . . . . 309
Cooling System . . . . . . . . . . . . . . . . . . . . . . . . 310
Engine Overheating . . . . . . . . . . . . . . . . . . . . 312
Overheated Engine Protection Operating Mode . . . . . . . . . . . . . . . . . . . . . 314
Engine Fan . . . . . . . . . . . . . . . . . . . . . . . . . . . . 314
Power Steering Fluid . . . . . . . . . . . . . . . . . . . 314
Washer Fluid . . . . . . . . . . . . . . . . . . . . . . . . . . 315
Brakes . . . . . . . . . . . . . . . . . . . . . . . . . . . . . . . . . 316
Brake Pad Life System . . . . . . . . . . . . . . . . . 316
Brake Fluid . . . . . . . . . . . . . . . . . . . . . . . . . . . . . 317
Battery - North America . . . . . . . . . . . . . . . 318
Four-Wheel Drive . . . . . . . . . . . . . . . . . . . . . . 320 Front Axle . . . . . . . . . . . . . . . . . . . . . . . . . . . . . 320
Rear Axle . . . . . . . . . . . . . . . . . . . . . . . . . . . . . . 320
Noise Control System . . . . . . . . . . . . . . . . . 320
Starter Switch Check . . . . . . . . . . . . . . . . . . . 321
Automatic Transmission Shift Lock
Control Function Check . . . . . . . . . . . . . . 322
Ignition Transmission Lock Check . . . . . . 322
Park Brake and P (Park) Mechanism Check . . . . . . . . . . . . . . . . . . . . . . . . . . . . . . . . 322
Wiper Blade Replacement . . . . . . . . . . . . . 322
Glass Replacement . . . . . . . . . . . . . . . . . . . . . 323
Windshield Replacement . . . . . . . . . . . . . . . 323
Gas Strut(s) . . . . . . . . . . . . . . . . . . . . . . . . . . . . 323
Headlamp Aiming
Front Headlamp Aiming . . . . . . . . . . . . . . . 324
Bulb Replacement
Bulb Replacement . . . . . . . . . . . . . . . . . . . . . 324
Halogen Bulbs . . . . . . . . . . . . . . . . . . . . . . . . . 325
LED Lighting . . . . . . . . . . . . . . . . . . . . . . . . . . . 325
Headlamps, Front Turn Signal, Sidemarker, and Parking Lamps . . . . . . 325
Taillamps, Turn Signal, Stoplamps, and Back-Up Lamps . . . . . . . . . . . . . . . . . . . . . . 326
Center High-Mounted Stoplamp (CHMSL) and Cargo Lamp . . . . . . . . . . . . 327
License Plate Lamp . . . . . . . . . . . . . . . . . . . . 328
Electrical System
Electrical System Overload . . . . . . . . . . . . 328 Fuses and Circuit Breakers . . . . . . . . . . . . . 329
Engine Compartment Fuse Block . . . . . . 329
Instrument Panel Fuse Block (Left) . . . . . 332
Instrument Panel Fuse Block (Right) . . . 334
Wheels and Tires
Tires . . . . . . . . . . . . . . . . . . . . . . . . . . . . . . . . . . 336
All-Season Tires . . . . . . . . . . . . . . . . . . . . . . . . 337
Winter Tires . . . . . . . . . . . . . . . . . . . . . . . . . . . 337
All-Terrain Tires . . . . . . . . . . . . . . . . . . . . . . . . 337
Tire Sidewall Labeling . . . . . . . . . . . . . . . . . 338
Tire Designations . . . . . . . . . . . . . . . . . . . . . . 339
Tire Terminology and Definitions . . . . . . 339
Tire Pressure . . . . . . . . . . . . . . . . . . . . . . . . . . . 341
Tire Pressure Monitor System . . . . . . . . . 342
Tire Pressure Monitor Operation . . . . . . 343
Tire Inspection . . . . . . . . . . . . . . . . . . . . . . . . 348
Tire Rotation . . . . . . . . . . . . . . . . . . . . . . . . . . 348
When It Is Time for New Tires . . . . . . . . 350
Buying New Tires . . . . . . . . . . . . . . . . . . . . . . 351
Different Size Tires and Wheels . . . . . . . . 352
Uniform Tire Quality Grading . . . . . . . . . . 352
Wheel Alignment and Tire Balance . . . . 354
Wheel Replacement . . . . . . . . . . . . . . . . . . . 354
Tire Chains . . . . . . . . . . . . . . . . . . . . . . . . . . . . 354
If a Tire Goes Flat . . . . . . . . . . . . . . . . . . . . . 355
Tire Changing . . . . . . . . . . . . . . . . . . . . . . . . . 356
Full-Size Spare Tire . . . . . . . . . . . . . . . . . . . . 366
Jump Starting
Jump Starting - North America . . . . . . . . 367
Page 309 of 433

Chevrolet Silverado 2500 HD/3500 HD Owner Manual (GMNA-Localizing-U.
S./Canada/Mexico-14632154) - 2021 - CRC - 11/20/20
308 Vehicle Care
The oil life system can also be reset as
follows:1. Display the oil life percentage on the DIC. See Driver Information Center (DIC)
(Base Level) 0119 or
Driver Information Center (DIC) (Midlevel
and Uplevel) 0120.
2. Fully press the accelerator pedal slowly three times within five seconds.
3. If the display changes to 100%, the system is reset.
If the vehicle has a CHANGE ENGINE OIL
SOON message and it comes back on when
the vehicle is started and/or the oil
life percentage is near 0%, the engine oil
life system has not been reset. Repeat the
procedure.
Automatic Transmission Fluid
When to Check and Change Automatic
Transmission Fluid
It is usually not necessary to check the
transmission fluid level. The only reason for
fluid loss is a transmission leak or
overheated transmission. This vehicle is not
equipped with a transmission fluid level
dipstick. There is a special procedure for
checking and changing the transmission fluid in these vehicles. Because this procedure is
difficult, this should be done at the dealer.
Contact the dealer for additional information
or the procedure can be found in the service
manual. See
Publication Ordering
Information 0408.
Caution
Use of the incorrect automatic
transmission fluid may damage the
vehicle, and the damage may not be
covered by the vehicle warranty. Always
use the correct automatic transmission
fluid. See Recommended Fluids and
Lubricants 0393.
Change the fluid and filter at the scheduled
maintenance intervals listed in Maintenance
Schedule 0384. Be sure to use the
transmission fluid listed in Recommended
Fluids and Lubricants 0393.
Engine Air Filter Life System
If equipped, this feature provides the engine
air filter’s remaining life and best timing for
a change. The timing to change an engine
air filter depends on driving and
environmental conditions.
When to Change the Engine Air Filter
When the Driver Information Center (DIC)
displays a message to replace the engine air
filter at the next oil change, follow this
timing.
When the DIC displays a message to replace
the engine air filter soon, replace the engine
air filter at the earliest convenience.
The system must be reset after the engine
air filter is changed.
If the DIC displays a message to check the
engine air filter system, see your dealer.
How to Reset the Engine Air Filter Life
System
To reset:
1. Place the vehicle in P (Park).
2. Display the Air Filter Life on the DIC. See Driver Information Center (DIC) (Base
Level) 0119 or
Driver Information Center (DIC) (Midlevel
and Uplevel) 0120.
3. Press
Ton the steering wheel, or press
the trip odometer reset stem if the
vehicle does not have DIC controls, to
move to the Reset/Disable display area.
Page 323 of 433
Chevrolet Silverado 2500 HD/3500 HD Owner Manual (GMNA-Localizing-U.
S./Canada/Mexico-14632154) - 2021 - CRC - 11/20/20
322 Vehicle Care
Automatic Transmission Shift Lock
Control Function Check
{Warning
When you are doing this inspection, the
vehicle could move suddenly. If the
vehicle moves, you or others could be
injured.
1. Before starting this check, be sure there is enough room around the vehicle.
It should be parked on a level surface.
2. Apply the parking brake. Be ready to apply the regular brake immediately if
the vehicle begins to move.
3. With the engine off, turn the ignition on, but do not start the engine. Without
applying the regular brake, try to move
the shift lever out of P (Park) with
normal effort. If the shift lever moves
out of P (Park), contact your dealer for
service.
Ignition Transmission Lock Check
If equipped with Key Access ignition, while
parked, and with the parking brake set, try
to turn the ignition off in each shift lever
position. The ignition should turn to off only
when the shift lever is in P (Park).
The ignition key should come out only when
the ignition is off. Contact your dealer if
service is required.
Park Brake and P (Park)
Mechanism Check
{Warning
When you are doing this check, the
vehicle could begin to move. You or
others could be injured and property
could be damaged. Make sure there is
room in front of the vehicle in case it
begins to roll. Be ready to apply the
regular brake at once should the vehicle
begin to move.
Park on a fairly steep hill, with the vehicle
facing downhill. Keeping your foot on the
regular brake, set the parking brake.
.To check the parking brake's holding
ability: With the engine running and the
transmission in N (Neutral), slowly remove
foot pressure from the regular brake
pedal. Do this until the vehicle is held by
the parking brake only.
.To check the P (Park) mechanism's holding
ability: With the engine running, shift to
P (Park). Then release the parking brake
followed by the regular brake.
Contact your dealer if service is required.
Wiper Blade Replacement
Windshield wiper blades should be replaced
periodically. See Maintenance Schedule
0 384.
Replacement blades come in different types
and are removed in different ways. For
proper type and length, see Maintenance
Replacement Parts 0394.
Caution
Allowing the wiper arm to touch the
windshield when no wiper blade is
installed could damage the windshield.
Any damage that occurs would not be
(Continued)
Page 340 of 433
Chevrolet Silverado 2500 HD/3500 HD Owner Manual (GMNA-Localizing-U.
S./Canada/Mexico-14632154) - 2021 - CRC - 11/20/20
Vehicle Care 339
Tire Designations
Tire Size
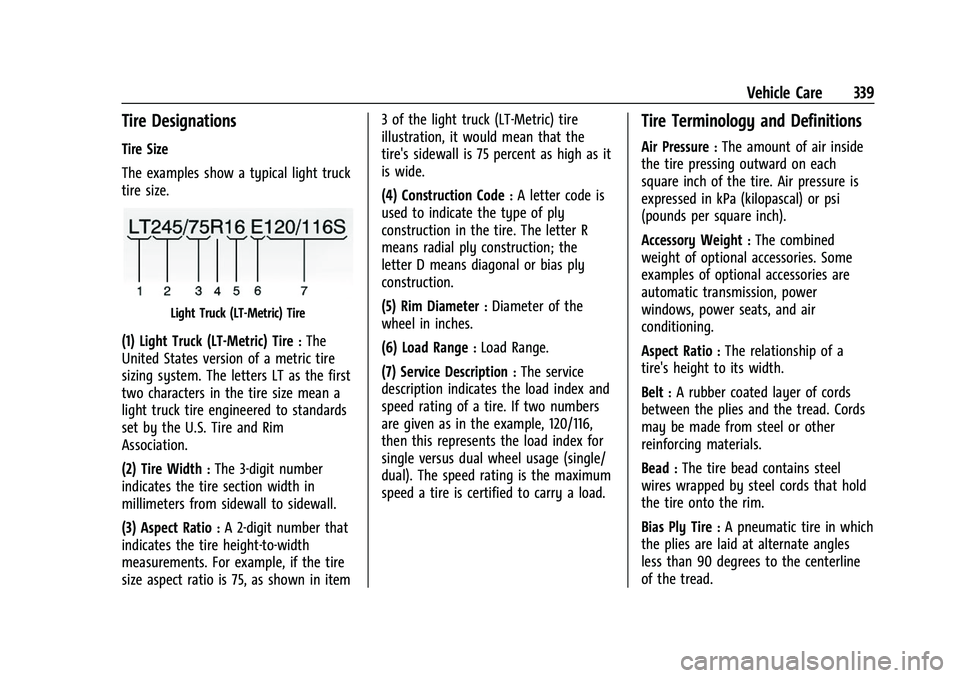
The examples show a typical light truck
tire size.
Light Truck (LT-Metric) Tire
(1) Light Truck (LT-Metric) Tire:The
United States version of a metric tire
sizing system. The letters LT as the first
two characters in the tire size mean a
light truck tire engineered to standards
set by the U.S. Tire and Rim
Association.
(2) Tire Width
:The 3-digit number
indicates the tire section width in
millimeters from sidewall to sidewall.
(3) Aspect Ratio
:A 2-digit number that
indicates the tire height-to-width
measurements. For example, if the tire
size aspect ratio is 75, as shown in item 3 of the light truck (LT-Metric) tire
illustration, it would mean that the
tire's sidewall is 75 percent as high as it
is wide.
(4) Construction Code
:A letter code is
used to indicate the type of ply
construction in the tire. The letter R
means radial ply construction; the
letter D means diagonal or bias ply
construction.
(5) Rim Diameter
:Diameter of the
wheel in inches.
(6) Load Range
:Load Range.
(7) Service Description
:The service
description indicates the load index and
speed rating of a tire. If two numbers
are given as in the example, 120/116,
then this represents the load index for
single versus dual wheel usage (single/
dual). The speed rating is the maximum
speed a tire is certified to carry a load.
Tire Terminology and Definitions
Air Pressure:The amount of air inside
the tire pressing outward on each
square inch of the tire. Air pressure is
expressed in kPa (kilopascal) or psi
(pounds per square inch).
Accessory Weight
:The combined
weight of optional accessories. Some
examples of optional accessories are
automatic transmission, power
windows, power seats, and air
conditioning.
Aspect Ratio
:The relationship of a
tire's height to its width.
Belt
:A rubber coated layer of cords
between the plies and the tread. Cords
may be made from steel or other
reinforcing materials.
Bead
:The tire bead contains steel
wires wrapped by steel cords that hold
the tire onto the rim.
Bias Ply Tire
:A pneumatic tire in which
the plies are laid at alternate angles
less than 90 degrees to the centerline
of the tread.
Page 369 of 433
Chevrolet Silverado 2500 HD/3500 HD Owner Manual (GMNA-Localizing-U.
S./Canada/Mexico-14632154) - 2021 - CRC - 11/20/20
368 Vehicle Care
1. Check the other vehicle. It must have a12-volt battery with a negative ground
system.
Caution
If the other vehicle does not have a
12-volt system with a negative ground,
both vehicles can be damaged. Only use
a vehicle that has a 12-volt system with a
negative ground for jump starting.
2. If you have a vehicle with a diesel engine with two batteries, you should
know before you begin that, especially in
cold weather, you may not be able to
get enough power from a single battery
in another vehicle to start your diesel
engine. If your vehicle has more than
one battery, using the battery that is
closer to the starter will reduce electrical
resistance. This is located on the
passenger side, in the rear of the engine
compartment.
3. Get the vehicles close enough so the jumper cables can reach, but be sure the
vehicles are not touching each other.
If they are, it could cause an unwanted
ground connection. You would not be able to start your vehicle, and the bad
grounding could damage the electrical
systems.
To avoid the possibility of the vehicles
rolling, set the parking brake firmly on
both vehicles involved in the jump start
procedure. Put the automatic
transmission in P (Park) before setting
the parking brake. If you have a
four-wheel-drive vehicle, be sure the
transfer case is in a drive gear, not in
N (Neutral).
Caution
If any accessories are left on or plugged
in during the jump starting procedure,
they could be damaged. The repairs
would not be covered by the vehicle
warranty. Whenever possible, turn off or
unplug all accessories on either vehicle
when jump starting.
4. Turn the ignition off on both vehicles. Unplug unnecessary accessories plugged
into the accessory power outlets. Turn
off the radio and all the lamps that are
not needed. This will avoid sparks and
help save both batteries. And it could
save the radio! 5. Open the hood on the other vehicle and
locate the positive (+) and negative (−)
terminal locations on that vehicle.
The positive (+) terminal is under a red
plastic cover at the positive battery post.
To uncover the positive (+) terminal,
open the red plastic cover.
For more information on the location of
the remote positive (+) and remote
negative (−) terminals, see Engine
Compartment Overview 0304.
{Warning
An electric fan can start up even when
the engine is not running and can injure
you. Keep hands, clothing, and tools
away from any underhood electric fan.
{Warning
Using a match near a battery can cause
battery gas to explode. People have been
hurt doing this, and some have been
blinded. Use a flashlight if you need
more light.
(Continued)