2021 CHEVROLET SILVERADO 2500HD spare tire
[x] Cancel search: spare tirePage 348 of 433

Chevrolet Silverado 2500 HD/3500 HD Owner Manual (GMNA-Localizing-U.
S./Canada/Mexico-14632154) - 2021 - CRC - 11/20/20
Vehicle Care 347
Contact your trailer service center or tire
service center to have the pressure sensors
installed inside the trailer tires. The
technician should insert the sensor stem
through the hole in the trailer wheel. When
the sensor is correctly positioned, the nut on
the sensor stem should be tightened to
8Y (6 lb ft). When mounting the trailer
tire onto the trailer wheel be careful not to
damage the sensor.
The Trailering App can be used to view the
tire pressures after the recommended trailer
tire pressures have been entered. Refer to
the trailer tire placard on the trailer or the
trailer tire sidewall for the recommended
tire pressure. The system is compatible with trailer tires
that have placard pressure values from 103 -
689 kpa (15 - 100 psi). The hole in the wheel
for the tire stem must be 11.43 mm
(0.453 in) in diameter. Use of the pressure
sensors on a wheel with a different stem
hole size could result in loss of air from
the tire.
If a low trailer tire pressure condition is
detected, the TTPMS displays a warning
message on the DIC. If the warning message
is displayed, stop as soon as possible and
inflate the tires to the recommended
pressure shown on the tire placard on the
trailer.
In addition, the TTPMS monitors the
temperature of the trailer tires. If the
system detects a high temperature on one
or more of the trailer tires, a warning
message will be displayed on the DIC. If this
warning message is displayed, stop as soon
as possible, and inspect the overheated
trailer tire. Common causes for high trailer
tire temperature are underinflation,
overloading, or tire damage.
TTPMS Malfunction Message
The TTPMS will not function properly if one
or more of the trailer tire sensors are
missing or inoperable. If the system detects
a malfunction, a DIC message indicates that
the system requires service. Some of the
conditions that can cause the service
message to occur are:
.One of the trailer tires has been replaced
with the spare tire which does not have a
learned TTPMS sensor. The DIC message
should turn off after the pressure sensor
is installed in the tire, and the learning
process is performed successfully. See
"TTPMS Sensor Learning Process" under
Trailering App
0286.
.The TTPMS sensor learning process was
not done or not completed successfully.
The DIC message should go off after
successfully completing the sensor
learning process. See "TTPMS Sensor
Learning Process" under Trailering App
0 286.
.One or more TTPMS sensors are missing
or damaged. The DIC message should go
off when the TTPMS sensors are installed
and the sensor learning process is
Page 349 of 433

Chevrolet Silverado 2500 HD/3500 HD Owner Manual (GMNA-Localizing-U.
S./Canada/Mexico-14632154) - 2021 - CRC - 11/20/20
348 Vehicle Care
performed successfully. See "TTPMS
Sensor Learning Process" underTrailering
App 0286.
.Operating electronic devices or being near
facilities using radio wave frequencies
similar to the TTPMS could cause
interference to the TTPMS which could
cause loss of signal reception from the
sensor.
.If the system does not receive the signal
from an individual sensor, an error
message may not occur until the vehicle
has been driver for a period of time.
If the TTPMS is not functioning properly, it
cannot detect or signal a low tire condition.
See your dealer for service if the DIC
message comes on and stays on when the
trailer tire pressures have been checked and
determined to be correct.
Tire Inspection
We recommend that the tires, including
the spare tire, if the vehicle has one, be
inspected for signs of wear or damage
at least once a month.
Replace the tire if:
.The indicators at three or more
places around the tire can be seen.
.There is cord or fabric showing
through the tire's rubber.
.The tread or sidewall is cracked, cut,
or snagged deep enough to show
cord or fabric.
.The tire has a bump, bulge, or split.
.The tire has a puncture, cut, or other
damage that cannot be repaired well
because of the size or location of the
damage.
Tire Rotation
Tires should be rotated every 12 000 km
(7,500 mi). See Maintenance Schedule
0 384.
Tires are rotated to achieve a more
uniform wear for all tires. The first
rotation is the most important.
Anytime unusual wear is noticed, rotate
the tires as soon as possible, check for
proper tire inflation pressure, and check
for damaged tires or wheels. If the
unusual wear continues after the
rotation, check the wheel alignment.
See When It Is Time for New Tires
0 350 and Wheel Replacement 0354. If the full-size spare tire is part of the
tire rotation, make sure the tire rotated
into the spare position is stored
securely. Push, pull, and then try to
rotate or turn the tire. If it moves, use
the wheel wrench/hoist shaft to tighten
the cable. See
Tire Changing0356.
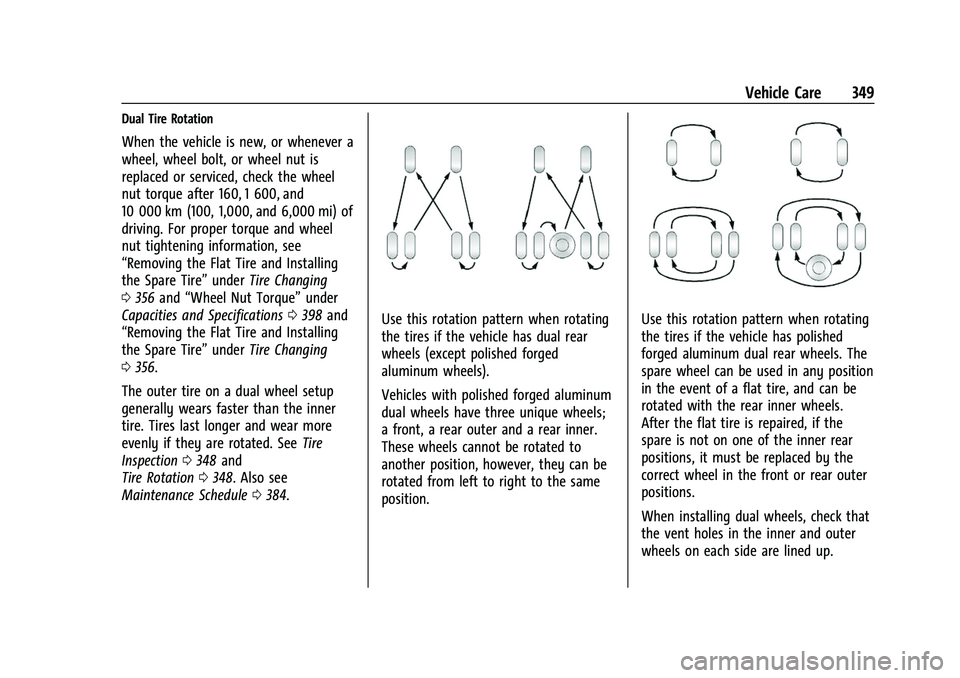
Use this rotation pattern when rotating
the tires if the vehicle has single rear
wheels.
Page 350 of 433
Chevrolet Silverado 2500 HD/3500 HD Owner Manual (GMNA-Localizing-U.
S./Canada/Mexico-14632154) - 2021 - CRC - 11/20/20
Vehicle Care 349
Dual Tire Rotation
When the vehicle is new, or whenever a
wheel, wheel bolt, or wheel nut is
replaced or serviced, check the wheel
nut torque after 160, 1 600, and
10 000 km (100, 1,000, and 6,000 mi) of
driving. For proper torque and wheel
nut tightening information, see
“Removing the Flat Tire and Installing
the Spare Tire”underTire Changing
0 356 and “Wheel Nut Torque” under
Capacities and Specifications 0398 and
“Removing the Flat Tire and Installing
the Spare Tire” underTire Changing
0 356.
The outer tire on a dual wheel setup
generally wears faster than the inner
tire. Tires last longer and wear more
evenly if they are rotated. See Tire
Inspection 0348 and
Tire Rotation 0348. Also see
Maintenance Schedule 0384.
Use this rotation pattern when rotating
the tires if the vehicle has dual rear
wheels (except polished forged
aluminum wheels).
Vehicles with polished forged aluminum
dual wheels have three unique wheels;
a front, a rear outer and a rear inner.
These wheels cannot be rotated to
another position, however, they can be
rotated from left to right to the same
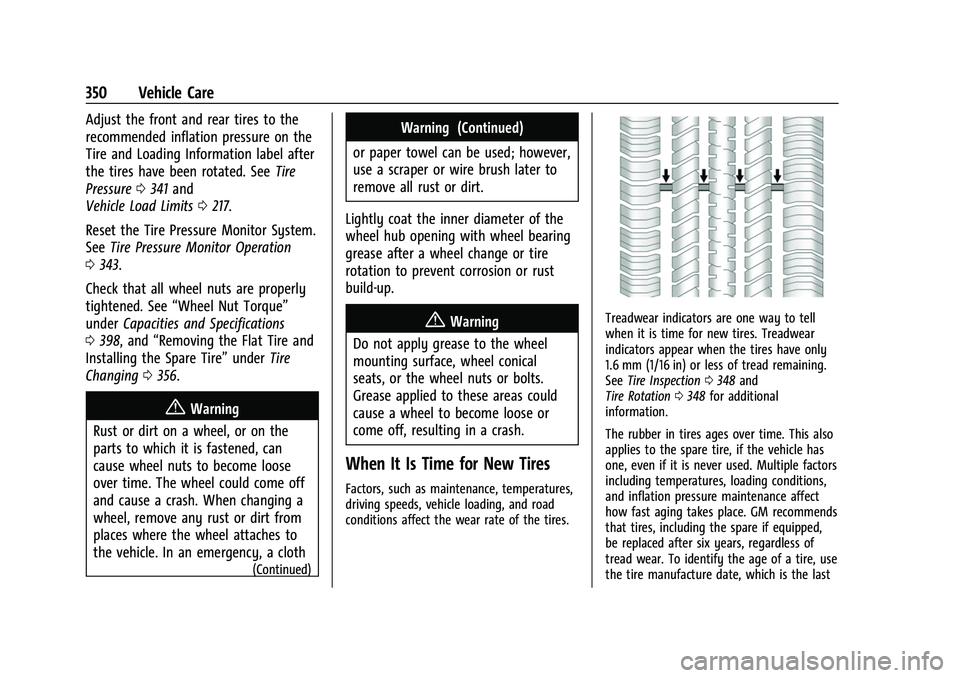
position.Use this rotation pattern when rotating
the tires if the vehicle has polished
forged aluminum dual rear wheels. The
spare wheel can be used in any position
in the event of a flat tire, and can be
rotated with the rear inner wheels.
After the flat tire is repaired, if the
spare is not on one of the inner rear
positions, it must be replaced by the
correct wheel in the front or rear outer
positions.
When installing dual wheels, check that
the vent holes in the inner and outer
wheels on each side are lined up.
Page 351 of 433
Chevrolet Silverado 2500 HD/3500 HD Owner Manual (GMNA-Localizing-U.
S./Canada/Mexico-14632154) - 2021 - CRC - 11/20/20
350 Vehicle Care
Adjust the front and rear tires to the
recommended inflation pressure on the
Tire and Loading Information label after
the tires have been rotated. SeeTire
Pressure 0341 and
Vehicle Load Limits 0217.
Reset the Tire Pressure Monitor System.
See Tire Pressure Monitor Operation
0 343.
Check that all wheel nuts are properly
tightened. See “Wheel Nut Torque”
under Capacities and Specifications
0 398, and “Removing the Flat Tire and
Installing the Spare Tire” underTire
Changing 0356.
{Warning
Rust or dirt on a wheel, or on the
parts to which it is fastened, can
cause wheel nuts to become loose
over time. The wheel could come off
and cause a crash. When changing a
wheel, remove any rust or dirt from
places where the wheel attaches to
the vehicle. In an emergency, a cloth
(Continued)
Warning (Continued)
or paper towel can be used; however,
use a scraper or wire brush later to
remove all rust or dirt.
Lightly coat the inner diameter of the
wheel hub opening with wheel bearing
grease after a wheel change or tire
rotation to prevent corrosion or rust
build-up.
{Warning
Do not apply grease to the wheel
mounting surface, wheel conical
seats, or the wheel nuts or bolts.
Grease applied to these areas could
cause a wheel to become loose or
come off, resulting in a crash.
When It Is Time for New Tires
Factors, such as maintenance, temperatures,
driving speeds, vehicle loading, and road
conditions affect the wear rate of the tires.
Treadwear indicators are one way to tell
when it is time for new tires. Treadwear
indicators appear when the tires have only
1.6 mm (1/16 in) or less of tread remaining.
See Tire Inspection 0348 and
Tire Rotation 0348 for additional
information.
The rubber in tires ages over time. This also
applies to the spare tire, if the vehicle has
one, even if it is never used. Multiple factors
including temperatures, loading conditions,
and inflation pressure maintenance affect
how fast aging takes place. GM recommends
that tires, including the spare if equipped,
be replaced after six years, regardless of
tread wear. To identify the age of a tire, use
the tire manufacture date, which is the last
Page 353 of 433
Chevrolet Silverado 2500 HD/3500 HD Owner Manual (GMNA-Localizing-U.
S./Canada/Mexico-14632154) - 2021 - CRC - 11/20/20
352 Vehicle Care
{Warning
Mixing tires of different sizes (other
than those originally installed on the
vehicle), brands, tread patterns,
or types may cause loss of vehicle
control, resulting in a crash or other
vehicle damage. Use the correct size,
brand, and type of tire on all wheels.
{Warning
Using bias-ply tires on the vehicle
may cause the wheel rim flanges to
develop cracks after many miles of
driving. A tire and/or wheel could fail
suddenly and cause a crash. Use only
radial-ply tires with the wheels on
the vehicle.
Winter tires with the same speed rating
as the original equipment tires may not
be available for H, V, W, Y and ZR
speed rated tires. Never exceed the
winter tires’ maximum speed capability
when using winter tires with a lower
speed rating. If the vehicle tires must be replaced
with a tire that does not have a TPC
Spec number, make sure they are the
same size, load range, speed rating, and
construction (radial) as the original
tires.
The Tire and Loading Information label
indicates the original equipment tires
on the vehicle. See
Vehicle Load Limits
0 217.Different Size Tires and Wheels
If wheels or tires are installed that are a
different size than the original equipment
wheels and tires, vehicle performance,
including its braking, ride and handling
characteristics, stability, and resistance to
rollover may be affected. If the vehicle has
electronic systems such as antilock brakes,
rollover airbags, traction control, electronic
stability control, or All-Wheel Drive, the
performance of these systems can also be
affected.
{Warning
If different sized wheels are used, there
may not be an acceptable level of
performance and safety if tires not
recommended for those wheels are
selected. This increases the chance of a
crash and serious injury. Only use GM
specific wheel and tire systems developed
for the vehicle, and have them properly
installed by a GM certified technician.
See Buying New Tires 0351 and
Accessories and Modifications 0302.
Uniform Tire Quality Grading
The following information relates to the
system developed by the United States
National Highway Traffic Safety
Administration (NHTSA), which grades
tires by treadwear, traction, and
temperature performance. This applies
only to vehicles sold in the United
States. The grades are molded on the
sidewalls of most passenger car tires.
The Uniform Tire Quality Grading
(UTQG) system does not apply to deep
tread, winter tires, compact spare tires,
Page 357 of 433
Chevrolet Silverado 2500 HD/3500 HD Owner Manual (GMNA-Localizing-U.
S./Canada/Mexico-14632154) - 2021 - CRC - 11/20/20
356 Vehicle Care
{Warning
Changing a tire can be dangerous. The
vehicle can slip off the jack and roll over
or fall causing injury or death. Find a
level place to change the tire. To help
prevent the vehicle from moving:1. Set the parking brake firmly.
2. Shift the vehicle to P (Park).
3. For vehicles with four-wheel drive with an N (Neutral) transfer case
position, be sure the transfer case is
in a drive gear —not in N (Neutral).
4. Turn off the engine and do not restart while the vehicle is raised.
5. Do not allow passengers to remain in the vehicle.
6. Place wheel blocks, if equipped, on both sides of the tire at the opposite
corner of the tire being changed. When the vehicle has a flat tire (2), use the
following example as a guide to assist in the
placement of the wheel blocks (1),
if equipped.
1. Wheel Block (If Equipped)
2. Flat Tire
The following information explains how to
use the jack and change a tire.
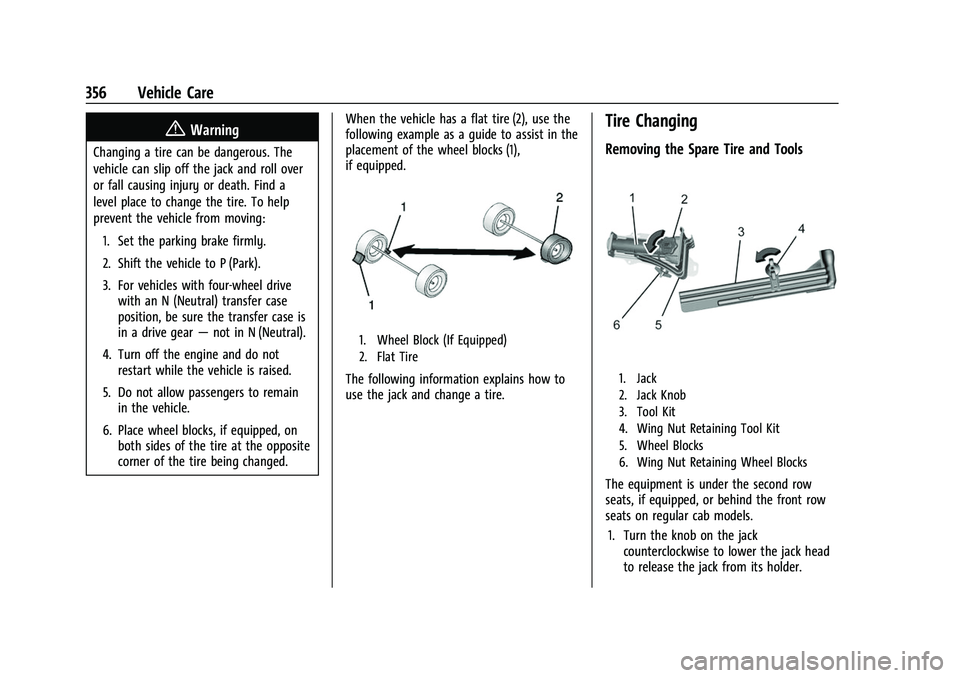
Tire Changing
Removing the Spare Tire and Tools
1. Jack
2. Jack Knob
3. Tool Kit
4. Wing Nut Retaining Tool Kit
5. Wheel Blocks
6. Wing Nut Retaining Wheel Blocks
The equipment is under the second row
seats, if equipped, or behind the front row
seats on regular cab models.
1. Turn the knob on the jack counterclockwise to lower the jack head
to release the jack from its holder.
Page 358 of 433
Chevrolet Silverado 2500 HD/3500 HD Owner Manual (GMNA-Localizing-U.
S./Canada/Mexico-14632154) - 2021 - CRC - 11/20/20
Vehicle Care 357
2. Turn the wing nut counterclockwise toremove the wheel blocks and the wheel
block retainer.
3. Turn the wing nut used to retain the storage bag and tools counterclockwise
to remove it.
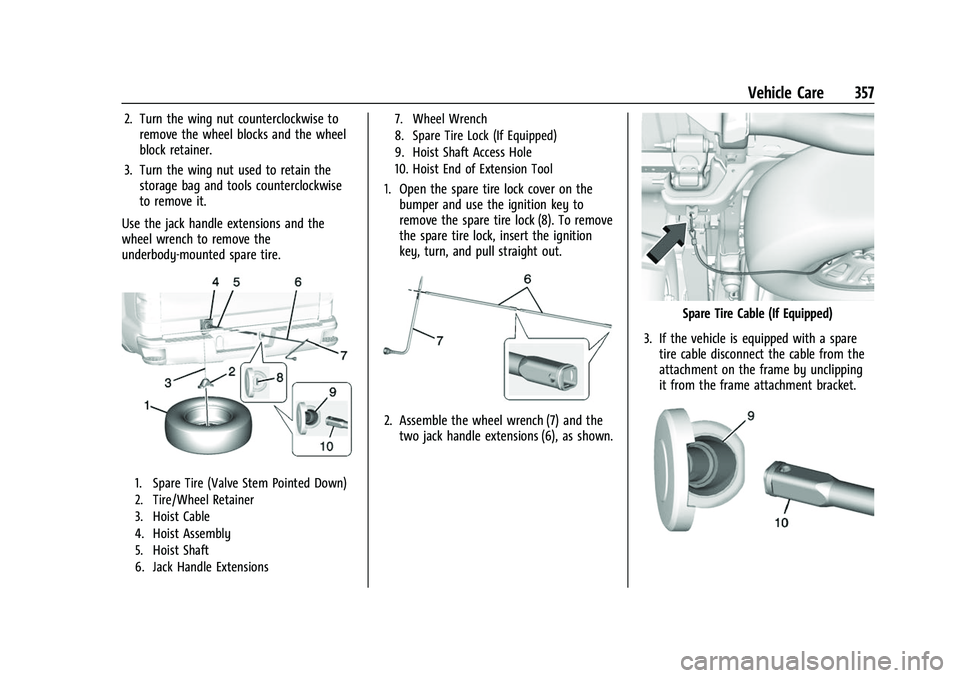
Use the jack handle extensions and the
wheel wrench to remove the
underbody-mounted spare tire.
1. Spare Tire (Valve Stem Pointed Down)
2. Tire/Wheel Retainer
3. Hoist Cable
4. Hoist Assembly
5. Hoist Shaft
6. Jack Handle Extensions 7. Wheel Wrench
8. Spare Tire Lock (If Equipped)
9. Hoist Shaft Access Hole
10. Hoist End of Extension Tool
1. Open the spare tire lock cover on the
bumper and use the ignition key to
remove the spare tire lock (8). To remove
the spare tire lock, insert the ignition
key, turn, and pull straight out.
2. Assemble the wheel wrench (7) and thetwo jack handle extensions (6), as shown.
Spare Tire Cable (If Equipped)
3. If the vehicle is equipped with a spare tire cable disconnect the cable from the
attachment on the frame by unclipping
it from the frame attachment bracket.
Page 359 of 433
Chevrolet Silverado 2500 HD/3500 HD Owner Manual (GMNA-Localizing-U.
S./Canada/Mexico-14632154) - 2021 - CRC - 11/20/20
358 Vehicle Care
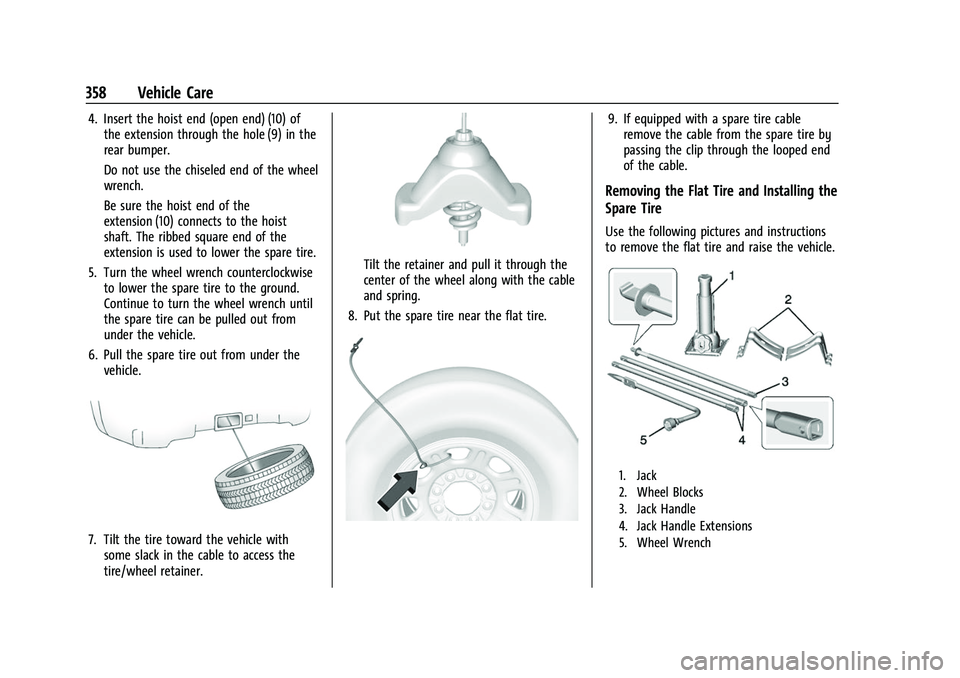
4. Insert the hoist end (open end) (10) ofthe extension through the hole (9) in the
rear bumper.
Do not use the chiseled end of the wheel
wrench.
Be sure the hoist end of the
extension (10) connects to the hoist
shaft. The ribbed square end of the
extension is used to lower the spare tire.
5. Turn the wheel wrench counterclockwise to lower the spare tire to the ground.
Continue to turn the wheel wrench until
the spare tire can be pulled out from
under the vehicle.
6. Pull the spare tire out from under the vehicle.
7. Tilt the tire toward the vehicle withsome slack in the cable to access the
tire/wheel retainer.
Tilt the retainer and pull it through the
center of the wheel along with the cable
and spring.
8. Put the spare tire near the flat tire.
9. If equipped with a spare tire cable remove the cable from the spare tire by
passing the clip through the looped end
of the cable.
Removing the Flat Tire and Installing the
Spare Tire
Use the following pictures and instructions
to remove the flat tire and raise the vehicle.
1. Jack
2. Wheel Blocks
3. Jack Handle
4. Jack Handle Extensions
5. Wheel Wrench