2021 CHEVROLET SILVERADO 1500 turn signal
[x] Cancel search: turn signalPage 302 of 463
Chevrolet Silverado 1500 Owner Manual (GMNA-Localizing-U.S./Canada/
Mexico/Paraguay-14632303) - 2021 - CRC - 11/9/20
Driving and Operating 299
Trailer Brakes
Loaded trailers over 900 kg (2,000 lb) must
be equipped with brake systems and with
brakes for each axle. Trailer braking
equipment conforming to Canadian
Standards Association (CSA) requirement
CAN3-D313, or its equivalent, is
recommended.
State or local regulations may require
trailers to have their own braking system if
the loaded weight of the trailer exceeds
certain minimums that can vary from state
to state. Read and follow the instructions for
the trailer brakes so they are installed,
adjusted, and maintained properly. Never
attempt to tap into your vehicle's hydraulic
brake system. If you do, both the vehicle
antilock brakes and the trailer brakes may
not function, which could result in a crash.
Auxiliary Battery
If equipped, the vehicle's auxiliary battery
can be used to supply electrical power to
additional equipment that may be added,
such as a slide-in camper.Locate the auxiliary battery connector under
the hood on the driver side of the vehicle,
next to the engine compartment fuse block.
Follow the proper installation instructions
included with any electrical equipment that
is installed.
Caution
To prevent draining the auxiliary battery,
always turn off electrical equipment
when not in use and do not use any
equipment that may exceed the
maximum amperage rating of 30 amps.
Trailer Wiring Harness
Basic Trailer Wiring
If the vehicle is not equipped with a trailer
connector on the rear bumper, a 7-wire
trailering harness is tied to the vehicles
frame. The harness requires the installation
of a trailer connector, which is available
through your dealer.
Use only a round, seven-wire connector with
flat blade terminals meeting SAE J2863
specifications for proper electrical
connectivity.
The seven-wire harness contains the
following trailer circuits:
Stop/Turn
Signal Left Yellow/Blue
Stop/Turn Signal
Right Green/Violet
Tail/Parking Lamps Gray/Brown
Reverse Lamps White/Green
Battery Feed Red/Green
Ground White
Electric Trailer Brake Blue
If equipped, the trailer wiring harness, with
a 7-pin connector and a 4-pin connector, is
mounted on the vehicle's rear bumper.
Page 304 of 463
Chevrolet Silverado 1500 Owner Manual (GMNA-Localizing-U.S./Canada/
Mexico/Paraguay-14632303) - 2021 - CRC - 11/9/20
Driving and Operating 301
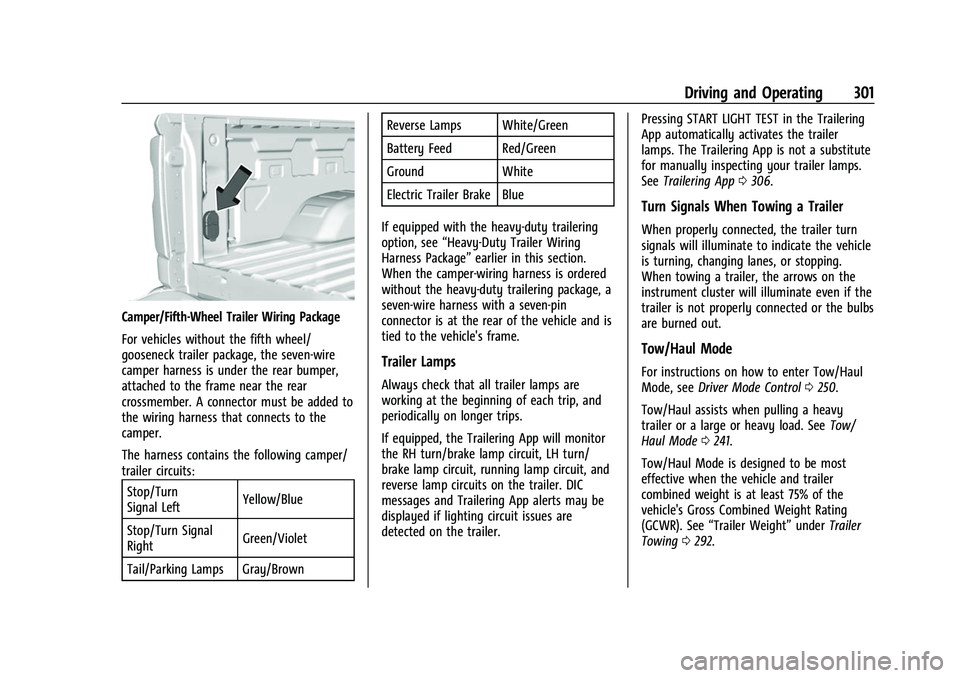
Camper/Fifth-Wheel Trailer Wiring Package
For vehicles without the fifth wheel/
gooseneck trailer package, the seven-wire
camper harness is under the rear bumper,
attached to the frame near the rear
crossmember. A connector must be added to
the wiring harness that connects to the
camper.
The harness contains the following camper/
trailer circuits:Stop/Turn
Signal Left Yellow/Blue
Stop/Turn Signal
Right Green/Violet
Tail/Parking Lamps Gray/Brown Reverse Lamps White/Green
Battery Feed Red/Green
Ground White
Electric Trailer Brake Blue
If equipped with the heavy-duty trailering
option, see “Heavy-Duty Trailer Wiring
Harness Package” earlier in this section.
When the camper-wiring harness is ordered
without the heavy-duty trailering package, a
seven-wire harness with a seven-pin
connector is at the rear of the vehicle and is
tied to the vehicle's frame.
Trailer Lamps
Always check that all trailer lamps are
working at the beginning of each trip, and
periodically on longer trips.
If equipped, the Trailering App will monitor
the RH turn/brake lamp circuit, LH turn/
brake lamp circuit, running lamp circuit, and
reverse lamp circuits on the trailer. DIC
messages and Trailering App alerts may be
displayed if lighting circuit issues are
detected on the trailer. Pressing START LIGHT TEST in the Trailering
App automatically activates the trailer
lamps. The Trailering App is not a substitute
for manually inspecting your trailer lamps.
See
Trailering App 0306.
Turn Signals When Towing a Trailer
When properly connected, the trailer turn
signals will illuminate to indicate the vehicle
is turning, changing lanes, or stopping.
When towing a trailer, the arrows on the
instrument cluster will illuminate even if the
trailer is not properly connected or the bulbs
are burned out.
Tow/Haul Mode
For instructions on how to enter Tow/Haul
Mode, see Driver Mode Control 0250.
Tow/Haul assists when pulling a heavy
trailer or a large or heavy load. See Tow/
Haul Mode 0241.
Tow/Haul Mode is designed to be most
effective when the vehicle and trailer
combined weight is at least 75% of the
vehicle's Gross Combined Weight Rating
(GCWR). See “Trailer Weight” underTrailer
Towing 0292.
Page 310 of 463
Chevrolet Silverado 1500 Owner Manual (GMNA-Localizing-U.S./Canada/
Mexico/Paraguay-14632303) - 2021 - CRC - 11/9/20
Driving and Operating 307
Touch Start to cycle the trailer lamps on and
off to determine if they are working. The
test follows this sequence:1. The running lights turn on first and remain on throughout the sequence.
2. The brake lights turn on for about two seconds.
3. The left turn signal light flashes three times.
4. The right turn signal light flashes three times.
5. The reverse lights turn on for about two seconds.
6. Steps 2–5 repeat for approximately one minute and 45 seconds, or until the
test deactivates.
Touch Stop to stop the test. The test will
automatically end after one minute and
45 seconds.
The sequence also deactivates when any of
the following occur:
.The ignition is turned off.
.The transmission is shifted out of P (Park).
.The brake pedal is pressed.
.The turn signal is activated.
.The hazard warning lights are activated.
Trailering App
If equipped, the Trailering App is on the
Home Page of the infotainment display.
If equipped this feature allows profiles for
connected trailers to be created to view
status, to store and track trailer usage
information, and to set up towing assistance
features.
The Trailering App Preview will appear when
the Trailering App is opened for the first
time from the Home Page. Touch GET
STARTED in the Trailering App to go into
the app.
When a trailer is electrically connected and
a trailer profile has not been created, there
will be an option to create a profile, use a
guest profile, or select Accessory/No trailer.
After the pop-up is displayed three times,
Don’t Remind Me will display and touching
that will turn off the trailer detection
pop-up. To turn the Trailer Detection Alert
on, select ON in the Settings tab.
When a trailer is electrically connected and
after a Trailer Profile has been created, the
trailer detection pop-up will appear with a
list of all of the custom Trailer Profiles made
on the vehicle. To load an existing Trailer
Profile, select one of the Trailer Profiles listed, or load the Guest Trailer Profile by
selecting GUEST TRAILER. Touching
Accessory/No trailer will select Accessory/No
trailer as the active Trailer Profile and will
dismiss the pop- up. Shifting the vehicle
from P (Park) will select Guest Trailer as the
active Trailer Profile and will dismiss the
pop-up.
Create a Trailer Profile
1. Touch Create Profile on the trailer detection pop-up or touch + Add Trailer
Profile in the Trailering App.
2. Create a name for the trailer.
3. Select the trailer type.
4. Select Save Profile.
A pop-up will indicate the setup is complete.
Touch DONE to complete the process or
touch TRAILER FEATURE SETUP to set up the
Tow/Haul Mode reminder, Trailer Tire
Pressure Monitoring System, if equipped,
maintenance reminders, or towing
assistance, if equipped.
Import a Trailer Profile
A trailer profile saved to an OnStar account
can be imported to the vehicle. 1. Touch + Add Trailer Profile in the Trailering App
Page 313 of 463
Chevrolet Silverado 1500 Owner Manual (GMNA-Localizing-U.S./Canada/
Mexico/Paraguay-14632303) - 2021 - CRC - 11/9/20
310 Driving and Operating
Trailer Side Blind Zone Alert Setup (if
equipped)
Trailer dimensions must be in range to
enable this feature.
.Trailer Length: 300 cm (118.1 in)–
1200 cm (472.4 in). Measure from center
of coupler to furthest rear point on the
trailer.
If trailer dimensions are out of range, this
feature will be unavailable.
Status View
The Status view shows:
.Vehicle
.Connections
.Tires
.Maintenance
.Cameras
Upon entry, the most recent items will be
shown. Select MORE to view all options.
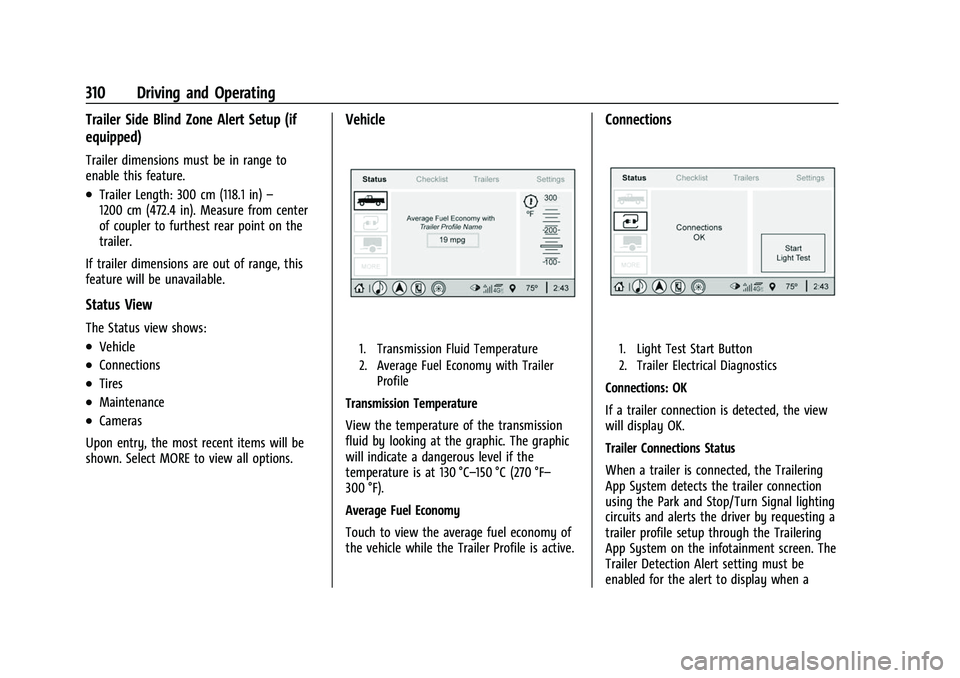
Vehicle
1. Transmission Fluid Temperature
2. Average Fuel Economy with Trailer Profile
Transmission Temperature
View the temperature of the transmission
fluid by looking at the graphic. The graphic
will indicate a dangerous level if the
temperature is at 130 °C–150 °C (270 °F–
300 °F).
Average Fuel Economy
Touch to view the average fuel economy of
the vehicle while the Trailer Profile is active.
Connections
1. Light Test Start Button
2. Trailer Electrical Diagnostics
Connections: OK
If a trailer connection is detected, the view
will display OK.
Trailer Connections Status
When a trailer is connected, the Trailering
App System detects the trailer connection
using the Park and Stop/Turn Signal lighting
circuits and alerts the driver by requesting a
trailer profile setup through the Trailering
App System on the infotainment screen. The
Trailer Detection Alert setting must be
enabled for the alert to display when a
Page 314 of 463
Chevrolet Silverado 1500 Owner Manual (GMNA-Localizing-U.S./Canada/
Mexico/Paraguay-14632303) - 2021 - CRC - 11/9/20
Driving and Operating 311
trailer is connected. When a trailer is
connected and the ignition is off, the
Trailering App System will periodically pulse
the lighting circuits of the trailer to verify it
is still connected. The trailer lights may
periodically flash as a result of this trailer
connection detection. These flashes may be
more visible in dark ambient light
environments. The flashing or flickering
lights are a normal condition and the
Trailering App System has built-in
protections to prevent the battery from
draining. When Theft Alert is also enabled
the frequency and pattern of this flashing
will change.
Connection Problem
If any of the trailer connections are lost, a
message about the connection issue will
appear on the Driver Information Center
(DIC). The infotainment display will also
show the connection issue in the Connection
Status view.
If a trailer connection is not detected, the
Trailering App will not display the
Connection Status screen.Connection Trailer Lighting Faults Detected
The Trailering App System monitors for
electrical faults on the trailer lights.
A message about the lighting issue will
appear on the DIC. The infotainment display
will also show the lighting issue in the
Connection Status view. Repair your trailer
lights if needed. A trailer lighting issue is
not covered by your GM warranty.
Diagnose View
Touch Diagnose to see more information
about the connection problem.
This view will display the names of the
trailer connector pins, a graphic of the trailer
connector, and a graphic of the back of the
trailer.
Any connector pin that failed will be amber
color, and the location of the corresponding
connection will be highlighted on the
graphic of the back of the trailer.
The Running Lights connection may not
detect partial outages. Activate the light test
to check all trailer lamps. See
“Light Test”
following. Light Test
Touch Start Light Test to cycle the trailer
lights on and off to determine if they are
working. The test follows this sequence:
1. The running lights turn on first and remain on throughout the sequence.
2. The brake lights turn on for about two seconds.
3. The left turn signal light flashes three times.
4. The right turn signal light flashes three times.
5. The reverse lights turn on for about two seconds.
6. Steps 2–5 repeat for approximately one minute and 45 seconds, or until the
test deactivates.
Touch Stop to stop the test. The test will
automatically end after one minute and
45 seconds.
The sequence also deactivates when any of
the following occur:
.The ignition is turned off.
.The transmission is shifted out of P (Park).
.The brake pedal is pressed.
.The turn signal is activated.
Page 323 of 463
Chevrolet Silverado 1500 Owner Manual (GMNA-Localizing-U.S./Canada/
Mexico/Paraguay-14632303) - 2021 - CRC - 11/9/20
320 Vehicle Care
Vehicle Care
General Information
General Information . . . . . . . . . . . . . . . . . . . 321
California Proposition 65 Warning . . . . . 321
California Perchlorate MaterialsRequirements . . . . . . . . . . . . . . . . . . . . . . . . 321
Accessories and Modifications . . . . . . . . . 322
Vehicle Checks
Doing Your Own Service Work . . . . . . . . . 322
Hood . . . . . . . . . . . . . . . . . . . . . . . . . . . . . . . . . . 322
Engine Compartment Overview . . . . . . . . 324
Engine Oil . . . . . . . . . . . . . . . . . . . . . . . . . . . . . 329
Engine Oil Life System . . . . . . . . . . . . . . . . . 331
Automatic Transmission Fluid . . . . . . . . . . 332
Engine Air Filter Life System . . . . . . . . . . . 332
Engine Air Cleaner/Filter . . . . . . . . . . . . . . . 333
Cooling System . . . . . . . . . . . . . . . . . . . . . . . . 334
Engine Overheating . . . . . . . . . . . . . . . . . . . . 337
Overheated Engine Protection Operating Mode . . . . . . . . . . . . . . . . . . . . . 339
Engine Fan . . . . . . . . . . . . . . . . . . . . . . . . . . . . 339
Washer Fluid . . . . . . . . . . . . . . . . . . . . . . . . . . 339
Brakes . . . . . . . . . . . . . . . . . . . . . . . . . . . . . . . . 340
Brake Pad Life System . . . . . . . . . . . . . . . . . 341
Brake Fluid . . . . . . . . . . . . . . . . . . . . . . . . . . . . 342
Battery - North America . . . . . . . . . . . . . . . 342 Four-Wheel Drive . . . . . . . . . . . . . . . . . . . . . . 345
Front Axle . . . . . . . . . . . . . . . . . . . . . . . . . . . . . 345
Rear Axle . . . . . . . . . . . . . . . . . . . . . . . . . . . . . . 345
Starter Switch Check . . . . . . . . . . . . . . . . . . 346
Automatic Transmission Shift Lock
Control Function Check . . . . . . . . . . . . . . 346
Ignition Transmission Lock Check . . . . . . 346
Park Brake and P (Park) Mechanism Check . . . . . . . . . . . . . . . . . . . . . . . . . . . . . . . 346
Wiper Blade Replacement . . . . . . . . . . . . . 347
Glass Replacement . . . . . . . . . . . . . . . . . . . . 347
Windshield Replacement . . . . . . . . . . . . . . 347
Gas Strut(s) . . . . . . . . . . . . . . . . . . . . . . . . . . . 348
Headlamp Aiming
Front Headlamp Aiming . . . . . . . . . . . . . . . 349
Bulb Replacement
Bulb Replacement . . . . . . . . . . . . . . . . . . . . . 349
Halogen Bulbs . . . . . . . . . . . . . . . . . . . . . . . . . 349
LED Lighting . . . . . . . . . . . . . . . . . . . . . . . . . . . 349
Headlamps, Front Turn Signal, Sidemarker, and Parking Lamps . . . . . 349
Taillamps, Turn Signal, Stoplamps, and Back-Up Lamps . . . . . . . . . . . . . . . . . . . . . . 350
Center High-Mounted Stoplamp (CHMSL) and Cargo Lamp . . . . . . . . . . . . 352
License Plate Lamp . . . . . . . . . . . . . . . . . . . . 352
Electrical System
Electrical System Overload . . . . . . . . . . . . . 352
Fuses and Circuit Breakers . . . . . . . . . . . . . 353
Engine Compartment Fuse Block . . . . . . . 353
Instrument Panel Fuse Block (Left) . . . . . 357
Instrument Panel Fuse Block (Right) . . . 358
Wheels and Tires
Tires . . . . . . . . . . . . . . . . . . . . . . . . . . . . . . . . . . . 361
All-Season Tires . . . . . . . . . . . . . . . . . . . . . . . . 361
Winter Tires . . . . . . . . . . . . . . . . . . . . . . . . . . . 362
All-Terrain Tires . . . . . . . . . . . . . . . . . . . . . . . 362
Tire Sidewall Labeling . . . . . . . . . . . . . . . . . 362
Tire Designations . . . . . . . . . . . . . . . . . . . . . . 364
Tire Terminology and Definitions . . . . . . 365
Tire Pressure . . . . . . . . . . . . . . . . . . . . . . . . . . 367
Tire Pressure Monitor System . . . . . . . . . 368
Tire Pressure Monitor Operation . . . . . . 369
Tire Inspection . . . . . . . . . . . . . . . . . . . . . . . . 374
Tire Rotation . . . . . . . . . . . . . . . . . . . . . . . . . . 374
When It Is Time for New Tires . . . . . . . . 375
Buying New Tires . . . . . . . . . . . . . . . . . . . . . 376
Different Size Tires and Wheels . . . . . . . . 377
Uniform Tire Quality Grading . . . . . . . . . . 377
Wheel Alignment and Tire Balance . . . . 379
Wheel Replacement . . . . . . . . . . . . . . . . . . . 379
Tire Chains . . . . . . . . . . . . . . . . . . . . . . . . . . . . 379
If a Tire Goes Flat . . . . . . . . . . . . . . . . . . . . . 380
Tire Changing . . . . . . . . . . . . . . . . . . . . . . . . . . 381
Full-Size Spare Tire . . . . . . . . . . . . . . . . . . . . . 391
Page 352 of 463
Chevrolet Silverado 1500 Owner Manual (GMNA-Localizing-U.S./Canada/
Mexico/Paraguay-14632303) - 2021 - CRC - 11/9/20
Vehicle Care 349
Headlamp Aiming
Front Headlamp Aiming
Headlamp aim has been preset and should
need no further adjustment.
If the vehicle is damaged in a crash, the
headlamp aim may be affected.
If adjustment to the headlamps is necessary,
see your dealer.
Bulb Replacement
For the proper type of replacement bulbs,
or any bulb changing procedure not listed in
this section, contact your dealer.
Caution
Do not replace incandescent bulbs with
aftermarket LED replacement bulbs. This
can cause damage to the vehicle electrical
system.
Halogen Bulbs
{Warning
Halogen bulbs have pressurized gas inside
and can burst if you drop or scratch the
bulb. You or others could be injured. Be
sure to read and follow the instructions
on the bulb package.
LED Lighting
This vehicle has several LED lamps. For
replacement of any LED lighting assembly,
contact your dealer.
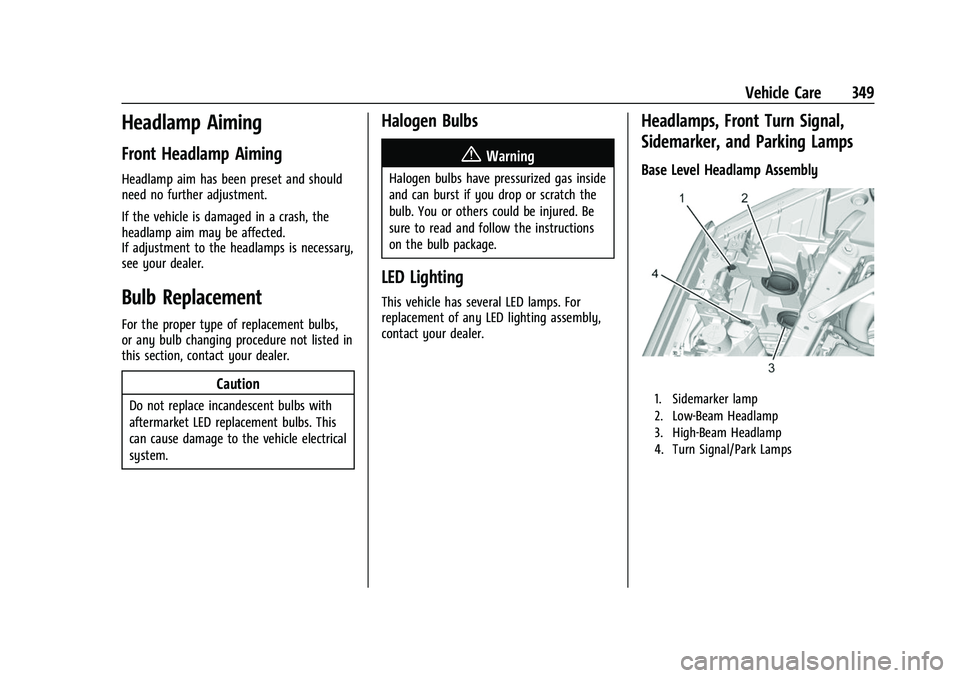
Headlamps, Front Turn Signal,
Sidemarker, and Parking Lamps
Base Level Headlamp Assembly
1. Sidemarker lamp
2. Low-Beam Headlamp
3. High-Beam Headlamp
4. Turn Signal/Park Lamps
Page 353 of 463
Chevrolet Silverado 1500 Owner Manual (GMNA-Localizing-U.S./Canada/
Mexico/Paraguay-14632303) - 2021 - CRC - 11/9/20
350 Vehicle Care
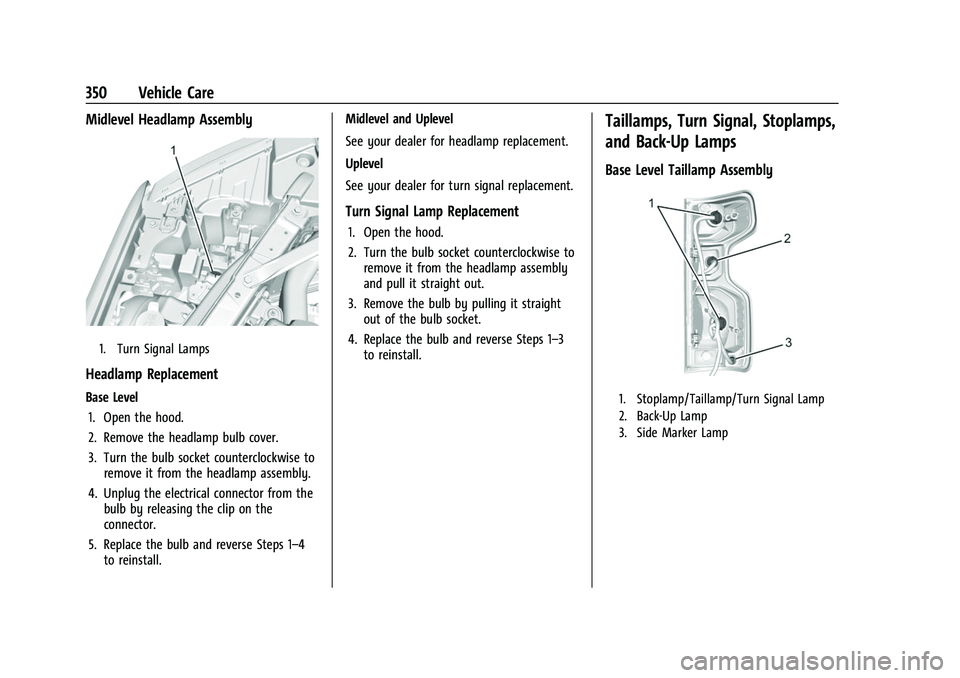
Midlevel Headlamp Assembly
1. Turn Signal Lamps
Headlamp Replacement
Base Level1. Open the hood.
2. Remove the headlamp bulb cover.
3. Turn the bulb socket counterclockwise to remove it from the headlamp assembly.
4. Unplug the electrical connector from the bulb by releasing the clip on the
connector.
5. Replace the bulb and reverse Steps 1–4 to reinstall. Midlevel and Uplevel
See your dealer for headlamp replacement.
Uplevel
See your dealer for turn signal replacement.
Turn Signal Lamp Replacement
1. Open the hood.
2. Turn the bulb socket counterclockwise to
remove it from the headlamp assembly
and pull it straight out.
3. Remove the bulb by pulling it straight out of the bulb socket.
4. Replace the bulb and reverse Steps 1–3 to reinstall.
Taillamps, Turn Signal, Stoplamps,
and Back-Up Lamps
Base Level Taillamp Assembly
1. Stoplamp/Taillamp/Turn Signal Lamp
2. Back-Up Lamp
3. Side Marker Lamp