Page 17 of 20

17F Optional equipment required
The available camera systems feature up to 8 camerasF with up to 15 viewsF to help make it easier to hitch a trailer and provide better visibility while to\
wing.
REAR VISION CAMERA
When the vehicle is in Reverse, a view of the area behind the vehicle di\
splays on the info-tainment screen. Camera view buttonsF are at the bottom of the screen.
Touch the Guidance Lines or Hitch Guid ance button to change guidelines.
Touch the Hitch View button for a zoomed-in view of the hitch area.
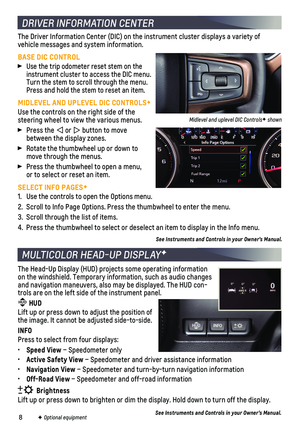
SURROUND VISIONF
High-definition rear, front or side camera views along with a view of the area
surrounding the vehicle are displayed on the infotainment screen when the vehicle is in Reverse or Drive. Camera view buttonsF are at the bottom of the screen.
Touch the Guidance Lines or Hitch Guidance button to change guidelines.
Touch the Bed View button to view the bed to check cargo or to view guide-lines to help when hitching a 5th wheel or gooseneck trailer. Zoom functionality also available.
To check available camera views when in Drive above 8 mph, touch the Camera icon on the infotainment screen and select the desired view. Touch X to exit the view.
ADDITIONAL TRAILER CAMERA VIEWSF
Multiple views to aid in trailering are shown on the infotainment screen using the vehicle cameras and up to two additional wired accessory camerasF mounted on the rear or interior of the trailer.
Touch the Rear Side View button for a biased split view of each side of the trailer (more of the left or right side will be shown based on trailer position) and to view trailer length when a turn signal is activated.
Touch the Transparent Trailer View button for a view behind the trailer. Compatible with most conventional box trailers; requires accessory camer\
aF.
Jack-Knife AlertF – The Jack-Knife Alert displays a warning symbol when the truck/trailer angle is in a possible jack-knife position and there is a potential imminent collision situation. The Safety Alert SeatF may pulse or beeps may sound.
Note: Accessory camera system compatible with most trailer and hitch types.
Surround Vision Rear Camera View screen
Bed View screen
Transparent Trailer View screenF
See Driving and Operating in your Owner’s Manual.
CAMERA SYSTEM FEATURES
Page 18 of 20

18F Optional equipment
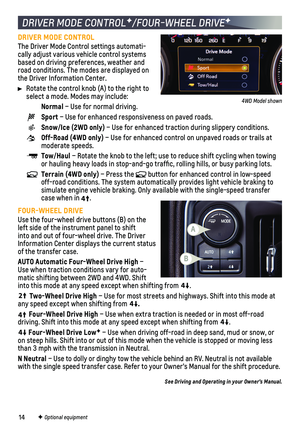
REAR CAMERA MIRRORF
The rear camera mirror provides a wider, less obstructed field of view\
than a traditional mirror to assist when driving, changing lanes and checking traffic con\
ditions.
A. On/Off
Pull or push the lever at the bottom of the mirror to turn the video display on or off.
B. Selection Control
Press and release the button to select the brightness, zoom, or tilt setting.
C. Adjustment
Press and release either button to adjust the selected setting.
HILL DESCENT CONTROLF
Hill Descent Control sets and maintains vehicle speed from 1–14 mph w\
hile descending a steep incline in a forward or reverse gear.
1. Press the Hill Descent Control button on the center of the instrument panel. Vehicle speed must be below 31 mph to enable the system. The symbol will illumi-nate on the instrument cluster.
2. Increase or decrease speed by applying the accelerator or brake pedal or\
use the Cruise Control +/– buttons on the steering wheel. The adjusted speed becomes the new set speed. The symbol flashes when the system is actively applying the brakes to maintain vehicle speed.
See Driving and Operating in your Owner’s Manual.
See Keys, Doors and Windows in your Owner’s Manual.
TRUCK TIRE PRESSURE MONITORING SYSTEM
The Low Tire Pressure warning light on the instrument cluster illuminates wh\
en one or more of the vehicle’s tires is significantly underinflated. Fi\
ll the tires to the proper tire pressures listed on the Tire and Loading Information label, located belo\
w the driver’s door latch. Current tire pressures can be viewed on the Driver Information Center.
With the ignition On or in Accessory mode, the Tire Fill Alert will prov\
ide visual and audi-ble alerts to help with inflating a tire to the recommended tire press\
ure (does not apply to spare tire). When the recommended pressure is reached, the horn soun\
ds and the turn signals change from flashing to solid.
Note: Refer to your Owner’s Manual for accessory trailer tire pressure monitoring system information\
.
See Vehicle Care in your Owner’s Manual.
ABC
Page 19 of 20

19F Optional equipment
TRAILERINGF
ADVANCED TRAILERING SYSTEMF
The in-vehicle trailering app on the info-tainment screen allows customized trailer profiles with a variety of helpful towing assistance features, including a hitching and setup checklist, trailer tire pressure and temperature monitoringF, trailer light testing, Jack-Knife Alert, trailer length
indicator, trailer theft detection and more. Trailering App information also is available with the myChevrolet mobile app.
Note: The Trailering App will monitor trailer presence, even while the vehicle is off, by periodically checking the trailer lighting circuits. On trailers equipped with LED lights, these periodic checks may cause the trailer lights to flash. This flashing will become more frequent if Theft Alert is enabled.
HITCH AREA LIGHTING
Press the Cargo Lamp button on the left side of the instrument panel to turn the cargo bed lamp or conventional hitch lamp on/off.
TRAILERING INFORMATION LABEL
The Trailering information label, located by the driver’s door latch,\
provides vehicle-specific weight information to help when loading the vehicle.
INTEGRATED TRAILER BRAKE CONTROL (ITBC)F
The ITBC system can be used to adjust the power output, or Trailer Gain, to the trailer brakes. The control panel is on the center of the instrument panel. ITBC information is displayed on the ITBC page on the Driver Information Center.
Squeeze the control together to
manually apply the trailer brakes.
Adjust the Trailer Gain by pressing the +/– adjustment buttons.
See Driving and Operating in your Owner’s Manual.
ELECTRIC PARKING BRAKE
To apply the parking brake, press the Parking Brake button on the left side of the instrument panel.
To release the parking brake, turn on the ignition, press the brake peda\
l, and then press the button.
See Driving and Operating in your Owner’s Manual.
Page 20 of 20
\
and, if your vehicle is properly equipped, you can start or turn off your engine, loc\
k or unlock your doors, view key diag")
20
Download the myChevrolet app to your compatible smartphone (or device)\
and, if your vehicle is properly equipped, you can start or turn off your engine, loc\
k or unlock your doors, view key diagnostic information, set parking information and more\
.
The app is available on select Apple and Android devices. Service availa\
bility, features and functionality vary by vehicle, device and data plan. Device data con\
nection required. Visit onstar.com for more details. Download the mobile app from your compatible mobile device’s app store.
ROADSIDE ASSISTANCE
1-800-CHEV-USA 1-800-243-8872 TTY Users: 1-888-889-2438
As the owner of a new Chevrolet, you are automatically enrolled in the C\
hevrolet Roadside Assistance program for up to 5 years/60,000 miles, whichever oc\
curs first, at no expense to you. Chevrolet’s Roadside Assistance toll-free numbe\
r is staffed by a team of trained advisors who are available 24 hours a day, 365 days a ye\
ar, to contact a
service provider for light services (fuel delivery, jump-starts, flat\
tire and lock-outs) or make arrangements to tow your vehicle to the nearest Chevrolet dealer fo\
r any repairs.
ONSTAR® ROADSIDE ASSISTANCE
If you have a current OnStar Safety & Security plan, push the blue OnStar button or red Emergency button to get the help you need. An OnStar advisor will use GPS technol\
ogy to pinpoint your vehicle location and contact the nearest service provid\
er.
To learn more about OnStar services, push the blue OnStar button, visit onstar.com, call 1-888-4-ONSTAR (1-888-466-7827), or refer to your Owner’s Manual.
CHEVROLET OWNER CENTER
Get to know your vehicle inside and out with the Chevrolet Owner Center.\
Check out personalized information, including an online Owner’s Manual and help\
ful how-to videos, track your service history and warranty status, manage your OnStar and C\
onnected Services vehicle plans, review your current Vehicle Diagnostics report (\
active service required) and more. Create an account today at my.chevrolet.com.
MYCHEVROLET MOBILE APP
!84550396=A!84550396 A
We recommend always using ACDelco or GM Genuine Parts.
Certain restrictions, precautions and safety procedures apply to your ve\
hicle. Please read your Owner’s Manual for complete instructions. All information contained in this guide is based \
on the latest information available at the time of printing and is subject to change without notice. Copyright 2020 Gene\
ral Motors. All rights reserved.
Page:
< prev 1-8 9-16 17-24