2021 CHEVROLET MALIBU ignition
[x] Cancel search: ignitionPage 188 of 351
Chevrolet Malibu Owner Manual (GMNA-Localizing-U.S./Canada-
14584249) - 2021 - CRC - 11/9/20
Driving and Operating 187
Torque Lock
Torque lock is when the weight of the
vehicle puts too much force on the parking
pawl in the transmission. This happens when
parking on a hill and shifting the
transmission into P (Park) is not done
properly and then it is difficult to shift out
of P (Park). To prevent torque lock, set the
parking brake and then shift into P (Park). To
find out how, see“Shifting Into Park” listed
previously.
If torque lock does occur, your vehicle may
need to be pushed uphill by another vehicle
to relieve the parking pawl pressure, so you
can shift out of P (Park).
Shifting out of Park
This vehicle is equipped with an electronic
shift lock release system. The shift lock
release is designed to prevent movement of
the shift lever out of P (Park), unless the
ignition is on and the brake pedal is applied.
The shift lock release is always functional
except in the case of an uncharged or low
voltage (less than 9 volt) battery. If the vehicle has an uncharged battery or a
battery with low voltage, try charging or
jump starting the battery. See
Jump Starting
- North America 0290 for more information.
To shift out of P (Park): 1. Apply the brake pedal.
2. Release the parking brake. See Electric
Parking Brake 0192.
3. Press the shift lever button.
4. Move the shift lever.
If unable to shift out of P (Park): 1. Fully release the shift lever button.
2. While holding down the brake pedal, press the shift lever button again.
3. Move the shift lever.
This vehicle may have the Buckle to Drive
feature, which may prevent the vehicle from
shifting out of P (Park). See Buckle To Drive
0 39.
If the shift lever will not move from P (Park),
consult your dealer or a professional towing
service.
Parking over Things That Burn
{Warning
Things that can burn could touch hot
exhaust parts under the vehicle and
ignite. Do not park over papers, leaves,
dry grass, or other things that can burn.
Extended Parking
It is best not to park with the vehicle
running. If the vehicle is left running, be
sure it will not move and there is adequate
ventilation.
See Shifting Into Park 0186 and
Engine Exhaust 0188.
If the vehicle is left parked and running with
the RKE transmitter outside the vehicle, it
will continue to run for up to half an hour.
If the vehicle is left parked and running with
the RKE transmitter inside the vehicle, it will
continue to run for up to an hour.
The vehicle could turn off sooner if it is
parked on a hill, due to lack of
available fuel.
The timer will reset if the vehicle is taken
out of P (Park) while it is running.
Page 190 of 351
Chevrolet Malibu Owner Manual (GMNA-Localizing-U.S./Canada-
14584249) - 2021 - CRC - 11/9/20
Driving and Operating 189
Warning (Continued)
sure the vehicle will not move, even
when you are on fairly level ground,
always set the parking brake and move
the shift lever to P (Park). SeeShifting
Into Park 0186 and
Driving Characteristics and Towing Tips
0 221.
Make sure the shift lever is fully in P (Park)
before starting the engine. The vehicle has
an automatic transmission shift lock control
system. With the ignition on, fully apply the
regular brake, then press the button on the
shift lever before shifting from P (Park).
If you cannot shift out of P (Park), ease
pressure on the shift lever, then push the
shift lever all the way into P (Park) as you
maintain brake application. Then press the
shift lever button and move the shift lever
into another gear. See Shifting out of Park
0 187.
R : Use this gear to back up.
Caution
Shifting to R (Reverse) while the vehicle is
moving forward could damage the
transmission. The repairs would not be
covered by the vehicle warranty. Shift to
R (Reverse) only after the vehicle is
stopped.
To rock the vehicle back and forth to get
out of snow, ice, or sand without damaging
the transmission, see If the Vehicle Is Stuck
0 178.
N : In this position, the engine does not
connect with the wheels. To restart the
engine when the vehicle is already moving,
use N (Neutral) only.
{Warning
Shifting into a drive gear while the
engine is running at high speed is
dangerous. Unless your foot is firmly on
the brake pedal, the vehicle could move
very rapidly. You could lose control and
hit people or objects. Do not shift into a
drive gear while the engine is running at
high speed.
Caution
Shifting out of P (Park) or N (Neutral) with
the engine running at high speed may
damage the transmission. The repairs
would not be covered by the vehicle
warranty. Be sure the engine is not
running at high speed when shifting the
vehicle.
Caution
A transmission hot message may display
if the automatic transmission fluid is too
hot. Driving under this condition can
damage the vehicle. Stop and idle the
engine to cool the automatic
transmission fluid. This message clears
when the transmission fluid has cooled
sufficiently.
D : This position is for normal driving.
If more power is needed for passing, press
the accelerator pedal down.
Caution
If the vehicle does not shift gears, the
transmission could be damaged. Have the
vehicle serviced right away.
Page 192 of 351
Chevrolet Malibu Owner Manual (GMNA-Localizing-U.S./Canada-
14584249) - 2021 - CRC - 11/9/20
Driving and Operating 191
Brakes
Antilock Brake System (ABS)
The Antilock Brake System (ABS) helps
prevent a braking skid and maintain steering
while braking hard.
ABS performs a system check when the
vehicle is first driven. A momentary motor
or clicking noise may be heard while this
test is going on, and the brake pedal may
move slightly. This is normal.
If there is a problem with ABS, this warning
light stays on. SeeAntilock Brake System
(ABS) Warning Light 089.
ABS does not change the time needed to
get a foot on the brake pedal and does not
always decrease stopping distance. If you
get too close to the vehicle ahead, there will
not be enough time to apply the brakes if
that vehicle suddenly slows or stops. Always
leave enough room ahead to stop, even
with ABS.
Using ABS
Do not pump the brakes. Just hold the brake
pedal down firmly. Hearing or feeling ABS
operate is normal.
Braking in Emergencies
ABS allows steering and braking at the same
time. In many emergencies, steering can
help even more than braking.
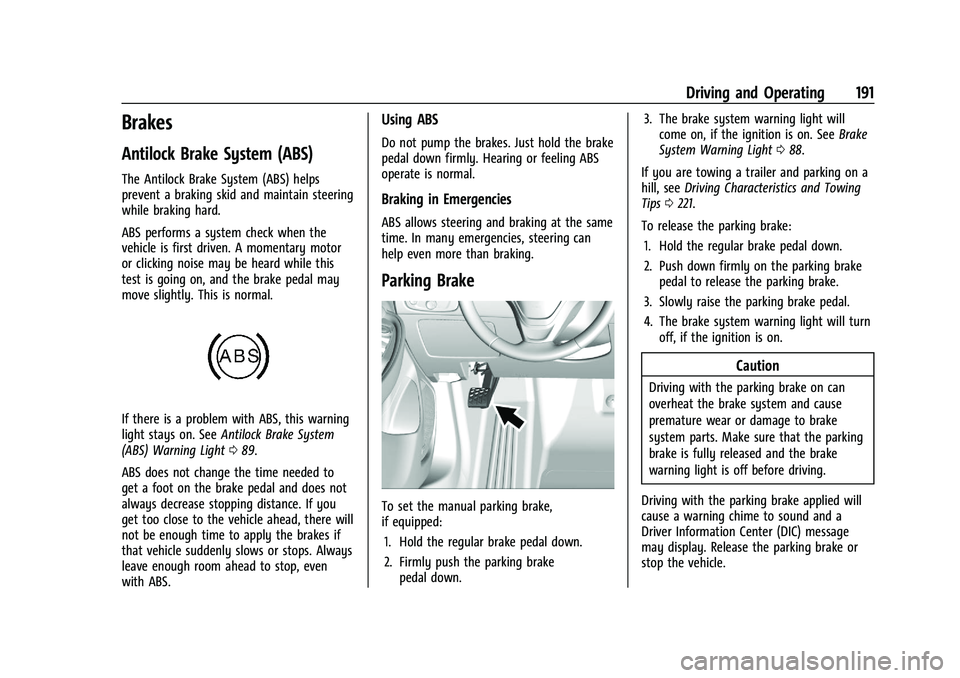
Parking Brake
To set the manual parking brake,
if equipped: 1. Hold the regular brake pedal down.
2. Firmly push the parking brake pedal down. 3. The brake system warning light will
come on, if the ignition is on. See Brake
System Warning Light 088.
If you are towing a trailer and parking on a
hill, see Driving Characteristics and Towing
Tips 0221.
To release the parking brake: 1. Hold the regular brake pedal down.
2. Push down firmly on the parking brake pedal to release the parking brake.
3. Slowly raise the parking brake pedal.
4. The brake system warning light will turn off, if the ignition is on.
Caution
Driving with the parking brake on can
overheat the brake system and cause
premature wear or damage to brake
system parts. Make sure that the parking
brake is fully released and the brake
warning light is off before driving.
Driving with the parking brake applied will
cause a warning chime to sound and a
Driver Information Center (DIC) message
may display. Release the parking brake or
stop the vehicle.
Page 193 of 351
Chevrolet Malibu Owner Manual (GMNA-Localizing-U.S./Canada-
14584249) - 2021 - CRC - 11/9/20
192 Driving and Operating
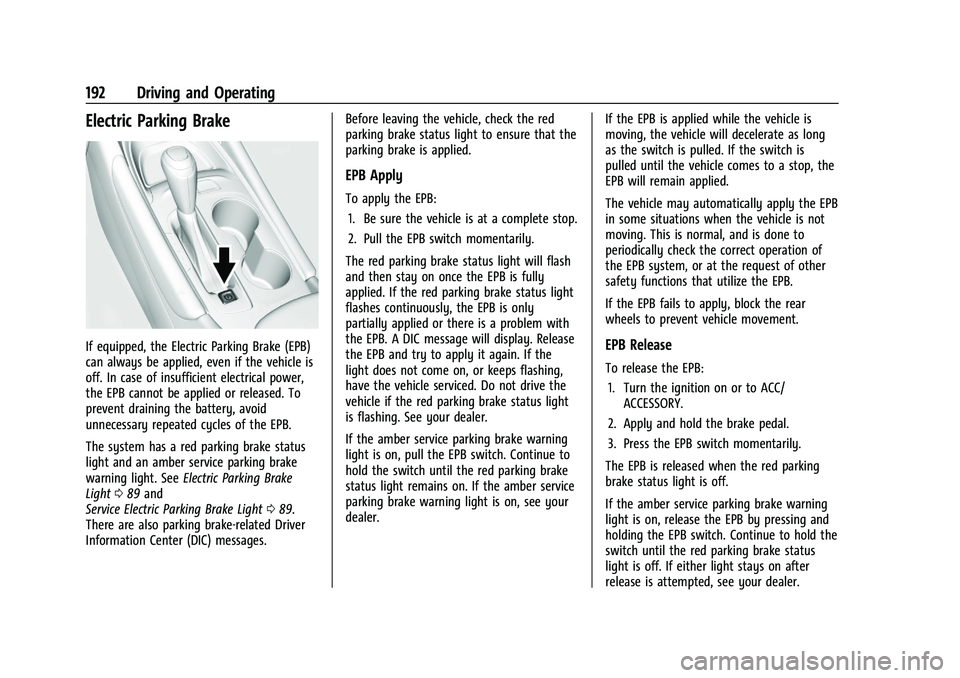
Electric Parking Brake
If equipped, the Electric Parking Brake (EPB)
can always be applied, even if the vehicle is
off. In case of insufficient electrical power,
the EPB cannot be applied or released. To
prevent draining the battery, avoid
unnecessary repeated cycles of the EPB.
The system has a red parking brake status
light and an amber service parking brake
warning light. SeeElectric Parking Brake
Light 089 and
Service Electric Parking Brake Light 089.
There are also parking brake-related Driver
Information Center (DIC) messages. Before leaving the vehicle, check the red
parking brake status light to ensure that the
parking brake is applied.
EPB Apply
To apply the EPB:
1. Be sure the vehicle is at a complete stop.
2. Pull the EPB switch momentarily.
The red parking brake status light will flash
and then stay on once the EPB is fully
applied. If the red parking brake status light
flashes continuously, the EPB is only
partially applied or there is a problem with
the EPB. A DIC message will display. Release
the EPB and try to apply it again. If the
light does not come on, or keeps flashing,
have the vehicle serviced. Do not drive the
vehicle if the red parking brake status light
is flashing. See your dealer.
If the amber service parking brake warning
light is on, pull the EPB switch. Continue to
hold the switch until the red parking brake
status light remains on. If the amber service
parking brake warning light is on, see your
dealer. If the EPB is applied while the vehicle is
moving, the vehicle will decelerate as long
as the switch is pulled. If the switch is
pulled until the vehicle comes to a stop, the
EPB will remain applied.
The vehicle may automatically apply the EPB
in some situations when the vehicle is not
moving. This is normal, and is done to
periodically check the correct operation of
the EPB system, or at the request of other
safety functions that utilize the EPB.
If the EPB fails to apply, block the rear
wheels to prevent vehicle movement.
EPB Release
To release the EPB:
1. Turn the ignition on or to ACC/ ACCESSORY.
2. Apply and hold the brake pedal.
3. Press the EPB switch momentarily.
The EPB is released when the red parking
brake status light is off.
If the amber service parking brake warning
light is on, release the EPB by pressing and
holding the EPB switch. Continue to hold the
switch until the red parking brake status
light is off. If either light stays on after
release is attempted, see your dealer.
Page 203 of 351
Chevrolet Malibu Owner Manual (GMNA-Localizing-U.S./Canada-
14584249) - 2021 - CRC - 11/9/20
202 Driving and Operating
{Warning
If ACC has stopped the vehicle, and if ACC
is disengaged, turned off, or canceled, the
vehicle will no longer be held at a stop.
The vehicle can move. When ACC is
holding the vehicle at a stop, always be
prepared to manually apply the brakes.
{Warning
Leaving the vehicle without placing it in
P (Park) can be dangerous. Do not leave
the vehicle while it is being held at a
stop by ACC. Always place the vehicle in
P (Park) and turn off the ignition before
leaving the vehicle.
ACC Override
If using the accelerator pedal while ACC is
active, the ACC indicator turns blue on the
instrument cluster to indicate that automatic
braking will not occur. ACC will resume
operation when the accelerator pedal is not
being pressed.
{Warning
The ACC will not automatically apply the
brakes if your foot is resting on the
accelerator pedal. You could crash into a
vehicle ahead of you.
Curves in the Road
{Warning
On curves, ACC may not detect a vehicle
ahead in your lane. You could be startled
if the vehicle accelerates up to the set
speed, especially when following a vehicle
exiting or entering exit ramps. You could
lose control of the vehicle or crash. Do
not use ACC while driving on an entrance
or exit ramp. Always be ready to use the
brakes if necessary.
{Warning
On curves, ACC may respond to a vehicle
in another lane, or may not have time to
react to a vehicle in your lane. You could
crash into a vehicle ahead of you, or lose
control of your vehicle. Give extra (Continued)
Warning (Continued)
attention in curves and be ready to use
the brakes if necessary. Select an
appropriate speed while driving in curves.
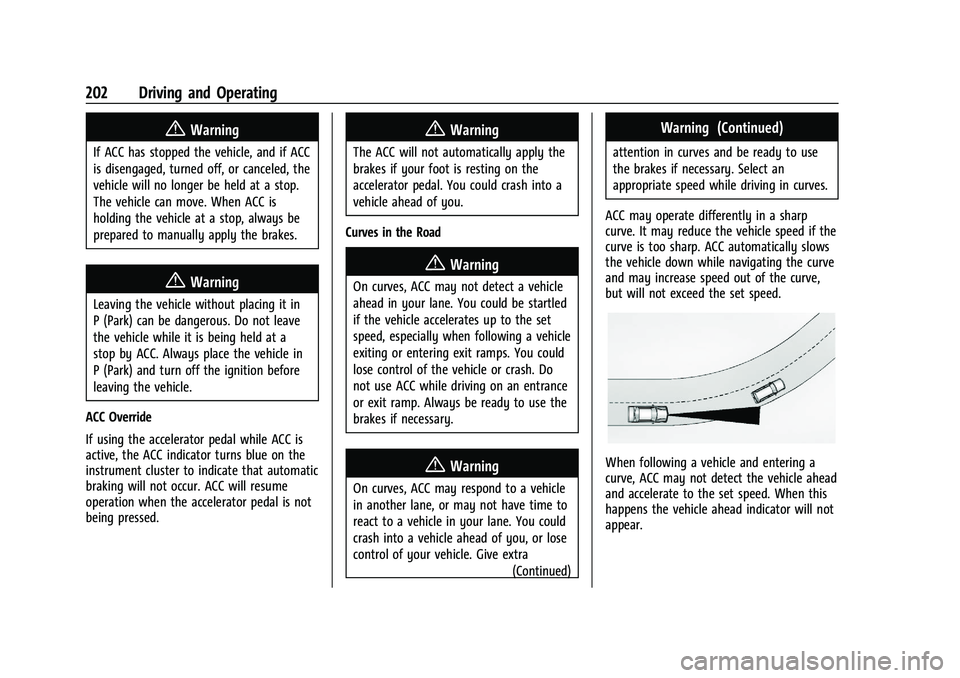
ACC may operate differently in a sharp
curve. It may reduce the vehicle speed if the
curve is too sharp. ACC automatically slows
the vehicle down while navigating the curve
and may increase speed out of the curve,
but will not exceed the set speed.
When following a vehicle and entering a
curve, ACC may not detect the vehicle ahead
and accelerate to the set speed. When this
happens the vehicle ahead indicator will not
appear.
Page 204 of 351
Chevrolet Malibu Owner Manual (GMNA-Localizing-U.S./Canada-
14584249) - 2021 - CRC - 11/9/20
Driving and Operating 203
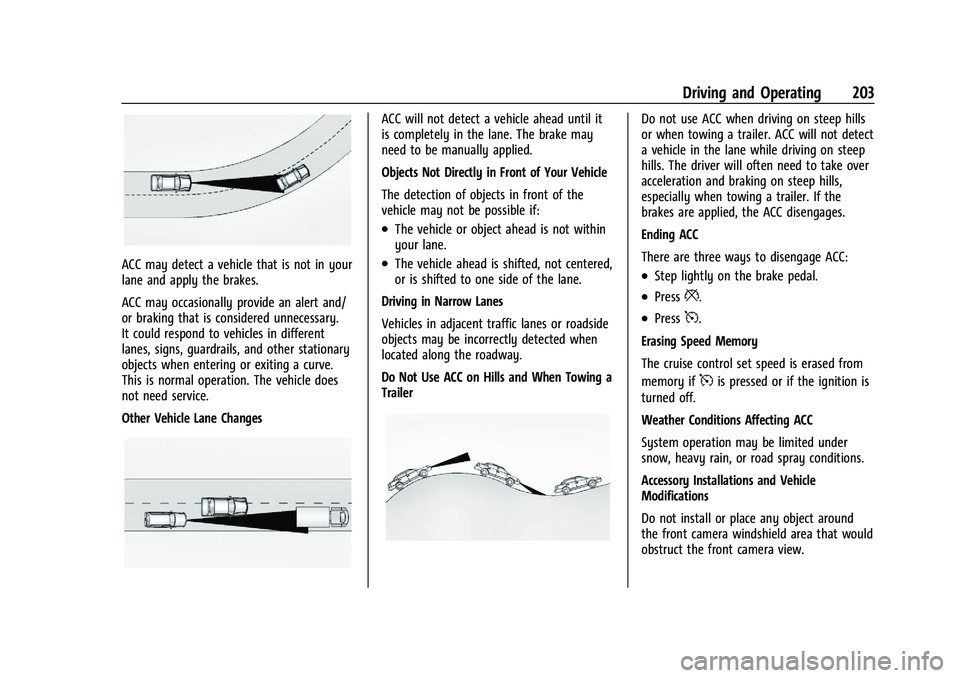
ACC may detect a vehicle that is not in your
lane and apply the brakes.
ACC may occasionally provide an alert and/
or braking that is considered unnecessary.
It could respond to vehicles in different
lanes, signs, guardrails, and other stationary
objects when entering or exiting a curve.
This is normal operation. The vehicle does
not need service.
Other Vehicle Lane Changes
ACC will not detect a vehicle ahead until it
is completely in the lane. The brake may
need to be manually applied.
Objects Not Directly in Front of Your Vehicle
The detection of objects in front of the
vehicle may not be possible if:
.The vehicle or object ahead is not within
your lane.
.The vehicle ahead is shifted, not centered,
or is shifted to one side of the lane.
Driving in Narrow Lanes
Vehicles in adjacent traffic lanes or roadside
objects may be incorrectly detected when
located along the roadway.
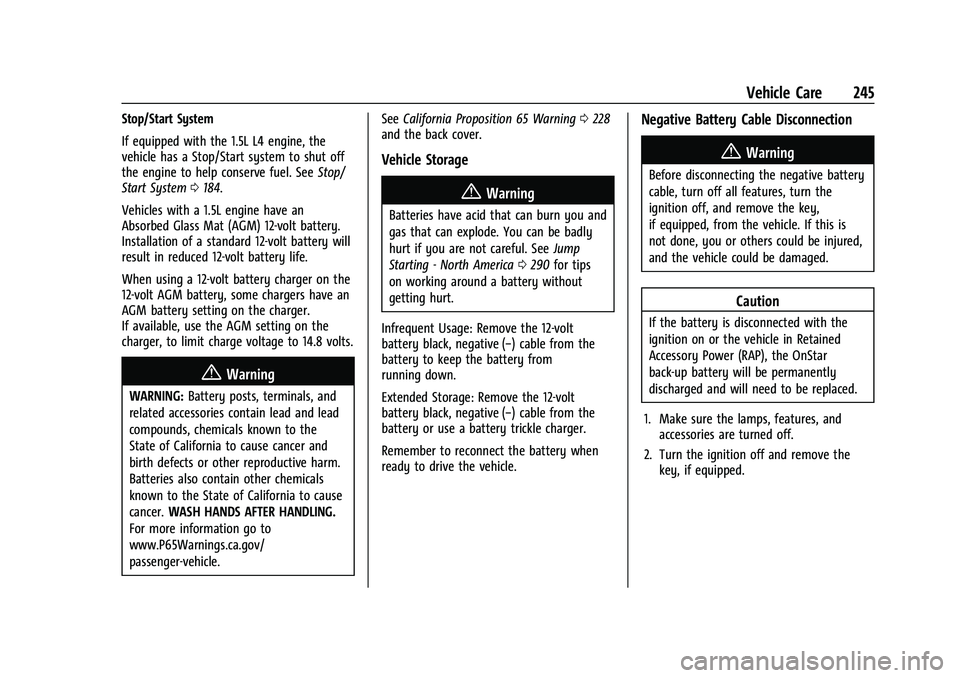
Do Not Use ACC on Hills and When Towing a
Trailer
Do not use ACC when driving on steep hills
or when towing a trailer. ACC will not detect
a vehicle in the lane while driving on steep
hills. The driver will often need to take over
acceleration and braking on steep hills,
especially when towing a trailer. If the
brakes are applied, the ACC disengages.
Ending ACC
There are three ways to disengage ACC:
.Step lightly on the brake pedal.
.Press*.
.Press5.
Erasing Speed Memory
The cruise control set speed is erased from
memory if
5is pressed or if the ignition is
turned off.
Weather Conditions Affecting ACC
System operation may be limited under
snow, heavy rain, or road spray conditions.
Accessory Installations and Vehicle
Modifications
Do not install or place any object around
the front camera windshield area that would
obstruct the front camera view.
Page 246 of 351
Chevrolet Malibu Owner Manual (GMNA-Localizing-U.S./Canada-
14584249) - 2021 - CRC - 11/9/20
Vehicle Care 245
Stop/Start System
If equipped with the 1.5L L4 engine, the
vehicle has a Stop/Start system to shut off
the engine to help conserve fuel. SeeStop/
Start System 0184.
Vehicles with a 1.5L engine have an
Absorbed Glass Mat (AGM) 12-volt battery.
Installation of a standard 12-volt battery will
result in reduced 12-volt battery life.
When using a 12-volt battery charger on the
12-volt AGM battery, some chargers have an
AGM battery setting on the charger.
If available, use the AGM setting on the
charger, to limit charge voltage to 14.8 volts.
{Warning
WARNING: Battery posts, terminals, and
related accessories contain lead and lead
compounds, chemicals known to the
State of California to cause cancer and
birth defects or other reproductive harm.
Batteries also contain other chemicals
known to the State of California to cause
cancer. WASH HANDS AFTER HANDLING.
For more information go to
www.P65Warnings.ca.gov/
passenger-vehicle. See
California Proposition 65 Warning 0228
and the back cover.
Vehicle Storage
{Warning
Batteries have acid that can burn you and
gas that can explode. You can be badly
hurt if you are not careful. See Jump
Starting - North America 0290 for tips
on working around a battery without
getting hurt.
Infrequent Usage: Remove the 12-volt
battery black, negative (−) cable from the
battery to keep the battery from
running down.
Extended Storage: Remove the 12-volt
battery black, negative (−) cable from the
battery or use a battery trickle charger.
Remember to reconnect the battery when
ready to drive the vehicle.
Negative Battery Cable Disconnection
{Warning
Before disconnecting the negative battery
cable, turn off all features, turn the
ignition off, and remove the key,
if equipped, from the vehicle. If this is
not done, you or others could be injured,
and the vehicle could be damaged.
Caution
If the battery is disconnected with the
ignition on or the vehicle in Retained
Accessory Power (RAP), the OnStar
back-up battery will be permanently
discharged and will need to be replaced.
1. Make sure the lamps, features, and accessories are turned off.
2. Turn the ignition off and remove the key, if equipped.
Page 247 of 351
Chevrolet Malibu Owner Manual (GMNA-Localizing-U.S./Canada-
14584249) - 2021 - CRC - 11/9/20
246 Vehicle Care
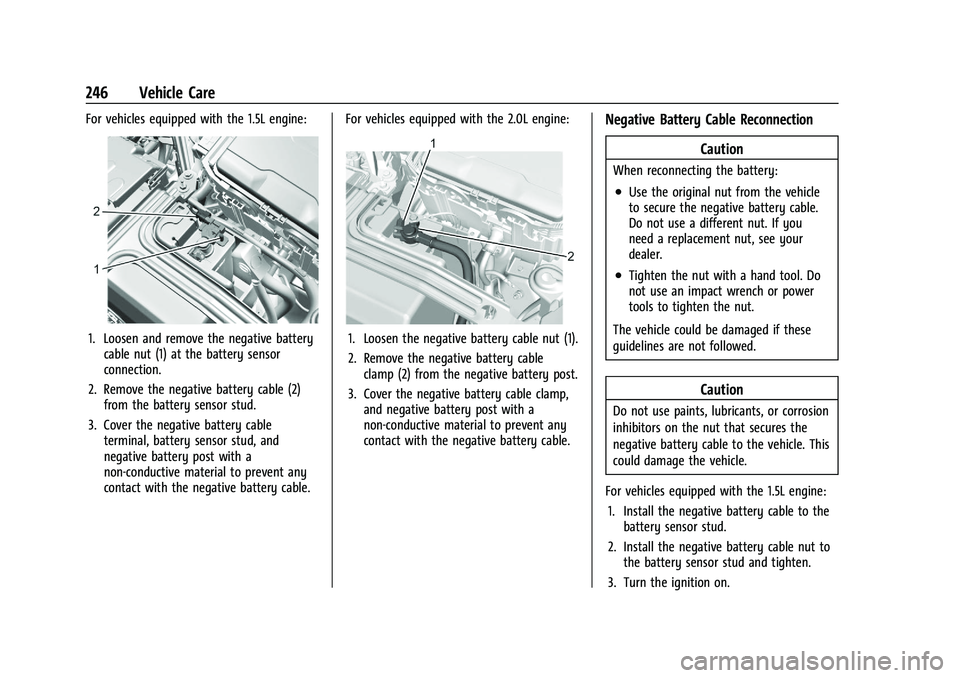
For vehicles equipped with the 1.5L engine:
1. Loosen and remove the negative batterycable nut (1) at the battery sensor
connection.
2. Remove the negative battery cable (2) from the battery sensor stud.
3. Cover the negative battery cable terminal, battery sensor stud, and
negative battery post with a
non-conductive material to prevent any
contact with the negative battery cable. For vehicles equipped with the 2.0L engine:1. Loosen the negative battery cable nut (1).
2. Remove the negative battery cable
clamp (2) from the negative battery post.
3. Cover the negative battery cable clamp, and negative battery post with a
non-conductive material to prevent any
contact with the negative battery cable.
Negative Battery Cable Reconnection
Caution
When reconnecting the battery:
.Use the original nut from the vehicle
to secure the negative battery cable.
Do not use a different nut. If you
need a replacement nut, see your
dealer.
.Tighten the nut with a hand tool. Do
not use an impact wrench or power
tools to tighten the nut.
The vehicle could be damaged if these
guidelines are not followed.
Caution
Do not use paints, lubricants, or corrosion
inhibitors on the nut that secures the
negative battery cable to the vehicle. This
could damage the vehicle.
For vehicles equipped with the 1.5L engine: 1. Install the negative battery cable to the battery sensor stud.
2. Install the negative battery cable nut to the battery sensor stud and tighten.
3. Turn the ignition on.