2021 CHEVROLET MALIBU ignition
[x] Cancel search: ignitionPage 104 of 351
Chevrolet Malibu Owner Manual (GMNA-Localizing-U.S./Canada-
14584249) - 2021 - CRC - 11/9/20
Instruments and Controls 103
Remote Start Auto Heat Seats
This setting automatically turns on the
heated seats when using the remote start
function on cold days. SeeHeated and
Ventilated Front Seats 034 and
Remote Vehicle Start 013.
Touch Off, On-Driver and Passenger,
or On-Driver.
Remote Window Operation
This allows the windows to be opened when
pressing and holding
Kon the RKE
transmitter. See Remote Keyless Entry (RKE)
System Operation 07.
Touch Off or On.
Passive Door Unlock
This setting specifies which doors unlock
when using the button on the driver door
handle to unlock the vehicle.
Touch Off, All Doors, or Driver Door Only.
Passive Door Lock
This setting specifies if the vehicle will
automatically lock, or lock and provide an
alert after all the doors are closed, and you
walk away from the vehicle with the RKE
transmitter. See Remote Keyless Entry (RKE)
System Operation 07. Touch Off, On with Horn Chirp, or On.
Remote Left in Vehicle Alert
This feature sounds an alert when the RKE
transmitter is left in the vehicle. This menu
also enables Remote No Longer in Vehicle
Alert.
Touch Off or On.
Seating Position
Touch and the following may display:
.Seat Entry Memory
.Seat Exit Memory
Seat Entry Memory
This feature automatically recalls the
previously stored 1 or 2 button positions
when the ignition is changed from off to on
or ACC/ACCESSORY. See Memory Seats032.
Touch Off or On.
Seat Exit Memory
This feature automatically recalls the
previously stored exit button positions when
the ignition is changed from on or ACC/
ACCESSORY to off if the driver door is open
or opened. See Memory Seats032.
Touch Off or On.
Teen Driver
See Teen Driver 0153.
Valet Mode
This will lock the infotainment system and
steering wheel controls. It may also limit
access to vehicle storage locations,
if equipped.
To enable valet mode:
1. Enter a four-digit code on the keypad.
2. Select Enter to go to the confirmation screen.
3. Re-enter the four-digit code.
Touch Lock or Unlock to lock or unlock the
system. Touch Back to go back to the
previous menu.
Page 106 of 351

Chevrolet Malibu Owner Manual (GMNA-Localizing-U.S./Canada-
14584249) - 2021 - CRC - 11/9/20
Lighting 105
To enable the IntelliBeam system, press
bon the turn signal lever when the
exterior lamp control is in the AUTO or
5
position.
Driving with IntelliBeam
The system only activates the high beams
when driving over 40 km/h (25 mph).
The blue high-beam on light appears on the
instrument cluster when the high beams
are on.
There is a sensor near the top center of the
windshield that automatically controls the
system. Keep this area of the windshield
clear of debris to allow for best system
performance.
The high-beam headlamps remain on, under
the automatic control, until one of the
following situations occurs:
.The system detects an approaching
vehicle's headlamps.
.The system detects a preceding vehicle's
taillamps.
.The outside light is bright enough that
high-beam headlamps are not required.
.The vehicle's speed drops below 20 km/h
(12 mph).
.The IntelliBeam system is disabled by the
button on the turn signal lever. If this
happens, press
bon the turn signal
lever when the exterior lamp control is in
the AUTO or
5position. The instrument
cluster light will come on to indicate the
IntelliBeam system is reactivated.
The high beams may not turn off
automatically if the system cannot detect
another vehicle's lamps because of any of
the following:
.The other vehicle's lamps are missing,
damaged, obstructed from view,
or otherwise undetected.
.The other vehicle's lamps are covered
with dirt, snow, and/or road spray.
.The other vehicle's lamps cannot be
detected due to dense exhaust, smoke,
fog, snow, road spray, mist, or other
airborne obstructions.
.The vehicle's windshield is dirty, cracked,
or obstructed by something that blocks
the view of the light sensor.
.The vehicle is loaded such that the front
end points upward, causing the light
sensor to aim high and not detect
headlamps and taillamps.
.Driving on winding or hilly roads. The IntelliBeam system may need to be
disabled if any of the above conditions exist.
Exterior Lamps Off Reminder
A warning chime sounds if the driver door is
opened while the ignition is off and the
exterior lamps are on.
Headlamp High/Low-Beam
Changer
3:
Push the turn signal lever away from
you and release, to turn the high beams on.
To return to low beams, push the lever
again or pull it toward you and release.
This indicator light turns on in the
instrument cluster when the high-beam
headlamps are on.
Flash-to-Pass
To flash the high beams, pull the turn signal
lever toward you, and release.
Page 107 of 351
Chevrolet Malibu Owner Manual (GMNA-Localizing-U.S./Canada-
14584249) - 2021 - CRC - 11/9/20
106 Lighting
Daytime Running Lamps (DRL)
DRL can make it easier for others to see the
front of your vehicle during the day. Fully
functional DRL are required on all vehicles
first sold in Canada.
The DRL system comes on in daylight when
the following conditions are met:
.The ignition is on.
.The exterior lamp control is in AUTO,
if equipped.
.The light sensor determines it is daytime.
.The vehicle is not in P (Park).
When the DRL are on, the taillamps,
sidemarker lamps, instrument panel lights,
and other lamps will not be on.
The DRLs turn off if the Exterior Lamp
control is placed out of AUTO. For vehicles
first sold in Canada, the DRL can only be
turned off when the vehicle is parked.
Automatic Headlamp System
The headlamps come on automatically when
the exterior lamp control is set to AUTO and
it is dark enough outside.
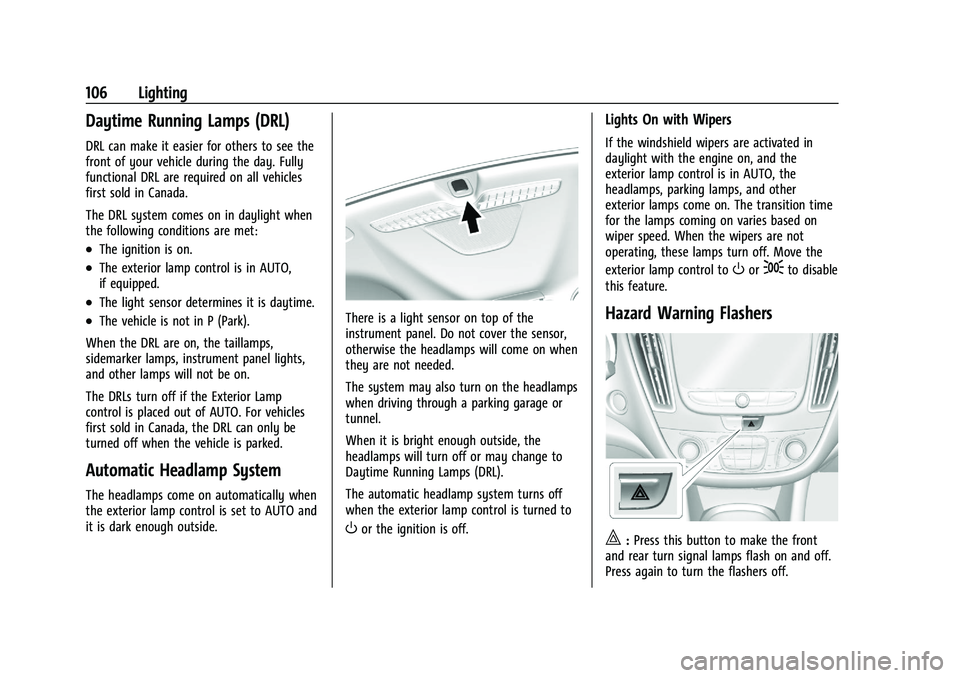
There is a light sensor on top of the
instrument panel. Do not cover the sensor,
otherwise the headlamps will come on when
they are not needed.
The system may also turn on the headlamps
when driving through a parking garage or
tunnel.
When it is bright enough outside, the
headlamps will turn off or may change to
Daytime Running Lamps (DRL).
The automatic headlamp system turns off
when the exterior lamp control is turned to
Oor the ignition is off.
Lights On with Wipers
If the windshield wipers are activated in
daylight with the engine on, and the
exterior lamp control is in AUTO, the
headlamps, parking lamps, and other
exterior lamps come on. The transition time
for the lamps coming on varies based on
wiper speed. When the wipers are not
operating, these lamps turn off. Move the
exterior lamp control to
Oor;to disable
this feature.
Hazard Warning Flashers
|: Press this button to make the front
and rear turn signal lamps flash on and off.
Press again to turn the flashers off.
Page 110 of 351
Chevrolet Malibu Owner Manual (GMNA-Localizing-U.S./Canada-
14584249) - 2021 - CRC - 11/9/20
Lighting 109
lamps dim to off. Entry lighting can be
disabled manually by turning the ignition on
or to ACC/ACCESSORY, or by pressing
Qon
the RKE transmitter.
This feature can be changed. See Vehicle
Personalization 0100.
Exit Lighting
Some exterior lamps and interior lights
come on at night, or in areas with limited
lighting, when the driver door is opened
after the ignition is turned off. The dome
lamp comes on after the ignition is turned
off. The exterior lamps and dome lamp
remain on for a set amount of time, then
automatically turn off.
The exterior lamps turn off immediately by
turning the exterior lamp control off.
This feature can be changed. See Vehicle
Personalization 0100.
Battery Load Management
The vehicle has Electric Power Management
(EPM) that estimates the battery's
temperature and state of charge. It then
adjusts the voltage for best performance
and extended life of the battery. When the battery's state of charge is low,
the voltage is raised slightly to quickly bring
the charge back up. When the state of
charge is high, the voltage is lowered
slightly to prevent overcharging. If the
vehicle has a voltmeter gauge or a voltage
display on the Driver Information Center
(DIC), you may see the voltage move up or
down. This is normal. If there is a problem,
an alert will be displayed.
The battery can be discharged at idle if the
electrical loads are very high. This is true for
all vehicles. This is because the generator
(alternator) may not be spinning fast
enough at idle to produce all of the power
needed for very high electrical loads.
A high electrical load occurs when several of
the following are on, such as: headlamps,
high beams, rear window defogger, climate
control fan at high speed, heated seats,
engine cooling fans, trailer loads, and loads
plugged into accessory power outlets.
EPM works to prevent excessive discharge of
the battery. It does this by balancing the
generator's output and the vehicle's
electrical needs. It can increase engine idle
speed to generate more power whenever
needed. It can temporarily reduce the power
demands of some accessories.Normally, these actions occur in steps or
levels, without being noticeable. In rare
cases at the highest levels of corrective
action, this action may be noticeable to the
driver. If so, a DIC message might be
displayed and it is recommended that the
driver reduce the electrical loads as much as
possible.
Battery Power Protection
The battery saver feature is designed to
protect the vehicle's battery.
If some interior lamps are left on and the
ignition is turned off, the battery rundown
protection system automatically turns the
lamp off after some time.
Exterior Lighting Battery Saver
The exterior lamps turn off about 10 minutes
after the ignition is turned off, if the parking
lamps or headlamps have been manually
left on. This protects against draining the
battery. To restart the 10-minute timer, turn
the exterior lamp control to the off position
and then back to the parking lamp or
headlamp position.
To keep the lamps on for more than
10 minutes, the ignition must be on or in
ACC/ACCESSORY.
Page 138 of 351
Chevrolet Malibu Owner Manual (GMNA-Localizing-U.S./Canada-
14584249) - 2021 - CRC - 11/9/20
Infotainment System 137
command. Another example of a one-shot
Destination Entry command is,“Directions to
Place of Interest at
commands do not work, try saying, “Take
me to Place of Interest” or“Find address”
and the system will walk you through by
asking additional questions.
Hybrid Speech Recognition
If equipped, this feature helps distinguish
words by using Internet-based information
along with the system’s voice recognition
database. This allows you to speak more
naturally when using voice recognition.
Using Voice Recognition
Voice recognition becomes available once
the system has been initialized. This begins
when the ignition is turned on. Initialization
may take a few moments.
1. Press
gon the steering wheel controls
to activate voice recognition.
2. The audio system mutes and the system plays a prompt.
3. Clearly speak one of the commands described in this section.
A voice recognition system prompt can
be interrupted while it is playing by
pressing
gagain. Once voice recognition is started, both the
infotainment display and instrument cluster
show the selections and visual dialog
content. These displays can be turned on or
off in the Tutorial Mode under
Settings
0 147.
There are three voice prompt modes
supported:
.Informative verbal prompts: This type of
prompt will provide more information
regarding the supported actions.
.Short prompts: This type of prompt will
provide simple instructions about what
can be stated.
.Auto informative prompts: This type of
prompt plays during the first few speech
sessions, then automatically switches to
the short prompt after some experience
has been gained through using the
system.
If a command is not spoken, the voice
recognition system says a help prompt.
Prompts and Infotainment Displays
While a voice recognition session is active,
there may be corresponding options
showing on the displays. A selection can be
made by manually touching the option,
or by speaking the number for the option to select. Manual interaction in the voice
recognition session is permitted. Interaction
during a voice session may be completed
entirely using voice commands while some
manual commands may expedite a task. If a
selection is made using a manual control,
the voice recognition dialog will progress in
the same way as if the selection were made
using a voice command. Once the system
completes the task, or the session is
terminated, the voice recognition dialog
stops.
An example of this type of manual
intervention is touching an entry of a
displayed number list instead of speaking
the number associated with the entry
desired.
Canceling Voice Recognition
.Touch or say
“Cancel”or“Exit” to
terminate the voice recognition session
and show the display where voice
recognition was initiated.
.Pression the steering wheel controls
to terminate the voice recognition session
and show the display where voice
recognition was initiated.
Page 143 of 351
Chevrolet Malibu Owner Manual (GMNA-Localizing-U.S./Canada-
14584249) - 2021 - CRC - 11/9/20
142 Infotainment System
.Review the controls and operation of the
infotainment system.
.Pair mobile device(s) to the vehicle. The
system may not work with all mobile
devices. See“Pairing”later in this section.
Vehicles with a Bluetooth system can use a
Bluetooth-capable mobile device with a
Hands-Free Profile to make and receive
phone calls. The infotainment system and
voice recognition are used to control the
system. The system can be used while the
ignition is on or in ACC/ACCESSORY. The
range of the Bluetooth system can be up to
9.1 m (30 ft). Not all mobile devices support
all functions and not all mobile devices work
with the Bluetooth system. See
my.chevrolet.com for more information
about compatible mobile devices.
Controls
Use the controls on the center stack and the
steering wheel to operate the Bluetooth
system.
Steering Wheel Controls
g: Press to answer incoming calls and start
voice recognition on your connected
Bluetooth mobile device.
i: Press to end a call, decline a call,
or cancel an operation. Press to mute or
unmute the infotainment system when not
on a call.
Infotainment System Controls
For information about how to navigate the
menu system using the infotainment
controls, see Using the System 0113.
Audio System
When using the Bluetooth mobile device
system, sound comes through the vehicle's
front audio system speakers and overrides
the audio system. The volume level while on
a mobile device call can be adjusted by
pressing the steering wheel controls or the
volume control on the center stack. The
adjusted volume level remains in memory
for later calls. The volume cannot be
lowered beyond a certain level.
Bluetooth (Pairing and Using a
Phone)
Pairing
A Bluetooth-enabled mobile device must be
paired to the Bluetooth system and then
connected to the vehicle before it can be used. See the mobile device manufacturer's
user guide for Bluetooth functions before
pairing the device.
Pairing Information
.If no mobile device has been connected,
the Phone main page on the infotainment
display will show the Connect Phone
option. Touch this option to connect.
Another way to connect is to touch the
Phones tab at the top right of the display
and then touch Add Phone.
.A Bluetooth smartphone with music
capability can be paired to the vehicle as
a smartphone and a music player at the
same time.
.Up to 10 devices can be paired to the
Bluetooth system.
.The pairing process is disabled when the
vehicle is moving.
.Pairing only needs to be completed once,
unless the pairing information on the cell
phone changes or the cell phone is
deleted from the system.
.If multiple paired cell phones are within
range of the system, the system connects
to the paired cell phone that is set to
First to Connect. If there is no cell phone
set to First to Connect, it will link to the
Page 151 of 351
Chevrolet Malibu Owner Manual (GMNA-Localizing-U.S./Canada-
14584249) - 2021 - CRC - 11/9/20
150 Infotainment System
prompt and recognize your command.
Background noise may cause accidental
interruptions. Touch Off or On.
Favorites
Touch and the following may display:
.Manage Favorites: Touch to display a list
of Audio, Phone, and Navigation favorites.
Favorites can be moved, renamed,
or deleted.
To move, touch and hold the favorite, and
then drag up or down to rearrange the
position.
.Set Number of Audio Favorites: Touch to
select how many favorites pages can be
viewed from the audio application. The
Auto setting will automatically adjust this
number based on the number of favorites
you have saved. Touch Auto, 5, 10, 15, 20,
25, 30, 35, or 40.
Updates
If equipped, the vehicle can download and
install select software updates over a
wireless connection. The system will prompt
for certain updates to be downloaded and
installed. There is also an option to check
for updates manually. To manually check for updates, touch
Settings on the Home Page and select the
System tab. Go to the Vehicle Software
section and touch Updates. Follow the
on-screen prompts. The steps to check for,
download, and install updates may vary by
vehicle.
The vehicle can be used normally during the
software download. Once the download is
complete, there may be a prompt to accept
the installation of the update upon the next
ignition cycle or the next time the vehicle is
shifted into P (Park). For most updates, the
vehicle will be disabled and cannot be driven
during the installation. The system will
deliver messages indicating success or error
during and after the download and
installation processes.
Downloading Over-the-Air vehicle software
updates requires Internet connectivity, which
can be accessed through the vehicle’s
built-in 4G LTE connection, if equipped and
active. If required, data plans are provided
by a third party. Optionally, a secure Wi-Fi
hotspot such as a compatible mobile device
hotspot, home hotspot, or public hotspot
can be used. Applicable data rates may
apply.To connect the infotainment system to a
secured mobile device hotspot, home
hotspot, or public hotspot, touch Settings on
the Home Page, select the System tab,
followed by Wi-Fi Networks. Select the
appropriate Wi-Fi network, and follow the
on-screen prompts. Download speeds
may vary.
On most compatible mobile devices,
activation of the Wi-Fi hotspot is in the
Settings menu under Mobile Network
Sharing, Personal Hotspot, Mobile Hotspot,
or similar.
Availability of Over-the-Air software updates
varies by vehicle and country. Features are
subject to change. For more information on
this feature, see my.chevrolet.com/learn.
Preferences
Touch the controls on the infotainment
display to disable or enable the download of
new updates in the background.
About
Touch to view the infotainment system
software information.
Page 155 of 351
Chevrolet Malibu Owner Manual (GMNA-Localizing-U.S./Canada-
14584249) - 2021 - CRC - 11/9/20
154 Infotainment System
recognize the non-Teen Driver key to start
the vehicle. The Teen Driver settings will not
be active.
For a keyed ignition system:1. Start the engine.
2. For automatic transmissions, the vehicle must be in P (Park). For manual
transmissions, the vehicle must be
stopped with the parking brake set.
3. From the Settings menu, touch Vehicle and then Teen Driver.
4. Enter the PIN.
5. Touch Setup Keys. The system displays instructions for registering or
unregistering a key. A confirmation
message displays.
Manage Settings
Buckle To Drive : When turned ON, Buckle
to Drive prevents the driver from shifting
out of P (Park) for a period of time if driver
seat belt, and on some vehicles, the
passenger seat belt, is not buckled. See
Buckle To Drive 039 and
Vehicle Personalization 0100. Audio Volume Limit :
Allows the audio
volume limit to be turned on or off. Touch
Set Audio Volume Limit to choose the
maximum allowable audio volume level.
Set Audio Volume Limit : Allows a
maximum radio volume to be set. Use the
arrows to choose the maximum allowable
level for the audio volume.
Teen Driver Speed Limiter : Limits the
maximum speed of the vehicle. When the
speed limiter is turned on and the vehicle is
started with a Teen Driver key, the DIC
displays a message that the top speed is
limited.
On certain vehicles, when the Speed Limiter
is turned ON, the vehicle’s maximum
acceleration will be limited. The DIC will
display a message that the acceleration is
limited.
Teen Driver Speed Warning : Allows the
speed warning to be turned on or off. Touch
Set Teen Driver Speed Warning to set the
warning speed.
Set Teen Driver Speed Warning : Displays a
warning in the DIC when exceeding a
selectable speed. Choose the desired speed
warning level. The speed warning does not
limit the speed of the vehicle. SiriusXM Explicit Content Filter (if
equipped) :
Allows the SiriusXM Explicit
Content Filter to be turned ON or OFF.
When ON, the teen driver will not be able
to listen to SiriusXM stations that contain
explicit content, and the Explicit Content
Filter selection in the Audio Settings will be
unavailable for change.
When Teen Driver is Active:
.The radio will mute when the driver, or in
some vehicles, the front passenger seat
belt, is not buckled. The audio from any
device paired to the vehicle will also be
muted.
.An object placed on the front passenger
seat, such as a briefcase, handbag,
grocery bag, laptop, or other electronic
device, could cause the passenger sensing
system to falsely sense an unbuckled
front passenger, mute the radio, and
prevent shifting from P (Park) if Buckle to
Drive is ON. If this happens, remove the
object from the seat. See Passenger
Sensing System 050.
.Some safety systems, such as Forward
Collision Alert, if equipped, cannot be
turned off.