2021 CHEVROLET MALIBU ECO mode
[x] Cancel search: ECO modePage 150 of 351
Chevrolet Malibu Owner Manual (GMNA-Localizing-U.S./Canada-
14584249) - 2021 - CRC - 11/9/20
Infotainment System 149
have requested this permission, and the
number of applications that are allowed
to use this permission.
.Used By Applications: This setting lists all
applications that are requested or are
using Android-defined as dangerous
permissions. Only requested and active
permissions are shown.
Display
Touch and the following may display:
.Mode: This adjusts the appearance of the
navigation map view and any
downloaded apps optimized for day or
night time conditions. Set to Auto for the
display to automatically adjust based on
bright/dark conditions.
Touch Auto, Day, or Night to adjust the
display.
.Calibrate Touchscreen: Touch to calibrate
the infotainment display and follow the
prompts.
.Turn Display Off: Touch to turn the
display off. Touch anywhere on the
infotainment display or press any
infotainment control on the center stack
again to turn the display on. Sounds
Touch and the following may display:
.Maximum Startup Volume: This feature
adjusts the maximum volume of the
infotainment system when you start your
vehicle. To set the maximum startup
volume, touch the controls on the
infotainment display to increase or
decrease.
.Audio Cues: This feature determines if
sounds play when the infotainment
system starts up and shuts down. This
feature can be turned off or on.
.Set Audio Cue Volume: This setting
controls the volume of Audio Cues played
on startup and shut down. Touch the
controls on the infotainment display to
increase or decrease.
.Audible Touch Feedback: This setting
determines if a sound plays when
touching the infotainment display or
radio controls. This feature can be turned
off or on.
Voice
Touch and the following may display:
.Confirm More/Less: This setting specifies
how often the voice recognition system
confirms commands. Touch Confirm More
to have the system check with you more
often before acting on your commands.
.Prompt Length: This setting specifies the
amount of detail the voice recognition
system provides when giving you
feedback. Touch Auto to have the system
automatically adjust to your speech
habits. Touch Informative, Short, or Auto.
.Audio Feedback Speed: Touch Slow,
Medium, or Fast to adjust how quickly
the voice recognition system speaks.
.Friendly Prompts: This setting adjusts the
formality of voice prompts. Touch Off for
shorter prompts. Touch On to hear
prompts with more personality. Touch
Auto to have the prompt match your
command style.
.Tutorial Mode: Touch Off or On to
provide tutorial feedback on the display.
.Allow Prompt Interruptions: This setting
controls whether voice commands can be
spoken before voice prompts finish. Turn
this on to speak commands without
hearing the full prompt. Speaking while
the prompt is still playing will
immediately stop playing the current
Page 154 of 351
Chevrolet Malibu Owner Manual (GMNA-Localizing-U.S./Canada-
14584249) - 2021 - CRC - 11/9/20
Infotainment System 153
This allows the device contacts to re-sync
if you are having difficulty accessing all of
the contacts on your cell phone.
.Delete All Vehicle Contacts: Touch to
delete all vehicle stored contacts.
.OnStar Phone TTY Mode: This enables
OnStar cell phone TTY mode.
Touch Disable or Enable.
Vehicle
This menu allows adjustment of different
vehicle features. SeeVehicle Personalization
0 100.
Teen Driver
If equipped, this allows multiple keys to be
registered for beginner drivers to encourage
safe driving habits. When the vehicle is
started with a Teen Driver key, it will
automatically activate certain safety
systems, allow setting of some features, and
limit the use of others. The Report Card will
record vehicle data about driving behavior
that can be viewed later. When the vehicle
is started with a registered key, the Driver
Information Center (DIC) displays a message
that Teen Driver is active. To access:
1. Touch Settings on the Home Page, then touch Vehicle, and then Teen Driver.
2. Create a Personal Identification Number (PIN) by choosing a four-digit PIN.
Re-enter the PIN to confirm. To change
the PIN, touch Change PIN.
The PIN is required to:
.Register or unregister keys.
.Change Teen Driver settings.
.Change or clear the Teen Driver PIN.
.Access or delete Report Card data.
Register keys to activate Teen Driver and
assign restrictions to the key:
Any vehicle key can be registered, up to a
maximum of eight keys. Label the key to
tell it apart from the other keys.
For a pushbutton start system: 1. Start the engine.
2. For automatic transmissions, the vehicle must be in P (Park). For manual
transmissions, the vehicle must be
stopped with the parking brake set.
3. From the Settings menu, touch Vehicle and then Teen Driver.
4. Enter the PIN. 5. Place the Remote Keyless Entry (RKE)
transmitter key you wish to register in
the transmitter pocket. The key does not
need to be the one that started the
vehicle. See Remote Keyless Entry (RKE)
System Operation 07for transmitter
pocket location.
6. From the Teen Driver menu, touch Setup Keys.
.If the transmitter key has not
previously been registered, the option
to add the key displays. Touch Setup
and a confirmation message displays.
Teen Driver restrictions will be
applied whenever this key is used to
operate the vehicle.
.If the transmitter key has already
been registered, the option to
remove the key displays. If Remove is
touched, the transmitter key is no
longer registered. A confirmation
message displays, and Teen Driver
restrictions will not be applied if this
transmitter key is used to operate
the vehicle.
In vehicles with a pushbutton start system,
if a Teen Driver and a non-Teen Driver key
are both present at start up, the vehicle will
Page 173 of 351
Chevrolet Malibu Owner Manual (GMNA-Localizing-U.S./Canada-
14584249) - 2021 - CRC - 11/9/20
172 Driving and Operating
Driving and Operating
Driving Information
Driving for Better Fuel Economy . . . . . . . 173
Distracted Driving . . . . . . . . . . . . . . . . . . . . . . 173
Defensive Driving . . . . . . . . . . . . . . . . . . . . . . 173
Impaired Driving . . . . . . . . . . . . . . . . . . . . . . . 174
Control of a Vehicle . . . . . . . . . . . . . . . . . . . 174
Braking . . . . . . . . . . . . . . . . . . . . . . . . . . . . . . . . 174
Steering . . . . . . . . . . . . . . . . . . . . . . . . . . . . . . . 174
Off-Road Recovery . . . . . . . . . . . . . . . . . . . . . 175
Loss of Control . . . . . . . . . . . . . . . . . . . . . . . . 176
Driving on Wet Roads . . . . . . . . . . . . . . . . . 176
Hill and Mountain Roads . . . . . . . . . . . . . . . 177
Winter Driving . . . . . . . . . . . . . . . . . . . . . . . . . 177
If the Vehicle Is Stuck . . . . . . . . . . . . . . . . . 178
Vehicle Load Limits . . . . . . . . . . . . . . . . . . . . 179
Starting and Operating
New Vehicle Break-In . . . . . . . . . . . . . . . . . . 182
Ignition Positions . . . . . . . . . . . . . . . . . . . . . . 182
Starting the Engine . . . . . . . . . . . . . . . . . . . . 183
Stop/Start System . . . . . . . . . . . . . . . . . . . . . 184
Engine Heater . . . . . . . . . . . . . . . . . . . . . . . . . 185
Retained Accessory Power (RAP) . . . . . . . 186
Shifting Into Park . . . . . . . . . . . . . . . . . . . . . . 186
Shifting out of Park . . . . . . . . . . . . . . . . . . . . 187
Parking over Things That Burn . . . . . . . . . 187
Extended Parking . . . . . . . . . . . . . . . . . . . . . . 187
Engine Exhaust
Engine Exhaust . . . . . . . . . . . . . . . . . . . . . . . . 188
Running the Vehicle While Parked . . . . . 188
Automatic Transmission
Automatic Transmission . . . . . . . . . . . . . . . 188
Manual Mode . . . . . . . . . . . . . . . . . . . . . . . . . 190
Brakes
Antilock Brake System (ABS) . . . . . . . . . . . 191
Parking Brake . . . . . . . . . . . . . . . . . . . . . . . . . . 191
Electric Parking Brake . . . . . . . . . . . . . . . . . . 192
Brake Assist . . . . . . . . . . . . . . . . . . . . . . . . . . . 193
Hill Start Assist (HSA) . . . . . . . . . . . . . . . . . . 193
Ride Control Systems
Traction Control/Electronic StabilityControl . . . . . . . . . . . . . . . . . . . . . . . . . . . . . . 193
Cruise Control
Cruise Control . . . . . . . . . . . . . . . . . . . . . . . . . 195
Adaptive Cruise Control (Advanced) . . . . 197
Driver Assistance Systems
Driver Assistance Systems . . . . . . . . . . . . . 204
Assistance Systems for Parking orBacking . . . . . . . . . . . . . . . . . . . . . . . . . . . . . . 205
Assistance Systems for Driving . . . . . . . . 209
Forward Collision Alert (FCA) System . . . . . . . . . . . . . . . . . . . . . . . . . . . . . . 209
Automatic Emergency Braking (AEB) . . . 211 Front Pedestrian Braking (FPB)
System . . . . . . . . . . . . . . . . . . . . . . . . . . . . . . . 212
Side Blind Zone Alert (SBZA) . . . . . . . . . . . 214
Lane Change Alert (LCA) . . . . . . . . . . . . . . . 214
Lane Keep Assist (LKA) . . . . . . . . . . . . . . . . . 216
Fuel
Top Tier Fuel . . . . . . . . . . . . . . . . . . . . . . . . . . . 217
Recommended Fuel (1.5L Engine) . . . . . . . 218
Recommended Fuel (2.0L Engine) . . . . . . 218
Prohibited Fuels . . . . . . . . . . . . . . . . . . . . . . . 218
Fuels in Foreign Countries . . . . . . . . . . . . . 218
Fuel Additives . . . . . . . . . . . . . . . . . . . . . . . . . 218
Filling the Tank . . . . . . . . . . . . . . . . . . . . . . . . 219
Filling a Portable Fuel Container . . . . . . . 220
Trailer Towing
General Towing Information . . . . . . . . . . . 220
Driving Characteristics and Towing Tips . . . . . . . . . . . . . . . . . . . . . . . . . . 221
Trailer Towing . . . . . . . . . . . . . . . . . . . . . . . . . 224
Towing Equipment . . . . . . . . . . . . . . . . . . . . 225
Conversions and Add-Ons
Add-On Electrical Equipment . . . . . . . . . . . 226
Page 184 of 351
Chevrolet Malibu Owner Manual (GMNA-Localizing-U.S./Canada-
14584249) - 2021 - CRC - 11/9/20
Driving and Operating 183
2. Shift the vehicle to N (Neutral). This canbe done while the vehicle is moving.
After shifting to N (Neutral), firmly apply
the brakes and steer the vehicle to a
safe location.
3. Come to a complete stop, shift to P (Park), and turn the ignition off. The
shift lever must be in P (Park) to turn the
ignition off.
4. Set the parking brake. See Electric
Parking Brake 0192.
{Warning
Turning off the vehicle while moving may
cause loss of power assist in the brake
and steering systems and disable the
airbags. While driving, only shut the
vehicle off in an emergency.
If the vehicle cannot be pulled over and
must be shut off while driving, press and
hold ENGINE START/STOP for longer than
two seconds, or press twice in five seconds.
ACC/ACCESSORY (Amber Indicator Light) :
This mode allows you to use some electrical
accessories when the engine is off. With the ignition off, pressing the button
one time without the brake pedal applied
will place the ignition system in ACC/
ACCESSORY.
The ignition will switch from ACC/
ACCESSORY to off after five minutes to
prevent battery run down.
ON/RUN/START (Green Indicator Light) :
This
mode is for driving and starting. With the
ignition off, and the brake pedal applied,
pressing the button once will turn the
ignition on. Once engine cranking begins,
release the button. Engine cranking will
continue until the engine starts. See Starting
the Engine 0183. The ignition will then
remain on.
Service Mode
This power mode is available for service and
diagnostics, and to verify the proper
operation of the malfunction indicator lamp
as may be required for emission inspection
purposes. With the vehicle off, and the
brake pedal not applied, pressing and
holding the button for more than
five seconds will place the vehicle in Service
Mode. The instruments and audio systems
will operate as they do with the ignition on,
but the vehicle will not be able to be driven. The engine will not start in Service Mode.
Press the button again to turn the
vehicle off.
Starting the Engine
Move the shift lever to P (Park) or
N (Neutral). The engine will not start in any
other position. To restart the engine when
the vehicle is already moving, use
N (Neutral) only.
Caution
Do not try to shift to P (Park) if the
vehicle is moving. If you do, you could
damage the transmission. Shift to P (Park)
only when the vehicle is stopped.
Caution
If you add electrical parts or accessories,
you could change the way the engine
operates. Any resulting damage would
not be covered by the vehicle warranty.
See
Add-On Electrical Equipment 0226.
Page 186 of 351
Chevrolet Malibu Owner Manual (GMNA-Localizing-U.S./Canada-
14584249) - 2021 - CRC - 11/9/20
Driving and Operating 185
.The vehicle battery has recently been
disconnected.
.Minimum vehicle speed has not been
reached since the last Auto Stop.
.The accelerator pedal is pressed.
.The engine or transmission is not at the
required operating temperature.
.The outside temperature is not in the
required operating range.
.The vehicle transmission is shifted out of
D (Drive) to any gear other than P (Park).
.Tow/Haul Mode or other driver modes
have been selected.
.The vehicle is on a steep hill or grade.
.The driver door has been opened or driver
seat belt has been unbuckled.
.The hood has been opened.
.The Auto Stop has reached the maximum
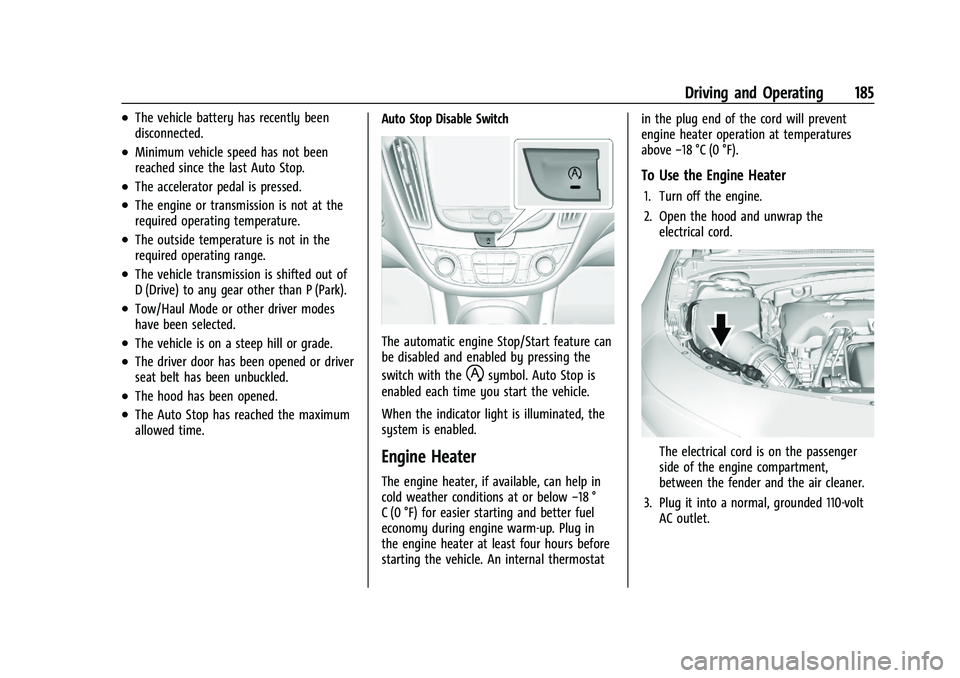
allowed time.Auto Stop Disable Switch
The automatic engine Stop/Start feature can
be disabled and enabled by pressing the
switch with the
hsymbol. Auto Stop is
enabled each time you start the vehicle.
When the indicator light is illuminated, the
system is enabled.
Engine Heater
The engine heater, if available, can help in
cold weather conditions at or below −18 °
C (0 °F) for easier starting and better fuel
economy during engine warm-up. Plug in
the engine heater at least four hours before
starting the vehicle. An internal thermostat in the plug end of the cord will prevent
engine heater operation at temperatures
above
−18 °C (0 °F).
To Use the Engine Heater
1. Turn off the engine.
2. Open the hood and unwrap the
electrical cord.
The electrical cord is on the passenger
side of the engine compartment,
between the fender and the air cleaner.
3. Plug it into a normal, grounded 110-volt AC outlet.
Page 191 of 351
Chevrolet Malibu Owner Manual (GMNA-Localizing-U.S./Canada-
14584249) - 2021 - CRC - 11/9/20
190 Driving and Operating
If the vehicle is stopped on a hill, with your
foot off the brake pedal, the vehicle may
roll. This is normal and is due to the torque
converter designed to improve fuel economy
and performance. Use the brake to hold the
vehicle on a hill. Do not use the accelerator
pedal.
L :This position gives you access to gear
ranges. This provides more engine braking
but lower fuel economy than D (Drive). You
can use it on very steep hills, or in deep
snow or mud. See Manual Mode0190.
Operating Modes : The transmission may
operate in a lower gear than normal to
improve vehicle performance. The engine
speed may be higher and there may be an
increase in noise during the following
conditions:
.When climbing a grade
.When driving downhill
.When driving in hot temperatures, or at
high altitude
Manual Mode
Electronic Range Select (ERS) Mode
ERS mode allows you to choose the top-gear
limit of the transmission and the vehicle's
speed while driving downhill or towing a trailer. The vehicle has an electronic shift
position indicator within the instrument
cluster. When using the ERS mode a number
will display next to the L, indicating the
highest gear available for the range selected.
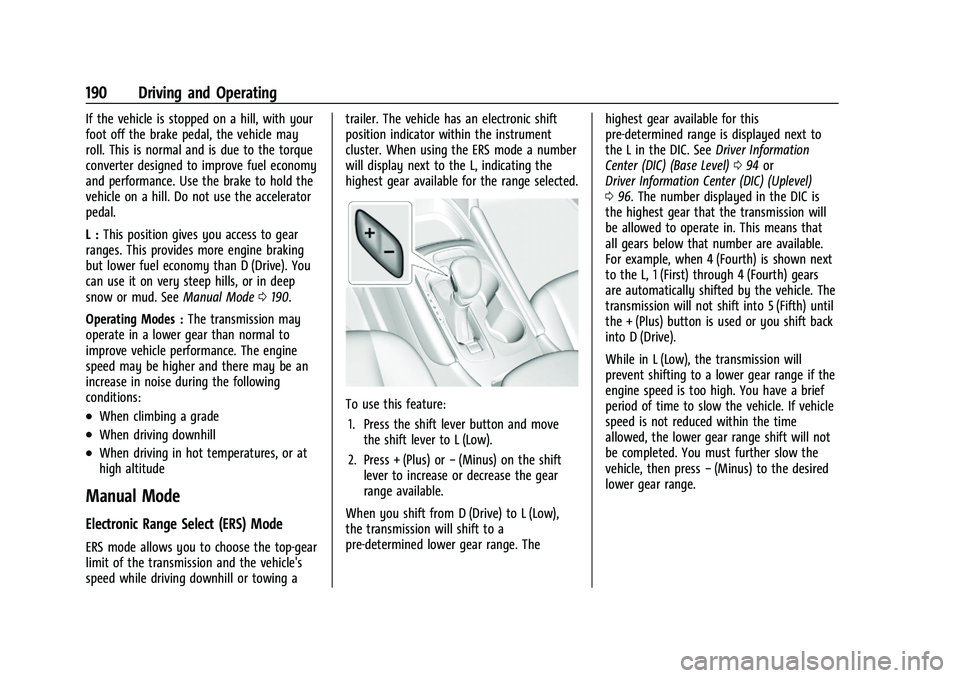
To use this feature:
1. Press the shift lever button and move the shift lever to L (Low).
2. Press + (Plus) or −(Minus) on the shift
lever to increase or decrease the gear
range available.
When you shift from D (Drive) to L (Low),
the transmission will shift to a
pre-determined lower gear range. The highest gear available for this
pre-determined range is displayed next to
the L in the DIC. See
Driver Information
Center (DIC) (Base Level) 094 or
Driver Information Center (DIC) (Uplevel)
0 96. The number displayed in the DIC is
the highest gear that the transmission will
be allowed to operate in. This means that
all gears below that number are available.
For example, when 4 (Fourth) is shown next
to the L, 1 (First) through 4 (Fourth) gears
are automatically shifted by the vehicle. The
transmission will not shift into 5 (Fifth) until
the + (Plus) button is used or you shift back
into D (Drive).
While in L (Low), the transmission will
prevent shifting to a lower gear range if the
engine speed is too high. You have a brief
period of time to slow the vehicle. If vehicle
speed is not reduced within the time
allowed, the lower gear range shift will not
be completed. You must further slow the
vehicle, then press −(Minus) to the desired
lower gear range.
Page 199 of 351
Chevrolet Malibu Owner Manual (GMNA-Localizing-U.S./Canada-
14584249) - 2021 - CRC - 11/9/20
198 Driving and Operating
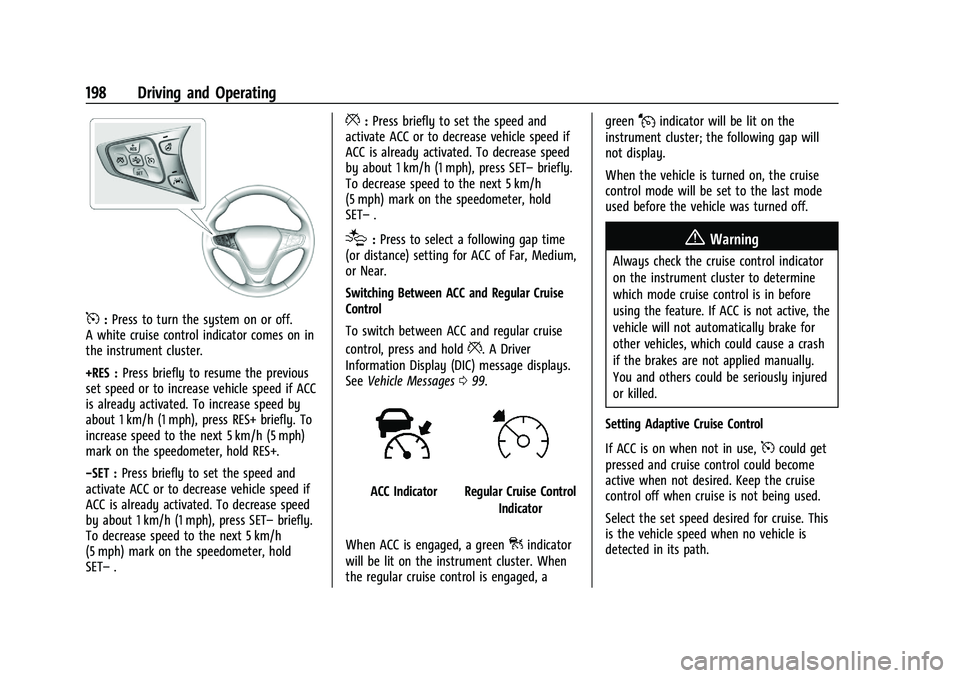
5:Press to turn the system on or off.
A white cruise control indicator comes on in
the instrument cluster.
+RES : Press briefly to resume the previous
set speed or to increase vehicle speed if ACC
is already activated. To increase speed by
about 1 km/h (1 mph), press RES+ briefly. To
increase speed to the next 5 km/h (5 mph)
mark on the speedometer, hold RES+.
−SET : Press briefly to set the speed and
activate ACC or to decrease vehicle speed if
ACC is already activated. To decrease speed
by about 1 km/h (1 mph), press SET– briefly.
To decrease speed to the next 5 km/h
(5 mph) mark on the speedometer, hold
SET– .
*:Press briefly to set the speed and
activate ACC or to decrease vehicle speed if
ACC is already activated. To decrease speed
by about 1 km/h (1 mph), press SET– briefly.
To decrease speed to the next 5 km/h
(5 mph) mark on the speedometer, hold
SET– .
[:Press to select a following gap time
(or distance) setting for ACC of Far, Medium,
or Near.
Switching Between ACC and Regular Cruise
Control
To switch between ACC and regular cruise
control, press and hold
*. A Driver
Information Display (DIC) message displays.
See Vehicle Messages 099.
ACC IndicatorRegular Cruise Control
Indicator
When ACC is engaged, a green
]indicator
will be lit on the instrument cluster. When
the regular cruise control is engaged, a green
Jindicator will be lit on the
instrument cluster; the following gap will
not display.
When the vehicle is turned on, the cruise
control mode will be set to the last mode
used before the vehicle was turned off.
{Warning
Always check the cruise control indicator
on the instrument cluster to determine
which mode cruise control is in before
using the feature. If ACC is not active, the
vehicle will not automatically brake for
other vehicles, which could cause a crash
if the brakes are not applied manually.
You and others could be seriously injured
or killed.
Setting Adaptive Cruise Control
If ACC is on when not in use,
5could get
pressed and cruise control could become
active when not desired. Keep the cruise
control off when cruise is not being used.
Select the set speed desired for cruise. This
is the vehicle speed when no vehicle is
detected in its path.
Page 222 of 351
Chevrolet Malibu Owner Manual (GMNA-Localizing-U.S./Canada-
14584249) - 2021 - CRC - 11/9/20
Driving and Operating 221
When towing with the 2.0L L4 engine, only
use unleaded gasoline with an octane rating
of 89 or higher. Using gasoline with a lower
octane rating while towing may damage the
engine and may not be covered by the
vehicle warranty. SeeRecommended Fuel
(1.5L Engine) 0218 or
Recommended Fuel (2.0L Engine) 0218.
Driving Characteristics and
Towing Tips
{Warning
You can lose control when towing a
trailer if the correct equipment is not
used or the vehicle is not driven properly.
For example, if the trailer is too heavy or
the trailer brakes are inadequate for the
load, the vehicle may not stop as
expected. You and others could be
seriously injured. The vehicle may also be
damaged, and the repairs would not be
covered by the vehicle warranty. Pull a
trailer only if all the steps in this section
have been followed. Ask your dealer for
advice and information about towing a
trailer with the vehicle.
Driving with a Trailer
Trailering is different than just driving the
vehicle by itself. Trailering means changes in
handling, acceleration, braking, durability,
and fuel economy. Successful, safe trailering
takes correct equipment, and it has to be
used properly.
The following information has many
time-tested, important trailering tips and
safety rules. Many of these are important
for your safety and that of your passengers.
Read this section carefully before pulling a
trailer.
When towing a trailer:
.Become familiar with and follow all state
and local laws that apply to trailer
towing. These requirements vary from
state to state.
.State laws may require the use of
extended side view mirrors. Even if not
required, you should install extended side
view mirrors if your visibility is limited or
restricted while towing.
.Do not tow a trailer during the first
800 km (500 mi) of vehicle use to prevent
damage to the engine, axle, or other
parts.
.It is recommended to perform the first oil
change before heavy towing.
.During the first 800 km (500 mi) of trailer
towing, do not drive over 80 km/h
(50 mph) and do not make starts at full
throttle.
.Vehicles can tow in D (Drive). If the
transmission downshifts too often, a
lower gear may be selected using Manual
Mode See Manual Mode 0190.
If equipped, the following driver assistance
features should be turned off when towing
a trailer:
.Adaptive Cruise Control (ACC)
.Super Cruise Control
.Lane Keep Assist (LKA)
.Park Assist
.Automatic Parking Assist (APA)
.Reverse Automatic Braking (RAB)
If equipped, the following driver assistance
features should be turned to alert or off
when towing a trailer:
.Automatic Emergency Braking (AEB)
.Intelligent Brake Assist (IBA)
.Front Pedestrian Braking (FPB)