2021 CHEVROLET COLORADO fuel pump
[x] Cancel search: fuel pumpPage 8 of 89
Chevrolet/GMC 2.8L Duramax Diesel Engine Supplement (GMNA-Localizing-
U.S./Canada-14465442) - 2021 - CRC - 2/3/20
Instruments and Controls 7
See the owner’s manual for warning lights
and gauges not listed in this supplement.
Fuel Gauge
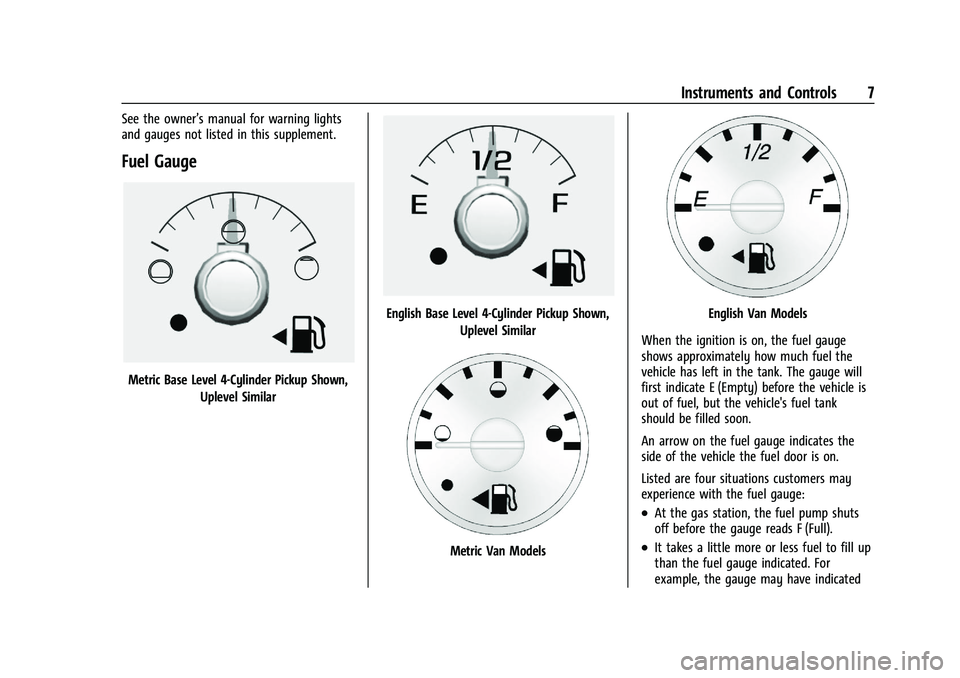
Metric Base Level 4-Cylinder Pickup Shown,Uplevel Similar
English Base Level 4-Cylinder Pickup Shown, Uplevel Similar
Metric Van Models
English Van Models
When the ignition is on, the fuel gauge
shows approximately how much fuel the
vehicle has left in the tank. The gauge will
first indicate E (Empty) before the vehicle is
out of fuel, but the vehicle's fuel tank
should be filled soon.
An arrow on the fuel gauge indicates the
side of the vehicle the fuel door is on.
Listed are four situations customers may
experience with the fuel gauge:
.At the gas station, the fuel pump shuts
off before the gauge reads F (Full).
.It takes a little more or less fuel to fill up
than the fuel gauge indicated. For
example, the gauge may have indicated
Page 28 of 89
Chevrolet/GMC 2.8L Duramax Diesel Engine Supplement (GMNA-Localizing-
U.S./Canada-14465442) - 2021 - CRC - 2/3/20
Driving and Operating 27
Caution
Do not use home-made biodiesel or home
test kits because the quality cannot be
verified by approved scientific methods.
Do not use raw vegetable oil or other
unmodified bio-oils, fats, or blends of
vegetable oil with diesel. They could
damage the fuel system and engine, and
damages would not be covered by the
vehicle warranty.
Biodiesel Blends
Fuels with a biodiesel content up to 20% by
volume may be used (e.g., named B20).
Only use biodiesel blends up to 20% by
volume that comply with your country’s or
region’s fuel standards.
Caution
Do not use blends containing more than
20% biodiesel. Any engine, fuel system,
or exhaust after-treatment system
damage would not be covered by the
vehicle warranty.
As a renewable fuel, biodiesel provides some
environmental benefits. However, biodiesel
has unique properties and needs to be handled differently than diesel fuel. Its use
presents additional risks and may not be
appropriate in all situations. Certain vehicle
operating modes increase these risks and
should be avoided.
Biodiesel fuel quality degrades with time
and exposure to high temperature quicker
than Ultra Low Sulfur Diesel fuel. More
frequent refueling provides the best
opportunity to have a supply of fresh fuel.
Storage at hot ambient temperatures will
accelerate biodiesel degradation.
If the vehicle is not driven often and uses
little fuel, or if it is stored for extended
periods of time, avoid the use of biodiesel
blended fuels above 5% by volume. When
the vehicle is stored for longer than one
month, it should be run out of biodiesel to
below one-quarter tank, refueled with
biodiesel-free fuel, and driven several
kilometers (miles) before storage.
Cold Weather Operation
In cold weather, the fuel filter may become
clogged by wax naturally present in the
fuel. To unclog it, move the vehicle to a
warm garage area and allow the filter to
warm up. The fuel filter may need to be
replaced. See
Fuel Filter Replacement 030. At temperatures below 0 °C (32 °F), it is
recommended to avoid using biodiesel
blends above 5% blend. This blend may
cause fuel filter plugging, system gelling,
and freezing that may affect vehicle
starting. You may need to turn the ignition
on and off a few times before the vehicle
will start. Also, idle the vehicle for a couple
of minutes before accelerating.
It is recommended to use Ultra Low Sulfur
No. 1-D diesel fuel or a blend of No. 1-D and
No. 2-D diesel fuel to enhance vehicle
operation in cold weather at temperatures
below 0 °C (32 °F). Use of No. 1-D diesel fuel
may lower the fuel economy. For additional
information for better cold weather
operation, see
Engine Heater017.
Water in Fuel
Improper fuel tank inspection or cleaning,
or contaminated fuel from suppliers, can
cause water to be pumped into the fuel
tank along with the diesel fuel. If a WATER
IN FUEL SERVICE REQUIRED message displays,
the water must be drained immediately.
Page 30 of 89
Chevrolet/GMC 2.8L Duramax Diesel Engine Supplement (GMNA-Localizing-
U.S./Canada-14465442) - 2021 - CRC - 2/3/20
Driving and Operating 29
Caution (Continued)
refuel, water was pumped into the fuel
tank. Turn off the engine and drain the
water immediately.
Removing Water from the Fuel Filter
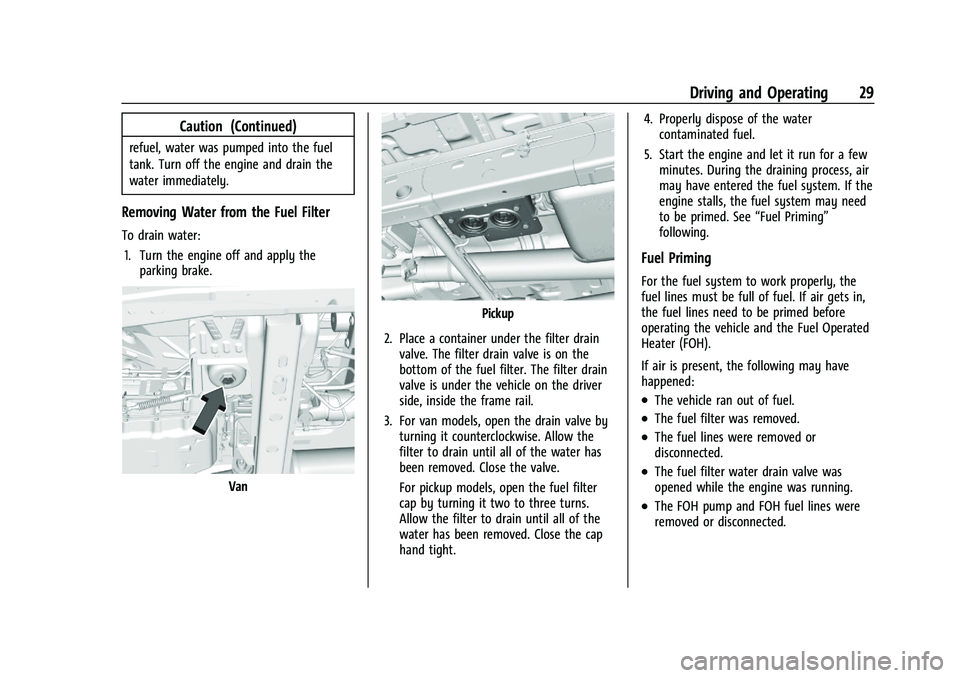
To drain water:1. Turn the engine off and apply the parking brake.
Van
Pickup
2. Place a container under the filter drain valve. The filter drain valve is on the
bottom of the fuel filter. The filter drain
valve is under the vehicle on the driver
side, inside the frame rail.
3. For van models, open the drain valve by turning it counterclockwise. Allow the
filter to drain until all of the water has
been removed. Close the valve.
For pickup models, open the fuel filter
cap by turning it two to three turns.
Allow the filter to drain until all of the
water has been removed. Close the cap
hand tight. 4. Properly dispose of the water
contaminated fuel.
5. Start the engine and let it run for a few minutes. During the draining process, air
may have entered the fuel system. If the
engine stalls, the fuel system may need
to be primed. See “Fuel Priming”
following.
Fuel Priming
For the fuel system to work properly, the
fuel lines must be full of fuel. If air gets in,
the fuel lines need to be primed before
operating the vehicle and the Fuel Operated
Heater (FOH).
If air is present, the following may have
happened:
.The vehicle ran out of fuel.
.The fuel filter was removed.
.The fuel lines were removed or
disconnected.
.The fuel filter water drain valve was
opened while the engine was running.
.The FOH pump and FOH fuel lines were
removed or disconnected.
Page 31 of 89
Chevrolet/GMC 2.8L Duramax Diesel Engine Supplement (GMNA-Localizing-
U.S./Canada-14465442) - 2021 - CRC - 2/3/20
30 Driving and Operating
The system is not harmed by air in the fuel
lines; however, the engine and/or the FOH
may not start until the fuel system is
primed and the air is removed.
Priming the Fuel System
There is an electric priming pump that will
bring fuel to the engine and eliminate air in
the fuel lines. To prime the engine:1. Correct any condition that caused the loss of prime.
2. Turn the ignition on for 30 seconds. Do not start the engine. The fuel pump will
start priming.
3. Turn the ignition off, then back to start, and crank the engine for 15 seconds.
4. If the engine does not start, repeat Steps 2 and 3 until the engine starts.
If the engine does not start after
repeating Steps 2 and 3 three times, turn
the ignition key off for 60 seconds.
5. Repeat the above steps until the engine starts.
6. If the engine starts, but does not run smoothly, increase the engine speed
slightly. 7. If the engine starts and runs but stalls
again, turn the ignition off for
60 seconds.
8. When the engine starts, let it idle for a few minutes and check the filter for any
leaks.
To Prime the Fuel Operated Heater (FOH)
Fuel Lines (Van Models)
See your dealer or qualified technician if the
FOH fuel lines need to be primed.
Running Out of Fuel
If the engine has stalled due to running out
of fuel, try to restart it: 1. If parked on a level surface, add at least 3.8 L (1 gal) of fuel. Up to 18.9 L (5 gal)
may be needed if parked on a slope.
2. Follow the vehicle fuel system priming procedure earlier in this section to
re-prime the system and restart the
engine.
If the check engine light comes on due to
running out of fuel, it may take a few drive
cycles to clear.
On van models only, the Fuel Operated
Heater (FOH) stops automatically when the
fuel tank volume is less than or equal to 10% of the total tank. The FOH fuel lines
will not need to be primed if the vehicle
runs out of fuel.
Fuel Filter Replacement
Van Models
{Warning
Diesel fuel is flammable. It could start a
fire if something ignites it, and people
could be burned. Do not let it get on hot
engine parts, and keep matches or other
ignition sources away.
The fuel filter is on the driver side, inside
the frame rail.
To replace the fuel filter: 1. Drain any water from the filter. See “Removing Water from the Fuel Filter” in
Water in Fuel 027.
Keep the engine off until the procedure
is completed.
2. Apply the parking brake.
Page 33 of 89

Chevrolet/GMC 2.8L Duramax Diesel Engine Supplement (GMNA-Localizing-
U.S./Canada-14465442) - 2021 - CRC - 2/3/20
32 Driving and Operating
4. Remove both filter elements. If there isany dirt on the filter sealing surface,
clean it off.
5. Install the new filter elements and tighten both caps.
6. Use the fuel filter priming procedure earlier in this section to prime the fuel
filter.
7. Start the engine and let it idle for five minutes. Check the fuel filter for
leaks.
8. Reset the fuel filter monitor. See Driver
Information Center (DIC) 010.
Filling the Tank
An arrow on the fuel gauge indicates which
side of the vehicle the fuel door is on. See
Fuel Gauge 07. Do not refill the diesel fuel
and Diesel Exhaust Fluid (DEF) at the
same time.
{Warning
Fuel vapors and fuel fires burn violently
and can cause injury or death.
Follow these guidelines to help avoid
injuries to you and others:
.Read and follow all the instructions on
the fuel pump island.
.Turn off the engine when refueling.
.Keep sparks, flames, and smoking
materials away from fuel.
.Do not leave the fuel pump
unattended.
.Avoid using electronic devices while
refueling.
.Do not re-enter the vehicle while
pumping fuel.
(Continued)
Warning (Continued)
.Keep children away from the fuel
pump and never let children
pump fuel.
.Before touching the fill nozzle, touch a
metallic object to discharge static
electricity from your body.
.Fuel can spray out if the fuel cap is
opened too quickly. This spray can
happen if the tank is nearly full, and is
more likely in hot weather. Open the
fuel cap slowly and wait for any hiss
noise to stop, then unscrew the cap all
the way.
Van Shown, Pickup Similar
Page 34 of 89

Chevrolet/GMC 2.8L Duramax Diesel Engine Supplement (GMNA-Localizing-
U.S./Canada-14465442) - 2021 - CRC - 2/3/20
Driving and Operating 33
The green fuel cap is behind a hinged door
on the driver side of the vehicle. The blue
Diesel Exhaust Fluid cap is also behind the
fuel door. Do not remove both caps at the
same time.
Turn the fuel cap counterclockwise to
remove. When refueling, hang the fuel cap
from the hook on the fuel door. Fully insert
and latch the fill nozzle, begin fueling.
{Warning
Overfilling the fuel tank by more than
three clicks of a standard fill nozzle may
cause:
.Vehicle performance issues, including
engine stalling and damage to the fuel
system.
.Fuel spills.
.Under certain conditions, fuel fires.Diesel fuel can foam when filling the tank.
The automatic pump nozzle may shut off,
even if the tank is not full. Wait for the
foaming to stop, and then fill the tank more
slowly. Be careful not to spill fuel. Wait
five seconds after pumping before removing
the fill nozzle. Clean fuel from painted
surfaces as soon as possible. See
Exterior
Care 071.
Reinstall the cap by turning it clockwise
until it clicks. Push the fuel door closed.
{Warning
If a fire starts while you are refueling, do
not remove the fill nozzle. Shut off the
flow of fuel by shutting off the pump or
by notifying the station attendant. Leave
the area immediately.
Caution
If a new fuel cap is needed, be sure to
get the right type of cap from your
dealer. The wrong type of fuel cap may
not fit properly and could damage the
fuel system.
Accidental Refueling with Gasoline
Caution
If the vehicle is accidentally refueled with
gasoline, do not continue driving the
vehicle except to get to a location where
it can be stopped safely. Driving the
vehicle will damage the engine. Tow the
vehicle for service. Have the gasoline
removed from the tank and fuel system.
Page 35 of 89
Chevrolet/GMC 2.8L Duramax Diesel Engine Supplement (GMNA-Localizing-
U.S./Canada-14465442) - 2021 - CRC - 2/3/20
34 Driving and Operating
Filling a Portable Fuel Container
{Warning
Never fill a portable fuel container while
it is in the vehicle. Static electricity
discharge from the container can ignite
the fuel vapor. You or others could be
badly burned and the vehicle could be
damaged. To help avoid injury to you
and others:
.Dispense fuel only into approved
containers.
.Do not fill a container while it is
inside a vehicle, in a vehicle's trunk, in
a pickup bed, or on any surface other
than the ground.
.Bring the fill nozzle in contact with
the inside of the fill opening before
operating the nozzle. Maintain contact
until filling is complete.(Continued)
Warning (Continued)
.Keep sparks, flames, and smoking
materials away from fuel.
.Avoid using electronic devices while
pumping fuel.
Trailer Towing
When towing at high elevation on steep
uphill grades, consider the following:
Engine coolant at higher elevation will boil
at a lower temperature than at or near sea
level. If the engine is turned off immediately
after towing at high elevation on steep
uphill grades, the vehicle may show signs
similar to engine overheating. To avoid this,
let the engine run while parked (preferably
on level ground) with the transmission in
P (Park) and the parking brake applied for at
least five minutes before turning the engine
off. If the overheat warning comes on, see
Engine Overheating062. Use the following chart to determine the
maximum the trailer can weigh, based upon
your vehicle model and options.
All axles of the trailer must be equipped
with brakes adequate for the intended use.
Trailer braking equipment conforming to
Canadian Standards Association (CSA)
requirement CAN3-D313, or its equivalent, is
recommended.
Page 67 of 89
Chevrolet/GMC 2.8L Duramax Diesel Engine Supplement (GMNA-Localizing-
U.S./Canada-14465442) - 2021 - CRC - 2/3/20
66 Vehicle Care
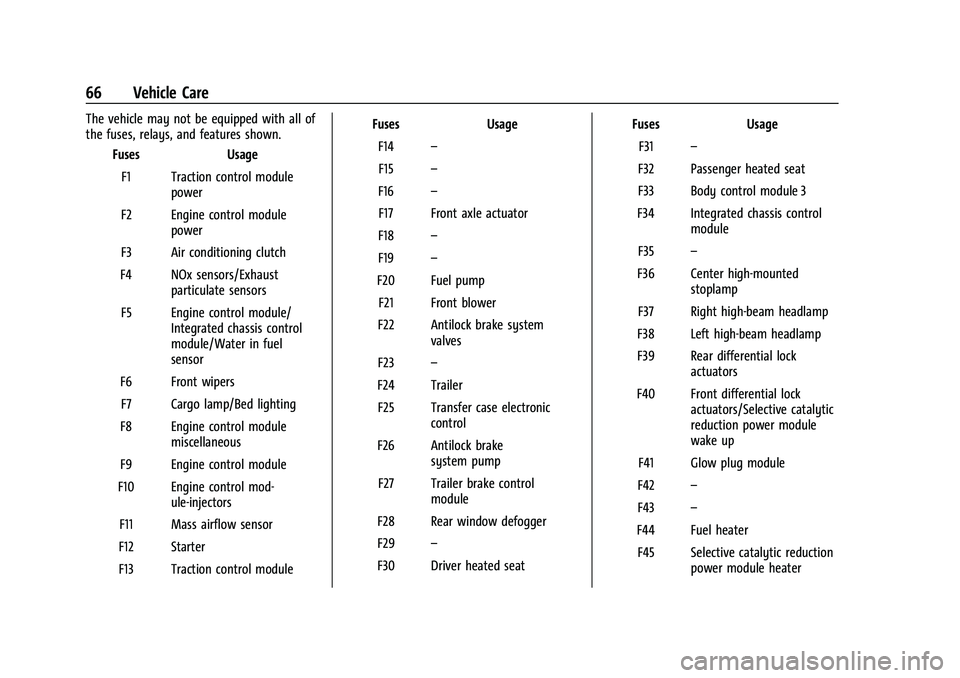
The vehicle may not be equipped with all of
the fuses, relays, and features shown.Fuses Usage
F1 Traction control module power
F2 Engine control module power
F3 Air conditioning clutch
F4 NOx sensors/Exhaust particulate sensors
F5 Engine control module/ Integrated chassis control
module/Water in fuel
sensor
F6 Front wipers F7 Cargo lamp/Bed lighting
F8 Engine control module miscellaneous
F9 Engine control module
F10 Engine control mod- ule-injectors
F11 Mass airflow sensor
F12 Starter
F13 Traction control module Fuses
Usage
F14 –
F15 –
F16 –
F17 Front axle actuator
F18 –
F19 –
F20 Fuel pump F21 Front blower
F22 Antilock brake system valves
F23 –
F24 Trailer F25 Transfer case electronic control
F26 Antilock brake system pump
F27 Trailer brake control module
F28 Rear window defogger
F29 –
F30 Driver heated seat Fuses
Usage
F31 –
F32 Passenger heated seat
F33 Body control module 3
F34 Integrated chassis control module
F35 –
F36 Center high-mounted stoplamp
F37 Right high-beam headlamp
F38 Left high-beam headlamp
F39 Rear differential lock actuators
F40 Front differential lock actuators/Selective catalytic
reduction power module
wake up
F41 Glow plug module
F42 –
F43 –
F44 Fuel heater F45 Selective catalytic reduction power module heater