Page 2 of 20
2
Power Mirror/ Window Controls
Cruise Control/Forward Collision AlertF/Heated Steering WheelF Buttons
Driver Information Center
Driver Information Center Controls/Voice Recognition Buttons
Windshield Wipers Lever
Exterior Lamps/ Instrument Panel Lighting Controls
Turn Signal Lever/IntelliBeam ControlF
Power Liftgate ControlF
Electric Parking Brake Button
Memory Seat ButtonsF
INSTRUMENT PANEL
Audio Volume Controls (behind steering wheel)
Steering Wheel Adjustment Lever or Power ControlF (under steering column)
Audio Favorite Station Controls (behind steering wheel)
Low Fuel
Brake System
Cruise Control Set
Security
Lane Keep Assist
Vehicle Ahead
Airbag Readiness
Engine Oil Pressure
PARK Electric Parking Brake
Check Engine
Traction Control Off
Lights On Reminder
SYMBOLS
Page 6 of 20

6
POWER FRONT SEATSF
F Optional equipment
REAR SEATS
REAR SEAT ADJUSTMENTS
Pull the lever (A) on the side of the seat and move the seatback to the desired position. Release the lever.
Lift up the bar (B) under the seat and slide the seat to the desired position.
FOLDING THE REAR SEAT
1. Press the button on the head restraint. It will fold automatically.
2. Pull the lever (A) on the side of the seat and fold the seatback forwa\
rd. From the cargo area, pull the lever on each side of the cargo area to fold the dr\
iver-side rear seatback or passenger-side rear seatback.
See Seats and Restraints in your Owner’s Manual.
POWER SEAT ADJUSTMENTS
A. Seat Cushion Adjustment
Move the control to move the seat forward or rearward and to tilt, raise or lower the seat.
B. Seatback Adjustment
Move the top of the control to recline or raise the seatback.
C. Lumbar Adjustment
Move the control to adjust the lumbar support.
SET MEMORY POSITIONS
1. With the vehicle in Park, adjust the driver’s seat, power steering columnF, and power outside mirrorsF to the desired positions.
2. Press and release the SET button on the driver’s door. A beep will sound.
3. Immediately press and hold button 1 or 2 until two beeps sound.
To store a seat position for more clearance when exiting the vehicle, re\
peat these steps using the Exit button instead of button 1 or 2.
RECALL MEMORY POSITIONS
Press and hold button 1, 2, or Exit until the set position is reached.
The memory/exit positions can be programmed to be recalled automatically\
when the ignition is turned on/off (for exit recall, the driver’s door must b\
e opened).
To set the recall options, go to Settings > Vehicle > Seating Position >\
Seat Entry Memory and Seat Exit Memory.See Seats and Restraints in your Owner’s Manual.
B
A
ACB
Page 7 of 20

7
OPEN/CLOSE THE POWER LIFTGATE
Press the Power Liftgate button on the Remote Keyless Entry transmitter (key fob) twice.
Press the Power Liftgate knob (A) on the driver’s door.
Press the touchpad (B) on the liftgate handle to open the liftgate.
Press the button (C) left of the liftgate latch to close the liftgate.
PROGRAMMING THE LIFTGATE HEIGHT
1. Turn the Power Liftgate knob (A) to the 3/4 mode position.
2. Open the liftgate.
3. Adjust the liftgate manually to the desired height.
4. To save the setting, press and hold the button (C) left of the liftgate latch until the turn signals flash and a beep sounds.
HANDS-FREE OPERATION
To open or close the liftgate hands-free, kick your foot straight under the driver’s side of the rear bumper between the exhaust pipe and the license plate. The key fob must be within 3 feet of the liftgate. The Chevrolet logo is projected on the ground near the rear bumper to indicate the kicking motion loca-tion. The logo is shown for 1 minute, depending on operating conditions.\
See Keys, Doors and Windows in your Owner’s Manual.
POWER LIFTGATEF
F Optional equipment
STEERING WHEEL ADJUSTMENT
With the vehicle parked, pull the lever under the steering column to adjust the steering wheel up or down and closer or farther away. Push up the lever to lock the steering wheel in place.
With the vehicle parked, use the power controlF under the steering column to adjust the steering wheel up or down and closer or farther away.
See Instruments and Controls in your Owner’s Manual.
Power controlF shown
A
B
C
Page 13 of 20

13
When the vehicle is on, the heated seats and heated steering wheel or ve\
ntilated seats will activate automatically based on the vehicle’s interior temperatu\
re. Manually turn off the heated or ventilated seats using the seat controls. Manually tur\
n off the heated steering wheel using the steering wheel control.
To turn the auto heated seats and auto ventilated seats on or off, go to\
Settings > Vehicle > Climate and Air Quality > Auto Heated Seats or Auto Cooled Sea\
ts.
See Seats and Restraints in your Owner’s Manual.
AUTO HEATED/VENTILATED SEATSF
F Optional equipment
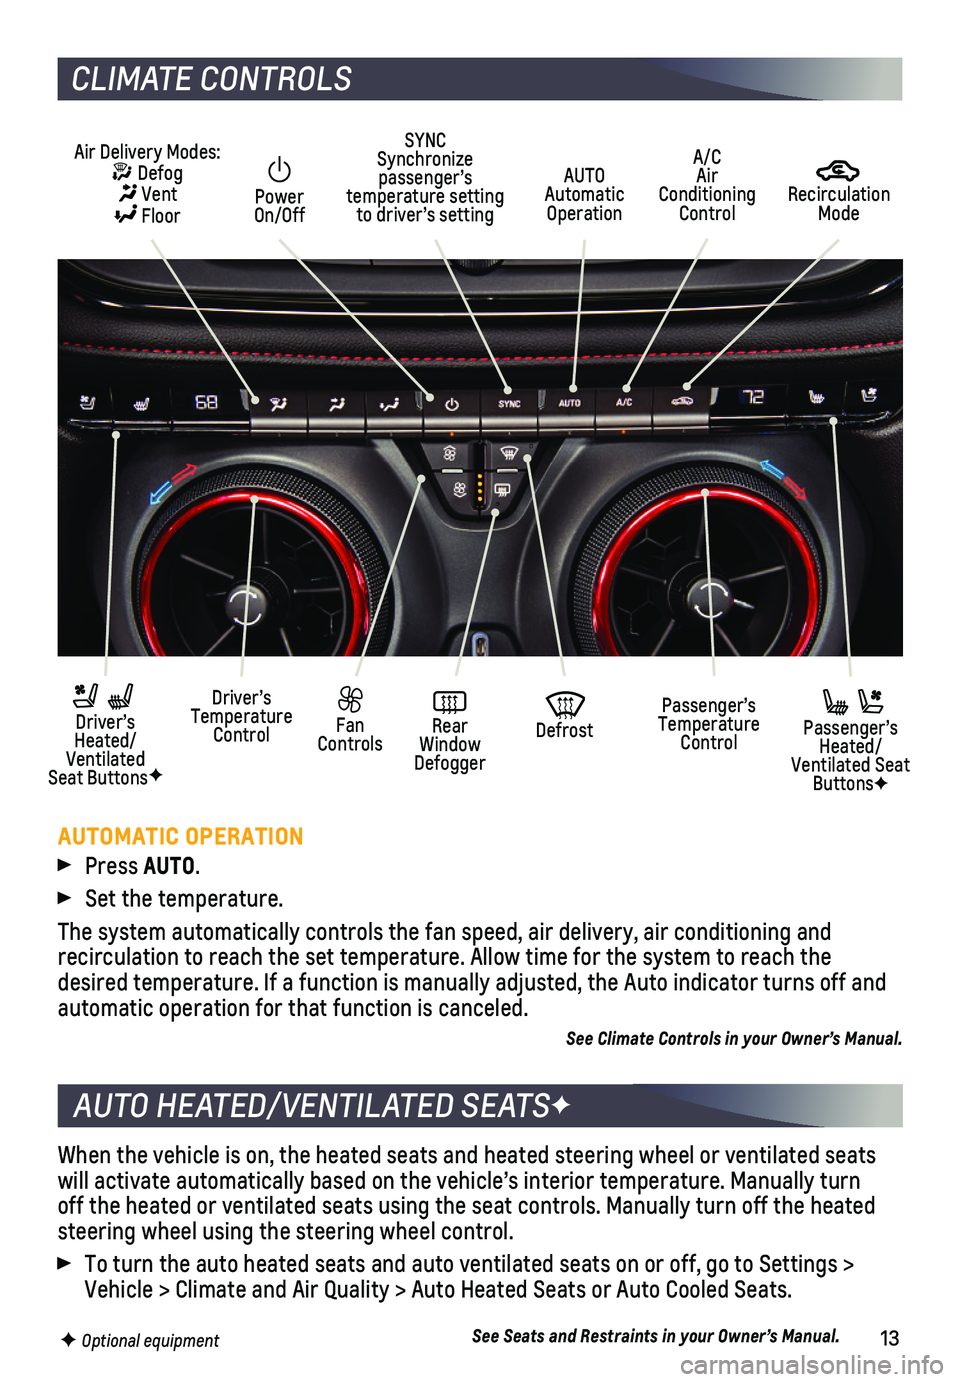
CLIMATE CONTROLS
AUTOMATIC OPERATION
Press AUTO.
Set the temperature.
The system automatically controls the fan speed, air delivery, air condi\
tioning and
recirculation to reach the set temperature. Allow time for the system to\
reach the desired temperature. If a function is manually adjusted, the Auto indica\
tor turns off and automatic operation for that function is canceled.
See Climate Controls in your Owner’s Manual.
Recirculation Mode
AUTO Automatic Operation
Power On/Off
Passenger’s Temperature Control
Fan Controls
Driver’s Temperature Control
Driver’s Heated/Ventilated Seat ButtonsF
Defrost
Air Delivery Modes: Defog Vent Floor
Passenger’s Heated/Ventilated Seat ButtonsF
SYNC Synchronize passenger’s temperature setting to driver’s setting
Rear Window Defogger
A/C Air Conditioning Control