Page 12 of 20

12
VEHICLE CUSTOMIZATIONULTRAVIEW SUNROOF♦
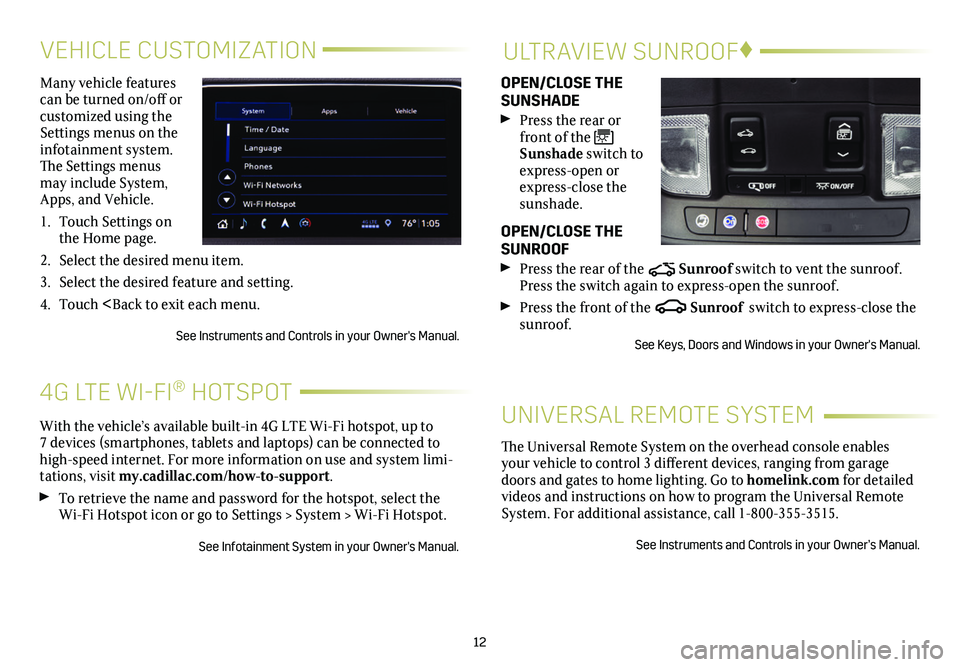
Many vehicle features can be turned on/off or customized using the Settings menus on the infotainment system. The Settings menus may include System, Apps, and Vehicle.
1. Touch Settings on the Home page.
2. Select the desired menu item.
3. Select the desired feature and setting.
4. Touch
See Instruments and Controls in your Owner's Manual.
OPEN/CLOSE THE SUNSHADE
Press the rear or front of the Sunshade switch to express-open or express-close the sunshade.
OPEN/CLOSE THE SUNROOF
Press the rear of the Sunroof switch to vent the sunroof. Press the switch again to express-open the sunroof.
Press the front of the Sunroof switch to express-close the sunroof.
See Keys, Doors and Windows in your Owner's Manual.
With the vehicle’s available built-in 4G LTE Wi-Fi hotspot, up to 7 devices (smartphones, tablets and laptops) can be connected to high-speed internet. For more information on use and system limi-tations, visit my.cadillac.com/how-to-support.
To retrieve the name and password for the hotspot, select the Wi-Fi Hotspot icon or go to Settings > System > Wi-Fi Hotspot.
See Infotainment System in your Owner's Manual.
4G LTE WI-FI® HOTSPOT
The Universal Remote System on the overhead console enables your vehicle to control 3 different devices, ranging from garage doors and gates to home lighting. Go to homelink.com for detailed videos and instructions on how to program the Universal Remote System. For additional assistance, call 1-800-355-3515.
See Instruments and Controls in your Owner’s Manual.
UNIVERSAL REMOTE SYSTEM
Page 15 of 20

15
EXTERIOR LIGHTINGWINDSHIELD WIPERS
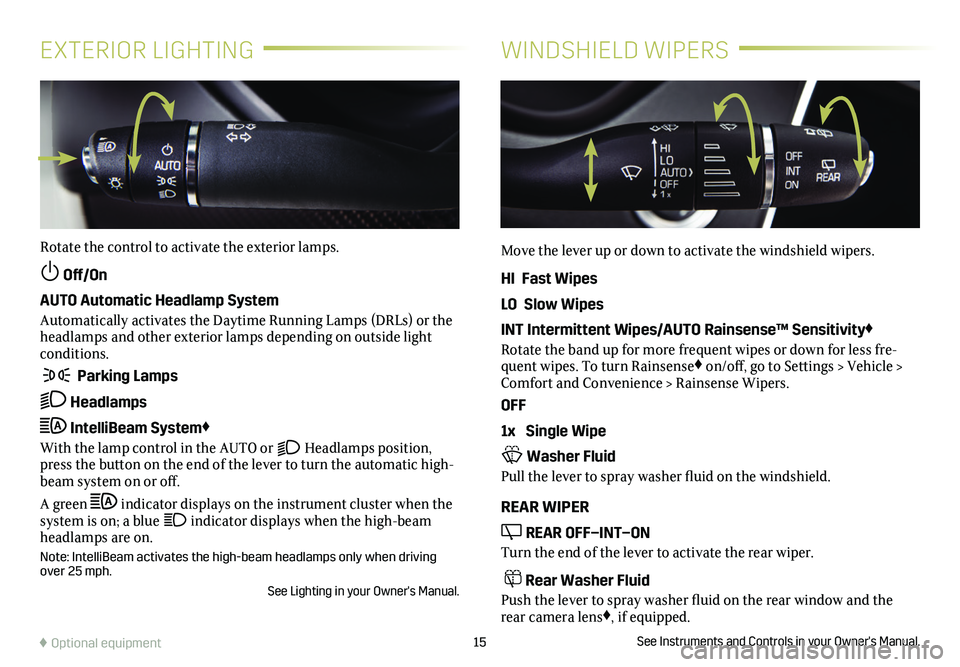
Rotate the control to activate the exterior lamps.
Off/On
AUTO Automatic Headlamp System
Automatically activates the Daytime Running Lamps (DRLs) or the headlamps and other exterior lamps depending on outside light conditions.
Parking Lamps
Headlamps
IntelliBeam System♦
With the lamp control in the AUTO or Headlamps position, press the button on the end of the lever to turn the automatic high-beam system on or off.
A green indicator displays on the instrument cluster when the system is on; a blue indicator displays when the high-beam headlamps are on.
Note: IntelliBeam activates the high-beam headlamps only when driving over 25 mph.
See Lighting in your Owner's Manual.
Move the lever up or down to activate the windshield wipers.
HI Fast Wipes
LO Slow Wipes
INT Intermittent Wipes/AUTO Rainsense™ Sensitivity♦
Rotate the band up for more frequent wipes or down for less fre-quent wipes. To turn Rainsense♦ on/off, go to Settings > Vehicle > Comfort and Convenience > Rainsense Wipers.
OFF
1x Single Wipe
Washer Fluid
Pull the lever to spray washer fluid on the windshield.
REAR WIPER
REAR OFF–INT–ON
Turn the end of the lever to activate the rear wiper.
Rear Washer Fluid
Push the lever to spray washer fluid on the rear
window and the rear camera lens♦, if equipped.
See Instruments and Controls in your Owner's Manual.♦ Optional equipment
Page 18 of 20

18
ELECTRIC PARKING BRAKE
To apply the parking brake, press the
Parking Brake switch on the left side of the instrument panel.
To release the parking brake, turn on the
ignition, press the brake pedal, and then press the switch.
Note: The parking brake will automatically release if the vehicle is run\
ning, placed into gear, and an attempt is made to drive away.
See Driving and Operating in your Owner's Manual.
HD REAR VISION CAMERA – When the vehicle is in Reverse below 8 mph, a view of the area behind the vehicle displays on the info-tainment screen.
HD SURROUND VISION♦ – The Surround Vision system displays the area surrounding the vehicle along with front and rear camera views on the infotainment screen. The system operates when the vehicle is in Reverse or Drive while moving less than 8 mph. Camera view buttons are at the bottom of the screen. See Driving and Operating in your Owner's Manual.
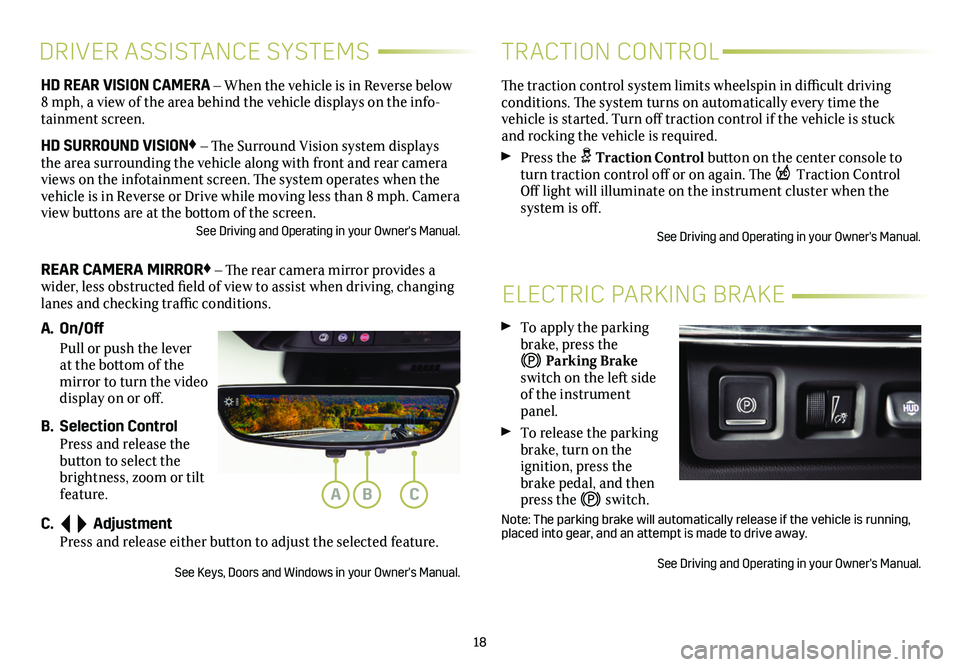
REAR CAMERA MIRROR♦ – The rear camera mirror provides a wider, less obstructed field of view to assist when driving, changing lanes and checking traffic conditions.
A. On/Off
Pull or push the lever at the bottom of the mirror to turn the video display on or off.
B. Selection Control Press and release the button to select the brightness, zoom or tilt feature.
C. Adjustment Press and release either button to adjust the selected feature.
See Keys, Doors and Windows in your Owner's Manual.
DRIVER ASSISTANCE SYSTEMS
The traction control system limits wheelspin in difficult driving conditions. The system turns on automatically every time the
vehicle is started. Turn off traction control if the vehicle is stuck and rocking the vehicle is required.
Press the Traction Control button on the center console to turn traction control off or on again. The Traction Control Off light will illuminate on the instrument cluster when the
system is off.
See Driving and Operating in your Owner's Manual.
TRACTION CONTROL
ABC
Page 19 of 20

19
OPEN/CLOSE THE POWER LIFTGATE
Press the Power Liftgate button on the Remote Keyless Entry (RKE) transmitter (key fob) twice.
Press the Power Liftgate knob (A) on the driver’s door.
Press the touchpad under the liftgate handle to open the
liftgate.
Press the button (B) next to the pull handle to close the liftgate.
PROGRAMMING THE LIFTGATE HEIGHT
1. Turn the Power Liftgate knob (A) to the 3/4 mode position.
2. Open the liftgate.
3. Adjust the liftgate manually to the desired height.
4. To save the setting, press and hold the
button (B) next to the pull handle for 3 seconds. The turn
signals flash and a beep sounds when the
setting is saved.
HANDS-FREE OPERATION♦
To open or close the liftgate hands-free, kick your foot straight under the left corner of the rear bumper (A), above the logo projected on the ground (B) indicat-ing the kicking motion location.
The projected logo is shown for 1 minute, depending on operating conditions. The RKE transmitter must be within 3 feet of the liftgate for hands-free operation.
See Keys, Doors and Windows in your Owner's Manual.
POWER LIFTGATEPOWER LIFTGATE
♦ Optional equipment
TIRE PRESSURE MONITOR
The Low Tire Pressure warning light on the instrument cluster illuminates when one or more of the vehicle’s tires is significantly underinflated. Fill the tires to the proper tire pressures listed on the Tire and Loading Information label, located below the driver’s door latch. Current tire pressures can be viewed on the Driver Information Center.
With the ignition On or in Accessory mode, the Tire Fill Alert will provide visual and audible alerts when inflating a tire.
Refer to your Owner's Manual for information about normal monthly tire maintenance.
See Vehicle Care in your Owner's Manual.
A
B
A
B