Page 9 of 20

9
WIRELESS CHARGING
4G LTE WI-FI® HOTSPOT
The wireless charging system for smartphones is located in the
center console. To check device compatibility, visit my.cadillac.com/how-to-support. See your phone retailer for required phone accessories or charging adapters.
1. The vehicle must be On or Retained Accessory Power must be active.
2. Remove all objects from the charging pocket.
3. Place the smartphone in the pocket with the screen facing up.
4. The battery charging symbol will display on the Infotainment Screen. If not charging, remove the smartphone for 3 seconds, and rotate it 180 degrees, before reinserting it in the charging pocket.
See Instruments and Controls in your Owner’s Manual.
With the vehicle’s available built-in 4G LTE Wi-Fi hotspot, up to 7 devices (smart phones, tablets and laptops) can be connected to high-speed Internet. For information on use and system limitations, visit my.cadillac.com/how-to-support.
To retrieve the name and password for the hotspot, select the Wi-Fi Hotspot icon on the Infotainment Screen or go to Settings > System > Wi-Fi Hotspot.
See Infotainment System in your Owner’s Manual
NAVIGATION SYSTEM
Select the Navigation icon on the Home screen to start a route, get directions, choose a display view and select other features.
Select Settings to save Home and Work destinations, set map preferences and more.
Swipe on the screen or use the rotary controller to view the
surrounding area, powered by Google Street View.
AUGMENTED REALITY VIEW
Route guidance and upcoming turns appear as graphics on the front camera image displayed in the Cluster Display.
To view the Augmented Reality View, after entering a destina-tion and selecting a route, select AR Camera from the Cluster Display menu on the Control Panel.
See Infotainment System in your Owner’s Manual.♦ Optional equipment
Page 10 of 20

10
REAR SEAT MEDIA SYSTEM♦
CENTER CONSOLE POWER OUTLET
The Rear Seat Media system includes 2 touchscreens, 2 USB-C ports, 2 HDMI ports, and 2 wireless infrared head-phones.
To power on the system and view the Home page, double tap anywhere on either screen.
To power on the system and control the screen sources from the front seats, select the Rear Media icon on the Infotainment Screen.
Video sources include all first- and second-row USB ports and second-row HDMI ports.
See Infotainment System in your Owner’s Manual.
To enable the 110-volt outlet on the rear of the center console or in the rear cargo area, with the vehicle On, press the Power Outlet button (A) inside the center console storage compartment. If uninterrupted power to your devices is required while driving, disable the Auto Stop feature.
See Instruments and Controls in your Owner’s Manual.
VEHICLE CUSTOMIZATION
UNIVERSAL REMOTE SYSTEM
Many vehicle features can be turned on/off and customized using the Settings menus on the Infotainment Screen, including Remote Start, Power Liftgate, Auto Heated/Ventilated Seats♦, Safety Alert Seat, Mirror Folding, Wipers and others.
1. Touch Settings on the Home screen.
2. Select the System, Vehicle, or Search tab.
3. Select the desired feature and setting.
4. Touch Back to exit each menu.
See Instruments and Controls in your Owner’s Manual
The Universal Remote System on the overhead console enables your vehicle to control 3 different devices, ranging from garage doors and gates to home lighting. Go to homelink.com for detailed videos and instructions on how to program the Universal Remote System. For additional assistance, call 1-800-355-3515.
See Instruments and Controls in your Owner’s Manual.A
Page 11 of 20

11
STEERING WHEEL CONTROLS
A. CRUISE CONTROL/ADAPTIVE CRUISE CONTROL♦/SUPER CRUISE♦
On/Off
SET– Set Speed
With Cruise Control on, press the switch down to set a speed.
RES+ Resume Speed
With Cruise Control on, press the switch up to resume the set speed.
Adjust Speed
With a cruise speed set, press the switch up or down to the detent to increase (+) or decrease ( – ) the set speed by 1-mph increments; fully press the switch past the detent to increase or decrease the set speed to the next 5-mph interval on the speedometer.
Cancel
Press to cancel Cruise Control without erasing the set speed from memory.
Press and hold to switch between Cruise Control and Adaptive Cruise Control♦.
Follow Distance Gap (Adaptive Cruise Control♦)
Press to select a targeted gap setting of Far, Medium, or Near – the time between your vehicle and a vehicle detected directly ahead.
Super Cruise♦
Engage/Disengage Super Cruise (Adaptive Cruise Control must be set.)
See Driving and Operating in your Owner’s Manual.
B. HEATED STEERING WHEEL
On/OffSee Instruments and Controls in your Owner’s Manual.
C. VOICE RECOGNITION/BLUETOOTH
Push to Talk
Press to answer a call or start voice recognition. Press and hold for 3-4 seconds to use Bluetooth voice rec-ognition (Siri or Google Assistant).
Conversation Enhancement
Press to turn the system on/off. For microphone settings, go to Settings > System > Conversation Enhancement.
See Infotainment System in your Owner’s Manual.
D. AUDIO CONTROLS
Volume
Press + or – to adjust the volume.
Mute
Press to mute/unmute the audio system.
Next/Previous
Press or to go to the next or
previous favorite, or selected source, radio station or track. Change the audio source to scroll though other available sources.
See Infotainment System in your Owner’s Manual.
E. AUDIO/PHONE/NAV CONTROLS
Now Playing
Press to open the Now Playing screen.
Phone
Press to view the Phone menu.
Select
Rotate the thumbwheel to move through the active menu. Press the thumbwheel to open a menu, select or reset an item, or clear a message.
See Infotainment System in your Owner’s Manual.
♦ Optional equipment♦ Optional equipment
B
AC
E
D
Page 12 of 20
12
CLIMATE CONTROLS
AUTO Automatic Operation
Fan Speed (lift up/press down)
ON Power On/Off
/ / Airflow Delivery
Passenger’s Temperature (lift up/press down)
MAX/REAR Windshield Defrost/ Rear Defog
Driver’s Temperature (lift up/press down)
SYNC Synchronize all settings to driver’s settings
AUTOMATIC OPERATION
Press the AUTO button. The system automatically controls the fan speed, air delivery, air conditioning and recirculation to reach the set temperature.
REAR CLIMATE CONTROLS
Use the rear climate control switches or select the Rear Climate icon on the Infotainment Screen to adjust the rear climate control settings. The Rear Climate status may be displayed in the bottom-right corner of the Infotainment Screen.
See Climate Controls in your Owner's Manual.
FRONT CLIMATE CONTROLS
A/C/ Air Conditioning/ Recirculation
Heated Rear Seat
Air Delivery Modes
Fan SpeedRear Seat Temperature
Automatic Operation Heated Rear Seat
Page 13 of 20

RECALL FRONT SEAT MEMORY POSITIONS
Press and hold button 1, 2 or Exit until the set position is reached.
The memory/exit positions can be programmed to be recalled automatically when the ignition is turned on/off (for exit recall, the driver’s door must be opened).
To set the recall options, go to Settings > Vehicle > Seating Position > Seat Entry Memory and Seat Exit Memory.
2ND-ROW SEAT ADJUSTMENTS
To slide a 2nd-row seat, lift the front lever (E) on the side of the seat cushion.
To recline a 2nd-row seatback, lift the rear lever (F) on the side of the seat cushion and push on the seatback.
To fold a 2nd-row seat, lift the rear lever (F) on the side of the seat cushion or, from the 3rd-row seat, pull the strap on the
bottom of the seat-back. The seatback will fold forward. Lift the lever or pull the strap again to tumble the seat forward.
To return the seat to the upright position, pull down the seat and lift the seatback until it locks in place. Slide the seat rear-ward by using the lever (E) on the seat cushion.
Note: Do not slide the 2nd-row seat while folded.
See Seats and Restraints in your Owner’s Manual.
13
SEAT FEATURES
FRONT SEAT ADJUSTMENTS
A. Seat Adjustment
B. Seatback Recline
C. Lumbar Support
D. Seat Massage♦
SET FRONT SEAT MEMORY POSITIONS
With the ignition On or in Accessory mode:
1. Adjust the driver’s seat, power steering column and power outside mirrors to the desired positions.
2. Press and release the SET button on the driver’s door. A beep will sound.
3. Immediately press and hold button 1 or 2 until two beeps sound. Use the button that matches the Driver Information Center welcome message indicating driver 1 or 2.
To store seat and power steering column positions for exiting the vehicle, repeat the steps using the Exit button.
♦ Optional equipment
BC
D
E
A
F
Page 14 of 20

14
SEAT FEATURESPOWER LIFTGATE
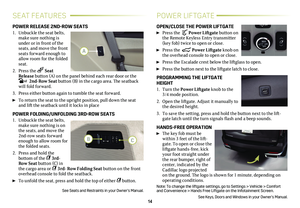
POWER RELEASE 2ND-ROW SEATS
1. Unbuckle the seat belts, make sure nothing is under or in front of the seats, and move the front seats forward enough to allow room for the folded seat.
2. Press the Seat Release button (A) on the panel behind each rear door or the x2 2nd-Row Seat button (B) in the cargo area. The seatback will fold forward.
3. Press either button again to tumble the seat forward.
To return the seat to the upright position, pull down the seat and lift the seatback until it locks in place
POWER FOLDING/UNFOLDING 3RD-ROW SEATS
1. Unbuckle the seat belts, make sure nothing is on the seats, and move the 2nd-row seats forward enough to allow room for the folded seats.
2. Press and hold the
bottom of the 3rd- Row Seat button (C) in the cargo area or 3rd- Row Folding Seat button on the front overhead console to fold the seatback.
To unfold the seat, press and hold the top of either button.
See Seats and Restraints in your Owner’s Manual.
OPEN/CLOSE THE POWER LIFTGATE
Press the Power Liftgate button on the Remote Keyless Entry transmitter (key fob) twice to open or close.
Press the Power Liftgate knob on the overhead console to open or close.
Press the Escalade crest below the liftglass to open.
Press the button next to the liftgate latch to close.
PROGRAMMING THE LIFTGATE HEIGHT
1. Turn the Power Liftgate knob to the 3/4 mode position.
2. Open the liftgate. Adjust it manually to the desired height.
3. To save the setting, press and hold the button next to the lift-gate latch until the turn signals flash and a beep sounds.
HANDS-FREE OPERATION
The key fob must be within 3 feet of the lift-gate. To open or close the liftgate hands-free, kick your foot straight under the rear bumper, right of center, indicated by the Cadillac logo projected on the ground. The logo is shown for 1 minute, depending on operating conditions.
Note: To change the liftgate settings, go to Settings > Vehicle > Comfor\
t and Convenience > Hands Free Liftgate on the Infotainment Screen.
See Keys, Doors and Windows in your Owner’s Manual.
A
BC
Page 15 of 20

15
ELECTRONIC PRECISION SHIFTDRIVER MODE SELECTOR
The automatic transmission shift pattern is displayed on top of the shift lever with the selected gear position illuminated in red. The shift lever always starts in the center position and, after shifting, returns to the center position.
Park – Press the button (A) on top of the lever to shift into Park. To shift out of Park, press the brake pedal and then press and hold the shift lock button (B) while selecting the desired gear.
Reverse – Press the brake pedal and then press and hold the shift lock button (B) while moving the lever for-ward completely (pass the detent) to shift into Reverse.
Neutral – Move the lever forward (to the detent) to shift into Neutral.
Note: The transmission will not stay in Neutral for an extended period. It will automatically shift into\
Park. See Car Wash Mode.
Drive – From Park, press the brake pedal and then press and hold the shift lock button (B) while moving the lever rearward to shift into Drive. From Reverse, move the lever rearward to shift into Drive.
Tap Shift Mode – With the transmission in Drive, pull back on the shift lever to shift manually. Pull the left steering wheel paddle to downshift and the right paddle to upshift. Pull back on the shift lever again to return to Drive.
Car Wash Mode – When entering an automatic car wash, press the brake pedal and move the lever forward (to the detent) to shift into Neutral. Release the brake pedal.
See Driving and Operating in your Owner’s Manual.
The Driver Mode Selector settings automatically adjust various vehi-cle control systems based on driving preferences, weather and road conditions. The modes are displayed on the Cluster Display.
Press the MODE button on the left side of the instrument panel to select a different driving mode.
Available modes may include:
Tour – Use in normal
driving for a smooth ride.
Sport – Use for enhanced responsiveness. Performance Shift Features are enabled when spirited driving is detected.
Snow/Ice (2WD only) – Use for enhanced acceleration on slippery surfaces.
Off-Road (4WD♦ only) – Use for enhanced control on unpaved roads or trails at moderate speeds. Accelerator pedal mapping, steering, ride height and other systems are modified.
Tow/Haul – Use to reduce shift cycling when towing or hauling heavy loads in stop-and-go traffic or rolling hills.
TERRAIN MODE (4WD SINGLE-SPEED TRANSFER CASE ONLY)♦
Press the button for enhanced control in low-speed off-road conditions. The transmission will hold a lower gear longer to maximize engine torque. The system automatically provides light vehicle braking to simulate engine vehicle braking. Only available with the single-speed transfer case when in 4
4
2
.
See Driving and Operating in your Owner’s Manual.
♦ Optional equipment
A
B
Page 16 of 20

16
FOUR-WHEEL DRIVE♦AIR RIDE ADAPTIVE SUSPENSION♦
Use the four-wheel drive buttons on the left side of the instru-ment panel to shift into and out of four-wheel drive. The icon on the Cluster Display will flash when the shift is in progress and will remain illuminated when the shift is completed.
AUTO Automatic 2WD High/4WD High – Use when traction con-ditions vary; engages the front and rear wheels automatically based on driving conditions.
4
4
2
2WD High – Use for most streets and highways.
4
4
2
4WD High – Use when extra traction is needed or in most off-road driving.
Shift between
4
4
2
, 4
4
2
, and AUTO at normal driving speeds.
44
2
4WD Low (2-Speed Transfer Case♦) – Use when driving off-road in deep sand, mud or snow, or on steep hills. Shift into or out of this mode when the vehicle is stopped or moving less than 3 mph with the transmission in Neutral.
N Neutral (2-Speed Transfer Case♦) – Use to dolly or dinghy tow the vehicle. Refer to your Owner’s Manual for the shift procedure.
See Driving and Operating in your Owner’s Manual
The Air Ride Adaptive Suspension offers load-leveling and adjust-able ride height capabilities.
1. Press either Ride Height button to display the menu on the Cluster Display.
2. Press the Up or Down Ride Height button to select a ride height.
3. To save the selection, press the button again or wait for the menu to time out.
Available modes may include:
Normal Ground Clearance – Use for normal driving.
Entry/Exit Ground Clearance – Lowers the vehicle for easy entry and exit.
Increased Ground Clearance – Raises the vehicle 1 inch from Normal. 4WD♦ models only.
Maximum Ground Clearance – Raises the vehicle 2 inches from Normal. 4WD♦ models only; available only in 4WD Low.
Aero – Automatically lowers the vehicle when vehicle speed exceeds 65 mph for a period of time to improve aerodynamics. This feature cannot be user selected.
To have the vehicle automatically lower to the Entry/Exit height when the vehicle is shifted to Park, go to Settings > Vehicle > Ride Height > Automatic Entry/Egress.
Note: Heavy use of the air suspension may cause the system to temporarily suspend all height changes to allow the air compressor to cool down.
See Driving and Operating in your Owner’s Manual.


ON Power On/Off
/ / Airflow Delivery
Passenger’s Temperature (lift up/press down)
MAX/REAR Windshield Defrost/ Rear De")