2021 AUDI Q7 airbag
[x] Cancel search: airbagPage 84 of 332

Sitting correctly and safely
In exceptional circumstances: transporting
children in the front passenger's seat
If exceptional circumstances require the child
safety seat to be placed on the front passenger's
seat, then the front passenger's airbag must be
deactivated. Please note the important informa-
tion for this > page 78, Advanced airbag system.
If you must secure a forward-facing child safety
seat, move the front passenger's seat as far back
as possible so that it is as far as possible from the
front passenger's airbag. While doing this, make
sure the seat can be adjusted all the way.
Only switch to a larger child safety seat when
absolutely necessary
Switch to a larger child safety seat only when ab-
solutely necessary. Secure your child using a safe-
ty belt without a child safety seat only if all of the
following statements are true:
—The child is large enough to sit upright in the
seat
—The child is able to sit with his or her back rest-
ing completely on the seat backrest
—The child is able to sit with his or her knees
bent over the edge of the seat surface
—The child is able to sit with both of his or her
feet completely touching the floor in the foot-
well
— The lap portion of the safety belt lies flat and
securely over the hip area and never over the
stomach
— The shoulder portion of the safety belt lies flat
and securely over the center of the shoulder
and
the chest, and never under the arm, behind
the back, or over the neck or face.
—The child is able to maintain this seating posi-
tion throughout the entire trip
Read and follow the important information and
warnings regarding the correct use of safety belts
=> page 71.
@ Tips
— Child safety seats can also be secured to
seats with side airbags. In the event of an
accident, children can also be protected by
the side airbags if the child is correctly se-
82
cured in a suitable child safety seat that is
attached correctly.
— The lower LATCH anchors as well as the
safety belt may be required to correctly in-
stall some child safety seats. Using both at
the same time is permitted, provided that
the fastening systems or safety belts do not
impair those in an adjacent seating position.
— All child safety seats are constructed so that
they can be secured using the lap safety belt
in the vehicle.
RAZ-0878
2 iL A
Fig. 71 Third row rear bench seat: lower LATCH anchors
Observe the safety precautions > page 80.
In the United States and Canada, child safety
seats can be secured without safety belts using
the LATCH system. LATCH stands for Lower An-
chors and Tethers for Children. In Canada, similar
systems are called UCRA, LUAS, or UAS.
The lower LATCH anchors in your vehicle are lo-
cated on the second and third row seats, between
the seat surface and the backrest. These seating
locations each have two lower LATCH anchors
that can be used to secure a LATCH child safety >
Page 85 of 332

4M1012721BC
Sitting correctly and safely
seat. The marked points with a symbol are locat-
ed on the cushions > fig. 70 or the covers
=> fig. 71 for the lower LATCH anchors. You can lo-
cate the LATCH anchors using the marking points.
> Applies to: vehicles with a rear bench seat that
can be moved forward/back: If you are securing
a child safety seat in the second row, move the
rear seat all the way back.
> Activate the child safety lock > page 44.
> If you are securing a child safety seat in the sec-
ond row, remove the cushion between the seat
surface and the backrest.
> If you are securing a child safety seat in the
third row, remove the cover on both LATCH an-
chors.
> If you secure a child safety seat to the rear seat,
secure any unused safety belts that are within
reach of the child > A\ in Securing child safety
seats with a safety belt on page 84.
> Secure the child safety seat according to the
child safety seat manufacturer instructions.
> Pull on the child safety seat to check if both
sides are engaged correctly in the LATCH an-
chors.
> If possible, also secure the child safety seat to
the respective top tether anchor on the seat
=> page 84.
ZA WARNING
The LATCH anchors in the vehicle are only de-
signed for child safety seats with the LATCH
system. To reduce the risk of serious or fatal
injury, never secure other child restraint sys-
tems, belts, or objects to the anchors.
@) Tips
The LATCH anchors are designed for a total
weight (child and child safety seat combined)
up to 65 lbs (29 kg). If the total weight is
greater than this, the child safety seat must
be secured with the vehicle safety belt.
Securing child safety seats with a safety
belt
Observe the safety precautions > page 80. The
front passenger’s seat is a dangerous location for
a child, even with an advanced airbag system. If
exceptional circumstances require the child safe-
ty seat to be placed on the front passenger's
seat, then the front passenger's airbag must be
deactivated. Please note the important informa-
tion for this > page 81, Correct positioning for
children and > page 78, Advanced airbag sys-
tem.
Securing child safety seats
» Applies to: vehicles with a rear bench seat that
can be moved forward/back: If you are securing
a child safety seat in the second row, move the
rear seat all the way back.
> Activate the child safety lock > page 44.
> If you secure a child safety seat to the rear seat,
secure any unused safety belts that are within
reach of the child > A\, > page 85.
> If you secure a child safety seat to the front
passenger's seat, adjust the front passenger's
seat to the highest position.
>» Secure the child safety seat according to the
child safety seat manufacturer instructions.
> If necessary, activate the belt retractor lock
=> page 83, Activating the belt retractor lock.
> If the child safety seat is secured on the front
passenger's seat, adjust the front passenger's
seat backrest until it rests flat against the child
safety seat. Also make sure that the upper safe-
ty belt fixture is behind the child safety seat.
> If you secure a child safety seat on the rear
seat, also secure it to the correct top tether an-
chor if possible > page 84.
Activating the belt retractor lock
If you secure a child safety seat using the vehicle
safety belt, you must activate the belt retractor
lock. Follow the child safety seat manufacturer
instructions.
The belt retractor lock prevents the safety belt
from becoming loose while driving, which could
result in the child safety seat no longer being ad-
equately secured.
> Secure the child safety seat according to the
child safety seat manufacturer instructions.
While doing so, pull out the safety belt. Insert
the safety belt into the belt latch that belongs
to that seat until it audibly locks.
83
>
Page 86 of 332
Sitting correctly and safely
> Pull the upper belt out completely and then al-
low it to retract. You will hear a clicking sound
while the belt is retracting. It will not be possi-
ble to pull the safety belt out any farther.
> Push the child safety seat into the seat and al-
low the belt to retract more.
> Make sure that the child safety seat cannot
move more than 1 inch (2.5 cm).
Deactivating the belt retractor lock
> Unbuckle the safety belt from the belt latch.
> Remove the child safety seat according to the
manufacturer instructions.
> Allow the safety belt to retract completely. The
belt retractor lock is deactivated.
Aw
—A safety belt that is not locked by the belt
retractor lock or a locking device cannot se-
cure a child safety seat while driving or in
the event of an accident, which increases the
risk of fatal injury. Always make sure the
belt retractor lock on the safety belt is acti-
vated if the child safety seat manufacturer
instructions require it.
— Due to the risk of fatal injury, never place a
rear-facing child safety seat on the front
passenger's seat when the front passenger's
airbag is switched on.
— For the child safety seat to offer the maxi-
mum protection, it is especially important
to route the vehicle safety belt correctly. Al-
ways follow the instructions from the child
safety seat manufacturer for routing the
safety belt correctly. Incorrectly fastened
safety belts can cause injuries, even during
minor accidents.
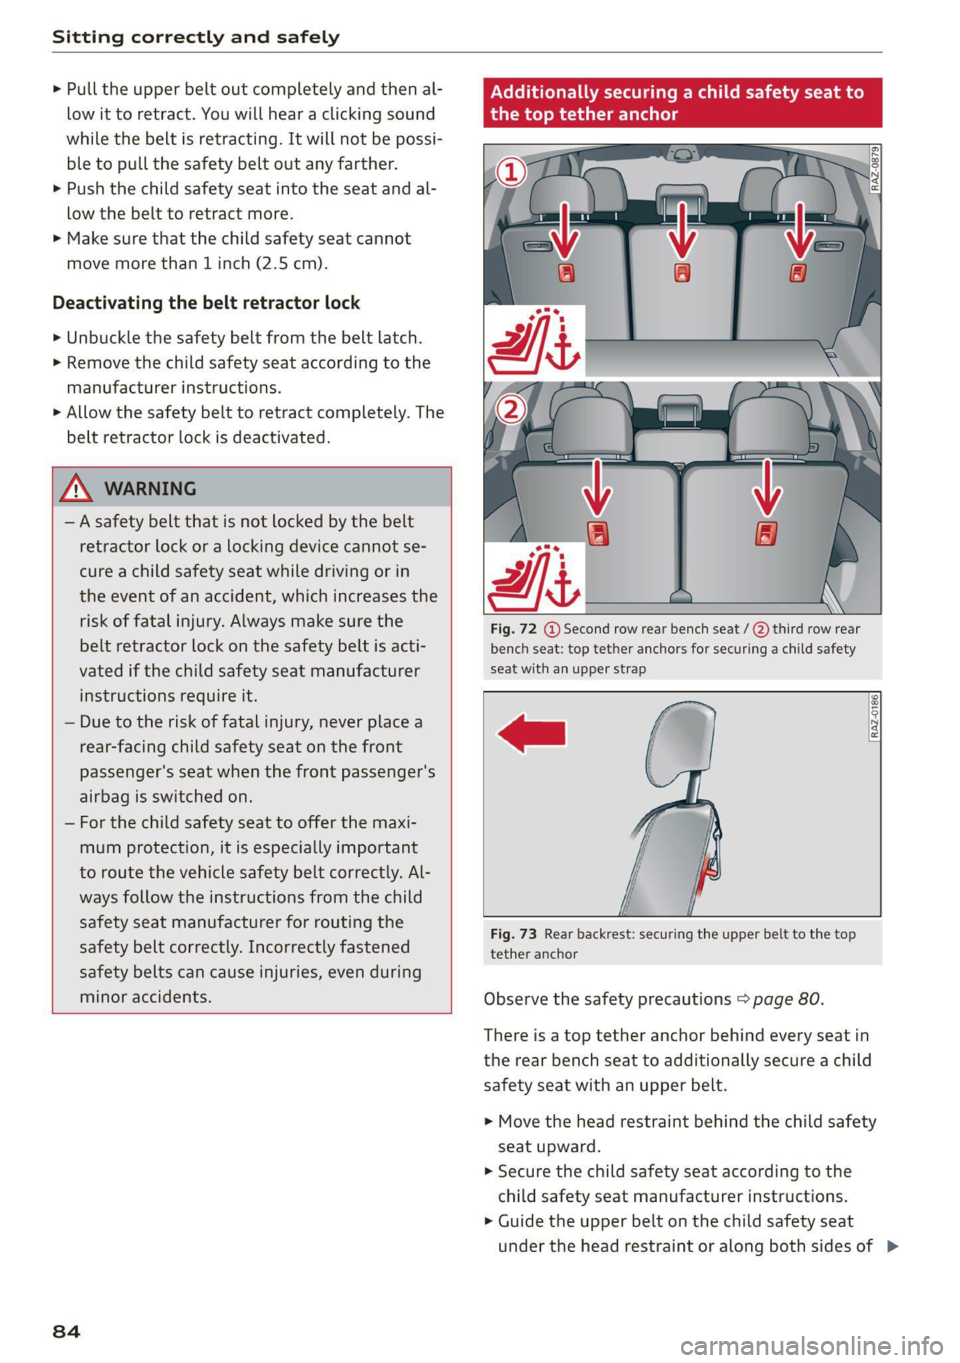
bench seat: top tether anchors for securing a child safety
seat with an upper strap
RAZ.0186)
84
Fig. 73 Rear backrest: securing the upper belt to the top
tether anchor
Observe the safety precautions > page 80.
There is a top tether anchor behind every seat in
the rear bench seat to additionally secure a child
safety seat with an upper belt.
> Move the head restraint behind the child safety
seat upward.
> Secure the child safety seat according to the
child safety seat manufacturer instructions.
> Guide the upper belt on the child safety seat
under the head restraint or along both sides of >
Page 89 of 332

4M1012721BC
Storage and convenience
> To open the cup holder, tap on the button @).
> To close the cup holder, fold the cover back un-
til it clicks into place.
ZA WARNING
— Do not put any hot beverages in the cup
holder while the vehicle is moving. Hot bev-
erages could spill, which increases the risk
of injury.
— Do not use any breakable beverage contain-
ers (for example, made out of glass or por-
celain). You could be injured by them in the
event of an accident.
@) Note
Beverage containers in the cup holders should
always have a lid. Otherwise, the liquid inside
could spill and cause damage to vehicle
equipment.
Storage and
compartments
Additional storage
Depending on vehicle equipment, there are a va-
riety of storage areas, compartments, and retain-
ers, such as the glove compartment, for safely
storing and securing objects.
ZA WARNING
—To reduce the risk of injury, make sure all
storage compartments are always closed
while driving.
— Loose objects can be thrown around the ve-
hicle interior during sudden driving or brak-
ing maneuvers, which increases the risk of
an accident. Store objects securely while
driving.
— Only use the storage compartments in the
door trim panels to store small objects that
will not stick out of the compartment and
impair the function of the side airbags.
— Only lightweight clothing should be hung
from the garment hooks in the vehicle. Do
not use clothes hangers to hang clothing.
The pockets of the clothing must not con-
tain any heavy, breakable, or sharp-edged
objects. This could impair the effectiveness
of the side curtain airbags.
— Make sure your view toward the rear is not
blocked, for example by hanging clothing or
objects in the vehicle.
Luggage compartment
General information
All pieces of luggage or objects must be securely
fastened in the luggage compartment. Note the
following to maintain good vehicle handling:
> Distribute the load evenly in the luggage com-
partment.
> Stow heavy luggage as far forward in the lug-
gage compartment as possible.
» Use non-elastic cords attached to the tie-downs
to secure objects.
ZA WARNING
— Applies to: vehicles with luggage compart-
ment cover: The luggage compartment cov-
er is not a surface for storing objects. Ob-
jects placed on the cover increase the risk of
injury to all vehicle occupants during sudden
driving or braking maneuvers or in the event
of an accident.
— Applies to: vehicles with luggage compart-
ment cover: The luggage compartment cov-
er must always be securely fastened when in
use to reduce the risk of an accident.
— Loose objects can be thrown around the ve-
hicle interior during sudden driving or brak-
ing maneuvers, which increases the risk of
an accident. Always stow objects securely in
the luggage compartment and secure them
at the tie-downs. Use straps suitable for
heavy objects.
— If pieces of luggage or objects are secured
to the tie-downs with unsuitable or dam-
aged straps, this can increase the risk of in-
jury during braking maneuvers or accidents.
— When transporting heavy objects, the vehi-
cle characteristics will change due to the
shift in the center of gravity, which increases
the risk of an accident. You may need to
87
Page 109 of 332

4M1012721BC
Driving
Operating noise
Noises may occur when braking depending on the
speed, braking force, and outside conditions such
as temperature and humidity.
Braking effect
The response time from the brakes depends on
the weather and environmental conditions. To
ensure the optimal braking effect, the brake sys-
tem is cleaned at regular intervals. This is done
by applying the brake pads to the brake rotors for
a short period of time when driving at high
speeds when the windshield wipers are switched
on.
If the brake system becomes damp, for example
after driving in heavy rain, the braking effect may
be delayed. Other factors that could temporarily
increase the response time of the brakes include:
— Wet conditions
— Low temperatures, ice, and snow
— Roads covered in salt
— Dirty brake pads
Corrosion
Corrosion may form on the brake rotors if there is
no heavy braking, if the vehicle is not driven for
long periods of time, or if the vehicle is not driv-
en
frequently or for long distances. In this case,
braking heavily several times while driving at
high speeds can clean the brake rotors > A\.
Brake pads
New brake pads do not achieve their full braking
effect during the first 250 miles (400 km). They
must be “broken in” first. However, you can com-
pensate for the slightly reduced braking force by
pressing firmly on the brake pedal. Avoid heavy
braking during the break-in period.
Brake pad wear depends largely on the way the
vehicle is driven and on operating conditions.
Brake pad wear increases when driving frequently
in the city or short distances or when using a very
sporty driving style.
Ceramic brakes
Applies to: vehicles with ceramic brakes
Ceramic brakes provide excellent deceleration
rates.
The break-in period for new ceramic brakes may
be significantly longer than for standard brake
rotors. Due to the properties of the material,
they may cause noises at lower speeds. Ceramic
brakes also absorb more moisture in wet condi-
tions. Therefore, there will temporarily be less
braking force than when the brakes are dry. You
can compensate for this by pressing the brake
pedal harder.
Automatic post-collision braking system
The automatic post-collision braking system can
help to reduce the risk of sliding and of addition-
al collisions after an accident. If the airbag con-
trol module detects a collision, the vehicle is
braked by the ESC.
The vehicle does not brake automatically if one of
the following occurs:
— The driver presses the accelerator pedal, or
—The braking force generated by the pressed
brake pedal is greater than the braking force
that would be initiated by the system
— The ESC, the brake system, or the vehicle elec-
trical system is not functioning
ZA WARNING
— Only apply the brakes for the purpose of
cleaning the brake system when road and
traffic conditions permit. You must not en-
danger other road users and increase the
risk of an accident.
— Due to the risk of injury, only have an au-
thorized Audi dealer or authorized Audi
Service Facility work on the brake system.
Incorrect repairs could impair the function.
— Never let the vehicle roll while the engine is
stopped because this increases the risk of an
accident.
— During automatic braking maneuvers, the
brake pedal may move downward automati-
cally. To reduce the risk of injury, do not
place your foot under the brake pedal.
107
Page 154 of 332

Driver assistance
Audi pre sense preemptive safety measures
Applies to: vehicles with Audi pre sense
Depending on the vehicle speed and the vehicle
equipment, the following functions may be initi-
ated in certain situations:
— Visual and audio warnings
— Reversible tensioning of safety belts
— Closing the windows and panoramic glass roof
— Adjusting the seats
— Other preemptive safety measures by individual
systems
ZA WARNING
Observe the safety precautions and note the
limits of the assist systems, sensors, and
cameras > page 123.
@ Tips
— Depending on the risk situation that is de-
tected and the selected Audi drive select*
mode, not all preemptive safety measures
may be initiated under certain circumstan-
ces. Certain functions can be adjusted or
skipped if necessary.
— Audi pre sense may be restricted or unavail-
able under certain circumstances, for exam-
ple if:
— There are passengers with unfastened
safety belts
— After turning on the ignition, as long as
the 8 indicator light is on.
— When driving in reverse.
— There is an airbag control module mal-
function
— System functions may not be available if
the ESC is limited or switched off, or if
there is a malfunction.
Audi pre sense basic
Applies to: vehicles with Audi pre sense basic
Audi pre sense basic is automatically active at
speeds of approximately 20 mph (30 km/h) and
higher. Audi pre sense basic can trigger preemp-
tive safety measures during emergency braking
and dangerous braking maneuvers as well as in
unstable driving situations, such as oversteering
152
or understeering > page 152, Audi pre sense pre-
emptive safety measures.
The message Audi pre sense © will warn you
about the danger.
A WARNING
Observe the safety precautions and note the
limits of the assist systems, sensors, and
cameras > page 123.
Audi pre sense front
Applies to: vehicles with Audi pre sense front
Within the limits of the system, Audi pre sense
front can warn about an impending front end col-
lision and brake the vehicle strongly, if necessary.
The system uses the camera behind the wind-
shield and is available at speeds above approxi-
mately 6 mph (10 km/h).
Driving situations
The situations to which the system reacts de-
pends on the vehicle speed.
Up to speeds of approximately 50 mph
(85 km/h), the system may react to the following
situations:
— Pedestrians and cyclists in your lane
Up to speeds of approximately 155 mph
(250 km/h), the system may react to the follow-
ing situations:
—Avehicle driving ahead clearly applies the
brakes
— When approaching a vehicle ahead that is clear-
ly traveling more slowly
— When approaching a stationary vehicle
Prewarning
To warn about detected dangers, Audi pre
sense [@ will appear in the instrument cluster
and an audio signal will sound.
A brief application of the brakes
If a collision is imminent, there may be an acute
warning using a brief application of the brakes.
You
will also be warned about the danger by an
indicator in the instrument cluster display. You >
Page 201 of 332

4M1012721BC
Emergency call
Emergency call
Overview
Applies to: vehicles with emergency call function
An emergency call is a combination of data trans-
mission and a phone call. The data transmission
from your vehicle forwards important informa-
tion, such as the vehicle and position data, to the
emergency call center.
Depending on the country and the vehicle equip-
ment, the following functions may be available:
With the emergency call, you can call for help in
dangerous situations as quickly as possible. Use
this function when emergency help is needed
=> page 199.
— Audi connect emergency call (TPS emergency
call). This eCall system uses emergency call
centers operated by third party providers.
With online roadside assistance, you can request
assistance if there is a breakdown or a minor acci-
dent > page 200.
ZA\ WARNING
In areas with poor GPS reception or outside
the coverage range of the respective cell
phone service provider, some functions and/or
services may not be available, it may not be
possible to send or receive data, or functional-
ity may be limited.
@) Tips
To see which data can be transmitted, visit
your Audi country or sales region website at
www.audi.com.
Emergency call
Applies to: vehicles with emergency call function
The services are provided through a SIM card in-
stalled in the vehicle. Services are provided as-
suming that the cell phone network required for
the installed SIM card is functioning and availa-
ble for use. The services made availably by Audi
are only available within the mobile phone net-
work coverage area for the mobile phone service
provider selected by Audi.
—The emergency call function cannot be deac-
tivated in the Infotainment system settings.
— The availability of the TPS emergency call is
limited to certain times.
—The costs for call and data connections for
TPS emergency calls is included in the price
of the services.
Applies to: vehicles with emergency call function
A TPS emergency call can be made manually or
automatically > page 199.
Making an emergency call
Applies to: vehicles with emergency call function
mi l
Fig. 142 Front headliner: cover for the emergency call but-
ton
Manual emergency call
Requirement: the ignition must be switched on.
> Tap the cover (@) to open it.
> Press and hold the emergency call button until
the LED () blinks. The emergency call will be
made.
> If the emergency call button is pressed by mis-
take, then press it again immediately and hold
it until the LED stays on. The emergency call
will be canceled.
Automatic emergency call
The vehicle electrical system initiates an auto-
matic emergency call under certain circumstan-
ces, for example if an airbag deploys. The LEDin >
199
Page 301 of 332

4M1012721BC
Fuses and bulbs
Fuse panel @) (red) Fuse panel (4) (brown)
4 |Compressor 1 Intersection assistant, driver assist sys-
5 |Engine mount tems
6 |Windshield washer system control module 12 | Right headlight
7 |Instrument panel 13 | Left headlight
8 | Climate control system blower 15 | USB input
9 | Driver assistance systems control module 16 | Rear Seat Entertainment preparation
10 | Emergency call system Fuca panel G) (DD)
11 | Engine start, electric drive clutch No. | Equipment
12 | Right Headlight 1 |Anti-theft alarm system
Fuse panel (8) (black) 2 |Engine control module
No. | Equipment 3 | Front seat electronics, lumbar support
1 | Front seat heating 4 |Automatic transmission selector lever
2 |Windshield wipers 5 |Horn
3 | Left headlight electronics 6 |Parking brake
4 |Panoramic glass roof 7 | Diagnostic interface
5 |Left front door control module 8 | Roof electronics control module
6 |Sockets 9 |48 V drivetrain generator
7 |Right rear door control module 10 | Airbag control module
8 | Left headlight 1 Electronic Stabilization Control (ESC), An-
9 |Right headlight electronics trtock Braking System cine
in Windshield washer systemn/headlight 12 Diagnostic connection, light/rain sensor
washer system control module 13 | Climate control system
11 | Left rear door control module 14 | Right front door control module
12 | Parking heater 15 |Climate control system compressor
Fase panel @ (brown) 16 | Brake system pressure reservoir
Nou) Faipmsns Fuse assignment - Driver's side of the
Seat ventilation, seat electronics, rearview (oleae
1 mirror, rear climate control system control
panel, diagnostic connection, traffic infor-
mation antenna (TMC)
N
Vehicle electrical system control module,
diagnostic interface
Sound generator
Transmission fluid cooling valve
Engine start, electric drive
Night vision assist, active roll stabilization
wW}oa;m|
&|w
Adaptive cruise assist, front wheel sensors
10 Exterior sound generator
LE EEEL|
Fig. 198 Driver side cockpit: fuse panel with plastic bracket D>
299