2021 AUDI E-TRON Charging
[x] Cancel search: ChargingPage 5 of 308

4KE012721BF
Table of contents
High-voltage system............. 108
General information................. 108
Charging the high-voltage battery...... 109
Charging equipment................. 117
Trailer ROwilne is «i wows «seas gs eeees 126
Driving witha trailer................. 126
Assist systems................... 129
ASSIST SYSTCINIS§ 65 6 i onws 5 can so oe 129:
General information................. 129
Surrounding area detection............ 130
Switching the systems on and off....... 132
Driving information.............. 134
Speed warning system..............-- 134
Camera-based traffic sign recognition... 134
Traffic light information.............. 136
Nightivision aSSiSti=x = «wm : » ase y s eon 137
Integrated Toll Module............... 139
Driver assistance................. 141
Cruise control system............00-5 141
Efficiency assist.............02.-000. 142
Adaptive cruise assist................ 144
Distance warning ..............00005. 154
Lane departure warning............... 155
Audi presense...........0 cece eee 156
Sid@vassist sews: = s sexs = 2 sews & e Ae & ne 160
EXIE Warning sire x 6 cera oo were @ @ eee os 162
Intersection assistant................ 163
Emergency assist... ....:seeceeeevees 164
Parking and maneuvering....... 166
IMEROUWECION « = ems x y ses 5 o were 2 x ews 166
Parking‘aid plus « sissies avis oe aretes so aoe 166
Rearview camera and peripheral cameras. 168
Rear cross-traffic assist............... 173
Infotainment system............ L75
Telephone....................005- t75
INtROGUCtION « 2 sees » y sees 9 2 gees s 5 aes 175
SOLUP scsvine a 6 sssnase 2 0 soeaam + 6 oewoan © 6 coesern < 175
Using the Audi phone box............. 177
Using the telephone..............0005 179
SOUS cass os awusse oo means o & seanoe @ seeMaRD & 182
Messages .............0 000200 e eee 183
ThOubLESHOOtING ices s weces s eeee ss pee 185
PRCT COMMBCE 's. cosves 5 6 sivas 6 6 snes 8 oo 186
General information................- 186
Audi connect Infotainment............ 186
Using a Wi-Fi hotspot................ 187
Audi connect Infotainment services..... 187
Functions on demand................ 188
Audi connect vehicle control services.... 188
Settings............. 0.0.00 002 eee 189
TRGUBIESHOOLING sass ¢ scm s 3 Hae 5 tee 190
Emergency call................... 191,
Overview... 12.0... eee eee eee 191
Emergenicy'call « css s sees 6 s gems © + eeu 191
Online roadside assistance............ 192
NaViGGationtc: « « meus « & seu sc poms + «oe 194
Opening navigation............0..005 194
myAudi navigation...............000. 194
Entering a destination................ 195
Stopping route guidance.............. 198
Map... .. see cece eee eee 199
Alternative
routes.............2-.00. 201
Additional functions................. 201
Satellite map.......... 2.0... ee eee 202
Electric:ranGe ccs «2 was ss eee ys ees 202
Map update’: « snes os anes 2s oiws oo ews 202
Traffic incidents ........ 0.0... cece eee 204
Settings............0..0 0.0202 205
Radio...... 02... eee eee ee 207
Generalinformation................. 207
Radio functions sas ss sees ss peee ss Hews 208
Online radiObi. «sacs x x sere @ armen 6 one 211
Options and settings................. 212
Troubleshooting zass x s eae s 3 come & a aw 213
Media........... 0. cece eee ee 215
General information................. 215
DVDidrive « sisi 2 5 semen 2 6 were 2 8 women 2 oe 215
Bluetooth audio player............... 216
Amazon Alexa.........0..:ee eee ee eee 216
Multimedia connections.............. 217
Playing media. ....... 0. cece ee eee eee 218
Options and settings................. 222
Supported media and file formats...... 223
Troubleshooting...............-.0005 224
Page 9 of 308

4KE012721BF
Quick access
— Audi musicinterface .......... 217
— Audi phone box ............... 177
Socket wz zs sews x 2 uews yo ees sve 78
@ Electromechanical parking brake
BUEtON sgsae «2 came o 2 eawa xo ees 2 98
@0 Selector lever ..............02. 92
@) [START STOP] button ............ 90
@ Steering wheel adjustment ...... 62
@) Lever for:
— Cruise control system ......... 141
— Adaptive cruise assist .......... 144
@4 Connection port for the On Board
Diagnostic System (OBD) ........ 281
@) Hood release ..............00-5 234
@8 Memory function buttons ........ 67
@) Buttons for:
SsLIQWtS | cove & & sonsaws o o amavors & & imamwas 9 0 48
—All-weather lights ............ 48
@8
Luggage compartment lid button . 39
@9 Exterior mirror adjustment ...... 52
60 Buttons for:
— Power windows .............. 43
—Child safety lock .............. 42
() Tips
Some the equipment listed here is only instal-
led in certain models or is available as an op-
tion.
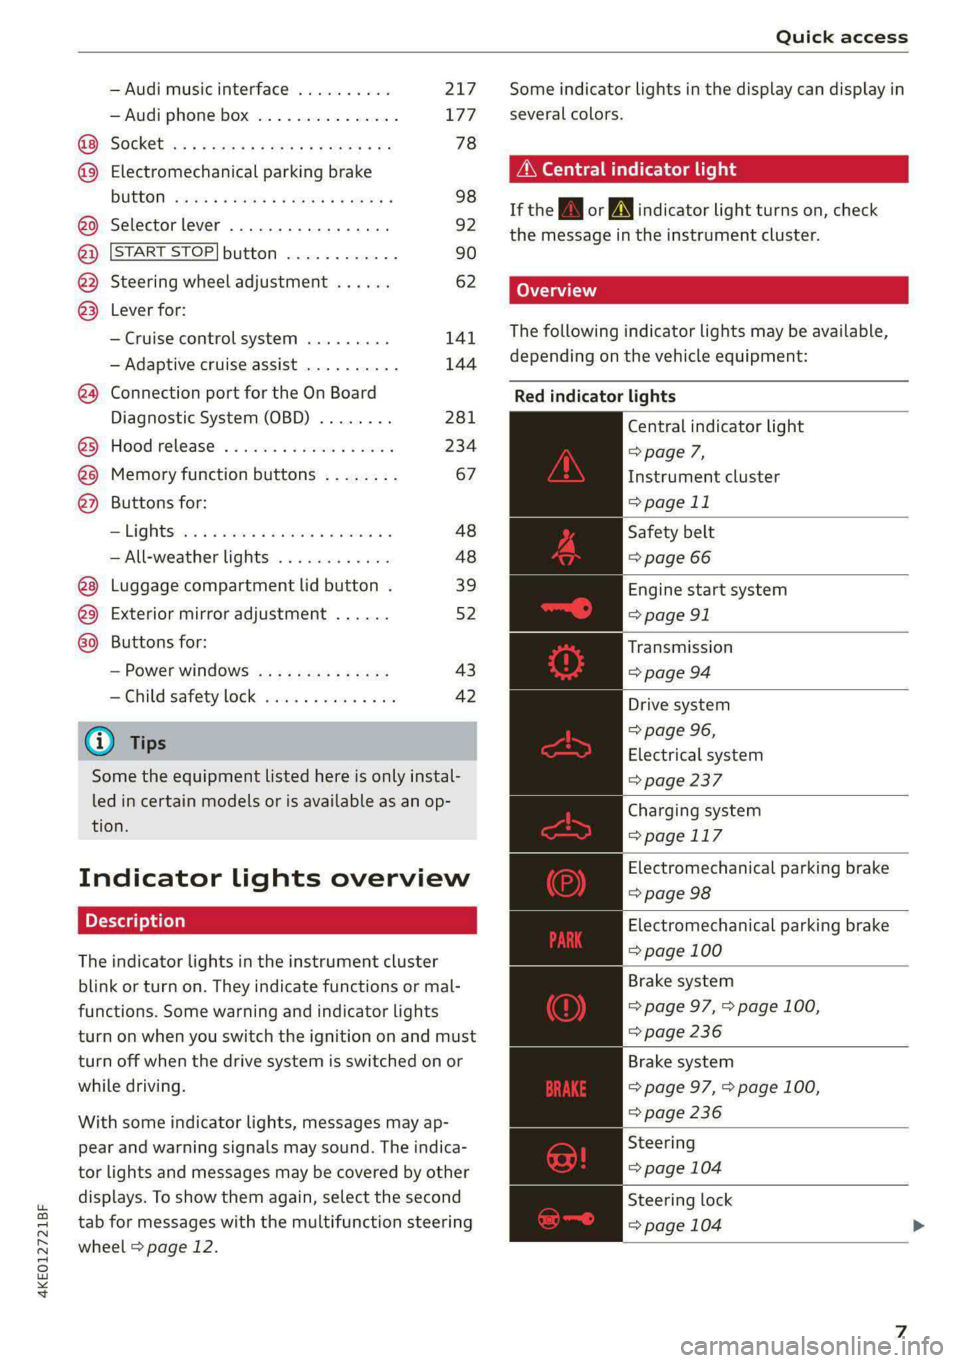
Indicator lights overview
The indicator lights in the instrument cluster
blink or turn on. They indicate functions or mal-
functions. Some warning and indicator lights
turn on when you switch the ignition on and must
turn off when the drive system is switched on or
while driving.
With some indicator lights, messages may ap-
pear and warning signals may sound. The indica-
tor lights and messages may be covered by other
displays. To show them again, select the second
tab for messages with the multifunction steering
wheel > page 12.
Some indicator lights in the display can display in
several colors.
A\ Central indicator light
If the A or indicator light turns on, check
the message in the instrument cluster.
The following indicator lights may be available,
depending on the vehicle equipment:
Red indicator lights
Central indicator light
=> page 7,
Instrument cluster
=> page 11
Safety belt
=> page 66
Engine start system
=> page 91
Transmission
=>page 94
Drive system
=> page 96,
Electrical system
=> page 237
Charging system
=>page 117
Electromechanical parking brake
=> page 98
Electromechanical parking brake
=> page 100
Brake system
=> page 97, > page 100,
=> page 236
Brake system
=> page 97, > page 100,
=> page 236
Steering
=> page 104
Steering lock
=> page 104
Page 10 of 308

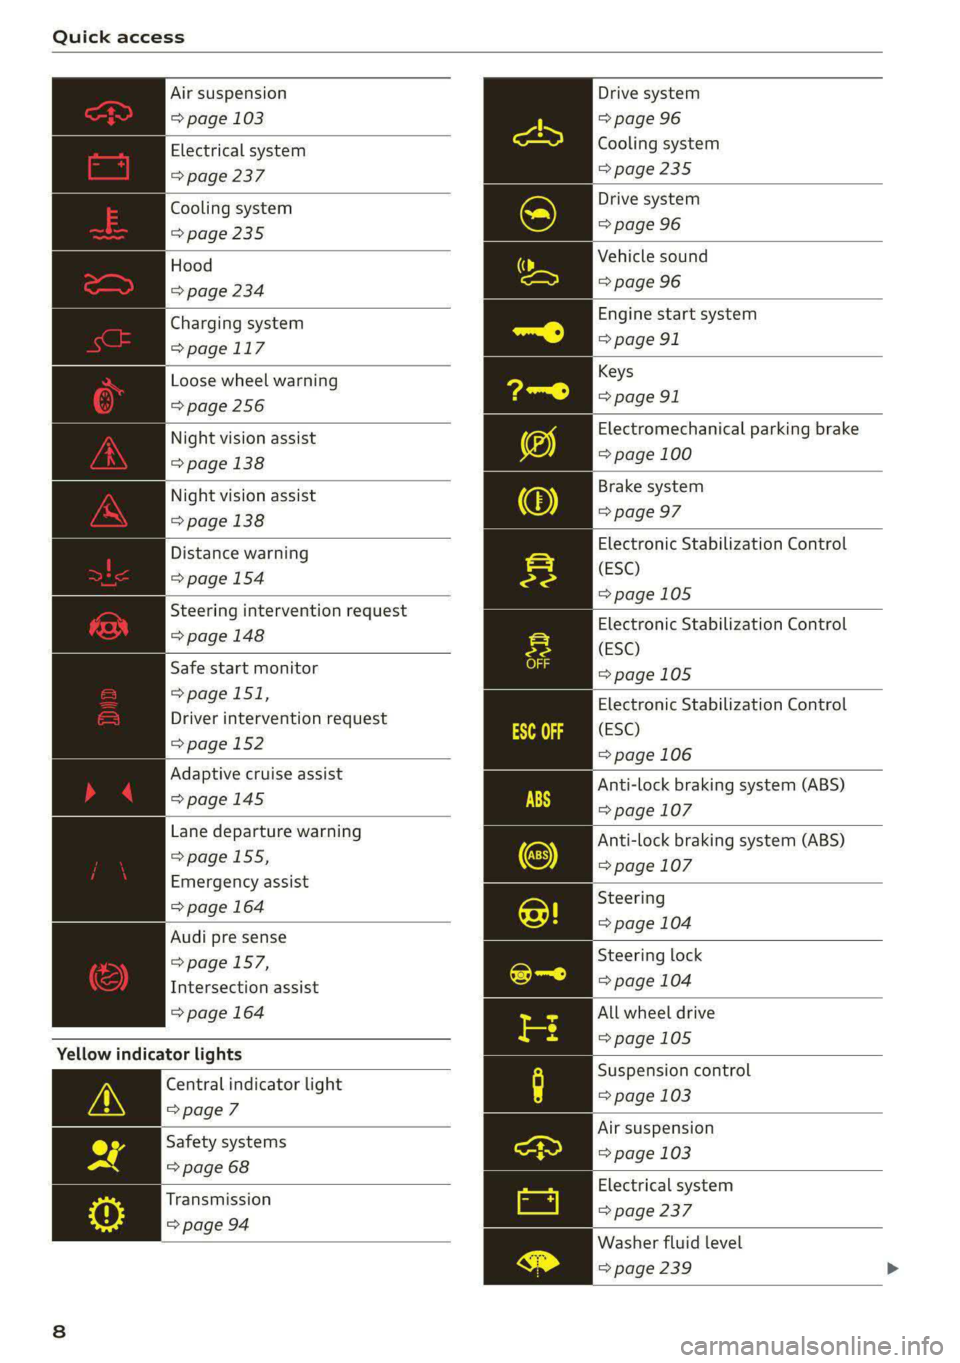
Quick access
Air suspension
=> page 103
Electrical system
=> page 237
Cooling system
=> page 235
Hood
=> page 234
Charging system
=>page 117
Loose wheel warning
=>page 256
Night vision assist
=> page 138
Night vision assist
=> page 138
Distance warning
=> page 154
Steering intervention request
=> page 148
Safe start monitor
=>page 151,
Driver intervention request
=>page 152
Adaptive cruise assist
=>page 145
Lane departure warning
=> page 155,
Emergency assist
=> page 164
Audi pre sense
=>page 157,
Intersection assist
=> page 164
Yellow indicator lights
Central indicator light
=>page 7
Safety systems
=> page 68
Transmission
=> page 94
Drive system
=> page 96
Cooling system
>page 235
Drive system
=> page 96
Vehicle sound
=> page 96
Engine start system
=> page 91
Keys
=> page 91
Electromechanical parking brake
=> page 100
Brake system
=> page 97
Electronic Stabilization Control
(ESC)
=>page 105
Electronic Stabilization Control
(ESC)
=>page 105
Electronic Stabilization Control
(ESC)
=> page 106
Anti-lock braking system (ABS)
=> page 107
Anti-lock braking system (ABS)
=> page 107
Steering
=> page 104
Steering lock
=> page 104
All wheel drive
=>page 105
Suspension control
= page 103
Air suspension
=> page 103
Electrical system
= page 237
Washer fluid level
=> page 239
Page 12 of 308

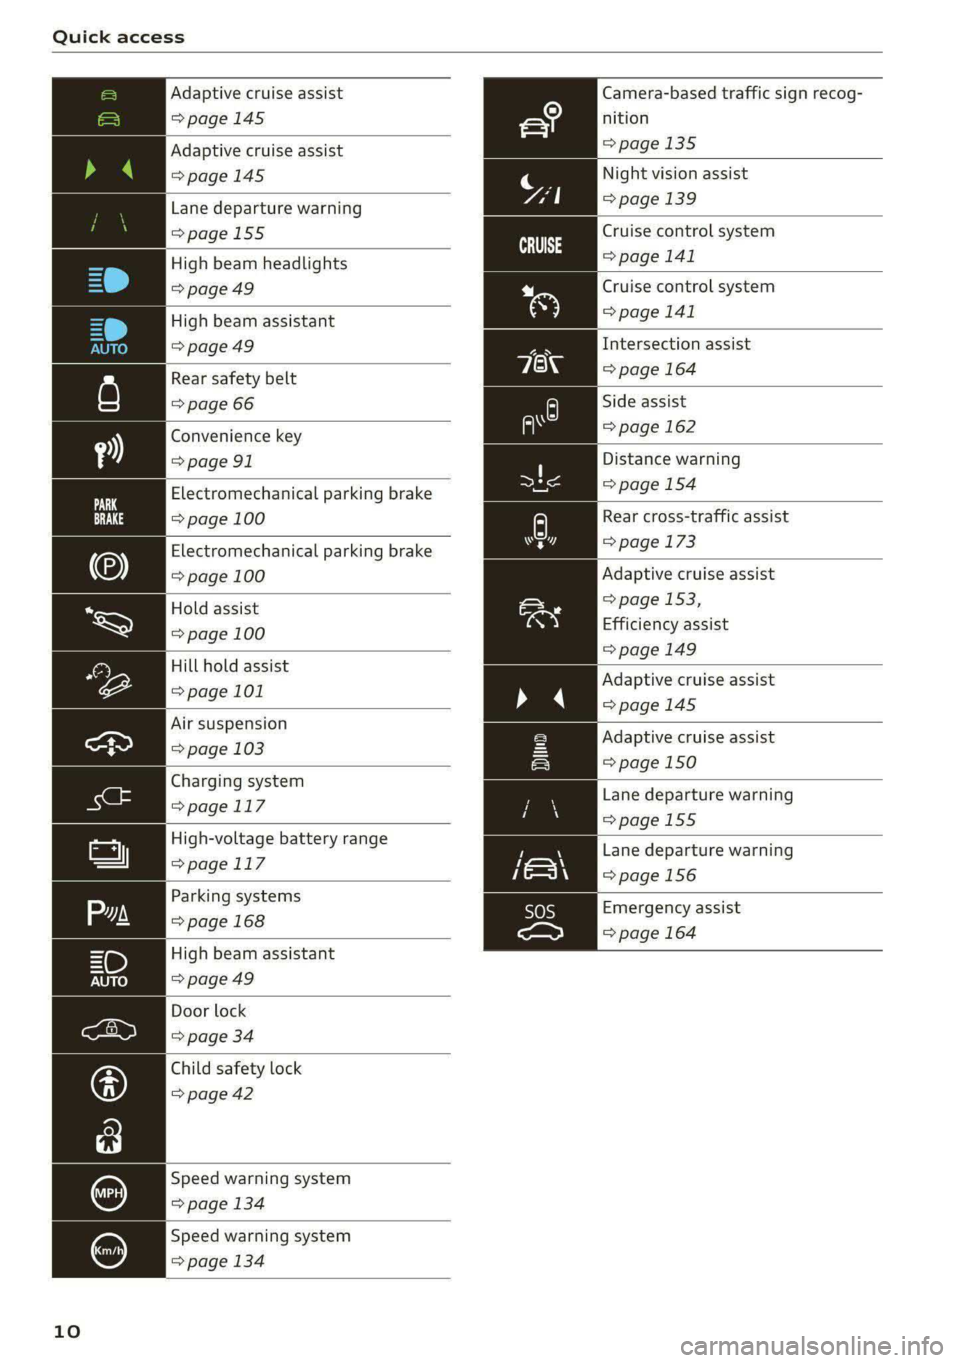
Quick access
Adaptive cruise assist Camera-based traffic sign recog-
=> page 145 nition
Adaptive cruise assist =>page 135
>page 145
Night vision assist
Lane departure warning page 139
=>page 155
High beam headlights
=>page 49
Cruise control system
=> page 141
Cruise control system
High beam assistant > page 141
=> page 49 Intersection assist
Rear safety belt => page 164
=> page 66 Side assist
Convenience key = page 162
= page 91 Distance warning
Electromechanical parking brake > page 154
=> page 100 Rear cross-traffic assist
Electromechanical parking brake > page 173
=> page 100 Adaptive cruise assist
=> page 153,
Efficiency assist
=> page 149
Hold assist
=> page 100
Hill hold assist
page 101 Adaptive cruise assist
=>page 145
Air suspension
ea > page 103
Charging system
>page 117
High-voltage battery range
> page.1 17
Adaptive cruise assist
=> page 150
Lane departure warning
=>page 155
Lane departure warning
=>page 156
Emergency assist
=> page 164
Door lock
=> page 34
Child safety lock
=> page 42
Speed warning system
=> page 134
Speed warning system
=> page 134
10
Page 15 of 308

4KE012721BF
Instrument cluster
Reducing the display
Depending on the vehicle equipment, you can
hide the central area in the instrument cluster.
> Select on the instrument cluster: vehicle func-
tions tab > EE] button > Reduced display.
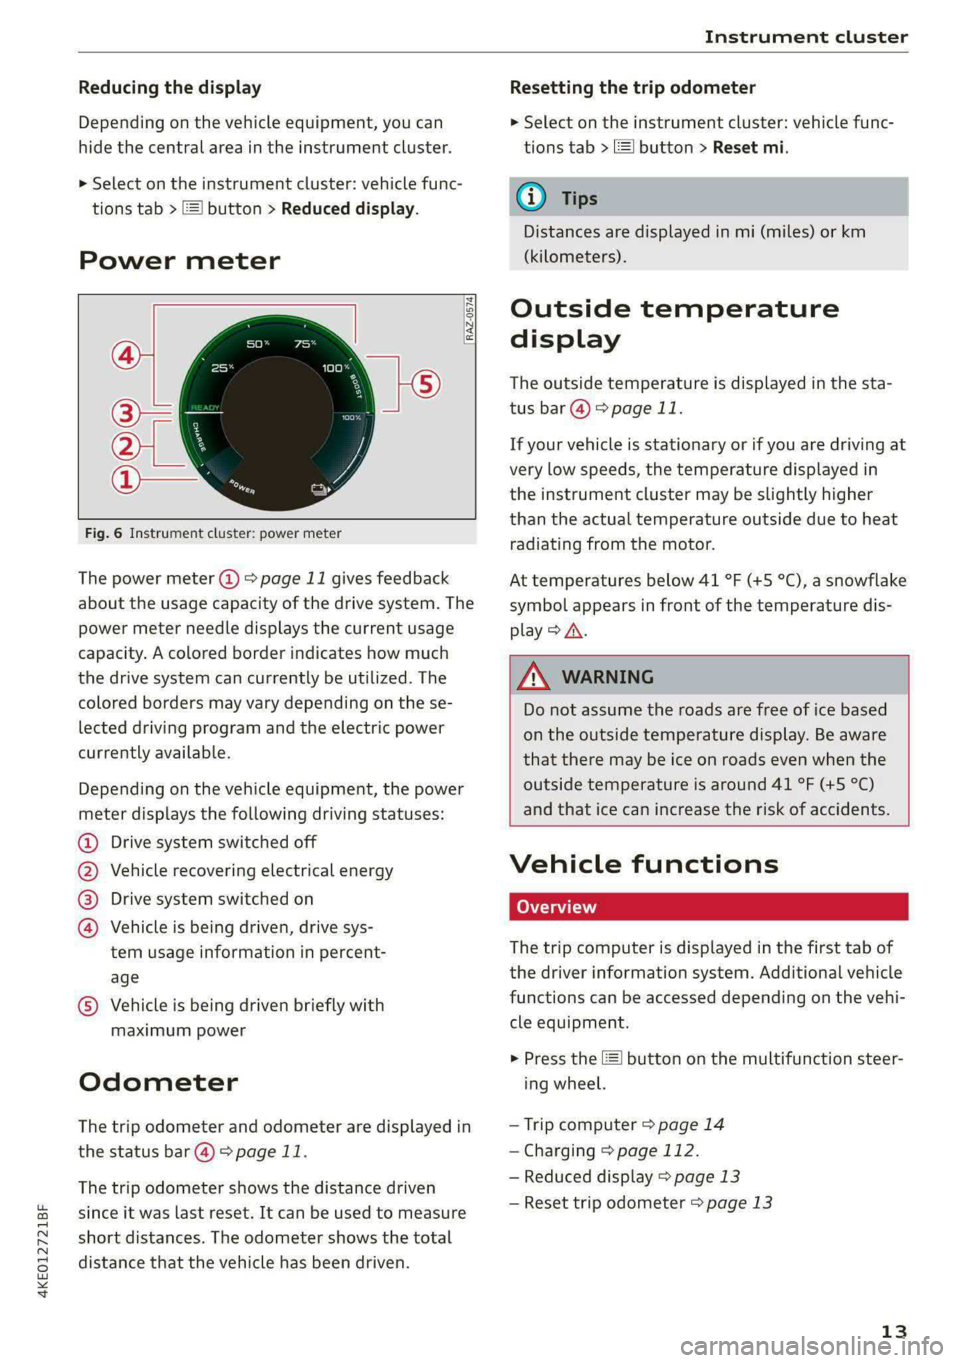
Power meter
RAZ-0574) fi
@
Fig. 6 Instrument cluster: power meter
The power meter @ > page 11 gives feedback
about the usage capacity of the drive system. The
power meter needle displays the current usage
capacity. A colored border indicates how much
the drive system can currently be utilized. The
colored borders may vary depending on the se-
lected driving program and the electric power
currently available.
Depending on the vehicle equipment, the power
meter displays the following driving statuses:
Drive system switched off
Vehicle recovering electrical energy
Drive system switched on
®©O&O Vehicle is being driven, drive sys-
tem usage information in percent-
age
© Vehicle is being driven briefly with
maximum power
Odometer
The trip odometer and odometer are displayed in
the status bar @) > page 11.
The trip odometer shows the distance driven
since it was last reset. It can be used to measure
short distances. The odometer shows the total
distance that the vehicle has been driven.
Resetting the trip odometer
> Select on the instrument cluster: vehicle func-
tions tab > EJ button > Reset mi.
(i) Tips
Distances are displayed in mi (miles) or km
(kilometers).
Outside temperature
display
The outside temperature is displayed in the sta-
tus bar @) > page 11.
If your vehicle is stationary or if you are driving at
very low speeds, the temperature displayed in
the instrument cluster may be slightly higher
than the actual temperature outside due to heat
radiating from the motor.
At temperatures below 41 °F (+5 °C), a snowflake
symbol appears in front of the temperature dis-
play > A\.
ZA\ WARNING
Do not assume the roads are free of ice based
on the outside temperature display. Be aware
that there may be ice on roads even when the
outside temperature is around 41 °F (+5 °C)
and that ice can increase the risk of accidents.
Vehicle functions
Coa (ai)
The trip computer is displayed in the first tab of
the driver information system. Additional vehicle
functions can be accessed depending on the vehi-
cle equipment.
> Press the E] button on the multifunction steer-
ing wheel.
— Trip computer > page 14
— Charging > page 112.
— Reduced display > page 13
— Reset trip odometer > page 13
13
Page 40 of 308

Opening and closing
Unlocking and locking with the Audi connect
vehicle control service!)
Applies to: vehicles with Audi connect vehicle control
Requirement: Audi connect vehicle control serv-
ices must be set up > page 188, Audi connect ve-
hicle control services. The vehicle must be park-
ing and the ignition must be switched off.
ZA WARNING
Observe the safety precautions > page 32.
@ Tips
— Only use the vehicle key when you can see
the
vehicle.
— The vehicle can only be locked when the "P”
selector lever position is engaged.
— Do not use the vehicle key to lock and un-
lock when you are inside the vehicle. Other-
wise, you could trigger the anti-theft
alarm™*. If this happens, press the @ unlock
button.
@ Tips
Applies to: vehicles with convenience key
— When unlocking or locking the vehicle, the
convenience key cannot be more than ap-
proximately 4 feet (1.5 m) away from the
door handle or luggage compartment.
— Unlocking with the convenience key (keyless
access) can be deactivated in the MMI sys-
tem > page 33.
— To prevent the vehicle battery from dis-
charging, the energy management gradual-
ly switches off convenience functions that
are not needed. You then may no longer be
able to unlock your vehicle with the sensors.
OTe yl ae -la amis eC
RAZ-0622
Fig. 26 Vehicle key: removing the battery holder
LED in the vehicle key
The LED @) indicates the vehicle key function.
> If you press a button briefly, the LED blinks
once.
> If you press and hold a button (convenience
opening/closing), the LED blinks several times.
> If the LED does not blink, the vehicle key bat-
tery is drained. Replace the battery in the vehi-
cle key.
Replacing the vehicle key battery
> Remove the mechanical key > page 36 and in-
sert it at an angle into the opening > fig. 26.
> Push the mechanical key in the opening in the
direction of the arrow to operate the release
button on the inside @). To reduce the risk of
damage, do not try to pry off the cover.
>» Remove the cover from the battery tray.
> Insert the new battery with the “+” symbol fac-
ing up.
> Close the battery tray with the cover.
> Insert the mechanical key.
ZA WARNING
If batteries or coin cell batteries are swal-
lowed or enter the body in any other way, they
can cause serious or fatal injuries within a
short period of time. There is a risk of chemi-
cal burns.
— Keep vehicle keys and key fobs with batter-
ies out of the reach of children. >
D_Incertain countries.
38
Page 50 of 308

Lights and Vision
Lights and Vision
Exterior lighting
Switching the lights on and off
Fig. 34 Instrument panel: light button module
@ Light switch &
Press and hold @ until the desired light function
is selected. The selected function is displayed
briefly in the instrument cluster. When switching
on the ignition, the AUTO light function is auto-
matically selected.
— AUTO - The automatic headlights adapt to the
surrounding brightness automatically. The day-
time running lights* will automatically turn on.
In vehicles for certain markets, you can switch
the automatic daytime running lights* on and
off in the MMI.
— 20 - You can switch the low beam headlights on
manually once the ignition is switched on.
— 3 - You can switch the parking lights on at
speeds below 20 mph (32 km/h).
— USA models: OFF - You can switch off all light
functions at speeds under 6 mph (10 km/h).
— Canada models: OFF - You can switch off all
light functions when the ignition is switched off
while the vehicle is stationary.
When the low beam headlights or parking lights
are switched on, the respective Ba or EB indica-
tor light appears in the instrument cluster.
@ All-weather lights 2
The headlights automatically adjust so that there
will be less glare, for example when the road sur-
face is wet.
48
Automatic headlight range control
Your vehicle is equipped with automatic head-
light range control. It reduces glare for oncoming
traffic if the vehicle load changes. The headlight
range adjusts automatically.
Audi adaptive light
Applies to: vehicles with Audi adaptive light
Audi adaptive light provides better visibility when
driving in the dark. The lights are adapted to the
road conditions based on speed, such as when
driving on expressways, rural roads, at intersec-
tions, and around curves. The adaptive light only
functions when the automatic headlights are ac-
tivated.
A WARNING
— Observe the safety precautions and note the
limits of the assist systems, sensors, and
cameras > page 129.
— Automatic headlights are only intended to
assist the driver. The driver is still responsi-
ble for controlling the headlights and may
need to switch them on and off manually
depending on light and visibility conditions.
For example, fog cannot be detected by the
light sensors. So always switch on the low
beams ZO under these weather conditions
and when driving in the dark.
G) Tips
— If the vehicle battery has been discharging
for a while, the parking light may switch off
automatically. Avoid using the parking
lights for several hours.
— When using lighting equipment, the driver
is responsible for adhering to any local ap-
plicable regulations while driving and when
parking the vehicle.
— Only the front headlights turn on when the
daytime running lights are switched on*. In
vehicles in certain markets, the tail lights
will also turn on.
—Incool or damp weather, the inside of the
headlights, turn signals, and tail lights can
fog
over due to the temperature difference
between the inside and outside. They will
clear shortly after switching them on. This >
Page 81 of 308

4KE012721BF
Storage and convenience
AN WARNING
— Do not put any hot beverages in the cup
holder while the vehicle is moving. Hot bev-
erages could spill, which increases the risk
of injury.
— Do not use any breakable beverage contain-
ers (for example, made out of glass or por-
celain). You could be injured by them in the
event of an accident.
® Note
Beverage containers in the cup holders should
always
have a lid. Otherwise, the liquid inside
could spill and cause damage to vehicle
equipment.
Storage and
compartments
Storage compartment in the motor
compartment
Fig. 67 Motor compartment: storage compartment
There is a compartment in the motor compart-
ment for storing objects, such as the charging
system.
Observe the safety precautions > page 233.
> Open the hood = page 234.
> To open the storage compartment cover, pull
the lever @ upward.
>» Store the objects.
> Close the storage compartment cover. It must
lock into place.
> Close the hood.
Additional storage
Depending on vehicle equipment, there are a va-
riety of storage areas, compartments, and retain-
ers, such as the glove compartment, for safely
storing and securing objects.
ZA WARNING
—To reduce the risk of injury, make sure all
storage compartments are always closed
while driving.
— Loose objects can be thrown around the ve-
hicle interior during sudden driving or brak-
ing maneuvers, which increases the risk of
an accident. Store objects securely while
driving.
— Only use the storage compartments in the
door trim panels to store small objects that
will not stick out of the compartment and
impair the function of the side airbags.
— Only lightweight clothing should be hung
from the garment hooks in the vehicle. Do
not use clothes hangers to hang clothing.
The pockets of the clothing must not con-
tain any heavy, breakable, or sharp-edged
objects. This could impair the effectiveness
of the side curtain airbags.
— Make sure your view toward the rear is not
blocked, for example by hanging clothing or
objects in the vehicle.
Luggage compartment
General information
All pieces of luggage or objects must be securely
fastened in the luggage compartment. Note the
following to maintain good vehicle handling:
> Distribute the load evenly in the luggage com-
partment.
> Stow heavy luggage as far forward in the lug-
gage compartment as possible.
> Use non-elastic cords attached to the tie-downs
to secure objects.
A WARNING
— Applies to: vehicles with luggage compart-
ment cover: The luggage compartment >
79